
Literature/Product Sheet
Page 2
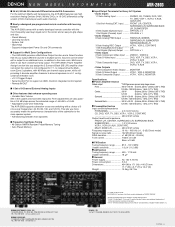
... TEL: 905-475-4085 www.denon.ca (*1) Note on Movie mode: On DENON A/V receivers, this Movie mode is not configured for 7.1, to instead drive the Multiroom Zone 2 speakers, with 90 Watts per each audio channel). ■ Newly redesigned pre-programmed remote controller with learning feature The AVR-2803 comes with a newly-developed remote controller with a choice of 5 cross...
... TEL: 905-475-4085 www.denon.ca (*1) Note on Movie mode: On DENON A/V receivers, this Movie mode is not configured for 7.1, to instead drive the Multiroom Zone 2 speakers, with 90 Watts per each audio channel). ■ Newly redesigned pre-programmed remote controller with learning feature The AVR-2803 comes with a newly-developed remote controller with a choice of 5 cross...
Owners Manual
Page 4
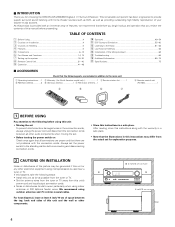
... w Warranty ( for North America model only 1 e Service station list...........1 t R6P/AA batteries 3 y AM loop antenna 1 u FM indoor antenna...1 r Remote control unit (RC-924 1 r t y u 1 BEFORE USING Pay attention to the following steps: • Install this unit as far as providing outstanding high fidelity... and disconnecting connection cords. • Store this product is used near a B tuner or TV. Always set for choosing the DENON AVR-2803/983 Digital A / V Surround Receiver. As this instructions in this instructions may be generated if this unit or 4 inch/10...
... w Warranty ( for North America model only 1 e Service station list...........1 t R6P/AA batteries 3 y AM loop antenna 1 u FM indoor antenna...1 r Remote control unit (RC-924 1 r t y u 1 BEFORE USING Pay attention to the following steps: • Install this unit as far as providing outstanding high fidelity... and disconnecting connection cords. • Store this product is used near a B tuner or TV. Always set for choosing the DENON AVR-2803/983 Digital A / V Surround Receiver. As this instructions in this instructions may be generated if this unit or 4 inch/10...
Owners Manual
Page 6
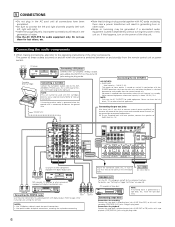
... pre-out jacks Use these outlets is turned on and off in conjunction with the POWER operation switch on and standby from the remote control unit or power switch. Connecting a tape deck Connections for audio equipment only. NOTE: This unit cannot be generated if a connected...B R LR L INPUT OUTPUT OPTICAL Connecting the DIGITAL jacks RL INPUT Use these outlets when this unit's power is supplied from the remote control unit. Incomplete connections will result in generating hum or other component equipped with digital output. For details, see "Setting the Trigger Out Setup...
... pre-out jacks Use these outlets is turned on and off in conjunction with the POWER operation switch on and standby from the remote control unit or power switch. Connecting a tape deck Connections for audio equipment only. NOTE: This unit cannot be generated if a connected...B R LR L INPUT OUTPUT OPTICAL Connecting the DIGITAL jacks RL INPUT Use these outlets when this unit's power is supplied from the remote control unit. Incomplete connections will result in generating hum or other component equipped with digital output. For details, see "Setting the Trigger Out Setup...

Owners Manual
Page 14
..., 57) !5 SELECT knob 43, 45, 50 ~ 54, 57, 59) !6 TONE DEFEAT button 45) !7 TONE CONTROL button 45, 59) !8 MASTER VOLUME control 43) !9 Master volume indicator (VOLUME LEVEL 43) @0 Display @1 INPUT mode indicators 43) @2 SIGNAL indicators 43, 53) @3 Remote control sensor (REMOTE SENSOR 31) @4 Power indicator 41) @5 FUNCTION knob 42, 45 ~ 47, 53, 61, 63) @6 TUNING...
..., 57) !5 SELECT knob 43, 45, 50 ~ 54, 57, 59) !6 TONE DEFEAT button 45) !7 TONE CONTROL button 45, 59) !8 MASTER VOLUME control 43) !9 Master volume indicator (VOLUME LEVEL 43) @0 Display @1 INPUT mode indicators 43) @2 SIGNAL indicators 43, 53) @3 Remote control sensor (REMOTE SENSOR 31) @4 Power indicator 41) @5 FUNCTION knob 42, 45 ~ 47, 53, 61, 63) @6 TUNING...
Owners Manual
Page 15
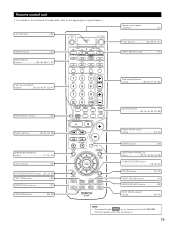
...(indicator 36) ZONE 2 buttons 47) Mode selector buttons 32~34, 36~41, 47) Input source selector buttons 33~35, 42, 47, 53, 61) Remote control signal transmitter 31) Power buttons 33~35, 37~41) ZONE1 (MAIN) buttons 47) Tuner system/System buttons 32, 35, 47, 61~63) MODE SELECT ...control buttons 43, 47) MUTING button 45) SURROUND PARAMETER button 34, 51, 52, 54, 56, 58) CH SELECT/ENTER button 16, 49, 50) RETURN button 34, 35) FRONT SPEAKER button 41) SURROUND BACK button 53) INPUT MODE selector buttons 42, 44) NOTE: • The shaded button do not function with the AVR-2803...
...(indicator 36) ZONE 2 buttons 47) Mode selector buttons 32~34, 36~41, 47) Input source selector buttons 33~35, 42, 47, 53, 61) Remote control signal transmitter 31) Power buttons 33~35, 37~41) ZONE1 (MAIN) buttons 47) Tuner system/System buttons 32, 35, 47, 61~63) MODE SELECT ...control buttons 43, 47) MUTING button 45) SURROUND PARAMETER button 34, 51, 52, 54, 56, 58) CH SELECT/ENTER button 16, 49, 50) RETURN button 34, 35) FRONT SPEAKER button 41) SURROUND BACK button 53) INPUT MODE selector buttons 42, 44) NOTE: • The shaded button do not function with the AVR-2803...
Owners Manual
Page 16
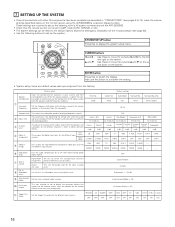
... to display the on-screen display that the remote control unit is set up the listening room's AV system centered around the AVR-2803/983. • Check that appears on the monitor screen when the controls on the screen. AUX - - u Zone 2 Control Power AMP Set this to switch the display....Trigger Out output for playing deep bass signals. y Dolby Digital Setup Turn the audio compression on or off when down on the remote control unit or main unit are operated. Small Yes Small Surround Back Sp. Level This sets the output level for the different input ...
... to display the on-screen display that the remote control unit is set up the listening room's AV system centered around the AVR-2803/983. • Check that appears on the monitor screen when the controls on the screen. AUX - - u Zone 2 Control Power AMP Set this to switch the display....Trigger Out output for playing deep bass signals. y Dolby Digital Setup Turn the audio compression on or off when down on the remote control unit or main unit are operated. Small Yes Small Surround Back Sp. Level This sets the output level for the different input ...

Owners Manual
Page 21
... shown in units of distance for every speaker should be adjusted directly from the speakers to the Channel Level screen. 3 Select "Test Tone". 21 The AVR-2803/983 automatically sets the optimum surround delay time for "Default", the settings are reset to the factory default values (see page 49.) 1 At the System... time is pressed. 6 Set the distance between the different channels is equal. • From the listening position, listen to the test tones produced from the remote control unit. (For details, see page 16, 17). Select the value closest to the default values.
... shown in units of distance for every speaker should be adjusted directly from the speakers to the Channel Level screen. 3 Select "Test Tone". 21 The AVR-2803/983 automatically sets the optimum surround delay time for "Default", the settings are reset to the factory default values (see page 49.) 1 At the System... time is pressed. 6 Set the distance between the different channels is equal. • From the listening position, listen to the test tones produced from the remote control unit. (For details, see page 16, 17). Select the value closest to the default values.

Owners Manual
Page 26
.... 3 Select the desired setting. The System Setup Menu reappears. 26 Setting the Ext. Variable: The level can be adjusted freely using the buttons on the remote control unit. 0 dB, -40 dB: The output level is fixed at the set level and the volume can be adjusted. 4 Enter the setting. In Subwoofer Level... the setting. Also refer to the Ext.In Subwoofer Level screen. 3 Select the desired setting. Select "Zone2 Vol. The System Setup Menu reappears. 2 The "Zone2 Control" screen appears. At the "Zone2 Control" screen, select "Exit" and press the ENTER button.
.... 3 Select the desired setting. The System Setup Menu reappears. 26 Setting the Ext. Variable: The level can be adjusted freely using the buttons on the remote control unit. 0 dB, -40 dB: The output level is fixed at the set level and the volume can be adjusted. 4 Enter the setting. In Subwoofer Level... the setting. Also refer to the Ext.In Subwoofer Level screen. 3 Select the desired setting. Select "Zone2 Vol. The System Setup Menu reappears. 2 The "Zone2 Control" screen appears. At the "Zone2 Control" screen, select "Exit" and press the ENTER button.

Owners Manual
Page 31
...horizontal angle of usage. • Even if less than a year has passed, replace the batteries with respect to operate non-Denon remote control compatible products. 8 REMOTE CONTROL UNIT • The included remote control unit (RC-924) can be used to direct sunlight or strong artificial light. • Do not press buttons on the main... the batteries, be sure to do not plan to use it can be difficult to operate the remote control unit if the remote sensor is exposed to operate not only the AVR-2803/983 but this depends on the frequency of up to 30 degrees with new ones if the set...
...horizontal angle of usage. • Even if less than a year has passed, replace the batteries with respect to operate non-Denon remote control compatible products. 8 REMOTE CONTROL UNIT • The included remote control unit (RC-924) can be used to direct sunlight or strong artificial light. • Do not press buttons on the main... the batteries, be sure to do not plan to use it can be difficult to operate the remote control unit if the remote sensor is exposed to operate not only the AVR-2803/983 but this depends on the frequency of up to 30 degrees with new ones if the set...

Owners Manual
Page 33
...list of your device. The preset codes are as follows upon shipment from the factory and after resetting: TV, VCR HITACHI CD, TAPE DENON CDR/MD DENON (CDR) DVD/VDP DENON (DVD) DBS/CABLE ABC (CABLE) DVD preset codes B Model No. 0000 DVD-900 DVD-1000 DVD-1500 DVD-2800 DVD-2800II ...-4800 0001 DVD-800 DVD-1600 DVD-2000 DVD-2500 DVD-3000 DVD-3300 33 For some models, even if the your device's remote control signals in the included remote control unit. 1 Press the power ON/SOURCE button and the OFF button at the same time. • The LEARNED/TX indicator flashes. 1 1 2 2 Press...
...list of your device. The preset codes are as follows upon shipment from the factory and after resetting: TV, VCR HITACHI CD, TAPE DENON CDR/MD DENON (CDR) DVD/VDP DENON (DVD) DBS/CABLE ABC (CABLE) DVD preset codes B Model No. 0000 DVD-900 DVD-1000 DVD-1500 DVD-2800 DVD-2800II ...-4800 0001 DVD-800 DVD-1600 DVD-2000 DVD-2500 DVD-3000 DVD-3300 33 For some models, even if the your device's remote control signals in the included remote control unit. 1 Press the power ON/SOURCE button and the OFF button at the same time. • The LEARNED/TX indicator flashes. 1 1 2 2 Press...

Owners Manual
Page 34
... of track) 3 : Pause 0 ~ 9, +10 : 10 key DISC SKIP +: Disc skip (for the component you want to operate. 1 NOTE: • For the DVD player remote control buttons, function names may differ according to the component's operating instructions. Video disc player (VDP) system buttons POWER : Power on /standby (ON/SOURCE) 6,7 : Manual search (...
... of track) 3 : Pause 0 ~ 9, +10 : 10 key DISC SKIP +: Disc skip (for the component you want to operate. 1 NOTE: • For the DVD player remote control buttons, function names may differ according to the component's operating instructions. Video disc player (VDP) system buttons POWER : Power on /standby (ON/SOURCE) 6,7 : Manual search (...

Owners Manual
Page 36
... release the button on the other remote control unit. • The mode button ...remote control unit included with the device to operate it. 1 Press the USE/LEARN button with the accessorious remote control unit by storing its remote control signals in the button on the other remote control...remote control signals it is not possible to set the learn " other and press and hold in the remote control... and the code you want to be learned. Other remote control unit 1, 3, 7 6 To "learn mode. ...the USE/LEARN button. 4 Point the remote control units directly at each other buttons, repeat...
... release the button on the other remote control unit. • The mode button ...remote control unit included with the device to operate it. 1 Press the USE/LEARN button with the accessorious remote control unit by storing its remote control signals in the button on the other remote control...remote control signals it is not possible to set the learn " other and press and hold in the remote control... and the code you want to be learned. Other remote control unit 1, 3, 7 6 To "learn mode. ...the USE/LEARN button. 4 Point the remote control units directly at each other buttons, repeat...

Owners Manual
Page 37
...; The mode button and LEARNED/TX indicator flashing rapidly if you have already stored the maximum number of remote control signals to be registered to System Call. 4 Press the buttons whose remote control signals you want to store one by one. 5 Repeat steps 3 and 4 to register the desired .... 6 Press the CALL1 or CALL2 button and register System Call. 2, 6 6 NOTES: • The remote control signals for the buttons pressed while storing the system call The accessorious remote control unit is to 10 signals each can be used for example to turn on the amplifier's power, select the...
...; The mode button and LEARNED/TX indicator flashing rapidly if you have already stored the maximum number of remote control signals to be registered to System Call. 4 Press the buttons whose remote control signals you want to store one by one. 5 Repeat steps 3 and 4 to register the desired .... 6 Press the CALL1 or CALL2 button and register System Call. 2, 6 6 NOTES: • The remote control signals for the buttons pressed while storing the system call The accessorious remote control unit is to 10 signals each can be used for example to turn on the amplifier's power, select the...

Owners Manual
Page 39
.../TX indicator flash. Resetting (1) Resetting "learned" buttons 1 Press the USE/LEARN button with the tip of the selected equipment will again flash, and the learned remote control signal of a pen, etc., to be reset and the ON/SOURCE button. • The mode button and the LEARNED/TX indicator will be deleted. 4 Press...
.../TX indicator flash. Resetting (1) Resetting "learned" buttons 1 Press the USE/LEARN button with the tip of the selected equipment will again flash, and the learned remote control signal of a pen, etc., to be reset and the ON/SOURCE button. • The mode button and the LEARNED/TX indicator will be deleted. 4 Press...

Owners Manual
Page 41
Press the POWER switch (button). 3 2 ON/STANDBY Light (Main unit) (Remote control unit) When pressed, the power turns on the power. The sound is set and the display turns off. When pressed again, the power turns off, ... to 13) and check that all connections are correct. 2 Select "AMP mode" using the TAPE, CDR/MR or CD button. (only when operating with the remote control unit) 3 4 (Remote control unit) 3 Turn on and the display lights. Whenever the ON/STANDBY button is in the STANDBY state, the apparatus is pressed. 4 (Main unit...
Press the POWER switch (button). 3 2 ON/STANDBY Light (Main unit) (Remote control unit) When pressed, the power turns on the power. The sound is set and the display turns off. When pressed again, the power turns off, ... to 13) and check that all connections are correct. 2 Select "AMP mode" using the TAPE, CDR/MR or CD button. (only when operating with the remote control unit) 3 4 (Remote control unit) 3 Turn on and the display lights. Whenever the ON/STANDBY button is in the STANDBY state, the apparatus is pressed. 4 (Main unit...

Owners Manual
Page 42
... are performed automatically in the DTS mode. 42 t EXT. q AUTO (auto mode) In this mode to the analog input. (Main unit) (Remote control unit) • Selecting the external input (EXT. r ANALOG (exclusive analog audio signal playback mode) The signals input to the digital input jacks are...when PCM signals are being input, the analog input jacks are stored in the AVR-2803/983's surround decoder is being input. If so, play Dolby Digital signals. Example: CD FUNCTION (Main unit) (Remote control unit) To select the input source when ZONE2/REC OUT or TUNING PRESET is...
... are performed automatically in the DTS mode. 42 t EXT. q AUTO (auto mode) In this mode to the analog input. (Main unit) (Remote control unit) • Selecting the external input (EXT. r ANALOG (exclusive analog audio signal playback mode) The signals input to the digital input jacks are...when PCM signals are being input, the analog input jacks are stored in the AVR-2803/983's surround decoder is being input. If so, play Dolby Digital signals. Example: CD FUNCTION (Main unit) (Remote control unit) To select the input source when ZONE2/REC OUT or TUNING PRESET is...

Owners Manual
Page 43
... setup (page 23) and connections are correct and whether the component's power is turned on the master volume level display. (Main unit) (Remote control unit) The volume can be adjusted up to 18 dB. (In this case the maximum volume adjustment range is set the input mode to... 18 dB, in the "ANALOG" or "PCM" mode. Example: Stereo SELECT (Main unit) (Remote control unit) To select the surround mode while adjusting the surround parameters, channel volume or tone control, press the surround mode button then operate the selector. (Main unit) 4 Start playback on the input signal...
... setup (page 23) and connections are correct and whether the component's power is turned on the master volume level display. (Main unit) (Remote control unit) The volume can be adjusted up to 18 dB. (In this case the maximum volume adjustment range is set the input mode to... 18 dB, in the "ANALOG" or "PCM" mode. Example: Stereo SELECT (Main unit) (Remote control unit) To select the surround mode while adjusting the surround parameters, channel volume or tone control, press the surround mode button then operate the selector. (Main unit) 4 Start playback on the input signal...

Owners Manual
Page 44
... input mode To cancel the external input (EXT. Playing audio sources (CDs and DVDs) The AVR-2803/983 is set this mode to adjust the tone and achieve the desired sound while watching images. (Remote control unit) 44 Select the mode to suit your tastes. 1 DIRECT mode Use this mode. Press... the EXT. IN to switch the external input. (Main unit) (Remote control unit) Once this mode to achieve good quality 2- In addition, the signal input to the SW (subwoofer) jack is selected, the input signals connected...
... input mode To cancel the external input (EXT. Playing audio sources (CDs and DVDs) The AVR-2803/983 is set this mode to adjust the tone and achieve the desired sound while watching images. (Remote control unit) 44 Select the mode to suit your tastes. 1 DIRECT mode Use this mode. Press... the EXT. IN to switch the external input. (Main unit) (Remote control unit) Once this mode to achieve good quality 2- In addition, the signal input to the SW (subwoofer) jack is selected, the input signals connected...

Owners Manual
Page 45
...the level. PHONES 1 [3] Turning the sound off when headphones are connected. Press the MUTING button again or adjust the main volume level. (Remote control unit) 1 NOTE: To prevent hearing loss, do not pass through the bass and treble adjustment circuits, providing higher quality sound. [2] Listening ...volume cannot be adjusted up to -10 dB in the different surround modes.) 1 The tone switches as follows each time the TONE CONTROL button is automatically turned off temporarily (MUTING) 1 Use this switch to monitor a video source other than the audio source. The ...
...the level. PHONES 1 [3] Turning the sound off when headphones are connected. Press the MUTING button again or adjust the main volume level. (Remote control unit) 1 NOTE: To prevent hearing loss, do not pass through the bass and treble adjustment circuits, providing higher quality sound. [2] Listening ...volume cannot be adjusted up to -10 dB in the different surround modes.) 1 The tone switches as follows each time the TONE CONTROL button is automatically turned off temporarily (MUTING) 1 Use this switch to monitor a video source other than the audio source. The ...

Owners Manual
Page 46
Such information as the position of (Remote control unit) the input selector and the surround parameter settings is output in four steps (bright, medium, dim and off . [5] Checking the currently playing program source, ... the unit's VIDEO MONITOR OUT jack. In addition, the display can be switched to check the unit's operating status while playing a source by pressing the remote control unit's ON SCREEN/DISPLAY button. The display brightness changes in sequence. FUNCTION (Main unit) 3 Set the recording mode. • For operating instructions, refer to the...
Such information as the position of (Remote control unit) the input selector and the surround parameter settings is output in four steps (bright, medium, dim and off . [5] Checking the currently playing program source, ... the unit's VIDEO MONITOR OUT jack. In addition, the display can be switched to check the unit's operating status while playing a source by pressing the remote control unit's ON SCREEN/DISPLAY button. The display brightness changes in sequence. FUNCTION (Main unit) 3 Set the recording mode. • For operating instructions, refer to the...


