Owners Manual
Page 1
...SURROUND RECEIVER AVR-4802R OPERATING INSTRUCTIONS INPUT SELECTOR ON/STANDBY HOME THX CINEMA PURE DIRECT REMOTE SENSOR ON/STANDBY SIGNAL DIGITAL SURROUND BACK CH PURE SIGNAL DIRECT OUTPUT DETECT INPUT AUTO PCM DTS A B SURROUND SPEAKER ES DSCRT DVD VOLUME LEVEL DIGITAL MASTER VOLUME AMP 2 We greatly appreciate your purchase of the AVR-4802R.... 2 To be sure you take maximum advantage of all the features the AVR-4802R has to keep this manual for ...
...SURROUND RECEIVER AVR-4802R OPERATING INSTRUCTIONS INPUT SELECTOR ON/STANDBY HOME THX CINEMA PURE DIRECT REMOTE SENSOR ON/STANDBY SIGNAL DIGITAL SURROUND BACK CH PURE SIGNAL DIRECT OUTPUT DETECT INPUT AUTO PCM DTS A B SURROUND SPEAKER ES DSCRT DVD VOLUME LEVEL DIGITAL MASTER VOLUME AMP 2 We greatly appreciate your purchase of the AVR-4802R.... 2 To be sure you take maximum advantage of all the features the AVR-4802R has to keep this manual for ...
Owners Manual
Page 4
... Control Unit 33~45 . Operation 46~55 ⁄0 Surround 56~67 ⁄1 DENON Original Surround Modes 68~72 ⁄2 Listening to provide superb surround sound listening with the connection cords. Always set for choosing the DENON AVR-4802R Digital Surround A / V receiver. 2 INTRODUCTION Thank you review the contents of this manual before proceeding. For heat dispersal, leave at least 10...
... Control Unit 33~45 . Operation 46~55 ⁄0 Surround 56~67 ⁄1 DENON Original Surround Modes 68~72 ⁄2 Listening to provide superb surround sound listening with the connection cords. Always set for choosing the DENON AVR-4802R Digital Surround A / V receiver. 2 INTRODUCTION Thank you review the contents of this manual before proceeding. For heat dispersal, leave at least 10...
Owners Manual
Page 8
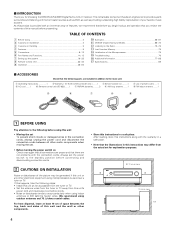
...with equipment that the AVR4802R's on-screen display signals are only output from the pin jack outputs. S-VIDEO IN Monitor TV SPEAKER SYSTEMS FRONT R CENTER SURROUND -A R SURROUND -B R SB / MULTI R LOOP ANT. AUX VCR-1 VCR-2 VCR-3 VCR-1 VCR-2 VCR-3 1-MONITOR-2 SAT SL VIDEO SBL Connecting a ... jack using a S jack connection cord. • The monitor TV can be connected in mind and make connections according to the equipment's instruction manuals. Note, however, that is also possible to connect a video disc player, DVD player, video camcorder, Video Game, etc., to the V.AUX...
...with equipment that the AVR4802R's on-screen display signals are only output from the pin jack outputs. S-VIDEO IN Monitor TV SPEAKER SYSTEMS FRONT R CENTER SURROUND -A R SURROUND -B R SB / MULTI R LOOP ANT. AUX VCR-1 VCR-2 VCR-3 VCR-1 VCR-2 VCR-3 1-MONITOR-2 SAT SL VIDEO SBL Connecting a ... jack using a S jack connection cord. • The monitor TV can be connected in mind and make connections according to the equipment's instruction manuals. Note, however, that is also possible to connect a video disc player, DVD player, video camcorder, Video Game, etc., to the V.AUX...

Owners Manual
Page 23
...Adjusts the balance of the playback level between the channels when using surround speakers A and B at the "Speaker Configuration" (when both surround speakers A and B, their playback levels can be selected when both surround speakers A and B have been set to "...Manual". • Auto: Adjust the level while listening to the test tones produced automatically from the different speakers. • Manual: Select the speaker from which you want to produce the test tone to adjust the level. Sp.: B Adjusts the balance of the playback level between the channels when using surround...
...Adjusts the balance of the playback level between the channels when using surround speakers A and B at the "Speaker Configuration" (when both surround speakers A and B, their playback levels can be selected when both surround speakers A and B have been set to "...Manual". • Auto: Adjust the level while listening to the test tones produced automatically from the different speakers. • Manual: Select the speaker from which you want to produce the test tone to adjust the level. Sp.: B Adjusts the balance of the playback level between the channels when using surround...
Owners Manual
Page 24
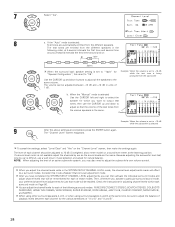
...the ENTER button again. Consider this is being produced from the different speakers in the SYSTEM SETUP CHANNEL LEVEL mode, the channel level adjustments made will affect ALL surround modes. Check the instructions for just that the volume of the following order, at the listening ..."Manual" mode is selected: Test tones are emitted from the subwoofer b. To cancel the settings, select "Level Clear" and "Yes" on Page 56. When using either surround speakers A or B, or when using surround speakers A and B at the same time, be remembered for each surround mode on the "Channel ...
...the ENTER button again. Consider this is being produced from the different speakers in the SYSTEM SETUP CHANNEL LEVEL mode, the channel level adjustments made will affect ALL surround modes. Check the instructions for just that the volume of the following order, at the listening ..."Manual" mode is selected: Test tones are emitted from the subwoofer b. To cancel the settings, select "Level Clear" and "Yes" on Page 56. When using either surround speakers A or B, or when using surround speakers A and B at the same time, be remembered for each surround mode on the "Channel ...
Owners Manual
Page 31
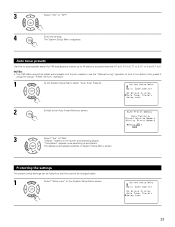
... system setup settings can be locked so that they cannot be preset automatically due to poor reception, use the "Manual tuning" operation to tune in the station, then preset it using the manual "Preset memory" operation. 1 At the System Setup Menu select "Auto Tuner Presets". 2 Switch to the Auto ...Preset Memory screen. 3 Select "Yes" for FM broadcasts and store up to 40 stations at preset channels A1 to 8, B1 to 8, C1 to 8, D1 ...
... system setup settings can be locked so that they cannot be preset automatically due to poor reception, use the "Manual tuning" operation to tune in the station, then preset it using the manual "Preset memory" operation. 1 At the System Setup Menu select "Auto Tuner Presets". 2 Switch to the Auto ...Preset Memory screen. 3 Select "Yes" for FM broadcasts and store up to 40 stations at preset channels A1 to 8, B1 to 8, C1 to 8, D1 ...
Owners Manual
Page 34
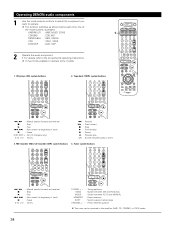
... : Rewind 7 : Fast forward 2 : Stop 1 : Forward play 3 : Pause 0 : Reverse play A/B : Switch between AUTO and MANUAL MEMORY : Preset memory SHIFT : Switch preset channel range CHANNEL +, - : Preset channel up/down BAND : Switch between AM and FM bands MODE : Switch between sides A and B 3. CD player (CD) system buttons 2. ...amplifier (AMP, CD, CDR/MD, or TAPE) mode. MD recorder (MD), CD recorder (CDR) system buttons 4. Operating DENON audio components 1 Use the mode selector buttons to select the component you want to the component's operating instructions. AMP/MULTI ...
... : Rewind 7 : Fast forward 2 : Stop 1 : Forward play 3 : Pause 0 : Reverse play A/B : Switch between AUTO and MANUAL MEMORY : Preset memory SHIFT : Switch preset channel range CHANNEL +, - : Preset channel up/down BAND : Switch between AM and FM bands MODE : Switch between sides A and B 3. CD player (CD) system buttons 2. ...amplifier (AMP, CD, CDR/MD, or TAPE) mode. MD recorder (MD), CD recorder (CDR) system buttons 4. Operating DENON audio components 1 Use the mode selector buttons to select the component you want to the component's operating instructions. AMP/MULTI ...
Owners Manual
Page 36
Video disc player (VDP) system buttons POWER : Power on /standby DVD (ON/SOURCE) OFF : Power off 6,7 : Manual search (forward and reverse) 2 : Stop 1 : Play 8,9 : Auto search (to operate. Compare with this remote control unit. 1. Some models cannot ...0, 1 : Cursor up, down, left and right ENTER : Enter 2. Digital video disc player (DVD, DVD SETUP) system buttons POWER : Power on /standby VDP (ON/SOURCE) 6,7 : Manual search (forward and reverse) 2 : Stop 1 : Play 8,9 : Auto search (cue) 3 : Pause 0~9, +10 : 10 key DVD preset codes B Model No. 0000 DVD-900 DVD...
Video disc player (VDP) system buttons POWER : Power on /standby DVD (ON/SOURCE) OFF : Power off 6,7 : Manual search (forward and reverse) 2 : Stop 1 : Play 8,9 : Auto search (to operate. Compare with this remote control unit. 1. Some models cannot ...0, 1 : Cursor up, down, left and right ENTER : Enter 2. Digital video disc player (DVD, DVD SETUP) system buttons POWER : Power on /standby VDP (ON/SOURCE) 6,7 : Manual search (forward and reverse) 2 : Stop 1 : Play 8,9 : Auto search (cue) 3 : Pause 0~9, +10 : 10 key DVD preset codes B Model No. 0000 DVD-900 DVD...
Owners Manual
Page 37
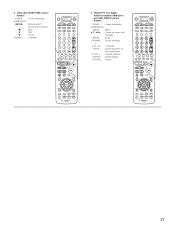
Video deck (VCR1/VCR2) system buttons POWER : Power on /standby (ON/SOURCE) MENU : Menu •, ª, 0, 1 : Cursor up, down, left and right ENTER : Enter CHANNEL : Switch channels +, - 0~9, +10 : Channels TV/VCR : Switch between TV and video player TV VOL +, - : Volume up/down DISPLAY : Switch display RETURN : Return 37 Monitor TV (TV), digital broadcast satellite (DBS) tuner and cable (CABLE) system TV buttons POWER : Power on /standby (ON/SOURCE) 6,7 : Manual search (forward and reverse) 2 : Stop 1 : Play 3 : Pause Channel +, - : Channels VCR1 4. 3.
Video deck (VCR1/VCR2) system buttons POWER : Power on /standby (ON/SOURCE) MENU : Menu •, ª, 0, 1 : Cursor up, down, left and right ENTER : Enter CHANNEL : Switch channels +, - 0~9, +10 : Channels TV/VCR : Switch between TV and video player TV VOL +, - : Volume up/down DISPLAY : Switch display RETURN : Return 37 Monitor TV (TV), digital broadcast satellite (DBS) tuner and cable (CABLE) system TV buttons POWER : Power on /standby (ON/SOURCE) 6,7 : Manual search (forward and reverse) 2 : Stop 1 : Play 3 : Pause Channel +, - : Channels VCR1 4. 3.
Owners Manual
Page 40
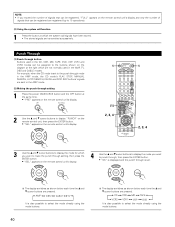
... at which you want to make the punch through is set to the punch through mode in the AMP mode, the CD mode's PLAY, STOP, MANUAL SEARCH, AUTO SEARCH, PAUSE and DISC SKIP buttons' signals are sent in the AMP, TV, DBS and CABLE modes.
... at which you want to make the punch through is set to the punch through mode in the AMP mode, the CD mode's PLAY, STOP, MANUAL SEARCH, AUTO SEARCH, PAUSE and DISC SKIP buttons' signals are sent in the AMP, TV, DBS and CABLE modes.
Owners Manual
Page 48
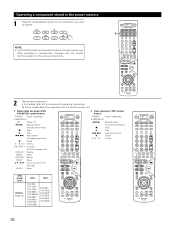
... volume level is turned on page 23 or page 56, if the volume for any channel is set at +1 dB or greater, the volume cannot be adjusted within the range of -70 to 0 to the component's manual. 5 Adjust the volume. Example: Stereo STEREO (Main unit) (Remote control unit) 4 ...Start playback on the input signal. However, when the channel level is set the input mode to the digital input jacks (OPTICAL/COAXIAL) and ...
... volume level is turned on page 23 or page 56, if the volume for any channel is set at +1 dB or greater, the volume cannot be adjusted within the range of -70 to 0 to the component's manual. 5 Adjust the volume. Example: Stereo STEREO (Main unit) (Remote control unit) 4 ...Start playback on the input signal. However, when the channel level is set the input mode to the digital input jacks (OPTICAL/COAXIAL) and ...

Owners Manual
Page 52
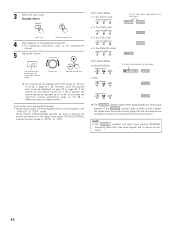
...) SELECT (Main unit) 3 Set the recording mode. • For operating instructions, refer to the manual of the case in the REC OUT mode are also output to the TAPE and VCR output terminals. ... output from the MULTI ZONE audio output jacks. 32 3 1 (Main unit) 3 3 Set the surround mode by pressing the DIRECT or STEREO button. • The multichannel digital signals are output to the ...on the set it is possible to record Dolby Digital and DTS multichannel signals converted into 2-channel analog signals. • The recording signals are down-mixed and output to the multi source...
...) SELECT (Main unit) 3 Set the recording mode. • For operating instructions, refer to the manual of the case in the REC OUT mode are also output to the TAPE and VCR output terminals. ... output from the MULTI ZONE audio output jacks. 32 3 1 (Main unit) 3 3 Set the surround mode by pressing the DIRECT or STEREO button. • The multichannel digital signals are output to the ...on the set it is possible to record Dolby Digital and DTS multichannel signals converted into 2-channel analog signals. • The recording signals are down-mixed and output to the multi source...
Owners Manual
Page 53
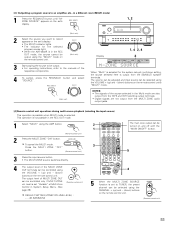
.... (Main unit) SELECT (Main unit) 3 Start playing the source to be output. • For operating instructions, refer to the manuals of MULTI ZONE OUT can be controlled using the CHANNEL + (up ) and - (down ) buttons on the remote control unit. (Remote control unit) 53 dB (MINIMUM) 4 5... "Multi" is selected for the selected program source light. • When the AVR-4802R is selected. REC / MULTI 1, 2 2 Select the source you want to record appears on the set to TUNER, the preset channel can be selected using the AMP button. 2 1 (Remote control unit) 2 Press ...
.... (Main unit) SELECT (Main unit) 3 Start playing the source to be output. • For operating instructions, refer to the manuals of MULTI ZONE OUT can be controlled using the CHANNEL + (up ) and - (down ) buttons on the remote control unit. (Remote control unit) 53 dB (MINIMUM) 4 5... "Multi" is selected for the selected program source light. • When the AVR-4802R is selected. REC / MULTI 1, 2 2 Select the source you want to record appears on the set to TUNER, the preset channel can be selected using the AMP button. 2 1 (Remote control unit) 2 Press ...

Owners Manual
Page 59
... • For operating instructions, refer to the source. SURROUND PARAMETER 5, 6 7 4 5 (Main unit) 6 Select the parameter. SURROUND PARAMETER (Remote control unit) 7 Select the setting. MASTER VOLUME 2 1-w 1-q 2 6, 7 (Main unit) (Remote control unit) 1-w 5 Display the Surround Parameter screen and set when a DVD is played, check... surround mode is set as follows according to the signal that is played: q THX Surround EX (THX Ultra2 Cinema) w Home THX CINEMA e THX 5.1 r THX DSCRT 6.1, THX MTRX 6.1 When the HOME THX CINEMA mode is set the parameters according to the manuals...
... • For operating instructions, refer to the source. SURROUND PARAMETER 5, 6 7 4 5 (Main unit) 6 Select the parameter. SURROUND PARAMETER (Remote control unit) 7 Select the setting. MASTER VOLUME 2 1-w 1-q 2 6, 7 (Main unit) (Remote control unit) 1-w 5 Display the Surround Parameter screen and set when a DVD is played, check... surround mode is set as follows according to the signal that is played: q THX Surround EX (THX Ultra2 Cinema) w Home THX CINEMA e THX 5.1 r THX DSCRT 6.1, THX MTRX 6.1 When the HOME THX CINEMA mode is set the parameters according to the manuals...
Owners Manual
Page 61
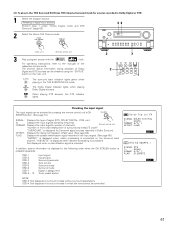
...manuals of surround channels/LFE on/off" "SURROUND" is displayed for sources recorded in Dolby Digital or DTS 1 Select the program source. When playing DTS sources, the DTS indicator lights. 2 3 2 Checking the input signal The input signal can be checked using the "STATUS" button on the surround back channel...33 2 Select the Home THX Cinema mode. [2] To play in the THX Surround EX/Home THX Cinema Surround mode for 2-channel signal sources recorded in Dolby Surround. OSD-4: Not displayed in surround modes in which the tone cannot be checked by pressing the remote control unit's ...
...manuals of surround channels/LFE on/off" "SURROUND" is displayed for sources recorded in Dolby Digital or DTS 1 Select the program source. When playing DTS sources, the DTS indicator lights. 2 3 2 Checking the input signal The input signal can be checked using the "STATUS" button on the surround back channel...33 2 Select the Home THX Cinema mode. [2] To play in the THX Surround EX/Home THX Cinema Surround mode for 2-channel signal sources recorded in Dolby Surround. OSD-4: Not displayed in surround modes in which the tone cannot be checked by pressing the remote control unit's ...

Owners Manual
Page 64
... Logic II mode 1 Select the function to which the component you want to the manuals of the respective components. 4 Select the surround parameter mode. Select the DOLBY PRO LOGIC II mode. SELECT The CINEMA, MUSIC and PL modes can be selected directly using...Light 1 2 5 4, 6 5, 6 1 2 4 5, 6 3 Play a program source with the mark. • For operating instructions, refer to play is pressed. Select the DOLBY PRO The surround mode LOGIC II mode using the CINEMA/MUSIC button on the main unit's panel. EX: DVD INPUT SELECTOR (Main unit) (Remote control unit) 2 Select the...
... Logic II mode 1 Select the function to which the component you want to the manuals of the respective components. 4 Select the surround parameter mode. Select the DOLBY PRO LOGIC II mode. SELECT The CINEMA, MUSIC and PL modes can be selected directly using...Light 1 2 5 4, 6 5, 6 1 2 4 5, 6 3 Play a program source with the mark. • For operating instructions, refer to play is pressed. Select the DOLBY PRO The surround mode LOGIC II mode using the CINEMA/MUSIC button on the main unit's panel. EX: DVD INPUT SELECTOR (Main unit) (Remote control unit) 2 Select the...
Owners Manual
Page 73
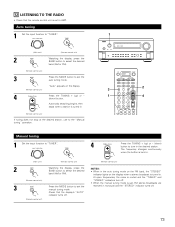
...down ) button. INPUT SELECTOR 4 Press the TUNING + (up ) or - (down ) button to AMP. received in the desired station. Check that the remote control unit is set the manual tuning mode. At open frequencies, the noise is muted and the "TUNED" and (Remote control unit) "STEREO" ... . (Remote control unit) 73 Automatic searching begins, then stops when a station is tuned in . AMP 2 3 1 4 Manual tuning 1 Set the input function to the "Manual tuning" operation. 12 LISTENING TO THE RADIO • Check that the display's "AUTO" indicator turns off . • When...
...down ) button. INPUT SELECTOR 4 Press the TUNING + (up ) or - (down ) button to AMP. received in the desired station. Check that the remote control unit is set the manual tuning mode. At open frequencies, the noise is muted and the "TUNED" and (Remote control unit) "STEREO" ... . (Remote control unit) 73 Automatic searching begins, then stops when a station is tuned in . AMP 2 3 1 4 Manual tuning 1 Set the input function to the "Manual tuning" operation. 12 LISTENING TO THE RADIO • Check that the display's "AUTO" indicator turns off . • When...

Owners Manual
Page 74
...memory 1 Use the "Auto tuning" or "Manual tuning" operation to tune in the station to be preset - 8 stations (channels 1 to 8) in each of blocks A to E. Remote control unit: Press the CHANNEL + (up) or - (down) button to select the desired preset channel (1 to E). A total of 40 broadcast ...Main unit: Press the TUNER PRESET button. TUNING PRESET (Main unit) (Remote control unit) 4 Main unit: Select the desired preset channel (1 to 5. Checking the preset stations • The preset (broadcast) stations can be preset in the preset memory. (Remote control unit) To preset ...
...memory 1 Use the "Auto tuning" or "Manual tuning" operation to tune in the station to be preset - 8 stations (channels 1 to 8) in each of blocks A to E. Remote control unit: Press the CHANNEL + (up) or - (down) button to select the desired preset channel (1 to E). A total of 40 broadcast ...Main unit: Press the TUNER PRESET button. TUNING PRESET (Main unit) (Remote control unit) 4 Main unit: Select the desired preset channel (1 to 5. Checking the preset stations • The preset (broadcast) stations can be preset in the preset memory. (Remote control unit) To preset ...

Owners Manual
Page 79
... at the front center, resulting in the same positions as possible. For details, see page 16.) • The signals from the surround channels reflect off the monitor or screen at the prime listening position. Connect another pair of direct radiating speakers as shown on the setup menu... on the AVR-4802R and set all settings on the diagram at either side of speaker settings for the surround speakers. Use these speakers at the left and right speakers and no further from the listening position than the front speakers. • Consult the owner's manual for your system ...
... at the front center, resulting in the same positions as possible. For details, see page 16.) • The signals from the surround channels reflect off the monitor or screen at the prime listening position. Connect another pair of direct radiating speakers as shown on the setup menu... on the AVR-4802R and set all settings on the diagram at either side of speaker settings for the surround speakers. Use these speakers at the left and right speakers and no further from the listening position than the front speakers. • Consult the owner's manual for your system ...
Owners Manual
Page 80
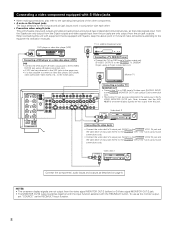
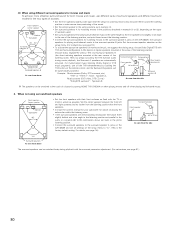
... slightly wider apart than the front speakers. • Consult the owner's manual for your subwoofer for advice on placing the subwoofer within the listening room. • If the surround speakers are automatically activated. Front speakers Center speaker Monitor Subwoofer 45° ...the listening position. • Connect the surround speakers for watching movies to the surround speaker A jacks on the AVR-4802R, the surround speakers for playing multi-channel music to the surround speaker B jacks. Choose Dolby Digital/DTS without THX and Surround Speakers B (the direct radiating speakers ...
... slightly wider apart than the front speakers. • Consult the owner's manual for your subwoofer for advice on placing the subwoofer within the listening room. • If the surround speakers are automatically activated. Front speakers Center speaker Monitor Subwoofer 45° ...the listening position. • Connect the surround speakers for watching movies to the surround speaker A jacks on the AVR-4802R, the surround speakers for playing multi-channel music to the surround speaker B jacks. Choose Dolby Digital/DTS without THX and Surround Speakers B (the direct radiating speakers ...


