
Owners Manual
Page 3
... ON, the user is no guarantee that may not cause harmful interference, and (2) this manual, meets FCC requirements. Tenir compte d'une dispersion de chaleur suffisante lors de l'installation sur ...use the product. 3. These limits are designed to comply with Part 15 of the FCC Rules. Denon Electronics (USA), LLC 19C Chapin Road, Suite 205 Pine Brook, NJ 07058-9385 Tel. 973-...the FCC, to Part 15 of the FCC Rules. COMPLIANCE INFORMATION Product Name: AV Surround Receiver Model Number: AVR-4306 This product complies with the limits for help. Hold the plug when unplugging the...
... ON, the user is no guarantee that may not cause harmful interference, and (2) this manual, meets FCC requirements. Tenir compte d'une dispersion de chaleur suffisante lors de l'installation sur ...use the product. 3. These limits are designed to comply with Part 15 of the FCC Rules. Denon Electronics (USA), LLC 19C Chapin Road, Suite 205 Pine Brook, NJ 07058-9385 Tel. 973-...the FCC, to Part 15 of the FCC Rules. COMPLIANCE INFORMATION Product Name: AV Surround Receiver Model Number: AVR-4306 This product complies with the limits for help. Hold the plug when unplugging the...

Owners Manual
Page 4
... DSP surround simulation 37, 38 Tone control setting 38 Channel level 39 Fader function 39 Listening to the radio Auto tuning 40 Manual tuning 40 Preset memory 41 Checking the preset stations 41 Recalling preset stations 41 XM Satellite Radio Checking the XM signal strength and... function 46 Music server function 46 System requirements 46, 47 Listening to music 45 Viewing still pictures (only for choosing the DENON AVR-4306 AV Surround Receiver. Getting Started Thank you review the contents of radio stations 49 Playing music files stored on the computer (music server 50 Operating ...
... DSP surround simulation 37, 38 Tone control setting 38 Channel level 39 Fader function 39 Listening to the radio Auto tuning 40 Manual tuning 40 Preset memory 41 Checking the preset stations 41 Recalling preset stations 41 XM Satellite Radio Checking the XM signal strength and... function 46 Music server function 46 System requirements 46, 47 Listening to music 45 Viewing still pictures (only for choosing the DENON AVR-4306 AV Surround Receiver. Getting Started Thank you review the contents of radio stations 49 Playing music files stored on the computer (music server 50 Operating ...

Owners Manual
Page 6
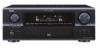
2 We greatly appreciate your purchase of the AVR-4306. 2 To be sure you take maximum advantage of all the features the AVR-4306 has to keep this manual for future reference should any questions or problems arise. PLEASE RECORD UNIT SERIAL NUMBER ATTACHED TO THE REAR OF THE CABINET FOR FUTURE REFERENCE" MEMO IV "SERIAL NO. Be sure to offer, read these instructions carefully and use the set properly.
2 We greatly appreciate your purchase of the AVR-4306. 2 To be sure you take maximum advantage of all the features the AVR-4306 has to keep this manual for future reference should any questions or problems arise. PLEASE RECORD UNIT SERIAL NUMBER ATTACHED TO THE REAR OF THE CABINET FOR FUTURE REFERENCE" MEMO IV "SERIAL NO. Be sure to offer, read these instructions carefully and use the set properly.

Owners Manual
Page 7
... unit operations during multi-source playback 62 Other function Playing Super Audio CDs with DENON LINK 63 Multi-source recording / playback 64 Last function memory 64 Initialization of this manual Accessories Getting Started Check that the illustrations in these instructions in a safe place...Setting the Dolby Digital Setup 74 Setting the Auto Surround Mode 75 Setting the Manual EQ Setup 75 Procedure for explanation purposes. 2 Getting Started Advanced Operation Remote control unit Operating DENON audio components 51, 52 Preset memory 53 Operating a component stored in the ...
... unit operations during multi-source playback 62 Other function Playing Super Audio CDs with DENON LINK 63 Multi-source recording / playback 64 Last function memory 64 Initialization of this manual Accessories Getting Started Check that the illustrations in these instructions in a safe place...Setting the Dolby Digital Setup 74 Setting the Auto Surround Mode 75 Setting the Manual EQ Setup 75 Procedure for explanation purposes. 2 Getting Started Advanced Operation Remote control unit Operating DENON audio components 51, 52 Preset memory 53 Operating a component stored in the ...
Owners Manual
Page 11
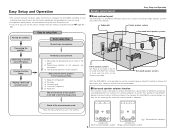
... function This function makes it possible to achieve the optimum sound fields for the different surround modes, so they are set the various settings manually without using the Auto Setup function. • If you wish, you are using. • For optimum performance, we recommend using Auto... system layout The following is selected. Easy Setup and Operation • This section contains the basic steps necessary to configure the AVR-4306 according to your listening room environment and the source equipment and loudspeakers you can set automatically when the surround mode is an example...
... function This function makes it possible to achieve the optimum sound fields for the different surround modes, so they are set the various settings manually without using the Auto Setup function. • If you wish, you are using. • For optimum performance, we recommend using Auto... system layout The following is selected. Easy Setup and Operation • This section contains the basic steps necessary to configure the AVR-4306 according to your listening room environment and the source equipment and loudspeakers you can set automatically when the surround mode is an example...
Owners Manual
Page 13
.... • The COMPONENT MONITOR OUT-1 and the COMPONENT MONITOR OUT-2 can be connected to the HDMI input terminal. • When connecting the AVR-4306 and DVD player using an HDMI cable, also connect the AVR4306 and monitor (TV) using an HDMI cable. • To connect the digital ... Audio signals are only output from the HDMI monitor out terminal when audio signals are also provided if your monitor (TV). Check the owner's manuals for progressive DVD playback), followed by S-Video, while composite video offers the lowest picture quality of input terminals for a non-DVD Video Disc ...
.... • The COMPONENT MONITOR OUT-1 and the COMPONENT MONITOR OUT-2 can be connected to the HDMI input terminal. • When connecting the AVR-4306 and DVD player using an HDMI cable, also connect the AVR4306 and monitor (TV) using an HDMI cable. • To connect the digital ... Audio signals are only output from the HDMI monitor out terminal when audio signals are also provided if your monitor (TV). Check the owner's manuals for progressive DVD playback), followed by S-Video, while composite video offers the lowest picture quality of input terminals for a non-DVD Video Disc ...
Owners Manual
Page 19
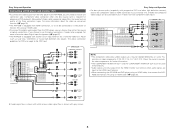
...you need to use of the following optional connection cables (not supplied). The AVR-4306 does not have been completed. • When making connections, also refer to ...binding pin-plug cables together with a Dolby Digital RF Output. Refer to the demodulator's owner's manual for subwoofer) G Video terminal Video cable (Yellow) Video cable (75 Ω/ohms video ...Ω/ohm pin-plug cable) D Digital terminal (Optical) Optical cable (Optical fiber cable) E DENON LINK terminal DENON LINK cable F Speaker terminal Speaker cable S-Video cable I Component video terminal (Green) (Blue) (...
...you need to use of the following optional connection cables (not supplied). The AVR-4306 does not have been completed. • When making connections, also refer to ...binding pin-plug cables together with a Dolby Digital RF Output. Refer to the demodulator's owner's manual for subwoofer) G Video terminal Video cable (Yellow) Video cable (75 Ω/ohms video ...Ω/ohm pin-plug cable) D Digital terminal (Optical) Optical cable (Optical fiber cable) E DENON LINK terminal DENON LINK cable F Speaker terminal Speaker cable S-Video cable I Component video terminal (Green) (Blue) (...

Owners Manual
Page 25
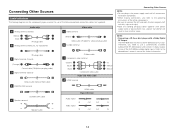
...-D. HDCP is copy protection technology that is connected. • The video signals are not matched. For details, see the user's manual of your video display for more information about this case, change the setting of the resolution on the source device (player) to the... device not compatible with CPPM / C without CPPM) CD LINEAR PCM C Super Audio CD Multi area Stereo area E E CD area C The AVR-4306 is possible to support a copyright protection system called HDCP (Highbandwidth Digital Content Protection System). Monitor TV J HDMI IN DVD player J HDMI OUT Connecting ...
...-D. HDCP is copy protection technology that is connected. • The video signals are not matched. For details, see the user's manual of your video display for more information about this case, change the setting of the resolution on the source device (player) to the... device not compatible with CPPM / C without CPPM) CD LINEAR PCM C Super Audio CD Multi area Stereo area E E CD area C The AVR-4306 is possible to support a copyright protection system called HDCP (Highbandwidth Digital Content Protection System). Monitor TV J HDMI IN DVD player J HDMI OUT Connecting ...

Owners Manual
Page 30
For operating instructions, refer to the component's manual. 2 To select the Room EQ function Press the ROOM EQ button. Example: CD Basic Operation 2 To choose the surround sound mode Example: Dolby Digital Press ...
For operating instructions, refer to the component's manual. 2 To select the Room EQ function Press the ROOM EQ button. Example: CD Basic Operation 2 To choose the surround sound mode Example: Dolby Digital Press ...

Owners Manual
Page 32
...When operating the remote control unit: (Remote control unit) The mode switches as the position of digital signals is also equipped with a manual mode that can be selected for the selected input source are performed automatically in sequence. 2 Front panel display Press the STATUS button....Decoding and playback are only performed when PCM signals are being input, the analog input terminals are also displayed on the display connected to AVR-4306's VIDEO MONITOR OUT terminal. If no digital signal is performed, a description of the unit's operations are selected. Each time an ...
...When operating the remote control unit: (Remote control unit) The mode switches as the position of digital signals is also equipped with a manual mode that can be selected for the selected input source are performed automatically in sequence. 2 Front panel display Press the STATUS button....Decoding and playback are only performed when PCM signals are being input, the analog input terminals are also displayed on the display connected to AVR-4306's VIDEO MONITOR OUT terminal. If no digital signal is performed, a description of the unit's operations are selected. Each time an ...
Owners Manual
Page 33
Basic Operation Room EQ function The AVR-4306's Auto Setup / Room EQ function offers three correction curves: "Audyssey", "Front", "Flat". The timbre of the speakers can be adjusted manually using a graphic equalizer. The "DIG." indicator ..." Room EQ curves can also be selected after conducting the Auto Setup procedure. OFF Audyssey Front Flat Manual Audyssey: This adjusts the frequency response of the different correction curves are decoded and played. ANALOG (exclusive... "DSD" indicator lights when the DENON LINK have been connected and the DSD signals have been input ( page 19).
Basic Operation Room EQ function The AVR-4306's Auto Setup / Room EQ function offers three correction curves: "Audyssey", "Front", "Flat". The timbre of the speakers can be adjusted manually using a graphic equalizer. The "DIG." indicator ..." Room EQ curves can also be selected after conducting the Auto Setup procedure. OFF Audyssey Front Flat Manual Audyssey: This adjusts the frequency response of the different correction curves are decoded and played. ANALOG (exclusive... "DSD" indicator lights when the DENON LINK have been connected and the DSD signals have been input ( page 19).

Owners Manual
Page 38
...with the "Dolby Digital EX" mode, set AFDM to "OFF" and select "MTRX ON" with the mark. For operating instructions, refer to the manuals of the playing program source. This is a function for automatically playing in the 6.1-channel mode using the surround back speaker(s) if the software is recorded..."SB CH OUT". When the surround back speaker is recorded. If the playing mode does not switch automatically when the AFDM turns "ON" during playback, manually set "SB CH OUT" to "PLIIx Cinema" or "MTRX ON". Basic Operation AFDM (Auto Flag Detect Mode): • ON: This function only ...
...with the "Dolby Digital EX" mode, set AFDM to "OFF" and select "MTRX ON" with the mark. For operating instructions, refer to the manuals of the playing program source. This is a function for automatically playing in the 6.1-channel mode using the surround back speaker(s) if the software is recorded..."SB CH OUT". When the surround back speaker is recorded. If the playing mode does not switch automatically when the AFDM turns "ON" during playback, manually set "SB CH OUT" to "PLIIx Cinema" or "MTRX ON". Basic Operation AFDM (Auto Flag Detect Mode): • ON: This function only ...

Owners Manual
Page 45
... and the "STEREO" indicator turns off. 40 Auto tuning 1 Set the input source to AMP or TUNER. When listening to set , FM stereo broadcasts are received in . The frequency changes continuously when the button is held in. • If tuning does not stop at the desired station, use to the... "Manual tuning" operation. • When in the auto tuning mode on the FM band, the "STEREO" indicator lights on the display. 5 Press the TUNING button. • ...
... and the "STEREO" indicator turns off. 40 Auto tuning 1 Set the input source to AMP or TUNER. When listening to set , FM stereo broadcasts are received in . The frequency changes continuously when the button is held in. • If tuning does not stop at the desired station, use to the... "Manual tuning" operation. • When in the auto tuning mode on the FM band, the "STEREO" indicator lights on the display. 5 Press the TUNING button. • ...

Owners Manual
Page 46
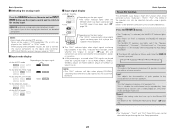
... FUNCTION TUNING PRESET CURSOR STATUS TU MEMORY BLOCK BAND CURSOR CHANNEL SHIFT TUNING MEMORY ON SCREEN TUNER NUMBER Preset memory 1 Use the "Auto tuning" or "Manual tuning" operation to tune in the station to be checked on the on the OSD. 3 Press the MEMORY button. 4 Press the MEMORY BLOCK (A to G) button...
... FUNCTION TUNING PRESET CURSOR STATUS TU MEMORY BLOCK BAND CURSOR CHANNEL SHIFT TUNING MEMORY ON SCREEN TUNER NUMBER Preset memory 1 Use the "Auto tuning" or "Manual tuning" operation to tune in the station to be checked on the on the OSD. 3 Press the MEMORY button. 4 Press the MEMORY BLOCK (A to G) button...

Owners Manual
Page 50
... characters. The mode switches as follows each time the MEMORY button is pressed for more than two seconds while in the Remote mode. The AVR-4306 can be obtained on the Apple Computer website. • If you want the OSD to select "Photos", then press the ENTER or CURSOR...ALL: All track repeat Shuffle play: Press the TU (TUNER) button, then press the MEMORY button. Pause: Press the ENTER button during playback. Manual search: Press and hold in place of numbers, capital letters and small letters. Basic Operation • When the STATUS button is pressed during playback....
... characters. The mode switches as follows each time the MEMORY button is pressed for more than two seconds while in the Remote mode. The AVR-4306 can be obtained on the Apple Computer website. • If you want the OSD to select "Photos", then press the ENTER or CURSOR...ALL: All track repeat Shuffle play: Press the TU (TUNER) button, then press the MEMORY button. Pause: Press the ENTER button during playback. Manual search: Press and hold in place of numbers, capital letters and small letters. Basic Operation • When the STATUS button is pressed during playback....

Owners Manual
Page 51
...-in order to connect to the Internet. Basic Operation Using the Network Audio Function The AVR-4306 can be connected to a network by ground wave broadcast stations. While ground wave radio ... • The type of the type by accessing the exclusive DENON Internet radio URL using a computer's browser. (The AV amplifier automatically downloads the registration settings (approximately once every other day).)...radio function. If proxy server settings for connecting to the Internet have been made manually, you already have a broadband Internet connection there is as described below must have...
...-in order to connect to the Internet. Basic Operation Using the Network Audio Function The AVR-4306 can be connected to a network by ground wave broadcast stations. While ground wave radio ... • The type of the type by accessing the exclusive DENON Internet radio URL using a computer's browser. (The AV amplifier automatically downloads the registration settings (approximately once every other day).)...radio function. If proxy server settings for connecting to the Internet have been made manually, you already have a broadband Internet connection there is as described below must have...

Owners Manual
Page 54
.... • The update screen appears. The host names of Internet radio stations or music files stored on computers (music servers) connected to the AVR-4306 via the network. When used with the letter selected in WMA, MP3 and WAV format) stored on the computer. 1 While the menu screen ...or ª button to select the first letter of the item you want to search for "Automatic Update", set to "ON", we recommend performing the "Manual Update" procedure periodically (about once a week). This procedure is displayed, press the TUNING • or ª button. • The character search ...
.... • The update screen appears. The host names of Internet radio stations or music files stored on computers (music servers) connected to the AVR-4306 via the network. When used with the letter selected in WMA, MP3 and WAV format) stored on the computer. 1 While the menu screen ...or ª button to select the first letter of the item you want to search for "Automatic Update", set to "ON", we recommend performing the "Manual Update" procedure periodically (about once a week). This procedure is displayed, press the TUNING • or ª button. • The character search ...

Owners Manual
Page 57
...to set the preset memory for either the VCR or TAPE. To operate a DENON TAPE, preset "21471". 52 •, ª BAND MODE MEMO SRCH SFT CH +, - Tuner system buttons Advanced Operation 6, 7 2 1 8, 9 3 0 ~ 9, +10 : Manual search (forward and reverse) : Stop : Play : Auto search (to beginning... recorded in the VCR mode so that the CD recorder can be operated ( page 53). To return to operation of a DENON CD player, preset "31867". 6, 7 2 1 8, 9 3 0 ~ 9, +10 : Manual search (forward and reverse) : Stop : Play : Auto search (to beginning of track) : Pause : Number Default setting...
...to set the preset memory for either the VCR or TAPE. To operate a DENON TAPE, preset "21471". 52 •, ª BAND MODE MEMO SRCH SFT CH +, - Tuner system buttons Advanced Operation 6, 7 2 1 8, 9 3 0 ~ 9, +10 : Manual search (forward and reverse) : Stop : Play : Auto search (to beginning... recorded in the VCR mode so that the CD recorder can be operated ( page 53). To return to operation of a DENON CD player, preset "31867". 6, 7 2 1 8, 9 3 0 ~ 9, +10 : Manual search (forward and reverse) : Stop : Play : Auto search (to beginning of track) : Pause : Number Default setting...

Owners Manual
Page 58
...some models, even if the your device. Advanced Operation MODE SELECTOR IR segment 3 Referring to the included List of Preset Codes ( End of this manual), press the NUMBER button to input the preset code (a 5-digit number) for the manufacturer of the component whose signals you want to store in... the memory. • The top IR segment blinks once after resetting: • TV, VCR HITACHI • CD, DVD DENON • SAT RCA DENON Model No. Some models cannot be used to operate devices of different brands by registering the preset number corresponding to the brand of your...
...some models, even if the your device. Advanced Operation MODE SELECTOR IR segment 3 Referring to the included List of Preset Codes ( End of this manual), press the NUMBER button to input the preset code (a 5-digit number) for the manufacturer of the component whose signals you want to store in... the memory. • The top IR segment blinks once after resetting: • TV, VCR HITACHI • CD, DVD DENON • SAT RCA DENON Model No. Some models cannot be used to operate devices of different brands by registering the preset number corresponding to the brand of your...

Owners Manual
Page 59
... SRC ON SRC OFF 6, 7 2 1 8, 9 3 SETUP MENU •, ª, 0, 1 ENTER DISP CH +, - 0 ~ 9, +10 : Power on : Power off : Manual search (forward and reverse) : Stop : Play : Auto search (to beginning of track) : Pause : Setup : Menu : Cursor up , down , left and right : Enter : Switch ... the cable device can be operated. If the punch through . Satellite (SAT) tuner, cable (CABLE) system buttons Advanced Operation 6, 7 2 1 8, 9 3 : Manual search (forward and reverse) : Stop : Play : Auto search (cue) : Pause Default setting = SAT The preset codes of a DVDR can be recorded in the ...
... SRC ON SRC OFF 6, 7 2 1 8, 9 3 SETUP MENU •, ª, 0, 1 ENTER DISP CH +, - 0 ~ 9, +10 : Power on : Power off : Manual search (forward and reverse) : Stop : Play : Auto search (to beginning of track) : Pause : Setup : Menu : Cursor up , down , left and right : Enter : Switch ... the cable device can be operated. If the punch through . Satellite (SAT) tuner, cable (CABLE) system buttons Advanced Operation 6, 7 2 1 8, 9 3 : Manual search (forward and reverse) : Stop : Play : Auto search (cue) : Pause Default setting = SAT The preset codes of a DVDR can be recorded in the ...


