Owner's Manual
Page 3
... 11 1 About Your Computer 15 Front View 15 Left View 19 Right View 20 Back View 22 Bottom View 24 2 Using the Keyboard and Mouse 27 Pairing the Keyboard 27 Keyboard Pairing Failed 28 Pairing the Mouse 29 Mouse Pairing With the Wizard 29 Mouse Pairing Failed 30 Numeric Keypad 31 Key Combinations... Technology Function 32 Display Switch 32 Power Management 32 Microsoft Windows Logo Key Functions 32 Touch Pad 33 Customizing the Touch Pad and Mouse 34 Keyboard Battery 34 Dell QuickSet Battery Meter 34 Contents 3
... 11 1 About Your Computer 15 Front View 15 Left View 19 Right View 20 Back View 22 Bottom View 24 2 Using the Keyboard and Mouse 27 Pairing the Keyboard 27 Keyboard Pairing Failed 28 Pairing the Mouse 29 Mouse Pairing With the Wizard 29 Mouse Pairing Failed 30 Numeric Keypad 31 Key Combinations... Technology Function 32 Display Switch 32 Power Management 32 Microsoft Windows Logo Key Functions 32 Touch Pad 33 Customizing the Touch Pad and Mouse 34 Keyboard Battery 34 Dell QuickSet Battery Meter 34 Contents 3
Owner's Manual
Page 4
Replacing the Keyboard Battery 35 3 Using Multimedia 37 Playing Media 37 Adjusting the Volume 39 Adjusting the Picture 40 Copying CD, DVD, and BD Media 40 How to Copy a CD, DVD, or BD 40 Using Blank CD, DVD, and BD Media 41 Helpful Tips 42 Using Dell Media Experience and Dell MediaDirect 42... If the computer is turned on or in standby mode 43 If the computer is turned off or in hibernate mode 43 Dell MediaDirect and Dell Media Experience Help 43 Using Your Computer With a TV or Audio Device 44 Connecting a Composite Video Adapter 44 Connecting a Component Video Adapter 45 ...
Replacing the Keyboard Battery 35 3 Using Multimedia 37 Playing Media 37 Adjusting the Volume 39 Adjusting the Picture 40 Copying CD, DVD, and BD Media 40 How to Copy a CD, DVD, or BD 40 Using Blank CD, DVD, and BD Media 41 Helpful Tips 42 Using Dell Media Experience and Dell MediaDirect 42... If the computer is turned on or in standby mode 43 If the computer is turned off or in hibernate mode 43 Dell MediaDirect and Dell Media Experience Help 43 Using Your Computer With a TV or Audio Device 44 Connecting a Composite Video Adapter 44 Connecting a Component Video Adapter 45 ...
Owner's Manual
Page 7
... Icon 91 Double-Clicking the Dell Support Icon 91 Drive Problems 91 DVD drive problems 91 If you hear an unfamiliar scraping or grinding sound 92 Hard drive problems 92 E-Mail, Modem, and Internet Problems 93 Error Messages 94 IEEE 1394 Device Problems 97 Keyboard Problems 97 Keyboard problems 98 Unexpected characters 98...
... Icon 91 Double-Clicking the Dell Support Icon 91 Drive Problems 91 DVD drive problems 91 If you hear an unfamiliar scraping or grinding sound 92 Hard drive problems 92 E-Mail, Modem, and Internet Problems 93 Error Messages 94 IEEE 1394 Device Problems 97 Keyboard Problems 97 Keyboard problems 98 Unexpected characters 98...
Owner's Manual
Page 10
Only 177 FCC Class B 177 Glossary 179 Index 189 10 Contents 15 Dell QuickSet 135 16 Specifications 137 17 Obtaining Assistance 145 Online Services 145 AutoTech Service 146 Automated Order-Status Service 146 Support Service 146 Problems With ... 147 Product Information 147 Returning Items for Warranty Repair or Credit 147 Before You Call 148 Contacting Dell 150 18 Appendix 175 Caution Regarding Safety and Bluetooth devices 175 Cleaning Your Computer 175 Computer, Keyboard, and Display 176 Touch Pad 176 CD, DVD, and BD Media 176 Macrovision Product Notice 176 FCC...
Only 177 FCC Class B 177 Glossary 179 Index 189 10 Contents 15 Dell QuickSet 135 16 Specifications 137 17 Obtaining Assistance 145 Online Services 145 AutoTech Service 146 Automated Order-Status Service 146 Support Service 146 Problems With ... 147 Product Information 147 Returning Items for Warranty Repair or Credit 147 Before You Call 148 Contacting Dell 150 18 Appendix 175 Caution Regarding Safety and Bluetooth devices 175 Cleaning Your Computer 175 Computer, Keyboard, and Display 176 Touch Pad 176 CD, DVD, and BD Media 176 Macrovision Product Notice 176 FCC...
Owner's Manual
Page 15
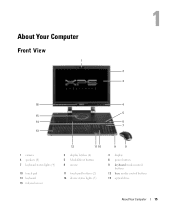
About Your Computer Front View 1 2 3 16 4 5 15 14 6 7 13 1 camera 4 speakers (8) 7 keyboard status lights (4) 10 touch pad 13 keyboard 16 infrared sensor 12 11 10 2 display latches (4) 5 MediaDirect button 8 mouse 11 touch pad buttons (2) 14 device status lights (5) 9 8 3 display 6 power button 9 keyboard media control buttons 12 base media control buttons 15 optical drive About Your Computer 15
About Your Computer Front View 1 2 3 16 4 5 15 14 6 7 13 1 camera 4 speakers (8) 7 keyboard status lights (4) 10 touch pad 13 keyboard 16 infrared sensor 12 11 10 2 display latches (4) 5 MediaDirect button 8 mouse 11 touch pad buttons (2) 14 device status lights (5) 9 8 3 display 6 power button 9 keyboard media control buttons 12 base media control buttons 15 optical drive About Your Computer 15
Owner's Manual
Page 16
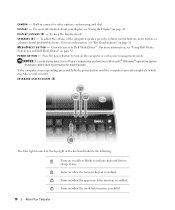
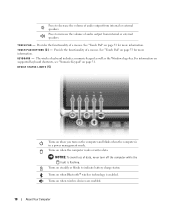
... button to indicate keyboard battery charge status. 9 Turns on when the uppercase letter function is enabled. M E D I A D I S P L A Y - For more information about your computer by performing a Microsoft® Windows® operating system shutdown rather than by pressing the power button. D I S P L A Y L A T C H E S ( 4 ) - C A M E R A - A Turns on when the numeric keypad is enabled. Controls access to Dell MediaDirect™.
... button to indicate keyboard battery charge status. 9 Turns on when the uppercase letter function is enabled. M E D I A D I S P L A Y - For more information about your computer by performing a Microsoft® Windows® operating system shutdown rather than by pressing the power button. D I S P L A Y L A T C H E S ( 4 ) - C A M E R A - A Turns on when the numeric keypad is enabled. Controls access to Dell MediaDirect™.
Owner's Manual
Page 17
.... Press once to go back to open the drive and eject the media. M E D I A C O N T R O L B U T T O N S - About Your Computer 17 Wireless mouse. For more information, see "Using the Keyboard and Mouse" on page 27. Press multiple times to skip back to skip forward one track/chapter. Press once to previous track/chapters.
.... Press once to go back to open the drive and eject the media. M E D I A C O N T R O L B U T T O N S - About Your Computer 17 Wireless mouse. For more information, see "Using the Keyboard and Mouse" on page 27. Press multiple times to skip back to skip forward one track/chapter. Press once to previous track/chapters.
Owner's Manual
Page 18
... About Your Computer See "Touch Pad" on page 31. K E Y B O A R D - Provide the functionality of a mouse. For information on supported keyboard shortcuts, see "Numeric Keypad" on page 33 for more information. DEVICE STATUS LIGHTS (5) Turns on when you turn off the computer while the light is...or external speakers. T O U C H P A D B U T T O N S ( 2 ) - See "Touch Pad" on the computer and blinks when the computer is enabled. The wireless keyboard includes a numeric keypad as well as the Windows logo key. NOTICE: To avoid loss of data, never turn on page 33 for more information.
... About Your Computer See "Touch Pad" on page 31. K E Y B O A R D - Provide the functionality of a mouse. For information on supported keyboard shortcuts, see "Numeric Keypad" on page 33 for more information. DEVICE STATUS LIGHTS (5) Turns on when you turn off the computer while the light is...or external speakers. T O U C H P A D B U T T O N S ( 2 ) - See "Touch Pad" on the computer and blinks when the computer is enabled. The wireless keyboard includes a numeric keypad as well as the Windows logo key. NOTICE: To avoid loss of data, never turn on page 33 for more information.
Owner's Manual
Page 20
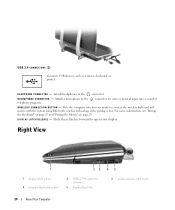
...H O N E C O N N E C T O R - connector for voice or musical input into discover mode to open your display. For more information, see "Pairing the Keyboard" on page 27 and "Pairing the Mouse" on page 29. Right View 1 1 display latch release 4 compact flash card reader 23 4 5 2 IEEE 1394 connector (firewire) 5 ...ExpressCard Slot 3 media memory card reader 20 About Your Computer USB 2.0 CONNECTORS (2) Connects USB devices, such as a mouse, keyboard, or printer. Attach headphones to the telephony program. DISPLAY LATCH RELEASE - Attach a microphone to the connector.
...H O N E C O N N E C T O R - connector for voice or musical input into discover mode to open your display. For more information, see "Pairing the Keyboard" on page 27 and "Pairing the Mouse" on page 29. Right View 1 1 display latch release 4 compact flash card reader 23 4 5 2 IEEE 1394 connector (firewire) 5 ...ExpressCard Slot 3 media memory card reader 20 About Your Computer USB 2.0 CONNECTORS (2) Connects USB devices, such as a mouse, keyboard, or printer. Attach headphones to the telephony program. DISPLAY LATCH RELEASE - Attach a microphone to the connector.

Owner's Manual
Page 27
... connection has been established (paired) between the computer and keyboard. NOTICE: Do not attempt to move the computer with the keyboard attached and the display open or the keyboard will fall away from the computer base. See "Pairing the Keyboard" on page 29. See "Pairing the Mouse" on ..., they may be awake to recognize the keyboard, the wireless connection may not be properly paired. To detach the keyboard, grasp the sides of the keyboard and pull it straight out and away from the computer base. The keyboard must pair the mouse with Bluetooth® wireless...
... connection has been established (paired) between the computer and keyboard. NOTICE: Do not attempt to move the computer with the keyboard attached and the display open or the keyboard will fall away from the computer base. See "Pairing the Keyboard" on page 29. See "Pairing the Mouse" on ..., they may be awake to recognize the keyboard, the wireless connection may not be properly paired. To detach the keyboard, grasp the sides of the keyboard and pull it straight out and away from the computer base. The keyboard must pair the mouse with Bluetooth® wireless...
Owner's Manual
Page 28
...mode. The Caps lock, Scroll, and Num lock wireless Bluetooth lights on the keyboard will all start flashing. 1 1 wireless connection button on keyboard The computer may go through a series of the keyboard and hold for the operating system to load and the computer to initialize the ...wireless connection button on computer base 3 Press the wireless connection button on the keyboard and these lights will be solid blue. If pairing was successful. Keyboard Pairing Failed If your computer fails to recognize the keyboard, follow these steps: 1 Press the power button to turn the computer ...
...mode. The Caps lock, Scroll, and Num lock wireless Bluetooth lights on the keyboard will all start flashing. 1 1 wireless connection button on keyboard The computer may go through a series of the keyboard and hold for the operating system to load and the computer to initialize the ...wireless connection button on computer base 3 Press the wireless connection button on the keyboard and these lights will be solid blue. If pairing was successful. Keyboard Pairing Failed If your computer fails to recognize the keyboard, follow these steps: 1 Press the power button to turn the computer ...
Owner's Manual
Page 29
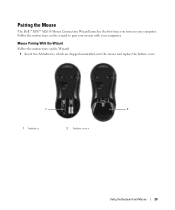
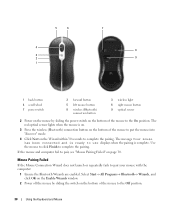
Pairing the Mouse The Dell™ XPS™ M2010 Mouse Connection Wizard launches the first time you turn on your computer. Follow the instructions on the Wizard: 1 Insert two AA batteries, which are shipped uninstalled, into the mouse and replace the battery cover. 1 2 1 batteries 2 battery cover Using the Keyboard and Mouse 29 Mouse Pairing With the Wizard Follow the instructions on the wizard to pair your mouse with your computer.
Pairing the Mouse The Dell™ XPS™ M2010 Mouse Connection Wizard launches the first time you turn on your computer. Follow the instructions on the Wizard: 1 Insert two AA batteries, which are shipped uninstalled, into the mouse and replace the battery cover. 1 2 1 batteries 2 battery cover Using the Keyboard and Mouse 29 Mouse Pairing With the Wizard Follow the instructions on the wizard to pair your mouse with your computer.
Owner's Manual
Page 30
... switch on page 30. Mouse Pairing Failed If the Mouse Connection Wizard does not launch or repeatedly fails to the Off position. 30 Using the Keyboard and Mouse If the mouse and computer fail to complete the pairing. The red optical sensor lights when the mouse is complete.
... switch on page 30. Mouse Pairing Failed If the Mouse Connection Wizard does not launch or repeatedly fails to the Off position. 30 Using the Keyboard and Mouse If the mouse and computer fail to complete the pairing. The red optical sensor lights when the mouse is complete.
Owner's Manual
Page 31
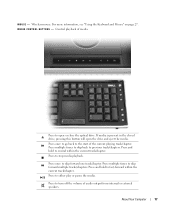
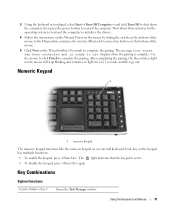
...mouse to the On position, and press the wireless (Bluetooth) connection button on the bottom of the mouse. 5 Click Next on an external keyboard. Use the mouse to click Finish to use displays when the pairing is complete. Numeric Keypad 1 1 numeric keypad The numeric keypad functions like.... The 9 light indicates that the keypad is ready to complete the pairing. Key Combinations System Functions Opens the Task Manager window. 3 Using the keyboard or touchpad, select Start→ Turn Off Computer→ and click Turn Off to shut down the computer, then press the power button to ...
...mouse to the On position, and press the wireless (Bluetooth) connection button on the bottom of the mouse. 5 Click Next on an external keyboard. Use the mouse to click Finish to use displays when the pairing is complete. Numeric Keypad 1 1 numeric keypad The numeric keypad functions like.... The 9 light indicates that the keypad is ready to complete the pairing. Key Combinations System Functions Opens the Task Manager window. 3 Using the keyboard or touchpad, select Start→ Turn Off Computer→ and click Turn Off to shut down the computer, then press the power button to ...

Owner's Manual
Page 32
... Battery Meter (see "Dell QuickSet Battery Meter" on page 135. To select a display, press and hold and press until the desired display is required. You can reprogram this keyboard shortcut to activate a different power management mode using the Advanced tab in the Power ...Options Properties window. Microsoft Windows Logo Key Functions Windows logo key and Minimizes all minimized windows. See "Dell QuickSet" on page 59). Windows...
... Battery Meter (see "Dell QuickSet Battery Meter" on page 135. To select a display, press and hold and press until the desired display is required. You can reprogram this keyboard shortcut to activate a different power management mode using the Advanced tab in the Power ...Options Properties window. Microsoft Windows Logo Key Functions Windows logo key and Minimizes all minimized windows. See "Dell QuickSet" on page 59). Windows...

Owner's Manual
Page 33
To adjust keyboard operation, such as you to a network). For information about the Control Panel, see "Windows Help and Support Center" ...touch pad buttons as the character repeat rate, open the Control Panel, click Printers and Other Hardware, and click Keyboard. To access the Help and Support Center, see the Microsoft® Windows® Help and Support Center. Using the... Keyboard and Mouse 33 On the second tap, leave your finger on the display. Touch Pad The touch pad detects...
To adjust keyboard operation, such as you to a network). For information about the Control Panel, see "Windows Help and Support Center" ...touch pad buttons as the character repeat rate, open the Control Panel, click Printers and Other Hardware, and click Keyboard. To access the Help and Support Center, see the Microsoft® Windows® Help and Support Center. Using the... Keyboard and Mouse 33 On the second tap, leave your finger on the display. Touch Pad The touch pad detects...
Owner's Manual
Page 34
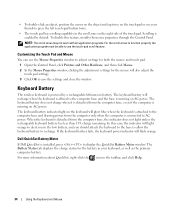
...; To double-click an object, position the cursor on the object and tap twice on the touch pad or use your keyboard, as well as the primary computer battery. Keyboard Battery The wireless keyboard is installed, press to use the touch-pad scroll feature. Dell QuickSet Battery Meter If Dell QuickSet is powered by default.
...; To double-click an object, position the cursor on the object and tap twice on the touch pad or use your keyboard, as well as the primary computer battery. Keyboard Battery The wireless keyboard is installed, press to use the touch-pad scroll feature. Dell QuickSet Battery Meter If Dell QuickSet is powered by default.
Owner's Manual
Page 35
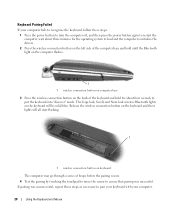
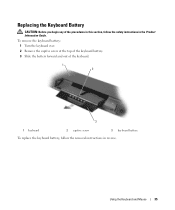
Replacing the Keyboard Battery CAUTION: Before you begin any of the keyboard. 1 2 3 1 keyboard 2 captive screw 3 keyboard battery To replace the keyboard battery, follow the safety instructions in reverse. Using the Keyboard and Mouse 35 To remove the keyboard battery: 1 Turn the keyboard over. 2 Remove the captive screw at the top of the keyboard battery. 3 Slide the battery forward and out of the procedures in this section, follow the removal instructions in the Product Information Guide.
Replacing the Keyboard Battery CAUTION: Before you begin any of the keyboard. 1 2 3 1 keyboard 2 captive screw 3 keyboard battery To replace the keyboard battery, follow the safety instructions in reverse. Using the Keyboard and Mouse 35 To remove the keyboard battery: 1 Turn the keyboard over. 2 Remove the captive screw at the top of the keyboard battery. 3 Slide the battery forward and out of the procedures in this section, follow the removal instructions in the Product Information Guide.

Owner's Manual
Page 36
36 Using the Keyboard and Mouse
36 Using the Keyboard and Mouse

Owner's Manual
Page 49
... the display to open the computer. Two latches are holding the display panel to the keyboard. 1 2 1 display latch release (2) 2 display latch (4) 2 Raise the display panel to the computer base and keyboard. As you can manually activate them by sliding the display latch release buttons forward. 3... lower the display panel, the four display latches will retract into the display panel. Using the Display 49 NOTICE: Ensure that the keyboard is no power source, the latches will not retract. Closing the Display Panel 1 Before closing the display panel, ensure that all ...
... the display to open the computer. Two latches are holding the display panel to the keyboard. 1 2 1 display latch release (2) 2 display latch (4) 2 Raise the display panel to the computer base and keyboard. As you can manually activate them by sliding the display latch release buttons forward. 3... lower the display panel, the four display latches will retract into the display panel. Using the Display 49 NOTICE: Ensure that the keyboard is no power source, the latches will not retract. Closing the Display Panel 1 Before closing the display panel, ensure that all ...


