
Users Manual
Page 4
Contents 1 Features 6 2 Accessories 10 3 Setting Up Your Computer 12 Connect the Power Cable to the Power Adapter 12 Charge Your Computer 13 Insert an SD Card (optional 15 Turning On Your Computer 16 Enable/Disable Wi-Fi 18 Connecting to a Network 18 Switch Networks 18 4 Using Your Computer 19 Screen Orientation 19 Windows 8 Start Screen 20 Gestures 21 Using Headphones/Microphones 26 Removing the SD Card 27 Turning Off the Screen 28 Turning Off Your Computer 28 Managing Computer Settings 29 5 Synchronizing Your Computer 31 4│
Contents 1 Features 6 2 Accessories 10 3 Setting Up Your Computer 12 Connect the Power Cable to the Power Adapter 12 Charge Your Computer 13 Insert an SD Card (optional 15 Turning On Your Computer 16 Enable/Disable Wi-Fi 18 Connecting to a Network 18 Switch Networks 18 4 Using Your Computer 19 Screen Orientation 19 Windows 8 Start Screen 20 Gestures 21 Using Headphones/Microphones 26 Removing the SD Card 27 Turning Off the Screen 28 Turning Off Your Computer 28 Managing Computer Settings 29 5 Synchronizing Your Computer 31 4│
Users Manual
Page 6
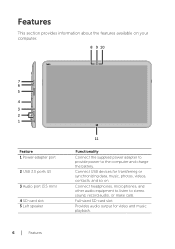
... the computer and charge the battery. Features This section provides information about the features available on . Provides audio output for transferring or synchronizing data, music, photos, videos, contacts, and so on your computer. 8 9 10 7 6 5 4 3 2 1 Feature 1 Power-adapter port 2 USB 3.0 ports (2) 3 Audio port (3.5 mm) 4 SD-card slot 5 Left speaker 11 Functionality Connect the supplied power adapter to provide power to stereo sound, record audio, or make calls. Connect USB devices for video and music playback. 6 │...
... the computer and charge the battery. Features This section provides information about the features available on . Provides audio output for transferring or synchronizing data, music, photos, videos, contacts, and so on your computer. 8 9 10 7 6 5 4 3 2 1 Feature 1 Power-adapter port 2 USB 3.0 ports (2) 3 Audio port (3.5 mm) 4 SD-card slot 5 Left speaker 11 Functionality Connect the supplied power adapter to provide power to stereo sound, record audio, or make calls. Connect USB devices for video and music playback. 6 │...

Users Manual
Page 8
Connect to secure your computer on -screen keyboard. Allows you to a Dell Powered Stand (optional). Indicates the power/battery charge status. (see battery status table) 8 │ Features Press and release to turn your computer using a Noble lock. Provides audio output for video and music playback. 6 5 4 3 1 2 Feature 1 Touchscreen display 2 Docking port 3 Noble lock port 4 Right speaker 5 Power and sleep/wake button 6 Power/Battery-status indicator Functionality Touch the display to use on-screen controls including buttons, menu items, and the on or off.
Connect to secure your computer on -screen keyboard. Allows you to a Dell Powered Stand (optional). Indicates the power/battery charge status. (see battery status table) 8 │ Features Press and release to turn your computer using a Noble lock. Provides audio output for video and music playback. 6 5 4 3 1 2 Feature 1 Touchscreen display 2 Docking port 3 Noble lock port 4 Right speaker 5 Power and sleep/wake button 6 Power/Battery-status indicator Functionality Touch the display to use on-screen controls including buttons, menu items, and the on or off.
Users Manual
Page 10
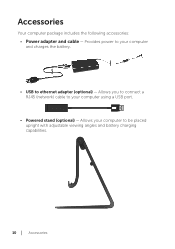
Allows your computer and charges the battery. • USB to ethernet adapter (optional) - Provides power to your computer to your computer using a USB port. • Powered stand (optional) - Allows you to connect a RJ45 (network) cable to be placed upright with adjustable viewing angles and battery charging capabilities. 10 │ Accessories Accessories Your computer package includes the following accessories: • Power adapter and cable -
Allows your computer and charges the battery. • USB to ethernet adapter (optional) - Provides power to your computer to your computer using a USB port. • Powered stand (optional) - Allows you to connect a RJ45 (network) cable to be placed upright with adjustable viewing angles and battery charging capabilities. 10 │ Accessories Accessories Your computer package includes the following accessories: • Power adapter and cable -

Users Manual
Page 12
WARNING: Before you begin any of the procedures in this section, read the safety information that shipped with your computer for first use. Connect the Power Cable to the Power Adapter 12 │ Setting Up Your Computer For additional best practices information, see www.dell.com/regulatory_compliance. Setting Up Your Computer This section provides information about setting up your computer.
WARNING: Before you begin any of the procedures in this section, read the safety information that shipped with your computer for first use. Connect the Power Cable to the Power Adapter 12 │ Setting Up Your Computer For additional best practices information, see www.dell.com/regulatory_compliance. Setting Up Your Computer This section provides information about setting up your computer.

Users Manual
Page 13
... a USB cable. NOTE: The battery charge light on the right side of your computer. Using unauthorized power adapters or power cables may severely damage to your computer turns off . NOTE: The battery is fully charged. To turn on during shipping. NOTE: A completely discharged battery takes 4-5 hours to charge fully while the computer is turned off once the battery is fully charged. CAUTION: Use only the supplied power adapter and power cable...
... a USB cable. NOTE: The battery charge light on the right side of your computer. Using unauthorized power adapters or power cables may severely damage to your computer turns off . NOTE: The battery is fully charged. To turn on during shipping. NOTE: A completely discharged battery takes 4-5 hours to charge fully while the computer is turned off once the battery is fully charged. CAUTION: Use only the supplied power adapter and power cable...
Users Manual
Page 14
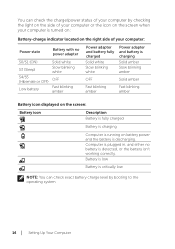
... blinking white OFF Fast blinking amber Power adapter and battery fully charged Solid white Slow blinking white Power adapter and battery is charging Solid amber Slow blinking amber OFF Solid amber Fast blinking amber Fast blinking amber Battery icon displayed on the screen: Battery icon Description Battery is fully charged Battery is charging Computer is running on the right side of your computer by booting to the operating system. 14 │ Setting...
... blinking white OFF Fast blinking amber Power adapter and battery fully charged Solid white Slow blinking white Power adapter and battery is charging Solid amber Slow blinking amber OFF Solid amber Fast blinking amber Fast blinking amber Battery icon displayed on the screen: Battery icon Description Battery is fully charged Battery is charging Computer is running on the right side of your computer by booting to the operating system. 14 │ Setting...

Users Manual
Page 16
Turning On Your Computer CAUTION: Use your computer turns on or off. 2 Complete all steps for the initial setup of Windows including Personalize, Settings, Sign in an ambient temperature between 0 °C and 35 °C (32 °F and 95 °F). 1 Press and release the Power and Sleep/Wake button . NOTE: After the button is pressed, there is a slight delay before your computer in . 3 Enable security on the Security & Dell Updates page. 4 Configure wireless settings (optional). 16 │ Setting Up Your Computer
Turning On Your Computer CAUTION: Use your computer turns on or off. 2 Complete all steps for the initial setup of Windows including Personalize, Settings, Sign in an ambient temperature between 0 °C and 35 °C (32 °F and 95 °F). 1 Press and release the Power and Sleep/Wake button . NOTE: After the button is pressed, there is a slight delay before your computer in . 3 Enable security on the Security & Dell Updates page. 4 Configure wireless settings (optional). 16 │ Setting Up Your Computer

Users Manual
Page 18
... left to . 18 │ Setting Up Your Computer Switch Networks NOTE: If you need to connect to another network later, access Charms → and select the network you want to connect to disable Wi-Fi. Enable/Disable Wi-Fi 1 Swipe from the right edge of the display to access Charms. 2 Touch Settings → Change PC settings→ Wireless. 3 Move the slider to the right to enable Wi-Fi. Connecting to a Network 1 Swipe...
... left to . 18 │ Setting Up Your Computer Switch Networks NOTE: If you need to connect to another network later, access Charms → and select the network you want to connect to disable Wi-Fi. Enable/Disable Wi-Fi 1 Swipe from the right edge of the display to access Charms. 2 Touch Settings → Change PC settings→ Wireless. 3 Move the slider to the right to enable Wi-Fi. Connecting to a Network 1 Swipe...
Users Manual
Page 20
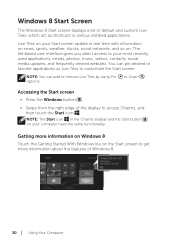
..., weather, stocks, social networks, and so on the Start screen to various installed applications. Getting more information about the features of the display to customize the Start screen. The tile-based user interface gives you direct access to your computer have the same functionality. You can add or remove Live Tiles by using Pin options. or Unpin Accessing the Start screen • Press the Windows button . • Swipe from...
..., weather, stocks, social networks, and so on the Start screen to various installed applications. Getting more information about the features of the display to customize the Start screen. The tile-based user interface gives you direct access to your computer have the same functionality. You can add or remove Live Tiles by using Pin options. or Unpin Accessing the Start screen • Press the Windows button . • Swipe from...
Users Manual
Page 22
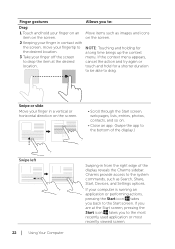
... your computer is running an application or performing actions, pressing the Start icon takes you to the most recently used application or most recently viewed screen. on an Move items such as Search, Share, Start, Devices, and Settings options. NOTE: Touching and holding for a shorter duration to be able to drag. If the context menu appears, cancel the action...
... your computer is running an application or performing actions, pressing the Start icon takes you to the most recently used application or most recently viewed screen. on an Move items such as Search, Share, Start, Devices, and Settings options. NOTE: Touching and holding for a shorter duration to be able to drag. If the context menu appears, cancel the action...

Users Manual
Page 25
... Settings → Change PC Settings→ Devices→ Add a device, to manually add a keyboard and mouse. You do not work automatically you purchased a wireless keyboard and mouse with a USB dongle. Using Your Computer │ 25 Pairing the wireless keyboard and mouse If the keyboard and mouse do not need to add them again. NOTE: If the keyboard or mouse pairing has been lost for some reason, use these steps to use the keyboard and mouse, make sure both devices have batteries installed and...
... Settings → Change PC Settings→ Devices→ Add a device, to manually add a keyboard and mouse. You do not work automatically you purchased a wireless keyboard and mouse with a USB dongle. Using Your Computer │ 25 Pairing the wireless keyboard and mouse If the keyboard and mouse do not need to add them again. NOTE: If the keyboard or mouse pairing has been lost for some reason, use these steps to use the keyboard and mouse, make sure both devices have batteries installed and...

Users Manual
Page 28
... Sleep/Wake button or Windows button once to turn off the computer. 28 │ Using Your Computer Turning Off Your Computer 1 Swipe from the right edge of the display to access Charms. 2 Touch Settings → Power → Shut down to turn off the screen. to turn • Using Charms: 1 Swipe from the right edge of the display to access Charms. 2 Touch Settings → Power → Sleep to turn on the screen. Turning Off the Screen...
... Sleep/Wake button or Windows button once to turn off the computer. 28 │ Using Your Computer Turning Off Your Computer 1 Swipe from the right edge of the display to access Charms. 2 Touch Settings → Power → Shut down to turn off the screen. to turn • Using Charms: 1 Swipe from the right edge of the display to access Charms. 2 Touch Settings → Power → Sleep to turn on the screen. Turning Off the Screen...
Users Manual
Page 29
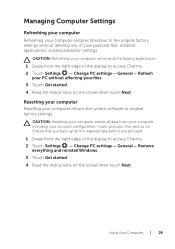
Managing Computer Settings Refreshing your computer Refreshing your computer restores Windows to the original factory settings without affecting your computer returns the system software to access Charms. 2 Touch Settings → Change PC settings→ General→ Remove everything and reinstall Windows. 3 Touch Get started . 4 Read the instructions on the screen then touch Next. CAUTION: Resetting your computer erases all data from your computer, including your personal files, installed applications...
Managing Computer Settings Refreshing your computer Refreshing your computer restores Windows to the original factory settings without affecting your computer returns the system software to access Charms. 2 Touch Settings → Change PC settings→ General→ Remove everything and reinstall Windows. 3 Touch Get started . 4 Read the instructions on the screen then touch Next. CAUTION: Resetting your computer erases all data from your computer, including your personal files, installed applications...
Users Manual
Page 30
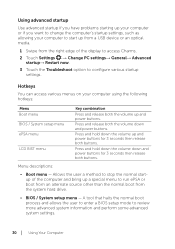
...; Restart now. 3 Touch the Troubleshoot option to configure various startup settings. Press and hold down and power buttons for 3 seconds then release both buttons. Menu descriptions: • Boot menu - Allows the user a method to stop the normal start up from a USB device or an optical media. 1 Swipe from the system hard drive. • BIOS / System setup menu - A tool that halts the normal boot process and allows the user to enter a BIOS setup mode to review more advanced system information...
...; Restart now. 3 Touch the Troubleshoot option to configure various startup settings. Press and hold down and power buttons for 3 seconds then release both buttons. Menu descriptions: • Boot menu - Allows the user a method to stop the normal start up from a USB device or an optical media. 1 Swipe from the system hard drive. • BIOS / System setup menu - A tool that halts the normal boot process and allows the user to enter a BIOS setup mode to review more advanced system information...

Users Manual
Page 31
... running video test outside the normal path. When you can sync user settings of the display to access Charms, then click Settings → Change PC Settings→ Users→ Switch to a Microsoft account to switch a local account to your Microsoft account. 2 Sync your settings option is added to help users trouble shoot a no video scenario by running properly, see dell.com/support. ePSA provides valuable configuration and diagnostic information and helps assure correct system operation...
... running video test outside the normal path. When you can sync user settings of the display to access Charms, then click Settings → Change PC Settings→ Users→ Switch to a Microsoft account to switch a local account to your Microsoft account. 2 Sync your settings option is added to help users trouble shoot a no video scenario by running properly, see dell.com/support. ePSA provides valuable configuration and diagnostic information and helps assure correct system operation...

Users Manual
Page 39
... turn on . Troubleshooting Battery Problems Problems Battery does not charge Possible causes • Your computer is not properly plugged into the computer. 4 Check all connectors to ensure proper connectivity. 5 Verify that the power adapter's white LED is on , try another outlet that the outlet is functioning. 3 Check all cable connections and plug back into the wall, then back into a power source. • You are using an incorrect power adapter/cable...
... turn on . Troubleshooting Battery Problems Problems Battery does not charge Possible causes • Your computer is not properly plugged into the computer. 4 Check all connectors to ensure proper connectivity. 5 Verify that the power adapter's white LED is on , try another outlet that the outlet is functioning. 3 Check all cable connections and plug back into the wall, then back into a power source. • You are using an incorrect power adapter/cable...

Users Manual
Page 40
... in shipping mode. System problem Problems Possible causes Possible solution Computer does not turn on the computer. Your computer may be set in the power adapter and press the power button to turn the computer back on. To get out of this mode, the user needs to plug in shipping mode. This is Connect your computer on during shipping and draining the battery. 40 │ Troubleshooting Computers shipped...
... in shipping mode. System problem Problems Possible causes Possible solution Computer does not turn on the computer. Your computer may be set in the power adapter and press the power button to turn the computer back on. To get out of this mode, the user needs to plug in shipping mode. This is Connect your computer on during shipping and draining the battery. 40 │ Troubleshooting Computers shipped...

Users Manual
Page 41
... been downloaded in the background. See Refreshing your computer. 3 Reset your computer. com/support or dell.com/ContactDell. Software updates may need to adjust display settings • Turn off your computer screen to avoid accidental touches, then gently wipe the display with a clean dry cloth. • Adjust display settings in Windows Desktop, Control Panel→ Appearance and Personalization→ Display. Swipe from the right edge of the display to access Charms...
... been downloaded in the background. See Refreshing your computer. 3 Reset your computer. com/support or dell.com/ContactDell. Software updates may need to adjust display settings • Turn off your computer screen to avoid accidental touches, then gently wipe the display with a clean dry cloth. • Adjust display settings in Windows Desktop, Control Panel→ Appearance and Personalization→ Display. Swipe from the right edge of the display to access Charms...

Users Manual
Page 42
... a different location for better signal reception. 2 Contact your Internet Service Provider. 42 │ Troubleshooting Possible solution 1 Check if the wireless radio is not strong enough. See Enabling/Disabling Wi-Fi. 2 Move closer to the wireless access point. 3 Reset the wireless router if using a private network. 4 Open the browser to view the landing page if using a public network, and follow the instructions given by the public network. 5 Try another wireless connection...
... a different location for better signal reception. 2 Contact your Internet Service Provider. 42 │ Troubleshooting Possible solution 1 Check if the wireless radio is not strong enough. See Enabling/Disabling Wi-Fi. 2 Move closer to the wireless access point. 3 Reset the wireless router if using a private network. 4 Open the browser to view the landing page if using a public network, and follow the instructions given by the public network. 5 Try another wireless connection...


