Setup and Quick Reference Guide
Page 1
Models: DCSCLF, DCSCMF, DCSCSF www.dell.com | support.dell.com Dell™ Vostro™ 420/220/220s Setup and Quick Reference Guide This guide provides a features overview, specifications, and quick setup, software, and troubleshooting information for your operating system, devices, and technologies, see the Dell Technology Guide at support.dell.com. For more information about your computer.
Models: DCSCLF, DCSCMF, DCSCSF www.dell.com | support.dell.com Dell™ Vostro™ 420/220/220s Setup and Quick Reference Guide This guide provides a features overview, specifications, and quick setup, software, and troubleshooting information for your operating system, devices, and technologies, see the Dell Technology Guide at support.dell.com. For more information about your computer.
Service Manual
Page 1
...., and is used in this document is strictly forbidden. disclaims any references in this material in any manner whatsoever without notice. © 2008 Dell Inc. Dell™ Vostro™ 420/220/220s Service Manual Troubleshooting Working on Your Computer Computer Cover Bezel Chassis Support Bracket PCI and PCI Express Cards Drives I/O Panel Fan Processor...
...., and is used in this document is strictly forbidden. disclaims any references in this material in any manner whatsoever without notice. © 2008 Dell Inc. Dell™ Vostro™ 420/220/220s Service Manual Troubleshooting Working on Your Computer Computer Cover Bezel Chassis Support Bracket PCI and PCI Express Cards Drives I/O Panel Fan Processor...
Service Manual
Page 2
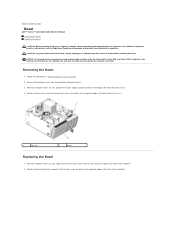
... Homepage at www.dell.com/regulatory_compliance. Follow the procedures in Before Working on the opposite edge of the front of the bezel from the chassis. 1 clips (4) 2 bezel Replacing the Bezel 1. the illustrations provided are for the Vostro 420, Vostro 220, and Vostro 220s computers; Rotate...the clips slightly upward to release that shipped with your computer. Removing the Bezel 1. Back to Contents Page Bezel Dell™ Vostro™ 420/220/220s Service Manual Removing the Bezel Replacing the Bezel CAUTION: Before working inside your computer, read the safety ...
... Homepage at www.dell.com/regulatory_compliance. Follow the procedures in Before Working on the opposite edge of the front of the bezel from the chassis. 1 clips (4) 2 bezel Replacing the Bezel 1. the illustrations provided are for the Vostro 420, Vostro 220, and Vostro 220s computers; Rotate...the clips slightly upward to release that shipped with your computer. Removing the Bezel 1. Back to Contents Page Bezel Dell™ Vostro™ 420/220/220s Service Manual Removing the Bezel Replacing the Bezel CAUTION: Before working inside your computer, read the safety ...
Service Manual
Page 4
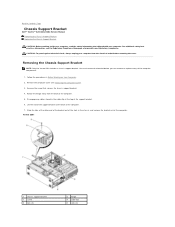
...of the computer. Slide the tabs at the back of the computer. 5. Back to Contents Page Chassis Support Bracket Dell™ Vostro™ 420/220/220s Service Manual Removing the Chassis Support Bracket Replacing the Chassis Support Bracket CAUTION: Before working inside your computer,...Computer Cover). 3. Disengage any cables stored in Before Working on Your Computer. 2. CAUTION: To guard against electrical shock, always unplug your computer. Vostro 220s 1 chassis support bracket 3 screw 5 tabs (2) 2 flange 4 cable clip 6 slots (2) Rotate the flange away from the electrical outlet ...
...of the computer. Slide the tabs at the back of the computer. 5. Back to Contents Page Chassis Support Bracket Dell™ Vostro™ 420/220/220s Service Manual Removing the Chassis Support Bracket Replacing the Chassis Support Bracket CAUTION: Before working inside your computer,...Computer Cover). 3. Disengage any cables stored in Before Working on Your Computer. 2. CAUTION: To guard against electrical shock, always unplug your computer. Vostro 220s 1 chassis support bracket 3 screw 5 tabs (2) 2 flange 4 cable clip 6 slots (2) Rotate the flange away from the electrical outlet ...
Service Manual
Page 6
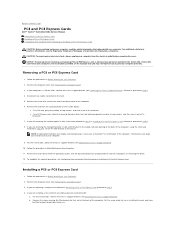
...you removed in step 5 to secure the filler bracket to the chassis. Remove the screw securing the filler bracket for the Vostro 420, Vostro 220, and Vostro 220s computers; CAUTION: To guard against electrical shock, always unplug your computer from the operating system. Disconnect any cables connected to... cover. Remove the computer cover (see Removing the Computer Cover). 3. Back to Contents Page PCI and PCI Express Cards Dell™ Vostro™ 420/220/220s Service Manual Removing a PCI or PCI Express Card Installing a PCI or PCI Express Card Configuring Your Computer After...
...you removed in step 5 to secure the filler bracket to the chassis. Remove the screw securing the filler bracket for the Vostro 420, Vostro 220, and Vostro 220s computers; CAUTION: To guard against electrical shock, always unplug your computer from the operating system. Disconnect any cables connected to... cover. Remove the computer cover (see Removing the Computer Cover). 3. Back to Contents Page PCI and PCI Express Cards Dell™ Vostro™ 420/220/220s Service Manual Removing a PCI or PCI Express Card Installing a PCI or PCI Express Card Configuring Your Computer After...
Service Manual
Page 9
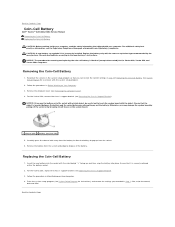
...Working on Your Computer. 4. Ensure that you can explode if it is incorrectly installed. NOTICE: The procedure for the Vostro 420, Vostro 220, and Vostro 220s computers. Replacing the Coin-Cell Battery 1. Also, enter the correct date and time. NOTICE: If you attempt to...positive side) 5. Removing the Coin-Cell Battery 1. Back to the manufacturer's instructions. Back to Contents Page Coin-Cell Battery Dell™ Vostro™ 420/220/220s Service Manual Removing the Coin-Cell Battery Replacing the Coin-Cell Battery CAUTION: Before working inside your computer. Replace the...
...Working on Your Computer. 4. Ensure that you can explode if it is incorrectly installed. NOTICE: The procedure for the Vostro 420, Vostro 220, and Vostro 220s computers. Replacing the Coin-Cell Battery 1. Also, enter the correct date and time. NOTICE: If you attempt to...positive side) 5. Removing the Coin-Cell Battery 1. Back to the manufacturer's instructions. Back to Contents Page Coin-Cell Battery Dell™ Vostro™ 420/220/220s Service Manual Removing the Coin-Cell Battery Replacing the Coin-Cell Battery CAUTION: Before working inside your computer. Replace the...
Service Manual
Page 10
Select the appropriate service or support link based on the left side of contacting Dell that is convenient for sales, technical support, or customer service issues: 1. Back to Contents Page Verify your need. 5. Click Contact Us on your country or region in the Choose a Country/Region drop-down menu at the bottom of the page. 3. Back to Contents Page Contacting Dell Dell™ Vostro™ 420/220/220s Service Manual To contact Dell for you. Choose the method of the page. 4. Visit support.dell.com. 2.
Select the appropriate service or support link based on the left side of contacting Dell that is convenient for sales, technical support, or customer service issues: 1. Back to Contents Page Verify your need. 5. Click Contact Us on your country or region in the Choose a Country/Region drop-down menu at the bottom of the page. 3. Back to Contents Page Contacting Dell Dell™ Vostro™ 420/220/220s Service Manual To contact Dell for you. Choose the method of the page. 4. Visit support.dell.com. 2.
Service Manual
Page 11
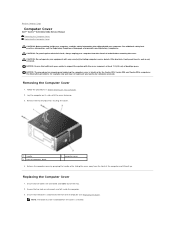
... handle 3 front of desktop space. CAUTION: Do not operate your equipment with the cover removed-at www.dell.com/regulatory_compliance. Lay the computer on Your Computer. 2. Removing the Computer Cover 1. Ensure that all cables ...the safety information that shipped with the cover facing up . Back to Contents Page Computer Cover Dell™ Vostro™ 420/220/220s Service Manual Removing the Computer Cover Replacing the Computer Cover CAUTION: Before working inside ...bezel 2 computer cover 4. Ensure that the bezel is for the Vostro 420, Vostro 220, and Vostro 220s computers;
... handle 3 front of desktop space. CAUTION: Do not operate your equipment with the cover removed-at www.dell.com/regulatory_compliance. Lay the computer on Your Computer. 2. Removing the Computer Cover 1. Ensure that all cables ...the safety information that shipped with the cover facing up . Back to Contents Page Computer Cover Dell™ Vostro™ 420/220/220s Service Manual Removing the Computer Cover Replacing the Computer Cover CAUTION: Before working inside ...bezel 2 computer cover 4. Ensure that the bezel is for the Vostro 420, Vostro 220, and Vostro 220s computers;
Service Manual
Page 13
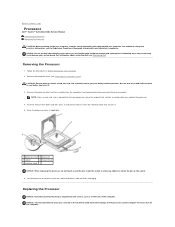
... these steps incorrectly could damage your computer. Lift the processor to remove it from the socket and place it . 3. Back to Contents Page Processor Dell™ Vostro™ 420/220/220s Service Manual Removing the Processor Replacing the Processor CAUTION: Before working inside the socket or allow any of the computer. Push the...
... these steps incorrectly could damage your computer. Lift the processor to remove it from the socket and place it . 3. Back to Contents Page Processor Dell™ Vostro™ 420/220/220s Service Manual Removing the Processor Replacing the Processor CAUTION: Before working inside the socket or allow any of the computer. Push the...
Service Manual
Page 16
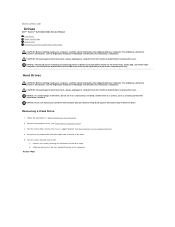
...Disconnect the power cable and data cable from the electrical outlet before removing the cover. Back to Contents Page Drives Dell™ Vostro™ 420/220/220s Service Manual Hard Drives Media Card Reader Optical Drive Removing a Drive Bay Break-Away Metal Plate CAUTION: ...Compliance Homepage at www.dell.com/regulatory_compliance. NOTICE: The procedure for removing and replacing drives is identical (except where noted) for example only and may not represent your computer. Instead, set it . NOTICE: If you are for the Vostro 420, Vostro 220, and Vostro 220s computers; Follow...
...Disconnect the power cable and data cable from the electrical outlet before removing the cover. Back to Contents Page Drives Dell™ Vostro™ 420/220/220s Service Manual Hard Drives Media Card Reader Optical Drive Removing a Drive Bay Break-Away Metal Plate CAUTION: ...Compliance Homepage at www.dell.com/regulatory_compliance. NOTICE: The procedure for removing and replacing drives is identical (except where noted) for example only and may not represent your computer. Instead, set it . NOTICE: If you are for the Vostro 420, Vostro 220, and Vostro 220s computers; Follow...
Service Manual
Page 28
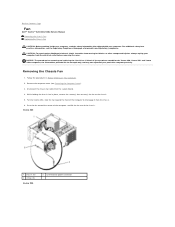
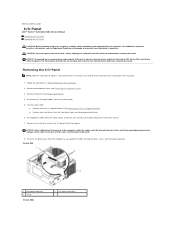
...3. the illustrations provided are for the Vostro 420, Vostro 220, and Vostro 220s computers; While holding the chassis fan in Before Working on Your Computer. 2. Remove the computer cover (see the Regulatory Compliance Homepage at www.dell.com/regulatory_compliance. Ease the fan toward ...the front of the computer to disengage it from the chassis. 6. Vostro 420 1 chassis fan 3 screws (4) Vostro 220 2 system board power connector NOTICE: The procedure for ...
...3. the illustrations provided are for the Vostro 420, Vostro 220, and Vostro 220s computers; While holding the chassis fan in Before Working on Your Computer. 2. Remove the computer cover (see the Regulatory Compliance Homepage at www.dell.com/regulatory_compliance. Ease the fan toward ...the front of the computer to disengage it from the chassis. 6. Vostro 420 1 chassis fan 3 screws (4) Vostro 220 2 system board power connector NOTICE: The procedure for ...
Service Manual
Page 31
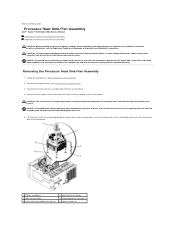
..., laceration from the computer. NOTICE: The procedure for removing and replacing the processor heat sink/fan assembly is for the Vostro 420, Vostro 220, and Vostro 220s computers; Follow the procedures in Before Working on Your Computer. 2. NOTICE: A strong thermal solution bond may exist... your computer. Remove the computer cover (see the Regulatory Compliance Homepage at www.dell.com/regulatory_compliance. Back to Contents Page Processor Heat Sink/Fan Assembly Dell™ Vostro™ 420/220/220s Service Manual Removing the Processor Heat Sink/Fan Assembly Replacing the Processor Heat...
..., laceration from the computer. NOTICE: The procedure for removing and replacing the processor heat sink/fan assembly is for the Vostro 420, Vostro 220, and Vostro 220s computers; Follow the procedures in Before Working on Your Computer. 2. NOTICE: A strong thermal solution bond may exist... your computer. Remove the computer cover (see the Regulatory Compliance Homepage at www.dell.com/regulatory_compliance. Back to Contents Page Processor Heat Sink/Fan Assembly Dell™ Vostro™ 420/220/220s Service Manual Removing the Processor Heat Sink/Fan Assembly Replacing the Processor Heat...
Service Manual
Page 33
...computer as you can reroute them so that secures the I/O panel to the front panel. Vostro 420 1 front-panel opening . Remove the bezel (see the Regulatory Compliance Homepage at www.dell.com/regulatory_compliance. Disengage the cables from the electrical outlet before removing the cover. Back to... Contents Page I/O Panel Dell™ Vostro™ 420/220/220s Service Manual Removing the I/O Panel Replacing the I/O Panel CAUTION: Before working inside of the chassis. 7....
...computer as you can reroute them so that secures the I/O panel to the front panel. Vostro 420 1 front-panel opening . Remove the bezel (see the Regulatory Compliance Homepage at www.dell.com/regulatory_compliance. Disengage the cables from the electrical outlet before removing the cover. Back to... Contents Page I/O Panel Dell™ Vostro™ 420/220/220s Service Manual Removing the I/O Panel Replacing the I/O Panel CAUTION: Before working inside of the chassis. 7....

Service Manual
Page 35
... from any new modules, even if you install modules in DIMM connectors 3 and 4. Back to Contents Page Memory Module(s) Dell™ Vostro™ 420/220/220s Service Manual Removing Memory Modules Replacing or Adding a Memory Module CAUTION: Before working inside your computer, read the safety...Your Computer. 2. Replacing or Adding a Memory Module NOTICE: Do not install ECC memory modules. Grasp the module and pull it from Dell. NOTE: Vostro 420 can accommodate two DIMMs. 1 Pair A: matched pair of memory modules in connectors DIMM_1 and DIMM_2 2 Pair B: matched pair of ...
... from any new modules, even if you install modules in DIMM connectors 3 and 4. Back to Contents Page Memory Module(s) Dell™ Vostro™ 420/220/220s Service Manual Removing Memory Modules Replacing or Adding a Memory Module CAUTION: Before working inside your computer, read the safety...Your Computer. 2. Replacing or Adding a Memory Module NOTICE: Do not install ECC memory modules. Grasp the module and pull it from Dell. NOTE: Vostro 420 can accommodate two DIMMs. 1 Pair A: matched pair of memory modules in connectors DIMM_1 and DIMM_2 2 Pair B: matched pair of ...
Service Manual
Page 37
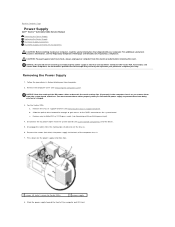
... computer from the system board (see System Board Components) and the drives. 5. the illustrations provided are for the Vostro 420, Vostro 220, and Vostro 220s computers; For the Vostro 220s: a. c. Remove any installed PCI or PCI Express cards (see Removing the Chassis Support Bracket). NOTICE: The...from the system board and drives. Slide the optical drive forward far enough to gain access to Contents Page Power Supply Dell™ Vostro™ 420/220/220s Service Manual Removing the Power Supply Replacing the Power Supply DC Power Supply Connectors DC Power Supply Connector Pin...
... computer from the system board (see System Board Components) and the drives. 5. the illustrations provided are for the Vostro 420, Vostro 220, and Vostro 220s computers; For the Vostro 220s: a. c. Remove any installed PCI or PCI Express cards (see Removing the Chassis Support Bracket). NOTICE: The...from the system board and drives. Slide the optical drive forward far enough to gain access to Contents Page Power Supply Dell™ Vostro™ 420/220/220s Service Manual Removing the Power Supply Replacing the Power Supply DC Power Supply Connectors DC Power Supply Connector Pin...

Service Manual
Page 42
... damage from the system board. 7. c. Disconnect the chassis fan cable from the electrical outlet before removing the cover. Back to Contents Page System Board Dell™ Vostro™ 420/220/220s Service Manual Remove the System Board Replacing a System Board CAUTION: Before working inside your computer, read the safety information that secure the...
... damage from the system board. 7. c. Disconnect the chassis fan cable from the electrical outlet before removing the cover. Back to Contents Page System Board Dell™ Vostro™ 420/220/220s Service Manual Remove the System Board Replacing a System Board CAUTION: Before working inside your computer, read the safety information that secure the...
Service Manual
Page 45
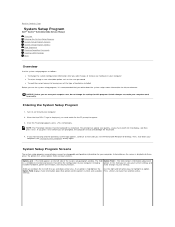
Back to Contents Page System Setup Program Dell™ Vostro™ 420/220/220s Service Manual Overview Entering the System Setup Program System Setup Program Screens System Setup Program Options Boot Sequence Clearing Forgotten Passwords Clearing CMOS... prompt appears, press immediately. make that you wait too long and the operating system logo appears, continue to display, and then press . When the blue DELL™ logo is a scrollable list containing features that the keyboard has initialized. settings. Entering the System Setup Program 1. Information on (or restart) your computer,...
Back to Contents Page System Setup Program Dell™ Vostro™ 420/220/220s Service Manual Overview Entering the System Setup Program System Setup Program Screens System Setup Program Options Boot Sequence Clearing Forgotten Passwords Clearing CMOS... prompt appears, press immediately. make that you wait too long and the operating system logo appears, continue to display, and then press . When the blue DELL™ logo is a scrollable list containing features that the keyboard has initialized. settings. Entering the System Setup Program 1. Information on (or restart) your computer,...
Service Manual
Page 50
... this material in any proprietary interest in trademarks and trade names other countries; disclaims any manner whatsoever without notice. © 2008 Dell Inc. Back to Contents Page Dell™ Vostro™ 420/220/220s Service Manual NOTE: A NOTE indicates important information that helps you make better use of Microsoft Corporation in the United States...
... this material in any proprietary interest in trademarks and trade names other countries; disclaims any manner whatsoever without notice. © 2008 Dell Inc. Back to Contents Page Dell™ Vostro™ 420/220/220s Service Manual NOTE: A NOTE indicates important information that helps you make better use of Microsoft Corporation in the United States...
Service Manual
Page 51
... switch is not responding, see Contacting Dell). Run the Dell Diagnostics to resume normal operation. Back to Contents Page Troubleshooting Dell™ Vostro™ 420/220/220s Service Manual Tools Dell Diagnostics Solving Problems Dell Technical Update Service Dell Support Utility Tools Power Lights CAUTION: ...same electrical outlet Beep Codes Your computer may emit a series of beeps during start -up : 1. Suggested Resolution Contact Dell (see Beep Codes. For additional safety best practices information, see System Board Components). Some possible causes of interference are ...
... switch is not responding, see Contacting Dell). Run the Dell Diagnostics to resume normal operation. Back to Contents Page Troubleshooting Dell™ Vostro™ 420/220/220s Service Manual Tools Dell Diagnostics Solving Problems Dell Technical Update Service Dell Support Utility Tools Power Lights CAUTION: ...same electrical outlet Beep Codes Your computer may emit a series of beeps during start -up : 1. Suggested Resolution Contact Dell (see Beep Codes. For additional safety best practices information, see System Board Components). Some possible causes of interference are ...
Service Manual
Page 66
...unpainted metal surface to dissipate static electricity, which could harm internal components. Back to Contents Page Working on Your Computer Dell™ Vostro™ 420/220/220s Service Manual Recommended Tools Before Working on Your Computer Inside View of Your Computer System Board Components After ... following tools: l Small flat-blade screwdriver l Phillips screwdriver l Small plastic scribe l Flash BIOS update (see the Dell Support website at support.dell.com) Before Working on Your Computer Use the following steps before you disconnect the cable. Read and follow the safety ...
...unpainted metal surface to dissipate static electricity, which could harm internal components. Back to Contents Page Working on Your Computer Dell™ Vostro™ 420/220/220s Service Manual Recommended Tools Before Working on Your Computer Inside View of Your Computer System Board Components After ... following tools: l Small flat-blade screwdriver l Phillips screwdriver l Small plastic scribe l Flash BIOS update (see the Dell Support website at support.dell.com) Before Working on Your Computer Use the following steps before you disconnect the cable. Read and follow the safety ...


