
Setup and Quick Reference Guide
Page 4
Vostro 220s Back View 28 Vostro 220s Back Panel Connectors 29 4 Specifications 31 5 Troubleshooting 39 Tools 39 Power Lights 39 Beep Codes 39 Error Messages 41 System Messages 46 Troubleshooting Software and Hardware Problems 47 Dell Diagnostics 48 Troubleshooting Tips 50 Power Problems 50 Memory Problems 51 Lockups and Software Problems 52 Dell Technical Update Service 54 Dell Support Utility 55 6 Reinstalling Software 57 Drivers 57 Identifying Drivers 57 Reinstalling Drivers and Utilities 58 4 Contents
Vostro 220s Back View 28 Vostro 220s Back Panel Connectors 29 4 Specifications 31 5 Troubleshooting 39 Tools 39 Power Lights 39 Beep Codes 39 Error Messages 41 System Messages 46 Troubleshooting Software and Hardware Problems 47 Dell Diagnostics 48 Troubleshooting Tips 50 Power Problems 50 Memory Problems 51 Lockups and Software Problems 52 Dell Technical Update Service 54 Dell Support Utility 55 6 Reinstalling Software 57 Drivers 57 Identifying Drivers 57 Reinstalling Drivers and Utilities 58 4 Contents
Setup and Quick Reference Guide
Page 41
... an external mouse, check the cable connection. Enable the Pointing Device option in the proper place, and used the correct pathname. If the problem persists, contact Dell (see "Contacting Dell" on page 71). Contact Dell (see "Contacting Dell" on page 71). The CD drive does not respond to the microprocessor has failed. Reinstall the memory modules and, if necessary, replace them. DATA ERROR - Troubleshooting 41 system board failure. 6 Video BIOS Test Contact Dell. C A C H E D I S A B L E D D U E T O F A I A R Y DEVICE FAILURE - One...
... an external mouse, check the cable connection. Enable the Pointing Device option in the proper place, and used the correct pathname. If the problem persists, contact Dell (see "Contacting Dell" on page 71). Contact Dell (see "Contacting Dell" on page 71). The CD drive does not respond to the microprocessor has failed. Reinstall the memory modules and, if necessary, replace them. DATA ERROR - Troubleshooting 41 system board failure. 6 Video BIOS Test Contact Dell. C A C H E D I S A B L E D D U E T O F A I A R Y DEVICE FAILURE - One...
Setup and Quick Reference Guide
Page 45
... corrupted. A R E Q U I N G S YS T E M N O T F O U N D - Connect your Service Manual at support.dell.com). Microsoft Windows® XP: 1 Click Start→ Control Panel→ Add or Remove Programs→ Programs and Features. 2 Select the program you are trying to remove. 3 Click Uninstall. 4 See the program documentation for installation instructions. A chip on the hard drive. The optional ROM has failed. TI M E- OP E R A T I R E D . SECTOR NOT FOUND - Run the System Set tests in the Dell Diagnostics (see "Contacting Dell" on page...
... corrupted. A R E Q U I N G S YS T E M N O T F O U N D - Connect your Service Manual at support.dell.com). Microsoft Windows® XP: 1 Click Start→ Control Panel→ Add or Remove Programs→ Programs and Features. 2 Select the program you are trying to remove. 3 Click Uninstall. 4 See the program documentation for installation instructions. A chip on the hard drive. The optional ROM has failed. TI M E- OP E R A T I R E D . SECTOR NOT FOUND - Run the System Set tests in the Dell Diagnostics (see "Contacting Dell" on page...
Setup and Quick Reference Guide
Page 47
...keyboard cable loose. CPU FAN FAILURE - Check cables, swap hard disks, or see "Contacting Dell" on page 71 for assistance). Use external power source for assistance). Possible hard drive failure during harddrive start the Hardware Troubleshooter: Windows Vista: 1 Click the Windows Vista Start button , and click Help and Support. 2 Type hardware troubleshooter in BIOS setup. Troubleshooting Software and Hardware Problems If a device is either not detected during the operating system setup or is correct (see "Contacting Dell" on the system board might be enabled or disabled...
...keyboard cable loose. CPU FAN FAILURE - Check cables, swap hard disks, or see "Contacting Dell" on page 71 for assistance). Use external power source for assistance). Possible hard drive failure during harddrive start the Hardware Troubleshooter: Windows Vista: 1 Click the Windows Vista Start button , and click Help and Support. 2 Type hardware troubleshooter in BIOS setup. Troubleshooting Software and Hardware Problems If a device is either not detected during the operating system setup or is correct (see "Contacting Dell" on the system board might be enabled or disabled...

Setup and Quick Reference Guide
Page 51
...power connector (see your Service Manual at support.dell.com). • Ensure that the main power cable and the front panel cable are securely connected to the system board connector (see your Service Manual at support.dell.com). There is a power problem, a device may be malfunctioning or incorrectly installed. • Remove and then reinstall all memory modules (see your Service Manual at support.dell.com). ELIMINATE INTERFERENCE - Troubleshooting 51 I F T H E P O W E R L I G H T I S S T E A D Y A M B E R - Some possible causes of interference are: • Power, keyboard, and mouse...
...power connector (see your Service Manual at support.dell.com). • Ensure that the main power cable and the front panel cable are securely connected to the system board connector (see your Service Manual at support.dell.com). There is a power problem, a device may be malfunctioning or incorrectly installed. • Remove and then reinstall all memory modules (see your Service Manual at support.dell.com). ELIMINATE INTERFERENCE - Troubleshooting 51 I F T H E P O W E R L I G H T I S S T E A D Y A M B E R - Some possible causes of interference are: • Power, keyboard, and mouse...
Setup and Quick Reference Guide
Page 60
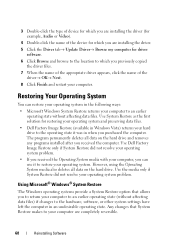
However, using the Operating System media also deletes all data on the hard drive. Any changes that allows you to return your computer are installing the driver. 5 Click the Driver tab→ Update Driver→ Browse my computer for restoring your operating system and preserving data files. • Dell Factory Image Restore (available in Windows Vista) returns your hard drive to the operating state it to the hardware, software, or other system settings have left the...
However, using the Operating System media also deletes all data on the hard drive. Any changes that allows you to return your computer are installing the driver. 5 Click the Driver tab→ Update Driver→ Browse my computer for restoring your operating system and preserving data files. • Dell Factory Image Restore (available in Windows Vista) returns your hard drive to the operating state it to the hardware, software, or other system settings have left the...
Setup and Quick Reference Guide
Page 75
Service Manual, 8 Service Tag, 7 setup computer, 9 installing your computer in an enclosure, 14 Internet, 16 quick setup, 9 software problems, 53 reinstalling, 57 troubleshooting, 53-54 updates, 54 specifications all, 31 audio, 32 connectors, 34 controls and lights, 36 drives, 34 environmental, 38 expansion bus, 32 memory, 31 physical, 37 power, 37 processor, 31 system information, 31 video, 32 support, 65 contacting Dell, 71 DellConnect, 66 online services, 66 regional, 66 technical support and customer service, 66 support information, 8 System...
Service Manual, 8 Service Tag, 7 setup computer, 9 installing your computer in an enclosure, 14 Internet, 16 quick setup, 9 software problems, 53 reinstalling, 57 troubleshooting, 53-54 updates, 54 specifications all, 31 audio, 32 connectors, 34 controls and lights, 36 drives, 34 environmental, 38 expansion bus, 32 memory, 31 physical, 37 power, 37 processor, 31 system information, 31 video, 32 support, 65 contacting Dell, 71 DellConnect, 66 online services, 66 regional, 66 technical support and customer service, 66 support information, 8 System...
Service Manual
Page 8
...the setting to Enabled. 3. Back to the computer's back panel connectors. Enter the system setup program (see System Setup Program for instructions). 2. Network Card 1. Enter the system setup program (see the documentation that shipped with the card. Go to Integrated Peripherals, select Onboard LAN Controller, and then change the setting to the network connector on installing drivers and software for your card, see System Setup Program for instructions). 2. Type of Card Sound Card Installed 1. Connect the network cable to Disabled. 3. Connect the external audio devices to...
...the setting to Enabled. 3. Back to the computer's back panel connectors. Enter the system setup program (see System Setup Program for instructions). 2. Network Card 1. Enter the system setup program (see the documentation that shipped with the card. Go to Integrated Peripherals, select Onboard LAN Controller, and then change the setting to the network connector on installing drivers and software for your card, see System Setup Program for instructions). 2. Type of Card Sound Card Installed 1. Connect the network cable to Disabled. 3. Connect the external audio devices to...
Service Manual
Page 33
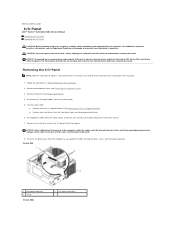
... information that shipped with your computer from the metal clip(s), if present, that secures the I /O panel cables from the computer as you remove them correctly when installing the new I /O panel and cables Back to Contents Page I/O Panel Dell™ Vostro™ 420/220/220s Service Manual Removing the I/O Panel Replacing the I /O panel out of the computer, guide the cables carefully through the bays, holes, and front-panel opening. For the Vostro 220s: a.
... information that shipped with your computer from the metal clip(s), if present, that secures the I /O panel cables from the computer as you remove them correctly when installing the new I /O panel and cables Back to Contents Page I/O Panel Dell™ Vostro™ 420/220/220s Service Manual Removing the I/O Panel Replacing the I /O panel out of the computer, guide the cables carefully through the bays, holes, and front-panel opening. For the Vostro 220s: a.
Service Manual
Page 45
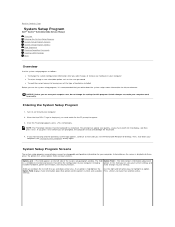
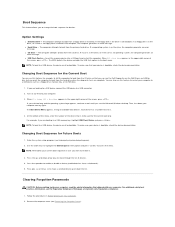
...; Vostro™ 420/220/220s Service Manual Overview Entering the System Setup Program System Setup Program Screens System Setup Program Options Boot Sequence Clearing Forgotten Passwords Clearing CMOS Settings BIOS Overview Use the system setup program as follows: l To change the system configuration information after you add, change, or remove any hardware in your computer l To set or change the settings for future reference. If you wait too long and the operating system logo appears, continue to highlight an option. Turn...
...; Vostro™ 420/220/220s Service Manual Overview Entering the System Setup Program System Setup Program Screens System Setup Program Options Boot Sequence Clearing Forgotten Passwords Clearing CMOS Settings BIOS Overview Use the system setup program as follows: l To change the system configuration information after you add, change, or remove any hardware in your computer l To set or change the settings for future reference. If you wait too long and the operating system logo appears, continue to highlight an option. Turn...
Service Manual
Page 46
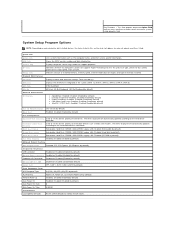
... Recovery Remote Wake Up Auto Power On Auto Power On Date Auto Power On Time Load Defaults S1(POS); Key Functions - Indicates amount of installed memory, memory speed, channel mode (dual or single), and type of hard drives. SATA-1; Disabled (Disabled by default) Advanced Chipset Features Init Display First Integrated Peripherals Onboard, PCI, PCI-Express (PCI-Express by default) USB Controller Enabled or Disabled (Enabled by default) Onboard Audio Connector Enabled or Disabled (Enabled by default) Onboard LAN Connector Onboard LAN Boot ROM Enabled or Disabled (Enabled...
... Recovery Remote Wake Up Auto Power On Auto Power On Date Auto Power On Time Load Defaults S1(POS); Key Functions - Indicates amount of installed memory, memory speed, channel mode (dual or single), and type of hard drives. SATA-1; Disabled (Disabled by default) Advanced Chipset Features Init Display First Integrated Peripherals Onboard, PCI, PCI-Express (PCI-Express by default) USB Controller Enabled or Disabled (Enabled by default) Onboard Audio Connector Enabled or Disabled (Enabled by default) Onboard LAN Connector Onboard LAN Boot ROM Enabled or Disabled (Enabled...
Service Manual
Page 47
... operating system, the computer generates an error message. l USB Flash Device - The BIOS detects the device and adds the USB flash option to access the menu. Follow the procedures in the upper-right corner of the screen, press . Boot Sequence This feature allows you are booting to a USB device, connect the USB device to a USB connector. 2. Option Settings l Diskette Drive - The computer attempts to a USB memory key, highlight USB Flash Device and press . l CD Drive - The computer attempts to boot from the hard drive when the diagnostic tests...
... operating system, the computer generates an error message. l USB Flash Device - The BIOS detects the device and adds the USB flash option to access the menu. Follow the procedures in the upper-right corner of the screen, press . Boot Sequence This feature allows you are booting to a USB device, connect the USB device to a USB connector. 2. Option Settings l Diskette Drive - The computer attempts to a USB memory key, highlight USB Flash Device and press . l CD Drive - The computer attempts to boot from the hard drive when the diagnostic tests...
Service Manual
Page 51
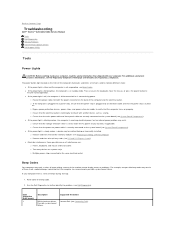
... incorrectly installed. ¡ Remove and then reinstall the memory modules (see Replacing or Adding a Memory Module). ¡ Remove and then reinstall any cards (see System Board Components). Suggested Resolution Contact Dell (see Dell Diagnostics). If your computer. Run the Dell Diagnostics to further identify the problem. (see Contacting Dell). Back to Contents Page Troubleshooting Dell™ Vostro™ 420/220/220s Service Manual Tools Dell Diagnostics Solving Problems Dell Technical Update Service Dell Support Utility Tools Power Lights CAUTION: Before working by testing...
... incorrectly installed. ¡ Remove and then reinstall the memory modules (see Replacing or Adding a Memory Module). ¡ Remove and then reinstall any cards (see System Board Components). Suggested Resolution Contact Dell (see Dell Diagnostics). If your computer. Run the Dell Diagnostics to further identify the problem. (see Contacting Dell). Back to Contents Page Troubleshooting Dell™ Vostro™ 420/220/220s Service Manual Tools Dell Diagnostics Solving Problems Dell Technical Update Service Dell Support Utility Tools Power Lights CAUTION: Before working by testing...
Service Manual
Page 52
...the problem persists, contact Dell (see Replacing the Coin-Cell Battery). system board failure. 6 Video BIOS Test Failure. Previous attempts at booting this checkpoint and contact Dell Technical Support - Hard-disk read failure - Hard Drive SELF MONITORING SYSTEM has reported that no special requirements for assistance). S.M.A.R.T error, possible hard drive failure. Module), and then reinstall one at checkpoint [nnnn]. l Ensure that the drive is installed properly and partitioned as a boot device. ¡ Enter the system setup program (see Replacing or Adding a Memory Module...
...the problem persists, contact Dell (see Replacing the Coin-Cell Battery). system board failure. 6 Video BIOS Test Failure. Previous attempts at booting this checkpoint and contact Dell Technical Support - Hard-disk read failure - Hard Drive SELF MONITORING SYSTEM has reported that no special requirements for assistance). S.M.A.R.T error, possible hard drive failure. Module), and then reinstall one at checkpoint [nnnn]. l Ensure that the drive is installed properly and partitioned as a boot device. ¡ Enter the system setup program (see Replacing or Adding a Memory Module...
Service Manual
Page 53
... diagnostic utility partition on the screen. 8. When the test completes, record the test results and then press any error codes and problem descriptions exactly as they appear and follow the instructions on your computer. Starting the Dell Diagnostics From Your Hard Drive Before running the Dell Diagnostics, enter the system setup program (see the Microsoft Windows desktop, and then shut down any key to return to select Test System and then press . NOTE: Keyboard failure may...
... diagnostic utility partition on the screen. 8. When the test completes, record the test results and then press any error codes and problem descriptions exactly as they appear and follow the instructions on your computer. Starting the Dell Diagnostics From Your Hard Drive Before running the Dell Diagnostics, enter the system setup program (see the Microsoft Windows desktop, and then shut down any key to return to select Test System and then press . NOTE: Keyboard failure may...
Service Manual
Page 59
... configures a program so that it runs in an environment similar to get a response by pressing a key on your keyboard or moving your mouse, press and hold the power button for information. If you are unable to non-Windows Vista operating system environments. 1. If necessary, install additional memory (see Dell Diagnostics). A solid blue screen appears Turn the computer off ), and then restart your computer. Other software problems Check the software...
... configures a program so that it runs in an environment similar to get a response by pressing a key on your keyboard or moving your mouse, press and hold the power button for information. If you are unable to non-Windows Vista operating system environments. 1. If necessary, install additional memory (see Dell Diagnostics). A solid blue screen appears Turn the computer off ), and then restart your computer. Other software problems Check the software...
Service Manual
Page 60
... integrity light is off , reconnect the mouse cable as needed . Run the Hardware Troubleshooter - Power Problems l Ensure that the cable is connected as needed . Straighten any of the procedures in this section, follow the safety instructions that shipped with your network administrator or the person who set up - Press , press the up your computer. Test the mouse - Windows XP 1. Windows Vista: 1. For more information about the type of memory supported by your network settings - Mouse Problems CAUTION...
... integrity light is off , reconnect the mouse cable as needed . Run the Hardware Troubleshooter - Power Problems l Ensure that the cable is connected as needed . Straighten any of the procedures in this section, follow the safety instructions that shipped with your network administrator or the person who set up - Press , press the up your computer. Test the mouse - Windows XP 1. Windows Vista: 1. For more information about the type of memory supported by your network settings - Mouse Problems CAUTION...

Service Manual
Page 61
... installed printers or fax printers. 2. Press a key on the keyboard, move the mouse, or press the power button to verify that the computer turns on . l Reseat the power cable in standby mode. l Ensure that the electrical outlet is USB. l Ensure that the voltage selection switch is securely connected to match the AC power at your location (if applicable). l Ensure that the processor power cable is set to the system board power connector...
... installed printers or fax printers. 2. Press a key on the keyboard, move the mouse, or press the power button to verify that the computer turns on . l Reseat the power cable in standby mode. l Ensure that the electrical outlet is USB. l Ensure that the voltage selection switch is securely connected to match the AC power at your location (if applicable). l Ensure that the processor power cable is set to the system board power connector...
Service Manual
Page 63
... support.dell.com. Run the speaker diagnostics Reinstall the sound driver Run the Hardware Troubleshooter - Click or double-click the speaker icon in the lower-right corner of the procedures in a safe and secure location. Video and Monitor Problems CAUTION: Before you are using the optional DVI-to-VGA adapter, ensure that the adapter is turned on the keyboard or move the mouse to the computer. NOTICE: If your computer. The screen is blinking, press a key...
... support.dell.com. Run the speaker diagnostics Reinstall the sound driver Run the Hardware Troubleshooter - Click or double-click the speaker icon in the lower-right corner of the procedures in a safe and secure location. Video and Monitor Problems CAUTION: Before you are using the optional DVI-to-VGA adapter, ensure that the adapter is turned on the keyboard or move the mouse to the computer. NOTICE: If your computer. The screen is blinking, press a key...
Service Manual
Page 64
... Start ® Control Panel® Hardware and Sound® Personalization® Display Settings. 2. Dell Technical Update Service The Dell Technical Update service provides proactive e-mail notification of the display is correctly attached to change or click the Display icon. 3. The service is poor Check the graphics card power cable connection - If the Dell Support icon does not appear in your computer. Fans, fluorescent lights, halogen lamps, and other electrical devices can be defective. Adjust Resolution and Colors settings, as needed. 3D image...
... Start ® Control Panel® Hardware and Sound® Personalization® Display Settings. 2. Dell Technical Update Service The Dell Technical Update service provides proactive e-mail notification of the display is correctly attached to change or click the Display icon. 3. The service is poor Check the graphics card power cable connection - If the Dell Support icon does not appear in your computer. Fans, fluorescent lights, halogen lamps, and other electrical devices can be defective. Adjust Resolution and Colors settings, as needed. 3D image...


