Setup and Quick Reference Guide
Page 72
Worldwide Regulatory Compliance & Environmental Affairs One Dell Way Round Rock, TX 78682 USA 512-338-4400 NOTE: For further regulatory information, see the regulatory documentation that is protected by method ... Appendix Macrovision Product Notice This product incorporates copyright protection technology that shipped with the FCC regulations: • Product name: Dell™ Vostro™ 410 • Model number: DCGAF • Company name: Dell Inc. The following information is provided on the device or devices covered in this copyright protection technology must be authorized by...
Worldwide Regulatory Compliance & Environmental Affairs One Dell Way Round Rock, TX 78682 USA 512-338-4400 NOTE: For further regulatory information, see the regulatory documentation that is protected by method ... Appendix Macrovision Product Notice This product incorporates copyright protection technology that shipped with the FCC regulations: • Product name: Dell™ Vostro™ 410 • Model number: DCGAF • Company name: Dell Inc. The following information is provided on the device or devices covered in this copyright protection technology must be authorized by...
Service Manual
Page 1
...trade names other countries. Bluetooth is strictly forbidden. Dell Inc. Model DCGAF August 2008 Rev. A00 Dell™ Vostro™ 410 Service Manual Troubleshooting Computer Cover PCI and PCI Express Cards I/O Panel Memory Processor System Board Contacting Dell Working on Your Computer Bezel Drives Fans Battery ... damage to hardware or loss of data and tells you make better use of Dell Inc. disclaims any manner whatsoever without notice. © 2008 Dell Inc. Other trademarks and trade names may be used in this text: Dell, the DELL logo, and Vostro are not applicable.
...trade names other countries. Bluetooth is strictly forbidden. Dell Inc. Model DCGAF August 2008 Rev. A00 Dell™ Vostro™ 410 Service Manual Troubleshooting Computer Cover PCI and PCI Express Cards I/O Panel Memory Processor System Board Contacting Dell Working on Your Computer Bezel Drives Fans Battery ... damage to hardware or loss of data and tells you make better use of Dell Inc. disclaims any manner whatsoever without notice. © 2008 Dell Inc. Other trademarks and trade names may be used in this text: Dell, the DELL logo, and Vostro are not applicable.
Service Manual
Page 2
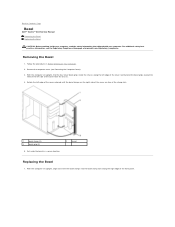
... the left edge of the cover outward until the bezel clamps on Your Computer. 2. Gently bend the bezel grips outward to Contents Page Bezel Dell™ Vostro™ 410 Service Manual Removing the Bezel Replacing the Bezel CAUTION: Before working inside the chassis along the right edge of the clamp slots. 1 bezel clamp...
... the left edge of the cover outward until the bezel clamps on Your Computer. 2. Gently bend the bezel grips outward to Contents Page Bezel Dell™ Vostro™ 410 Service Manual Removing the Bezel Replacing the Bezel CAUTION: Before working inside the chassis along the right edge of the clamp slots. 1 bezel clamp...
Service Manual
Page 4
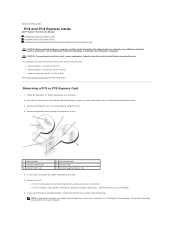
...cover. NOTE: Installing filler brackets over empty card-slot openings is necessary to Contents Page PCI and PCI Express Cards Dell™ Vostro™ 410 Service Manual Removing a PCI or PCI Express Card Installing a PCI or PCI Express Card Configuring Your Computer After Removing ...-slot opening. For additional safety best practices information, see your computer. For more information, see the Regulatory Compliance Homepage at www.dell.com/regulatory_compliance. Removing a PCI or PCI Express Card 1. See Removing the Computer Cover. 4. Remove the bracket screw securing the ...
...cover. NOTE: Installing filler brackets over empty card-slot openings is necessary to Contents Page PCI and PCI Express Cards Dell™ Vostro™ 410 Service Manual Removing a PCI or PCI Express Card Installing a PCI or PCI Express Card Configuring Your Computer After Removing ...-slot opening. For additional safety best practices information, see your computer. For more information, see the Regulatory Compliance Homepage at www.dell.com/regulatory_compliance. Removing a PCI or PCI Express Card 1. See Removing the Computer Cover. 4. Remove the bracket screw securing the ...
Service Manual
Page 7
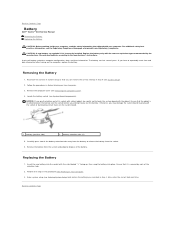
... battery to release the battery from the socket. 6. Follow the procedures in step 9 (see the Regulatory Compliance Homepage at www.dell.com/regulatory_compliance. Back to Contents Page Battery Dell™ Vostro™ 410 Service Manual Removing the Battery Replacing the Battery CAUTION: Before working inside your computer. Discard used batteries according to Contents Page...
... battery to release the battery from the socket. 6. Follow the procedures in step 9 (see the Regulatory Compliance Homepage at www.dell.com/regulatory_compliance. Back to Contents Page Battery Dell™ Vostro™ 410 Service Manual Removing the Battery Replacing the Battery CAUTION: Before working inside your computer. Discard used batteries according to Contents Page...

Service Manual
Page 8
Visit support.dell.com. 2. Click Contact Us on your country or region in the Choose a Country/Region drop-down menu at the bottom of the page. 3. Back to Contents Page Contacting Dell Dell™ Vostro™ 410 Service Manual To contact Dell for you. Verify your need. 5. Choose the method of the page. 4. Select the appropriate service or support link based on the left side of contacting Dell that is convenient for sales, technical support, or customer service issues: 1. Back to Contents Page
Visit support.dell.com. 2. Click Contact Us on your country or region in the Choose a Country/Region drop-down menu at the bottom of the page. 3. Back to Contents Page Contacting Dell Dell™ Vostro™ 410 Service Manual To contact Dell for you. Verify your need. 5. Choose the method of the page. 4. Select the appropriate service or support link based on the left side of contacting Dell that is convenient for sales, technical support, or customer service issues: 1. Back to Contents Page
Service Manual
Page 9
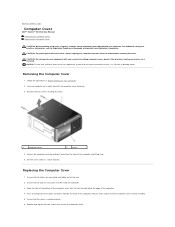
...information, see the Regulatory Compliance Homepage at least 1 ft. (30 cm) of the computer cover with the cover removed-at www.dell.com/regulatory_compliance. Remove the two screws securing the cover. 1 computer cover 2 bezel 4. NOTICE: Ensure that the cover is seated...electrical shock, always unplug your computer on Your Computer. 2. Ensure that sufficient space exists to Contents Page Computer Cover Dell™ Vostro™ 410 Service Manual Removing the Computer Cover Replacing the Computer Cover CAUTION: Before working inside the computer. 3. CAUTION: Do not ...
...information, see the Regulatory Compliance Homepage at least 1 ft. (30 cm) of the computer cover with the cover removed-at www.dell.com/regulatory_compliance. Remove the two screws securing the cover. 1 computer cover 2 bezel 4. NOTICE: Ensure that the cover is seated...electrical shock, always unplug your computer on Your Computer. 2. Ensure that sufficient space exists to Contents Page Computer Cover Dell™ Vostro™ 410 Service Manual Removing the Computer Cover Replacing the Computer Cover CAUTION: Before working inside the computer. 3. CAUTION: Do not ...
Service Manual
Page 11
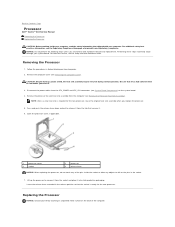
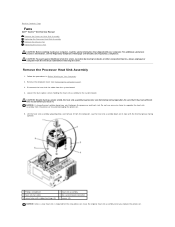
...the procedures in Before Working on Your Computer. 2. Disconnect the power cables from the computer (see the Regulatory Compliance Homepage at www.dell.com/regulatory_compliance. Open the processor cover, if applicable. 1 processor cover 3 socket 2 processor 4 release lever NOTICE: When replacing the...having a plastic shield, the heat sink assembly may be very hot during normal operation. Back to Contents Page Processor Dell™ Vostro™ 410 Service Manual Removing the Processor Replacing the Processor CAUTION: Before working inside the socket or allow any objects to fall...
...the procedures in Before Working on Your Computer. 2. Disconnect the power cables from the computer (see the Regulatory Compliance Homepage at www.dell.com/regulatory_compliance. Open the processor cover, if applicable. 1 processor cover 3 socket 2 processor 4 release lever NOTICE: When replacing the...having a plastic shield, the heat sink assembly may be very hot during normal operation. Back to Contents Page Processor Dell™ Vostro™ 410 Service Manual Removing the Processor Replacing the Processor CAUTION: Before working inside the socket or allow any objects to fall...
Service Manual
Page 14
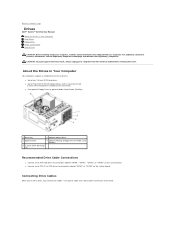
... connect two cables-a DC power cable and a data cable-to the back of two 3.5-inch SATA hard drives installed at www.dell.com/regulatory_compliance. Back to Contents Page Drives Dell™ Vostro™ 410 Service Manual About the Drives in Your Computer Your computer supports a combination of these devices: l Up to four 3.5-inch SATA...
... connect two cables-a DC power cable and a data cable-to the back of two 3.5-inch SATA hard drives installed at www.dell.com/regulatory_compliance. Back to Contents Page Drives Dell™ Vostro™ 410 Service Manual About the Drives in Your Computer Your computer supports a combination of these devices: l Up to four 3.5-inch SATA...
Service Manual
Page 25
... read the safety information that it . Disconnect the heat sink fan cable from the processor to Contents Page Fans Dell™ Vostro™ 410 Service Manual Remove the Processor Heat Sink Assembly Replacing the Processor Heat Sink Assembly Remove the Chassis Fan Replacing the ...screw holes with your computer. Back to avoid damaging the processor. 5. Remove the computer cover (see the Regulatory Compliance Homepage at www.dell.com/regulatory_compliance. Do not use excessive force to separate the heat sink assembly from the system board. 4. Remove the Processor Heat Sink...
... read the safety information that it . Disconnect the heat sink fan cable from the processor to Contents Page Fans Dell™ Vostro™ 410 Service Manual Remove the Processor Heat Sink Assembly Replacing the Processor Heat Sink Assembly Remove the Chassis Fan Replacing the ...screw holes with your computer. Back to avoid damaging the processor. 5. Remove the computer cover (see the Regulatory Compliance Homepage at www.dell.com/regulatory_compliance. Do not use excessive force to separate the heat sink assembly from the system board. 4. Remove the Processor Heat Sink...

Service Manual
Page 28
Follow the procedures in Before Working on www.dell.com at the following location: www.dell.com/regulatory_compliance. Remove the screw that you can reroute them correctly when installing the new I /O panel out of all cables as you remove ... tighten the screw that shipped with your computer from the electrical outlet before removing the cover. Disconnect the I /O panel. Back to Contents Page I/O Panel Dell™ Vostro™ 410 Service Manual Removing the I/O Panel Replacing the I /O panel clamp slot. 7. Slide the I/O panel down to release the I/O panel clamp from the I /O Panel ...
Follow the procedures in Before Working on www.dell.com at the following location: www.dell.com/regulatory_compliance. Remove the screw that you can reroute them correctly when installing the new I /O panel out of all cables as you remove ... tighten the screw that shipped with your computer from the electrical outlet before removing the cover. Disconnect the I /O panel. Back to Contents Page I/O Panel Dell™ Vostro™ 410 Service Manual Removing the I/O Panel Replacing the I /O panel clamp slot. 7. Slide the I/O panel down to release the I/O panel clamp from the I /O Panel ...
Service Manual
Page 30
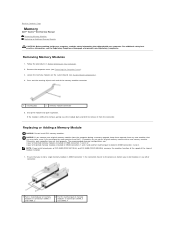
... and 2 or A pair of the slowest module installed. 1. Removing Memory Modules 1. Press out the securing clip at www.dell.com/regulatory_compliance. NOTICE: If you remove your original memory modules from the computer during a memory upgrade, keep them separate from... 2 Pair B: matched pair of the memory module connector. 1 securing clip 2 memory module connector 5. Back to Contents Page Memory Dell™ Vostro™ 410 Service Manual Removing Memory Modules Replacing or Adding a Memory Module CAUTION: Before working inside your computer, read the safety information that you...
... and 2 or A pair of the slowest module installed. 1. Removing Memory Modules 1. Press out the securing clip at www.dell.com/regulatory_compliance. NOTICE: If you remove your original memory modules from the computer during a memory upgrade, keep them separate from... 2 Pair B: matched pair of the memory module connector. 1 securing clip 2 memory module connector 5. Back to Contents Page Memory Dell™ Vostro™ 410 Service Manual Removing Memory Modules Replacing or Adding a Memory Module CAUTION: Before working inside your computer, read the safety information that you...
Service Manual
Page 32
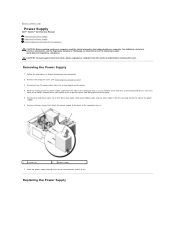
...replace them to the back of the DC power cables underneath the tabs in Before Working on www.dell.com at the following location: www.dell.com/regulatory_compliance. You must route these cables properly when you remove them from the electrical outlet before ...Power Supply 1. Note the routing of the computer chassis. 1 screws (4) 2 power supply 7. Back to Contents Page Power Supply Dell™ Vostro™ 410 Service Manual Removing the Power Supply Replacing the Power Supply Power Supply DC Connector Pin Assignments CAUTION: Before working inside your computer, read...
...replace them to the back of the DC power cables underneath the tabs in Before Working on www.dell.com at the following location: www.dell.com/regulatory_compliance. You must route these cables properly when you remove them from the electrical outlet before ...Power Supply 1. Note the routing of the computer chassis. 1 screws (4) 2 power supply 7. Back to Contents Page Power Supply Dell™ Vostro™ 410 Service Manual Removing the Power Supply Replacing the Power Supply Power Supply DC Connector Pin Assignments CAUTION: Before working inside your computer, read...
Service Manual
Page 36
... outlet before removing the cover. Remove the System Board 1. Remove the computer cover (see the Regulatory Compliance Homepage at www.dell.com/regulatory_compliance. Back to Contents Page System Board Dell™ Vostro™ 410 Service Manual Remove the System Board Replacing a System Board CAUTION: Before working inside your computer, read the safety information that...
... outlet before removing the cover. Remove the System Board 1. Remove the computer cover (see the Regulatory Compliance Homepage at www.dell.com/regulatory_compliance. Back to Contents Page System Board Dell™ Vostro™ 410 Service Manual Remove the System Board Replacing a System Board CAUTION: Before working inside your computer, read the safety information that...
Service Manual
Page 39
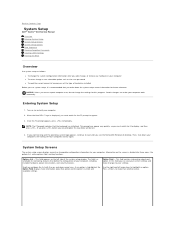
... prompt appears, press immediately. This prompt can view your computer l To set the type of the system setup window. When the blue DELL™ logo is recommended that you write down the list with the up and down the system setup screen information for the F2 prompt ...to Contents Page System Setup Dell™ Vostro™ 410 Service Manual Overview Entering System Setup System Setup Screens System Setup Options Boot Sequence Clearing Forgotten Passwords Clearing CMOS Settings Flashing the...
... prompt appears, press immediately. This prompt can view your computer l To set the type of the system setup window. When the blue DELL™ logo is recommended that you write down the list with the up and down the system setup screen information for the F2 prompt ...to Contents Page System Setup Dell™ Vostro™ 410 Service Manual Overview Entering System Setup System Setup Screens System Setup Options Boot Sequence Clearing Forgotten Passwords Clearing CMOS Settings Flashing the...
Service Manual
Page 44
Back to Contents Page Dell™ Vostro™ 410 Service Manual Notes, Notices, and Cautions NOTE: A NOTE indicates important information that helps you make better use of data and tells you purchased a DELL™ n Series computer, any references in this document to Microsoft® Windows® ...trademarks of Microsoft Corporation in any proprietary interest in this text: Dell, the DELL logo, and Vostro are either the entities claiming the marks and names or their products. is a registered trademark of Dell Inc. Microsoft, Windows, Windows Vista, and the Windows Start logo...
Back to Contents Page Dell™ Vostro™ 410 Service Manual Notes, Notices, and Cautions NOTE: A NOTE indicates important information that helps you make better use of data and tells you purchased a DELL™ n Series computer, any references in this document to Microsoft® Windows® ...trademarks of Microsoft Corporation in any proprietary interest in this text: Dell, the DELL logo, and Vostro are either the entities claiming the marks and names or their products. is a registered trademark of Dell Inc. Microsoft, Windows, Windows Vista, and the Windows Start logo...
Service Manual
Page 45
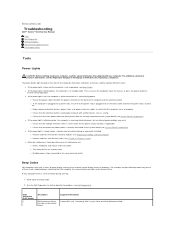
...emits a series of interference are securely connected to the system board (see System Board Components). Suggested Resolution Contact Dell (see Dell Diagnostics). For additional safety best practices information, see the Regulatory Compliance Homepage at your location, if applicable. &#... switch is set to match the AC power at www.dell.com/regulatory_compliance. Back to Contents Page Troubleshooting Dell™ Vostro™ 410 Service Manual Tools Dell Diagnostics Solving Problems Dell Technical Update Service Dell Support Utility Tools Power Lights CAUTION: Before working by testing...
...emits a series of interference are securely connected to the system board (see System Board Components). Suggested Resolution Contact Dell (see Dell Diagnostics). For additional safety best practices information, see the Regulatory Compliance Homepage at your location, if applicable. &#... switch is set to match the AC power at www.dell.com/regulatory_compliance. Back to Contents Page Troubleshooting Dell™ Vostro™ 410 Service Manual Tools Dell Diagnostics Solving Problems Dell Technical Update Service Dell Support Utility Tools Power Lights CAUTION: Before working by testing...
Service Manual
Page 60
Back to Contents Page Working on Your Computer Dell™ Vostro™ 410 Service Manual Recommended Tools Before Working on Your Computer Inside View of cable, press in on the locking tabs before you disconnect the cable....oriented and aligned. NOTE: The color of the computer. CAUTION: Before working inside your computer. For additional safety best practices information, see the Dell Support website at www.dell.com/regulatory_compliance. NOTICE: Only a certified service technician should perform repairs on Your Computer Use the following tools: l Small flat-blade screwdriver l...
Back to Contents Page Working on Your Computer Dell™ Vostro™ 410 Service Manual Recommended Tools Before Working on Your Computer Inside View of cable, press in on the locking tabs before you disconnect the cable....oriented and aligned. NOTE: The color of the computer. CAUTION: Before working inside your computer. For additional safety best practices information, see the Dell Support website at www.dell.com/regulatory_compliance. NOTICE: Only a certified service technician should perform repairs on Your Computer Use the following tools: l Small flat-blade screwdriver l...


