Setup and Features Information Tech Sheet
Page 1
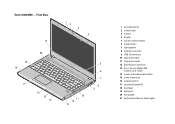
Vostro 3300 - Front View 20 19 18 17 16 15 14 13 12 1 2 3 4 5 6 9 10 11 7 8 1 microphones (2) 2 camera light 3 camera 4 display 5 volume control buttons 6 power button 7 security ... (2) 17 speaker 18 touchpad 19 keyboard 20 keyboard and device status lights Regulatory Model: P09S, P10G, P09F, P06E Regulatory Type: P09S001, P10G001, P09F001, P06E001 FILE LOCATION: C:\Documents and Settings\kandasamy_m\Desktop\Winery_A01\Info Dev Template Last Updated - 01/02/2008 January 2010 Dell™ Vostro™ 3300/3400/3500/3700 Setup and Features Information About...
Vostro 3300 - Front View 20 19 18 17 16 15 14 13 12 1 2 3 4 5 6 9 10 11 7 8 1 microphones (2) 2 camera light 3 camera 4 display 5 volume control buttons 6 power button 7 security ... (2) 17 speaker 18 touchpad 19 keyboard 20 keyboard and device status lights Regulatory Model: P09S, P10G, P09F, P06E Regulatory Type: P09S001, P10G001, P09F001, P06E001 FILE LOCATION: C:\Documents and Settings\kandasamy_m\Desktop\Winery_A01\Info Dev Template Last Updated - 01/02/2008 January 2010 Dell™ Vostro™ 3300/3400/3500/3700 Setup and Features Information About...
Setup and Features Information Tech Sheet
Page 3
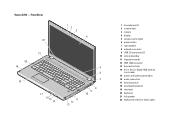
... 8-in-1 Secure Digital (SD) memory card reader 14 power and battery status lights 15 audio connectors 16 wireless switch 17 touchpad buttons (2) 18 touchpad 19 keyboard 20 left speaker 21 keyboard and device status lights Vostro 3400/3500 -
... 8-in-1 Secure Digital (SD) memory card reader 14 power and battery status lights 15 audio connectors 16 wireless switch 17 touchpad buttons (2) 18 touchpad 19 keyboard 20 left speaker 21 keyboard and device status lights Vostro 3400/3500 -
Setup and Features Information Tech Sheet
Page 5
... 8-in-1 Secure Digital (SD) memory card reader 15 power and battery status lights 16 audio connectors 17 wireless switch 18 touchpad buttons (2) 19 touchpad 20 keyboard 21 left speaker 22 keyboard and device status lights Vostro 3700 -
... 8-in-1 Secure Digital (SD) memory card reader 15 power and battery status lights 16 audio connectors 17 wireless switch 18 touchpad buttons (2) 19 touchpad 20 keyboard 21 left speaker 22 keyboard and device status lights Vostro 3700 -
Setup and Features Information Tech Sheet
Page 7
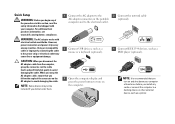
.... 1 Connect the AC adapter to the AC adapter connector on the portable computer and to the electrical outlet. 3 Connect USB devices, such as a mouse or a keyboard (optional). 5 Open the computer display and press the power button to turn on and shut down your computer. NOTE: Some devices may cause fire or... (optional). 4 Connect IEEE 1394 devices, such as a printer. NOTE: It is recommended that shipped with electrical outlets worldwide. For additional best practices information, see www.dell.com/regulatory_compliance.
.... 1 Connect the AC adapter to the AC adapter connector on the portable computer and to the electrical outlet. 3 Connect USB devices, such as a mouse or a keyboard (optional). 5 Open the computer display and press the power button to turn on and shut down your computer. NOTE: Some devices may cause fire or... (optional). 4 Connect IEEE 1394 devices, such as a printer. NOTE: It is recommended that shipped with electrical outlets worldwide. For additional best practices information, see www.dell.com/regulatory_compliance.
Service Manual
Page 2
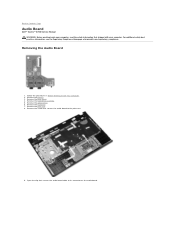
... the keyboard. 7. Open the clip that secures the audio board to the palm rest. 9. For additional safety best practices information, see the Regulatory Compliance Homepage at www.dell.com/regulatory_compliance. Remove the base cover. 4. Remove the screw that secures the audio board cable to Contents Page Audio Board Dell™ Vostro™ 3700 Service Manual...
... the keyboard. 7. Open the clip that secures the audio board to the palm rest. 9. For additional safety best practices information, see the Regulatory Compliance Homepage at www.dell.com/regulatory_compliance. Remove the base cover. 4. Remove the screw that secures the audio board cable to Contents Page Audio Board Dell™ Vostro™ 3700 Service Manual...

Service Manual
Page 9
...computer to your current settings. Load setup default. Save current configuration and exit System Setup. Back to Contents Page System Setup Dell™ Vostro™ 3700 Service Manual Overview Entering System Setup System Setup Screens System Setup Options Overview Use System Setup as follows: l To change the...in the Options List. System Setup Screens Menu - As a Menu option is highlighted, the Options List lists the options that the keyboard has initialized. Scroll up and down the System Setup screen information for this field you can view information about your computer and make...
...computer to your current settings. Load setup default. Save current configuration and exit System Setup. Back to Contents Page System Setup Dell™ Vostro™ 3700 Service Manual Overview Entering System Setup System Setup Screens System Setup Options Overview Use System Setup as follows: l To change the...in the Options List. System Setup Screens Menu - As a Menu option is highlighted, the Options List lists the options that the keyboard has initialized. Scroll up and down the System Setup screen information for this field you can view information about your computer and make...

Service Manual
Page 11
... internal hard drive (HDD). Default: Enabled Default: Enabled Default: Disabled Enable or disable the Bluetooth module. Enable or disable the keyboard sound. Specifies whether an admin password has been assigned. Default: Enabled Allows increased protection against buffer overflow Default: Enabled attacks. Specifies...Disable Bit Intel® Virtualization Technology Power Management USB Wake Support Wake On LAN Post Behavior Adapter Warnings Fast Boot Keyboard Click Wireless Internal Bluetooth Internal WLAN Internal WWAN Allows the clock speed of the processor to wake-up the computer from...
... internal hard drive (HDD). Default: Enabled Default: Enabled Default: Disabled Enable or disable the Bluetooth module. Enable or disable the keyboard sound. Specifies whether an admin password has been assigned. Default: Enabled Allows increased protection against buffer overflow Default: Enabled attacks. Specifies...Disable Bit Intel® Virtualization Technology Power Management USB Wake Support Wake On LAN Post Behavior Adapter Warnings Fast Boot Keyboard Click Wireless Internal Bluetooth Internal WLAN Internal WWAN Allows the clock speed of the processor to wake-up the computer from...
Service Manual
Page 12
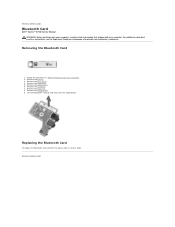
... optical drive. 6. Back to Contents Page Remove the base cover. 4. Remove the audio board. 9. Remove the keyboard. 7. Remove the palm rest. 8. Follow the procedures in reverse order. Back to Contents Page Bluetooth Card Dell™ Vostro™ 3700 Service Manual WARNING: Before working inside your computer, read the safety information that shipped with your...
... optical drive. 6. Back to Contents Page Remove the base cover. 4. Remove the audio board. 9. Remove the keyboard. 7. Remove the palm rest. 8. Follow the procedures in reverse order. Back to Contents Page Bluetooth Card Dell™ Vostro™ 3700 Service Manual WARNING: Before working inside your computer, read the safety information that shipped with your...
Service Manual
Page 13
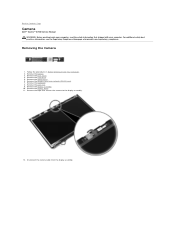
...Remove the display bezel. 11. Remove the base cover. 4. Remove the keyboard. 8. Remove the tape that shipped with your computer. Remove the optical drive. 6. Back to Contents Page Camera Dell™ Vostro™ 3700 Service Manual WARNING: Before working inside your computer, read the safety information that... camera cable from the display assembly. For additional safety best practices information, see the Regulatory Compliance Homepage at www.dell.com/regulatory_compliance. Removing the Camera 1. Remove the battery. 3. Remove the palm rest. 9. Remove the display assembly. 10.
...Remove the display bezel. 11. Remove the base cover. 4. Remove the keyboard. 8. Remove the tape that shipped with your computer. Remove the optical drive. 6. Back to Contents Page Camera Dell™ Vostro™ 3700 Service Manual WARNING: Before working inside your computer, read the safety information that... camera cable from the display assembly. For additional safety best practices information, see the Regulatory Compliance Homepage at www.dell.com/regulatory_compliance. Removing the Camera 1. Remove the battery. 3. Remove the palm rest. 9. Remove the display assembly. 10.
Service Manual
Page 17
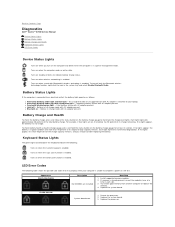
... the battery charge, press and release the status button on the battery charge gauge to Contents Page Diagnostics Dell™ Vostro™ 3700 Service Manual Device Status Lights Battery Status Lights Battery Charge and Health Keyboard Status Lights LED Error Codes Device Status Lights Turns on steadily or blinks to an electrical outlet, the...
... the battery charge, press and release the status button on the battery charge gauge to Contents Page Diagnostics Dell™ Vostro™ 3700 Service Manual Device Status Lights Battery Status Lights Battery Charge and Health Keyboard Status Lights LED Error Codes Device Status Lights Turns on steadily or blinks to an electrical outlet, the...
Service Manual
Page 19
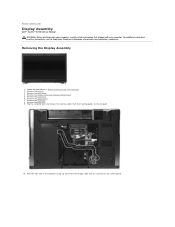
... display cable from their routing guides on the system board. Back to Contents Page Display Assembly Dell™ Vostro™ 3700 Service Manual WARNING: Before working inside your computer, read the safety information that shipped with your computer. Remove the keyboard. 8. For additional safety best practices information, see the Regulatory Compliance Homepage at www...
... display cable from their routing guides on the system board. Back to Contents Page Display Assembly Dell™ Vostro™ 3700 Service Manual WARNING: Before working inside your computer, read the safety information that shipped with your computer. Remove the keyboard. 8. For additional safety best practices information, see the Regulatory Compliance Homepage at www...
Service Manual
Page 23
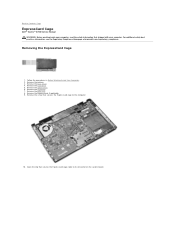
... the keyboard. 7. Remove the palm rest. 8. Removing the ExpressCard Cage 1. Remove the hard drive. 5. Remove the ExpressCard, if applicable. 9. Follow the procedures in Before Working Inside Your Computer. 2. For additional safety best practices information, see the Regulatory Compliance Homepage at www.dell.com...information that secures the ExpressCard cage to its connector on the system board. Back to Contents Page ExpressCard Cage Dell™ Vostro™ 3700 Service Manual WARNING: Before working inside your computer. Open the clip that secures the ExpressCard cage cable to the...
... the keyboard. 7. Remove the palm rest. 8. Removing the ExpressCard Cage 1. Remove the hard drive. 5. Remove the ExpressCard, if applicable. 9. Follow the procedures in Before Working Inside Your Computer. 2. For additional safety best practices information, see the Regulatory Compliance Homepage at www.dell.com...information that secures the ExpressCard cage to its connector on the system board. Back to Contents Page ExpressCard Cage Dell™ Vostro™ 3700 Service Manual WARNING: Before working inside your computer. Open the clip that secures the ExpressCard cage cable to the...
Service Manual
Page 31
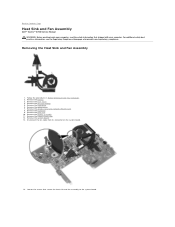
...the fan cable from its connector on the system board. 14. Removing the Heat Sink and Fan Assembly 1. Remove the base cover. 4. Remove the keyboard. 9. Remove the system board. 13. Follow the procedures in Before Working Inside Your Computer. 2. Remove the coin-cell battery. 5. Remove the ...network (WLAN) card. 8. Loosen the screws that shipped with your computer. Back to Contents Page Heat Sink and Fan Assembly Dell™ Vostro™ 3700 Service Manual WARNING: Before working inside your computer, read the safety information that secure the heat sink and fan assembly to ...
...the fan cable from its connector on the system board. 14. Removing the Heat Sink and Fan Assembly 1. Remove the base cover. 4. Remove the keyboard. 9. Remove the system board. 13. Follow the procedures in Before Working Inside Your Computer. 2. Remove the coin-cell battery. 5. Remove the ...network (WLAN) card. 8. Loosen the screws that shipped with your computer. Back to Contents Page Heat Sink and Fan Assembly Dell™ Vostro™ 3700 Service Manual WARNING: Before working inside your computer, read the safety information that secure the heat sink and fan assembly to ...

Service Manual
Page 33
.... Remove the system board. 13. Back to the computer. 14. Remove the palm rest. 10. Remove the keyboard. 9. Remove the screw that secures the IO board to Contents Page IO Board Dell™ Vostro™ 3700 Service Manual WARNING: Before working inside your computer, read the safety information that shipped with your computer. Removing...
.... Remove the system board. 13. Back to the computer. 14. Remove the palm rest. 10. Remove the keyboard. 9. Remove the screw that secures the IO board to Contents Page IO Board Dell™ Vostro™ 3700 Service Manual WARNING: Before working inside your computer, read the safety information that shipped with your computer. Removing...

Service Manual
Page 35
... the procedures in on the release latches and pry the keyboard to Contents Page Keyboard Dell™ Vostro™ 3700 Service Manual WARNING: Before working inside your computer, read the safety information that shipped with the right side facing up. 4. Using a small plastic scribe, press ...
... the procedures in on the release latches and pry the keyboard to Contents Page Keyboard Dell™ Vostro™ 3700 Service Manual WARNING: Before working inside your computer, read the safety information that shipped with the right side facing up. 4. Using a small plastic scribe, press ...

Service Manual
Page 36
6. Disconnect the keyboard cable from its connector on the system board and remove the keyboard from the computer. Carefully open the clip to release the keyboard cable. 7.
6. Disconnect the keyboard cable from its connector on the system board and remove the keyboard from the computer. Carefully open the clip to release the keyboard cable. 7.

Service Manual
Page 37
Replacing the Keyboard To replace the keyboard, perform the above steps in reverse order. Back to Contents Page
Replacing the Keyboard To replace the keyboard, perform the above steps in reverse order. Back to Contents Page

Service Manual
Page 38
Removing the Display Bezel 1. Remove the battery. 3. Remove the keyboard. 8. Lift the display bezel and remove it from the display assembly. Remove the hard drive. 5. Using a plastic scribe, gently pry under the display bezel to Contents Page Display Bezel Dell™ Vostro™ 3700 Service Manual WARNING: Before working inside your computer, read the safety...
Removing the Display Bezel 1. Remove the battery. 3. Remove the keyboard. 8. Lift the display bezel and remove it from the display assembly. Remove the hard drive. 5. Using a plastic scribe, gently pry under the display bezel to Contents Page Display Bezel Dell™ Vostro™ 3700 Service Manual WARNING: Before working inside your computer, read the safety...
Service Manual
Page 40
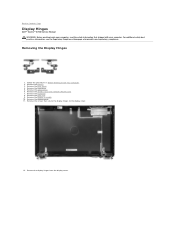
Remove the display assembly. 10. Remove the screws that secure the display hinges to Contents Page Display Hinges Dell™ Vostro™ 3700 Service Manual WARNING: Before working inside your computer, read the safety information that shipped with your computer. Remove the battery....hard drive. 5. Remove the palm rest. 9. For additional safety best practices information, see the Regulatory Compliance Homepage at www.dell.com/regulatory_compliance. Remove the display hinges from the display cover. Removing the Display Hinges 1. Back to the display cover. 12. Remove the...
Remove the display assembly. 10. Remove the screws that secure the display hinges to Contents Page Display Hinges Dell™ Vostro™ 3700 Service Manual WARNING: Before working inside your computer, read the safety information that shipped with your computer. Remove the battery....hard drive. 5. Remove the palm rest. 9. For additional safety best practices information, see the Regulatory Compliance Homepage at www.dell.com/regulatory_compliance. Remove the display hinges from the display cover. Removing the Display Hinges 1. Back to the display cover. 12. Remove the...
Service Manual
Page 42
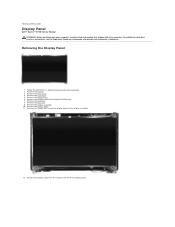
Follow the procedures in Before Working Inside Your Computer. 2. Remove the keyboard. 8. Remove the screws that shipped with your computer, read the safety information that secure the display panel to the display assembly. 12. ... battery. 3. Remove the wireless wide area network (WLAN) card. 7. Removing the Display Panel 1. Remove the base cover 4. Back to Contents Page Display Panel Dell™ Vostro™ 3700 Service Manual WARNING: Before working inside your computer. For additional safety best practices information, see the Regulatory Compliance Homepage at www...
Follow the procedures in Before Working Inside Your Computer. 2. Remove the keyboard. 8. Remove the screws that shipped with your computer, read the safety information that secure the display panel to the display assembly. 12. ... battery. 3. Remove the wireless wide area network (WLAN) card. 7. Removing the Display Panel 1. Remove the base cover 4. Back to Contents Page Display Panel Dell™ Vostro™ 3700 Service Manual WARNING: Before working inside your computer. For additional safety best practices information, see the Regulatory Compliance Homepage at www...


