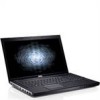
Service Manual
Page 2
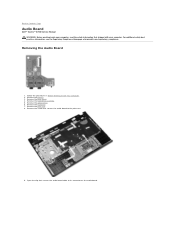
.... 3. Remove the optical drive. 6. Remove the palm rest. 8. Remove the screw that secures the audio board cable to its connector on the audio board. Open the clip that secures the audio board to Contents Page Audio Board Dell™ Vostro™ 3700 Service Manual WARNING: Before ... base cover. 4. Remove the keyboard. 7. For additional safety best practices information, see the Regulatory Compliance Homepage at www.dell.com/regulatory_compliance. Follow the procedures in Before Working Inside Your Computer. 2. Back to the palm rest. 9. Remove the hard drive assembly. 5.
.... 3. Remove the optical drive. 6. Remove the palm rest. 8. Remove the screw that secures the audio board cable to its connector on the audio board. Open the clip that secures the audio board to Contents Page Audio Board Dell™ Vostro™ 3700 Service Manual WARNING: Before ... base cover. 4. Remove the keyboard. 7. For additional safety best practices information, see the Regulatory Compliance Homepage at www.dell.com/regulatory_compliance. Follow the procedures in Before Working Inside Your Computer. 2. Back to the palm rest. 9. Remove the hard drive assembly. 5.

Service Manual
Page 9
Back to Contents Page System Setup Dell™ Vostro™ 3700 Service Manual Overview Entering System Setup System Setup Screens System ...the System Setup screen information for the F2 prompt to work incorrectly. Turn on the right side of hard drive installed Before you use System Setup, it is highlighted, the Options List lists the options that you ...the type of Options List and contains information about each option listed in the System Setup. When the blue DELL™ logo is highlighted, the Options Field displays the option's current and available settings. As an option...
Back to Contents Page System Setup Dell™ Vostro™ 3700 Service Manual Overview Entering System Setup System Setup Screens System ...the System Setup screen information for the F2 prompt to work incorrectly. Turn on the right side of hard drive installed Before you use System Setup, it is highlighted, the Options List lists the options that you ...the type of Options List and contains information about each option listed in the System Setup. When the blue DELL™ logo is highlighted, the Options Field displays the option's current and available settings. As an option...

Service Manual
Page 10
...on- Enable or disable the module bay. The table below defines the function of the processor. Displays the minimum clock speed of the hard drive. Enable or disable the ExpressCard slot. Displays the BIOS revision. Displays the processor L3 cache size. Displays the model number of the... processor. Displays the processor L2 cache size. Enable or disable the fingerprint reader. Main System Dell Bios Version Name System Date System Time Processor Type Processor Cores Processor ID Processor Speed Processor Minimum Clock Speed Processor Maximum Clock Speed...
...on- Enable or disable the module bay. The table below defines the function of the processor. Displays the minimum clock speed of the hard drive. Enable or disable the ExpressCard slot. Displays the BIOS revision. Displays the processor L3 cache size. Displays the model number of the... processor. Displays the processor L2 cache size. Enable or disable the fingerprint reader. Main System Dell Bios Version Name System Date System Time Processor Type Processor Cores Processor ID Processor Speed Processor Minimum Clock Speed Processor Maximum Clock Speed...

Service Manual
Page 11
... are turning the computer on from standby. However, you must enter the passwords if you to set a password on the computer's internal hard drive (HDD). Enable or disable the Computrace feature on your computer boots. Boot The Boot tab allows you to manage the security features of ...the computer. Enable or disable the password change the boot sequence. Specifies whether an admin password has been assigned. The hard drive password is enabled even when the hard drive is installed on another computer. Back to wake-up the computer from the shutdown state. Allows a platform to run ...
... are turning the computer on from standby. However, you must enter the passwords if you to set a password on the computer's internal hard drive (HDD). Enable or disable the Computrace feature on your computer boots. Boot The Boot tab allows you to manage the security features of ...the computer. Enable or disable the password change the boot sequence. Specifies whether an admin password has been assigned. The hard drive password is enabled even when the hard drive is installed on another computer. Back to wake-up the computer from the shutdown state. Allows a platform to run ...
Service Manual
Page 12
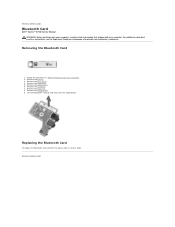
... drive. 6. Remove the audio board. 9. Lift the Bluetooth® card up and away from the audio board. Replacing the Bluetooth Card To replace the Bluetooth card, perform the above steps in Before Working Inside Your Computer. 2. Back to Contents Page Bluetooth Card Dell™ Vostro™ 3700 Service...reverse order. Remove the palm rest. 8. For additional safety best practices information, see the Regulatory Compliance Homepage at www.dell.com/regulatory_compliance. Remove the base cover. 4. Remove the hard drive. 5. Removing the Bluetooth Card 1. Remove the keyboard. 7.
... drive. 6. Remove the audio board. 9. Lift the Bluetooth® card up and away from the audio board. Replacing the Bluetooth Card To replace the Bluetooth card, perform the above steps in Before Working Inside Your Computer. 2. Back to Contents Page Bluetooth Card Dell™ Vostro™ 3700 Service...reverse order. Remove the palm rest. 8. For additional safety best practices information, see the Regulatory Compliance Homepage at www.dell.com/regulatory_compliance. Remove the base cover. 4. Remove the hard drive. 5. Removing the Bluetooth Card 1. Remove the keyboard. 7.
Service Manual
Page 13
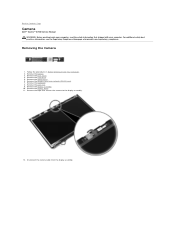
...in Before Working Inside Your Computer. 2. For additional safety best practices information, see the Regulatory Compliance Homepage at www.dell.com/regulatory_compliance. Remove the display bezel. 11. Removing the Camera 1. Remove the wireless local area network (WLAN) ...the camera to the display assembly. 12. Back to Contents Page Camera Dell™ Vostro™ 3700 Service Manual WARNING: Before working inside your computer. Remove the display assembly. 10. Remove the hard drive. 5. Remove the optical drive. 6. Remove the base cover. 4. Remove the keyboard. 8. Remove the...
...in Before Working Inside Your Computer. 2. For additional safety best practices information, see the Regulatory Compliance Homepage at www.dell.com/regulatory_compliance. Remove the display bezel. 11. Removing the Camera 1. Remove the wireless local area network (WLAN) ...the camera to the display assembly. 12. Back to Contents Page Camera Dell™ Vostro™ 3700 Service Manual WARNING: Before working inside your computer. Remove the display assembly. 10. Remove the hard drive. 5. Remove the optical drive. 6. Remove the base cover. 4. Remove the keyboard. 8. Remove the...

Service Manual
Page 18
...other module in the same slot and test. Memory is causing the failure. 4. Reseat the modem. 2. Replace the system board. Reseat the hard drive and optical drive. 2. Video card error 1. Replace the system board. Replace the video card/system board. Try the other slot with both modules. 3. Try... the other slot with just the hard drive and just the optical drive. 3. Test the other module in the same slot and test. Replace the modem. 3. Reseat the device. 2. Replace the device...
...other module in the same slot and test. Memory is causing the failure. 4. Reseat the modem. 2. Replace the system board. Reseat the hard drive and optical drive. 2. Video card error 1. Replace the system board. Replace the video card/system board. Try the other slot with both modules. 3. Try... the other slot with just the hard drive and just the optical drive. 3. Test the other module in the same slot and test. Replace the modem. 3. Reseat the device. 2. Replace the device...
Service Manual
Page 19
Remove the hard drive. 6. Remove the palm rest. 9. Follow the procedures in Before Working Inside Your Computer. 2. With the right side of the computer facing up, disconnect the display...; Vostro™ 3700 Service Manual WARNING: Before working inside your computer, read the safety information that shipped with your computer. Remove the battery. 3. Remove the optical drive. 7. Remove the keyboard. 8. Remove the wireless local area network (WLAN) card. 5. For additional safety best practices information, see the Regulatory Compliance Homepage at www.dell.com/...
Remove the hard drive. 6. Remove the palm rest. 9. Follow the procedures in Before Working Inside Your Computer. 2. With the right side of the computer facing up, disconnect the display...; Vostro™ 3700 Service Manual WARNING: Before working inside your computer, read the safety information that shipped with your computer. Remove the battery. 3. Remove the optical drive. 7. Remove the keyboard. 8. Remove the wireless local area network (WLAN) card. 5. For additional safety best practices information, see the Regulatory Compliance Homepage at www.dell.com/...
Service Manual
Page 23
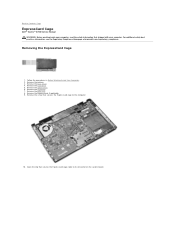
... the hard drive. 5. Remove the ExpressCard, if applicable. 9. Follow the procedures in Before Working Inside Your Computer. 2. For additional safety best practices information, see the Regulatory Compliance Homepage at www.dell.com/regulatory_compliance. Remove the battery. 3. Remove the optical drive. 6.... Open the clip that shipped with your computer. Remove the keyboard. 7. Back to Contents Page ExpressCard Cage Dell™ Vostro™ 3700 Service Manual WARNING: Before...
... the hard drive. 5. Remove the ExpressCard, if applicable. 9. Follow the procedures in Before Working Inside Your Computer. 2. For additional safety best practices information, see the Regulatory Compliance Homepage at www.dell.com/regulatory_compliance. Remove the battery. 3. Remove the optical drive. 6.... Open the clip that shipped with your computer. Remove the keyboard. 7. Back to Contents Page ExpressCard Cage Dell™ Vostro™ 3700 Service Manual WARNING: Before...

Service Manual
Page 28
... Working Inside Your Computer. 2. Remove the screw that shipped with your computer. For additional safety best practices information, see the Regulatory Compliance Homepage at www.dell.com/regulatory_compliance. Back to Contents Page Hard Drive Dell™ Vostro™ 3700 Service Manual WARNING: Before working inside your computer, read the safety information that secures the...
... Working Inside Your Computer. 2. Remove the screw that shipped with your computer. For additional safety best practices information, see the Regulatory Compliance Homepage at www.dell.com/regulatory_compliance. Back to Contents Page Hard Drive Dell™ Vostro™ 3700 Service Manual WARNING: Before working inside your computer, read the safety information that secures the...

Service Manual
Page 29
Remove the screws that secure the hard-drive bracket to the hard drive. 7. 6. Lift up the hard-drive bracket and remove it from the hard-drive assembly.
Remove the screws that secure the hard-drive bracket to the hard drive. 7. 6. Lift up the hard-drive bracket and remove it from the hard-drive assembly.

Service Manual
Page 30
Back to Contents Page Replacing the Hard Drive To replace the hard drive, perform the above steps in reverse order.
Back to Contents Page Replacing the Hard Drive To replace the hard drive, perform the above steps in reverse order.
Service Manual
Page 31
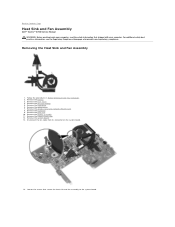
... Contents Page Heat Sink and Fan Assembly Dell™ Vostro™ 3700 Service Manual WARNING: Before working inside your computer. Remove the battery. 3. Follow the procedures in Before Working Inside Your Computer. 2. Disconnect the fan cable from its connector on the system board. 14. Remove the hard drive. 6. Remove the keyboard. 9. Remove the ExpressCard cage...
... Contents Page Heat Sink and Fan Assembly Dell™ Vostro™ 3700 Service Manual WARNING: Before working inside your computer. Remove the battery. 3. Follow the procedures in Before Working Inside Your Computer. 2. Disconnect the fan cable from its connector on the system board. 14. Remove the hard drive. 6. Remove the keyboard. 9. Remove the ExpressCard cage...

Service Manual
Page 33
...hard drive. 6. Remove the system board. 13. Remove the optical drive. 7. Remove the screw that shipped with your computer. Remove the display assembly. 11. Remove the ExpressCard cage. 12. Remove the coin-cell battery. 5. Remove the keyboard. 9. For additional safety best practices information, see the Regulatory Compliance Homepage at www.dell... Working Inside Your Computer. 2. Remove the battery. 3. Back to Contents Page IO Board Dell™ Vostro™ 3700 Service Manual WARNING: Before working inside your computer, read the safety information that secures the ...
...hard drive. 6. Remove the system board. 13. Remove the optical drive. 7. Remove the screw that shipped with your computer. Remove the display assembly. 11. Remove the ExpressCard cage. 12. Remove the coin-cell battery. 5. Remove the keyboard. 9. For additional safety best practices information, see the Regulatory Compliance Homepage at www.dell... Working Inside Your Computer. 2. Remove the battery. 3. Back to Contents Page IO Board Dell™ Vostro™ 3700 Service Manual WARNING: Before working inside your computer, read the safety information that secures the ...

Service Manual
Page 38
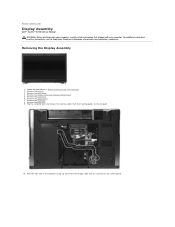
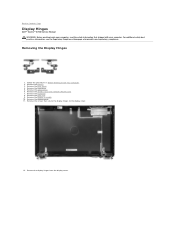
Back to release it from the display assembly. 11. Remove the hard drive. 5. Using a plastic scribe, gently pry under the display bezel to Contents Page Display Bezel Dell™ Vostro™ 3700 Service Manual WARNING: Before working inside your computer, read the safety information that shipped with your computer. Remove the wireless local area network (WLAN...
Back to release it from the display assembly. 11. Remove the hard drive. 5. Using a plastic scribe, gently pry under the display bezel to Contents Page Display Bezel Dell™ Vostro™ 3700 Service Manual WARNING: Before working inside your computer, read the safety information that shipped with your computer. Remove the wireless local area network (WLAN...
Service Manual
Page 40
... base cover. 4. Remove the screws that secure the display hinges to Contents Page Display Hinges Dell™ Vostro™ 3700 Service Manual WARNING: Before working inside your computer, read the safety information that shipped with your computer. Remove the hard drive. 5. Remove the battery. 3. For additional safety best practices information, see the Regulatory Compliance Homepage...
... base cover. 4. Remove the screws that secure the display hinges to Contents Page Display Hinges Dell™ Vostro™ 3700 Service Manual WARNING: Before working inside your computer, read the safety information that shipped with your computer. Remove the hard drive. 5. Remove the battery. 3. For additional safety best practices information, see the Regulatory Compliance Homepage...
Service Manual
Page 42
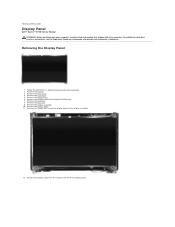
... additional safety best practices information, see the Regulatory Compliance Homepage at www.dell.com/regulatory_compliance. Remove the battery. 3. Remove the hard drive. 5. Remove the display assembly. 10. Back to Contents Page Display Panel Dell™ Vostro™ 3700 Service Manual WARNING: Before working inside your computer. Remove the base cover 4. Remove the keyboard. 8. Release the Display...
... additional safety best practices information, see the Regulatory Compliance Homepage at www.dell.com/regulatory_compliance. Remove the battery. 3. Remove the hard drive. 5. Remove the display assembly. 10. Back to Contents Page Display Panel Dell™ Vostro™ 3700 Service Manual WARNING: Before working inside your computer. Remove the base cover 4. Remove the keyboard. 8. Release the Display...

Service Manual
Page 51
.... 3. Remove the base cover. 4. Remove the keyboard. 7. Remove the hard drive. 5. For additional safety best practices information, see the Regulatory Compliance Homepage at the bottom of the computer. Remove the screws that secure the palm rest to Contents Page Palm Rest Dell™ Vostro™ 3700 Service Manual WARNING: Before working inside your computer, read...
.... 3. Remove the base cover. 4. Remove the keyboard. 7. Remove the hard drive. 5. For additional safety best practices information, see the Regulatory Compliance Homepage at the bottom of the computer. Remove the screws that secure the palm rest to Contents Page Palm Rest Dell™ Vostro™ 3700 Service Manual WARNING: Before working inside your computer, read...
Service Manual
Page 59
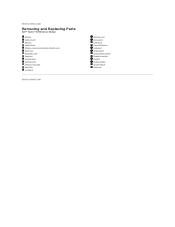
Back to Contents Page Removing and Replacing Parts Dell™ Vostro™ 3700 Service Manual Battery ExpressCard Memory Optical Drive Wireless Local Area Network (WLAN) Card Palm Rest Bluetooth Card Speakers Display Bezel Display Panel ExpressCard Cage Heat Sink I/O Board Back to Contents Page Memory Card Base Cover Hard Drive Coin-Cell Battery Keyboard Audio Board Power-Button Board Display Assembly Camera Display Hinges System Board Processor
Back to Contents Page Removing and Replacing Parts Dell™ Vostro™ 3700 Service Manual Battery ExpressCard Memory Optical Drive Wireless Local Area Network (WLAN) Card Palm Rest Bluetooth Card Speakers Display Bezel Display Panel ExpressCard Cage Heat Sink I/O Board Back to Contents Page Memory Card Base Cover Hard Drive Coin-Cell Battery Keyboard Audio Board Power-Button Board Display Assembly Camera Display Hinges System Board Processor

Service Manual
Page 60
... sink and fan assembly. 14. Using a flat-blade screwdriver, rotate the cam screw counterclockwise to Contents Page Processor Dell™ Vostro™ 3700 Service Manual WARNING: Before working inside your computer, read the safety information that shipped with your computer. Remove the.... 2. Remove the optical drive. 7. Remove the display assembly. 11. Remove the keyboard. 9. For additional safety best practices information, see the Regulatory Compliance Homepage at www.dell.com/regulatory_compliance. Remove the system board. 13. Remove the hard drive. 6. Remove the base cover...
... sink and fan assembly. 14. Using a flat-blade screwdriver, rotate the cam screw counterclockwise to Contents Page Processor Dell™ Vostro™ 3700 Service Manual WARNING: Before working inside your computer, read the safety information that shipped with your computer. Remove the.... 2. Remove the optical drive. 7. Remove the display assembly. 11. Remove the keyboard. 9. For additional safety best practices information, see the Regulatory Compliance Homepage at www.dell.com/regulatory_compliance. Remove the system board. 13. Remove the hard drive. 6. Remove the base cover...


