User Manual
Page 3
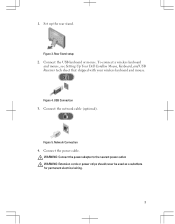
Rear Stand setup 2. USB Connection 3. Figure 5. Connect the network cable (optional). Figure 3. WARNING: Extension cords or power strips should never be used as a substitute for permanent electrical wiring. 3 Connect the USB keyboard or mouse. Figure 4. Network Connection 4. 1. Set up the rear stand. WARNING: Connect the power adapter to the nearest power outlet. Connect the power cable. To connect a wireless keyboard and mouse, see Setting Up Your Dell Cordless Mouse, Keyboard, and USB Receiver tech sheet that shipped with your wireless keyboard and mouse.
Rear Stand setup 2. USB Connection 3. Figure 5. Connect the network cable (optional). Figure 3. WARNING: Extension cords or power strips should never be used as a substitute for permanent electrical wiring. 3 Connect the USB keyboard or mouse. Figure 4. Network Connection 4. 1. Set up the rear stand. WARNING: Connect the power adapter to the nearest power outlet. Connect the power cable. To connect a wireless keyboard and mouse, see Setting Up Your Dell Cordless Mouse, Keyboard, and USB Receiver tech sheet that shipped with your wireless keyboard and mouse.
User Manual
Page 6
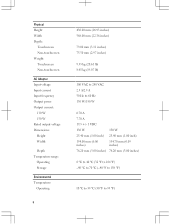
Physical Height Width Depth: Touchscreen Non-touchscreen Weight: Touchscreen Non-touchscreen AC Adapter Input voltage Input current Input frequency Output power Output current: 130 W 150 W Rated output voltage Dimensions: Height Width Depth Temperature range: Operating Storage Environmental Temperature: Operating 6 430.00 mm (16.93 inches) 568....
Physical Height Width Depth: Touchscreen Non-touchscreen Weight: Touchscreen Non-touchscreen AC Adapter Input voltage Input current Input frequency Output power Output current: 130 W 150 W Rated output voltage Dimensions: Height Width Depth Temperature range: Operating Storage Environmental Temperature: Operating 6 430.00 mm (16.93 inches) 568....


