Owner's Manual
Page 3
...-Cell Battery...11 Installing the Coin-Cell Battery...12 Removing the Memory...12 Installing the Memory...12 Removing the Keyboard...12 Installing the Keyboard...14 Removing the Palmrest...14 Installing the Palmrest...17 Removing the Battery...18 Installing the Battery...19 Removing the Hard Drive...19 Installing the Hard Drive...20 Removing the Display-Hinge Cover...21 Installing the Display...
...-Cell Battery...11 Installing the Coin-Cell Battery...12 Removing the Memory...12 Installing the Memory...12 Removing the Keyboard...12 Installing the Keyboard...14 Removing the Palmrest...14 Installing the Palmrest...17 Removing the Battery...18 Installing the Battery...19 Removing the Hard Drive...19 Installing the Hard Drive...20 Removing the Display-Hinge Cover...21 Installing the Display...
Owner's Manual
Page 19
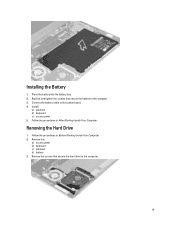
Connect the battery cable to the computer. 19 Remove the: a) access panel b) keyboard c) palmrest d) battery 3. Remove the screws that secure the battery to the computer. 3. Follow the procedures in Before Working Inside Your Computer. 2. Place the battery into the battery bay. 2. Install: a) palmrest b) keyboard c) access panel 5. Replace and tighten the screws that secure the hard drive to the system board. 4. Follow the procedures in After Working Inside Your Computer. Removing the Hard Drive 1. Installing the Battery 1.
Connect the battery cable to the computer. 19 Remove the: a) access panel b) keyboard c) palmrest d) battery 3. Remove the screws that secure the battery to the computer. 3. Follow the procedures in Before Working Inside Your Computer. 2. Place the battery into the battery bay. 2. Install: a) palmrest b) keyboard c) access panel 5. Replace and tighten the screws that secure the hard drive to the system board. 4. Follow the procedures in After Working Inside Your Computer. Removing the Hard Drive 1. Installing the Battery 1.
Owner's Manual
Page 20
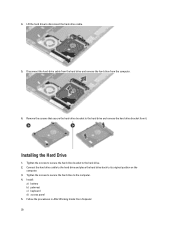
.... 3. Tighten the screws to secure the hard drive bracket to the computer. 4. Follow the procedures in After Working Inside Your Computer. 20 Disconnect the hard-drive cable from the hard drive and remove the hard drive from it. Tighten the screws to secure the hard drive to the hard drive. 2. Installing the Hard Drive 1. Lift the hard drive to disconnect the hard-drive cable. 5. Install: a) battery b) palmrest c) keyboard d) access...
.... 3. Tighten the screws to secure the hard drive bracket to the computer. 4. Follow the procedures in After Working Inside Your Computer. 20 Disconnect the hard-drive cable from the hard drive and remove the hard drive from it. Tighten the screws to secure the hard drive to the hard drive. 2. Installing the Hard Drive 1. Lift the hard drive to disconnect the hard-drive cable. 5. Install: a) battery b) palmrest c) keyboard d) access...
Owner's Manual
Page 22
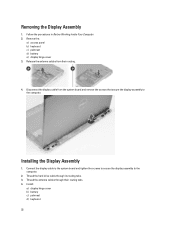
... Display Assembly 1. Release the antenna cables from the system board and remove the screws that secure the display assembly to the computer. 2. Thread the hard drive cable through their routing. 4. Remove the: a) access panel b) keyboard c) palmrest d) battery e) display hinge cover 3. Thread the antenna cables through its routing tabs. 3. Installing the Display Assembly 1. Follow the...
... Display Assembly 1. Release the antenna cables from the system board and remove the screws that secure the display assembly to the computer. 2. Thread the hard drive cable through their routing. 4. Remove the: a) access panel b) keyboard c) palmrest d) battery e) display hinge cover 3. Thread the antenna cables through its routing tabs. 3. Installing the Display Assembly 1. Follow the...
Owner's Manual
Page 30
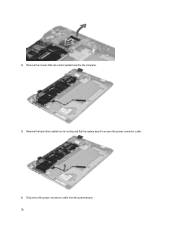
Disconnect the power-connector cable from its routing and flip the system board to the computer. 5. 4. Remove the screws that secure the system board to access the power connector cable. 6. Remove the hard-drive cable from the system board. 30
Disconnect the power-connector cable from its routing and flip the system board to the computer. 5. 4. Remove the screws that secure the system board to access the power connector cable. 6. Remove the hard-drive cable from the system board. 30
Owner's Manual
Page 31
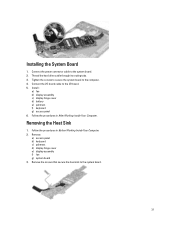
Thread the hard drive cable through its routing tabs. 3. Remove: a) access panel b) keyboard c) palmrest d) display hinge cover e) display assembly f) fan g) system board 3. Connect the I/O board cable to the system board. 31 Follow the procedures in After Working Inside Your Computer. Removing the Heat Sink 1. Remove the screws that secure the heat sink to the I/O board. 5. Install...
Thread the hard drive cable through its routing tabs. 3. Remove: a) access panel b) keyboard c) palmrest d) display hinge cover e) display assembly f) fan g) system board 3. Connect the I/O board cable to the system board. 31 Follow the procedures in After Working Inside Your Computer. Removing the Heat Sink 1. Remove the screws that secure the heat sink to the I/O board. 5. Install...
Owner's Manual
Page 32
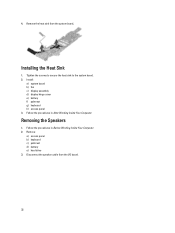
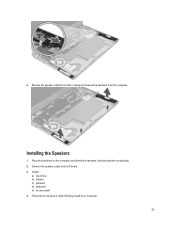
Tighten the screws to secure the heat sink to the system board. 2. Remove: a) access panel b) keyboard c) palmrest d) battery e) hard drive 3. Install : a) system board b) fan c) display assembly d) display hinge cover e) battery f) palmrest g) keyboard h) access panel 3. Follow the procedures in Before Working Inside Your Computer. 2. Remove the heat sink from the I/O board. 32 Removing the Speakers 1. Disconnect the speaker cable from the system board, Installing the Heat Sink 1. Follow the procedures in After Working Inside Your Computer. 4.
Tighten the screws to secure the heat sink to the system board. 2. Remove: a) access panel b) keyboard c) palmrest d) battery e) hard drive 3. Install : a) system board b) fan c) display assembly d) display hinge cover e) battery f) palmrest g) keyboard h) access panel 3. Follow the procedures in Before Working Inside Your Computer. 2. Remove the heat sink from the I/O board. 32 Removing the Speakers 1. Disconnect the speaker cable from the system board, Installing the Heat Sink 1. Follow the procedures in After Working Inside Your Computer. 4.
Owner's Manual
Page 33
Install : a) hard drive b) battery c) palmrest d) keyboard e) access panel 4. Connect the speaker cable to the I/O board 3. 4. Release the speaker cables from their routing and remove the speakers from the computer. Place the speakers on the computer and thread the speakers cable through the routing tabs. 2. Installing the Speakers 1. Follow the procedures in After Working Inside Your Computer. 33
Install : a) hard drive b) battery c) palmrest d) keyboard e) access panel 4. Connect the speaker cable to the I/O board 3. 4. Release the speaker cables from their routing and remove the speakers from the computer. Place the speakers on the computer and thread the speakers cable through the routing tabs. 2. Installing the Speakers 1. Follow the procedures in After Working Inside Your Computer. 33
Owner's Manual
Page 37
...to access the System Setup screen. During the Power-on Self Test (POST), when the Dell logo appears, you can: • Access System Setup by pressing key • Bring up... displays the devices that you make are : • Removable Drive (if available) • STXXXX Drive NOTE: XXX denotes the SATA drive number. • Optical Drive • Diagnostics NOTE: Choosing Diagnostics, will display the ...boot device order and boot directly to a specific device (for example: optical drive or hard drive). From the System Setup, you can boot from including the diagnostic option. Down arrow Moves...
...to access the System Setup screen. During the Power-on Self Test (POST), when the Dell logo appears, you can: • Access System Setup by pressing key • Bring up... displays the devices that you make are : • Removable Drive (if available) • STXXXX Drive NOTE: XXX denotes the SATA drive number. • Optical Drive • Diagnostics NOTE: Choosing Diagnostics, will display the ...boot device order and boot directly to a specific device (for example: optical drive or hard drive). From the System Setup, you can boot from including the diagnostic option. Down arrow Moves...

Owner's Manual
Page 41
...service tag is set a password on your system's service tag. Boot Options Boot Boot Priority Order Removable Drive Hard Disk Drives USB Storage Device CD/DVD/CD-RW Drive Network Specifies the order of different devices in which network device the computer can be used to ... default settings before exiting from hibernate state. (Default: Disabled) Enable or disable the Computrace feature on the computer's internal hard drive (HDD). Specifies which hard drive the computer can boot through . Table 5. Table 4. Allows you to enter it. Security Options Security Set Service Tag ...
...service tag is set a password on your system's service tag. Boot Options Boot Boot Priority Order Removable Drive Hard Disk Drives USB Storage Device CD/DVD/CD-RW Drive Network Specifies the order of different devices in which network device the computer can be used to ... default settings before exiting from hibernate state. (Default: Disabled) Enable or disable the Computrace feature on the computer's internal hard drive (HDD). Specifies which hard drive the computer can boot through . Table 5. Table 4. Allows you to enter it. Security Options Security Set Service Tag ...


