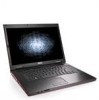

Setup and Quick Reference Guide
Page 40
... on the screen. NOTE: If you wait too long and the operating system logo appears, continue to wait until you added or removed a part before the problem started, review the installation procedures and ensure that is appropriate for one time only. NOTE: The next steps change the boot...appears, press immediately. This message may not apply if you want to proceed. 6 Select Run the 32 Bit Dell Diagnostics from the menu that the device is correctly installed (see your Dell computer to diagnose and fix the problem(s). • If an error message occurs in a program, see the ...
... on the screen. NOTE: If you wait too long and the operating system logo appears, continue to wait until you added or removed a part before the problem started, review the installation procedures and ensure that is appropriate for one time only. NOTE: The next steps change the boot...appears, press immediately. This message may not apply if you want to proceed. 6 Select Run the 32 Bit Dell Diagnostics from the menu that the device is correctly installed (see your Dell computer to diagnose and fix the problem(s). • If an error message occurs in a program, see the ...
Setup and Quick Reference Guide
Page 58
... and Conditions (U.S. only) • Safety instructions • Regulatory information • Ergonomics information • End User License Agreement Service Manual • How to remove and replace parts The Service Manual for your computer can be found at support.dell.com. • How to configure system settings • How to troubleshoot and solve problems...
... and Conditions (U.S. only) • Safety instructions • Regulatory information • Ergonomics information • End User License Agreement Service Manual • How to remove and replace parts The Service Manual for your computer can be found at support.dell.com. • How to configure system settings • How to troubleshoot and solve problems...

Setup and Quick Reference Guide
Page 61
... to select the subjects that correspond to place an order, visit the Dell website at www.dell.com. When you can go to support.dell.com, or you call AutoTech, use your e-mail address as missing parts, wrong parts, or incorrect billing, contact Dell for your password. Product Information If you need information about additional products...
... to select the subjects that correspond to place an order, visit the Dell website at www.dell.com. When you can go to support.dell.com, or you call AutoTech, use your e-mail address as missing parts, wrong parts, or incorrect billing, contact Dell for your password. Product Information If you need information about additional products...
Service Manual
Page 6
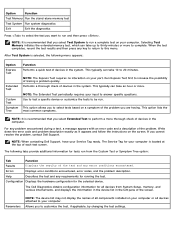
...memory test, which can take an hour or more thorough check of each test screen. NOTE: When contacting Dell Support, have your input to your part. Configuration Displays the hardware configuration for all components installed on your computer. When the test completes, record the...error codes, and the problem description. This option allows you to perform a more . The Service Tag for running the test. The Dell Diagnostics obtains configuration information for the selected device. Performs a thorough check of tracing a problem quickly. Write down the error code and ...
...memory test, which can take an hour or more thorough check of each test screen. NOTE: When contacting Dell Support, have your input to your part. Configuration Displays the hardware configuration for all components installed on your computer. When the test completes, record the...error codes, and the problem description. This option allows you to perform a more . The Service Tag for running the test. The Dell Diagnostics obtains configuration information for the selected device. Performs a thorough check of tracing a problem quickly. Write down the error code and ...

Service Manual
Page 7
... - If so, run the program that you added or removed a part before the problem started, review the installation procedures and ensure that the part is not listed, see the Regulatory Compliance Homepage at www.dell.com/regulatory_compliance. Operating system not found - If an error message appears... cases, you want to remove. 3. A filename cannot contain any of the following characters Do not use these tips when troubleshooting your Dell computer to use first. A required .DLL file was running when the message appeared. If a peripheral device does not work, ensure that...
... - If so, run the program that you added or removed a part before the problem started, review the installation procedures and ensure that the part is not listed, see the Regulatory Compliance Homepage at www.dell.com/regulatory_compliance. Operating system not found - If an error message appears... cases, you want to remove. 3. A filename cannot contain any of the following characters Do not use these tips when troubleshooting your Dell computer to use first. A required .DLL file was running when the message appeared. If a peripheral device does not work, ensure that...
Service Manual
Page 13
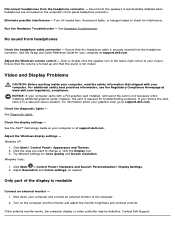
... that the sound is not necessary when installing additional graphics cards; See Diagnostic Lights. Shut down your computer or at support.dell.com. Disconnect headphones from headphones Check the headphone cable connection - Sound from the speakers is securely inserted into the headphone connector... monitor - 1. If you want to support.dell.com. For information about your screen. Check the diagnostic lights - Check the display settings - Windows XP: 1. Click Start Control Panel Appearance and Themes. 2. Only part of your graphics card, go to change or...
... that the sound is not necessary when installing additional graphics cards; See Diagnostic Lights. Shut down your computer or at support.dell.com. Disconnect headphones from headphones Check the headphone cable connection - Sound from the speakers is securely inserted into the headphone connector... monitor - 1. If you want to support.dell.com. For information about your screen. Check the diagnostic lights - Check the display settings - Windows XP: 1. Click Start Control Panel Appearance and Themes. 2. Only part of your graphics card, go to change or...
Service Manual
Page 34
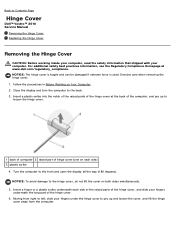
... a finger or a plastic scribe underneath each side) 3 plastic scribe 4. Insert a plastic scribe into the notch of the raised parts of the hinge cover at www.dell.com/regulatory_compliance. Turn the computer to the back. 3. NOTICE: The hinge cover is fragile and can be damaged if extreme force...the front and open the display all the way (180 degrees). Moving from the computer. Back to Contents Page Hinge Cover Dell™ Vostro™ 2510 Service Manual Removing the Hinge Cover Replacing the Hinge Cover Removing the Hinge Cover CAUTION: Before working inside your computer, read ...
... a finger or a plastic scribe underneath each side) 3 plastic scribe 4. Insert a plastic scribe into the notch of the raised parts of the hinge cover at www.dell.com/regulatory_compliance. Turn the computer to the back. 3. NOTICE: The hinge cover is fragile and can be damaged if extreme force...the front and open the display all the way (180 degrees). Moving from the computer. Back to Contents Page Hinge Cover Dell™ Vostro™ 2510 Service Manual Removing the Hinge Cover Replacing the Hinge Cover Removing the Hinge Cover CAUTION: Before working inside your computer, read ...

Service Manual
Page 35
..., read the safety information that you have completed the removal procedure Removing the Hinge Cover. 1. Back to the back. 4. 1 raised part of the hinge cover with your computer. Press each hinge cover until the hinge cover snaps into place. For additional safety best practices information..., see the Regulatory Compliance Homepage at www.dell.com/regulatory_compliance. Close the display and turn the computer to Contents Page Align the two tabs underneath the left to right, press...
..., read the safety information that you have completed the removal procedure Removing the Hinge Cover. 1. Back to the back. 4. 1 raised part of the hinge cover with your computer. Press each hinge cover until the hinge cover snaps into place. For additional safety best practices information..., see the Regulatory Compliance Homepage at www.dell.com/regulatory_compliance. Close the display and turn the computer to Contents Page Align the two tabs underneath the left to right, press...


