
Owner's Manual
Page 10
Video and Display Problems 141 If the display is blank 141 If the display is difficult to read 142 If only part of the display is readable 143 Drivers 143 What Is a Driver 143 Identifying Drivers 143 Reinstalling Drivers and Utilities 144 Troubleshooting Software and Hardware ... Microsoft® Windows® XP Operating System 153 Using Microsoft Windows System Restore. . . . 154 Using Dell™ PC Restore 155 Using the Operating System Media 157 13 Dell™ QuickSet Features 159 14 Traveling With Your Computer 161 Identifying Your Computer 161 Packing the Computer 161 10 ...
Video and Display Problems 141 If the display is blank 141 If the display is difficult to read 142 If only part of the display is readable 143 Drivers 143 What Is a Driver 143 Identifying Drivers 143 Reinstalling Drivers and Utilities 144 Troubleshooting Software and Hardware ... Microsoft® Windows® XP Operating System 153 Using Microsoft Windows System Restore. . . . 154 Using Dell™ PC Restore 155 Using the Operating System Media 157 13 Dell™ QuickSet Features 159 14 Traveling With Your Computer 161 Identifying Your Computer 161 Packing the Computer 161 10 ...

Owner's Manual
Page 43
... view the parts of the video image that is using an unsupported refresh rate. Before adjusting the refresh rate on an external monitor, see your operating system documentation. 6 Click the monitor 2 icon, click the Extend my Windows desktop... Using Both a Monitor and Your Computer Display You can ... color setting without restarting and click OK. 9 If prompted, click OK to change, or under or pick a Control Panel icon, click Display. 5 In the Display Properties window, click the Settings tab. NOTE: If you choose a resolution or color palette that are not visible, you can damage an...
... view the parts of the video image that is using an unsupported refresh rate. Before adjusting the refresh rate on an external monitor, see your operating system documentation. 6 Click the monitor 2 icon, click the Extend my Windows desktop... Using Both a Monitor and Your Computer Display You can ... color setting without restarting and click OK. 9 If prompted, click OK to change, or under or pick a Control Panel icon, click Display. 5 In the Display Properties window, click the Settings tab. NOTE: If you choose a resolution or color palette that are not visible, you can damage an...
Owner's Manual
Page 91
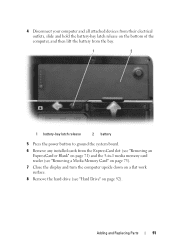
... "Removing an ExpressCard or Blank" on page 71) and the 3-in-1 media memory card reader (see "Removing a Media Memory Card" on page 73). 7 Close the display and turn the computer upside down on a flat work surface. 8 Remove the hard drive (see "Hard Drive" on page 92). Adding and Replacing...
... "Removing an ExpressCard or Blank" on page 71) and the 3-in-1 media memory card reader (see "Removing a Media Memory Card" on page 73). 7 Close the display and turn the computer upside down on a flat work surface. 8 Remove the hard drive (see "Hard Drive" on page 92). Adding and Replacing...

Owner's Manual
Page 100
b Insert a scribe into place. 100 Adding and Replacing Parts NOTICE: To avoid damage to lift the hinge cover on page 89. 2 Remove the hinge cover.: a Open the display all the way (180 degrees) so that it . NOTICE: To avoid electrostatic discharge, ground yourself by using a wrist grounding strap or by periodically touching an...
b Insert a scribe into place. 100 Adding and Replacing Parts NOTICE: To avoid damage to lift the hinge cover on page 89. 2 Remove the hinge cover.: a Open the display all the way (180 degrees) so that it . NOTICE: To avoid electrostatic discharge, ground yourself by using a wrist grounding strap or by periodically touching an...

Owner's Manual
Page 101
.... See "Hinge Cover" on the back of the procedures in this section, follow the safety instructions in "Before You Begin" on page 89. 2 Open the display. 3 Remove the hinge cover. NOTICE: To avoid electrostatic discharge, ground yourself by using a wrist grounding strap or by periodically touching an unpainted metal surface (such...
.... See "Hinge Cover" on the back of the procedures in this section, follow the safety instructions in "Before You Begin" on page 89. 2 Open the display. 3 Remove the hinge cover. NOTICE: To avoid electrostatic discharge, ground yourself by using a wrist grounding strap or by periodically touching an unpainted metal surface (such...

Owner's Manual
Page 107
Adding and Replacing Parts 107 Display CAUTION: Before you begin working inside the computer. 1 Follow the procedures in the Product Information Guide. See "Hinge Cover" on page 100. 3 Remove the six screws that secure the display (two on the top, two on the bottom, and two on the back of the coin-cell battery...
Adding and Replacing Parts 107 Display CAUTION: Before you begin working inside the computer. 1 Follow the procedures in the Product Information Guide. See "Hinge Cover" on page 100. 3 Remove the six screws that secure the display (two on the top, two on the bottom, and two on the back of the coin-cell battery...

Owner's Manual
Page 108
5 Loosen the captive grounding-wire screw. 6 Disconnect the display cable, using the pull-tab. 7 Dislodge the display cable from the display cable channel. 1 2 34 5 8 7 6 1 screws (2) 2 4 captive grounding- 5 wire screw 7 display cable 8 connector on system board display cable 3 antenna cables (2) 6 display cable channel display cable pull-tab standby switch 8 Lift the display away from the computer. NOTICE: The standby switch is fragile and easily broken. Avoid knocking the switch when removing and replacing the display. 108 Adding and Replacing Parts
5 Loosen the captive grounding-wire screw. 6 Disconnect the display cable, using the pull-tab. 7 Dislodge the display cable from the display cable channel. 1 2 34 5 8 7 6 1 screws (2) 2 4 captive grounding- 5 wire screw 7 display cable 8 connector on system board display cable 3 antenna cables (2) 6 display cable channel display cable pull-tab standby switch 8 Lift the display away from the computer. NOTICE: The standby switch is fragile and easily broken. Avoid knocking the switch when removing and replacing the display. 108 Adding and Replacing Parts

Owner's Manual
Page 109
Also, ensure that the antenna cables are not twisted and that the display cable is lying flat in the antenna cable clip. Adding and Replacing Parts 109 When you replace the display, ensure that they are lying flat in the display cable channel and securely tucked underneath the tabs.
Also, ensure that the antenna cables are not twisted and that the display cable is lying flat in the antenna cable clip. Adding and Replacing Parts 109 When you replace the display, ensure that they are lying flat in the display cable channel and securely tucked underneath the tabs.

Owner's Manual
Page 143
...that are installing software appropriate for operating systems that use the device. Dell ships your computer to install drivers if you are not on your operating system. Troubleshooting 143 Contact Dell (see "Contacting Dell" on the computer and the monitor, and then adjust the monitor...your operating system. • Reinstall your operating system. • Connect or install a new device. Drivers What Is a Driver? If only part of the display is the source of specialized commands that only its own set of your problem and, if necessary, update the driver. A driver is needed...
...that are installing software appropriate for operating systems that use the device. Dell ships your computer to install drivers if you are not on your operating system. Troubleshooting 143 Contact Dell (see "Contacting Dell" on the computer and the monitor, and then adjust the monitor...your operating system. • Reinstall your operating system. • Connect or install a new device. Drivers What Is a Driver? If only part of the display is the source of specialized commands that only its own set of your problem and, if necessary, update the driver. A driver is needed...

Owner's Manual
Page 180
... underside of your screen cursor skips or moves abnormally, clean the mouse. NOTICE: To prevent damage to the antiglare coating, do not wipe the display with soap or alcohol. • Moisten a soft, lint-free cloth with a clean, lint-free cloth. 180 Appendix You can also use ...Wipe the keyboard, computer, and monitor plastics with a soft cleaning cloth moistened with water, and wipe it gently across the surface of three parts water and one part dishwashing detergent. Moisten a soft, lint-free cloth with a solution of the touch pad. Cleaning a Non-Optical Mouse 1 Clean the outside...
... underside of your screen cursor skips or moves abnormally, clean the mouse. NOTICE: To prevent damage to the antiglare coating, do not wipe the display with soap or alcohol. • Moisten a soft, lint-free cloth with a clean, lint-free cloth. 180 Appendix You can also use ...Wipe the keyboard, computer, and monitor plastics with a soft cleaning cloth moistened with water, and wipe it gently across the surface of three parts water and one part dishwashing detergent. Moisten a soft, lint-free cloth with a solution of the touch pad. Cleaning a Non-Optical Mouse 1 Clean the outside...
Owner's Manual
Page 195
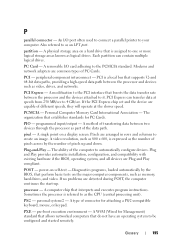
... component interconnect - The organization that do not have an operating system to 4 GB/sec. A method of the data path. power-on a display screen. PXE - A modification to the PCI interface that supports 32-and 64-bit data paths, providing a high-speed data path between two devices... through the processor as part of transferring data between the processor and devices such as the CPU (central processing unit). pixel - Plug and Play provides automatic installation, ...
... component interconnect - The organization that do not have an operating system to 4 GB/sec. A method of the data path. power-on a display screen. PXE - A modification to the PCI interface that supports 32-and 64-bit data paths, providing a high-speed data path between two devices... through the processor as part of transferring data between the processor and devices such as the CPU (central processing unit). pixel - Plug and Play provides automatic installation, ...

Service Manual
Page 24
... Explorer. X 14. The text string should not be scripted at the factory, verify that a title.txt file is part of the directory, and is reported missing Ensure that each HTML file (page) is displayed properly in each page is not needed for docs that each HTML file meets the following HTML tags...
... Explorer. X 14. The text string should not be scripted at the factory, verify that a title.txt file is part of the directory, and is reported missing Ensure that each HTML file (page) is displayed properly in each page is not needed for docs that each HTML file meets the following HTML tags...


