Dell 5055 Users Guide
Page 3
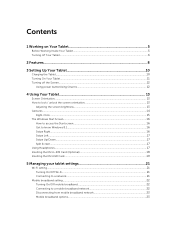
Contents 1 Working on Your Tablet 5 Before Working Inside Your Tablet...5 Turning off Your Tablet...6 2 Features...8 3 Setting Up Your Tablet 10 Charging the Tablet...10 Turning On Your Tablet...11 Turning off the Screen...12 Using power buttonUsing Charms 12 4 Using Your Tablet 13 Screen Orientation...13 How to lock / unlock the ... Split Screen...17 Using Headphones...17 Inserting the Micro-SIM Card (Optional 18 Inserting the MicroSD Card...19 5 Managing your tablet settings 21 Wi-Fi setting...21 Turning On/Off Wi-Fi...21 Connecting to a network...21 Mobile broadband setting...22 Turning...
Contents 1 Working on Your Tablet 5 Before Working Inside Your Tablet...5 Turning off Your Tablet...6 2 Features...8 3 Setting Up Your Tablet 10 Charging the Tablet...10 Turning On Your Tablet...11 Turning off the Screen...12 Using power buttonUsing Charms 12 4 Using Your Tablet 13 Screen Orientation...13 How to lock / unlock the ... Split Screen...17 Using Headphones...17 Inserting the Micro-SIM Card (Optional 18 Inserting the MicroSD Card...19 5 Managing your tablet settings 21 Wi-Fi setting...21 Turning On/Off Wi-Fi...21 Connecting to a network...21 Mobile broadband setting...22 Turning...
Dell 5055 Users Guide
Page 4
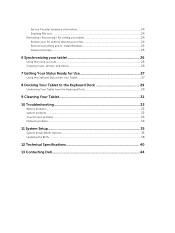
... Use 27 Using the Optional Stylus with Your Tablet 27 8 Docking Your Tablet to the Keyboard Dock 29 Undocking Your Tablet from the Keyboard Dock 29 9 Cleaning Your Tablet 31 10 Troubleshooting 32 Battery problem...32 System problem...32 Touchscreen... problem...33 Network problem...34 11 System Setup...35 System Setup (BIOS) Options...35 Updating the BIOS ...38 12 Technical Specifications 40 13 Contacting Dell...
... Use 27 Using the Optional Stylus with Your Tablet 27 8 Docking Your Tablet to the Keyboard Dock 29 Undocking Your Tablet from the Keyboard Dock 29 9 Cleaning Your Tablet 31 10 Troubleshooting 32 Battery problem...32 System problem...32 Touchscreen... problem...33 Network problem...34 11 System Setup...35 System Setup (BIOS) Options...35 Updating the BIOS ...38 12 Technical Specifications 40 13 Contacting Dell...

Dell 5055 Users Guide
Page 5
...information that came with your tablet. if you are correctly oriented and aligned. WARNING: Before working inside your tablet, read the safety information that is not authorized by Dell is flat and clean to servicing that shipped with your tablet. You should only perform ... directed by the online or telephone service and support team. NOTE: The color of the tablet. Turn off your tablet (see the Regulatory Compliance Homepage at www.dell.com/regulatory_compliance CAUTION: Many repairs may appear differently than shown in your product documentation, or ...
...information that came with your tablet. if you are correctly oriented and aligned. WARNING: Before working inside your tablet, read the safety information that is not authorized by Dell is flat and clean to servicing that shipped with your tablet. You should only perform ... directed by the online or telephone service and support team. NOTE: The color of the tablet. Turn off your tablet (see the Regulatory Compliance Homepage at www.dell.com/regulatory_compliance CAUTION: Many repairs may appear differently than shown in your product documentation, or ...

Dell 5055 Users Guide
Page 6
... unpainted metal surface, such as the metal at the right edge of the screen, tap Search, enter Control Panel in Venue 10 Pro 5055. You can turn off your tablet by two ways: • Using power button • Using charms menu 1. NOTE: You can also turn off your... the back of the display to turn off your tablet completely shuts down your tablet using the charms menu: a. b. Slide to dissipate static electricity, which could harm internal components. 6. Swipe from the tablet. Press and hold the Power button for >10 seconds to access the Charms menu. 6 Remove the...
... unpainted metal surface, such as the metal at the right edge of the screen, tap Search, enter Control Panel in Venue 10 Pro 5055. You can turn off your tablet by two ways: • Using power button • Using charms menu 1. NOTE: You can also turn off your... the back of the display to turn off your tablet completely shuts down your tablet using the charms menu: a. b. Slide to dissipate static electricity, which could harm internal components. 6. Swipe from the tablet. Press and hold the Power button for >10 seconds to access the Charms menu. 6 Remove the...

Dell 5055 Users Guide
Page 7
b. Touch Settings -> Power -> Shut down to turn off the tablet. 7
b. Touch Settings -> Power -> Shut down to turn off the tablet. 7
Dell 5055 Users Guide
Page 10
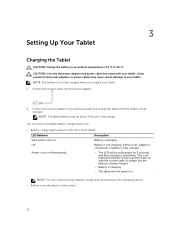
...of charge, but the battery is being charged. - NOTE: The battery is not fully charged when you unpack your tablet. This is charging. You can check the exact battery charge level by booting to 40 °C. Either no AC ... to the operating system. • Battery icons displayed on with your tablet. The tablet will be solid amber for 2 seconds and then change to an electrical outlet and charge the tablet until the battery is fully charged. Connect the power adapter to solid ... Use only the power adapter and power cable that the system cannot power on the screen: 10
...of charge, but the battery is being charged. - NOTE: The battery is not fully charged when you unpack your tablet. This is charging. You can check the exact battery charge level by booting to 40 °C. Either no AC ... to the operating system. • Battery icons displayed on with your tablet. The tablet will be solid amber for 2 seconds and then change to an electrical outlet and charge the tablet until the battery is fully charged. Connect the power adapter to solid ... Use only the power adapter and power cable that the system cannot power on the screen: 10

Dell 5055 Users Guide
Page 11
...use after the Windows Start screen displays. If the lock screen image displays, swipe your tablet. 2. Your tablet is running on your finger from a sleep state. 11 Turning On Your Tablet NOTE: Use this tablet in to the start screen. Battery is connected. Battery icon Description Battery is fully .... NOTE: If the login screen is ready for 2 seconds to turn on battery power and the battery is not working correctly. The tablet is not enabled in , and either no battery is detected or the battery is discharging. NOTE: The lock screen displays only when returning...
...use after the Windows Start screen displays. If the lock screen image displays, swipe your tablet. 2. Your tablet is running on your finger from a sleep state. 11 Turning On Your Tablet NOTE: Use this tablet in to the start screen. Battery is connected. Battery icon Description Battery is fully .... NOTE: If the login screen is ready for 2 seconds to turn on battery power and the battery is not working correctly. The tablet is not enabled in , and either no battery is detected or the battery is discharging. NOTE: The lock screen displays only when returning...

Dell 5055 Users Guide
Page 12
Touch Settings → Power → Sleep to turn off the screen. NOTE: If your tablet is in a sleep state, press the Power button once to access the Charms bar. 2. Swipe from the right edge of the display to turn on the screen. or Windows button 12 Using Charms 1. Turning off the Screen Using power button Press the Power button to turn off the screen.
Touch Settings → Power → Sleep to turn off the screen. NOTE: If your tablet is in a sleep state, press the Power button once to access the Charms bar. 2. Swipe from the right edge of the display to turn on the screen. or Windows button 12 Using Charms 1. Turning off the Screen Using power button Press the Power button to turn off the screen.

Dell 5055 Users Guide
Page 13
... access the Charms bar. 2. NOTE: Some applications may not support automatic screen rotation to portrait or landscape format depending on how you hold the tablet. 4 Using Your Tablet Screen Orientation For optimal viewing experience, the screen orientation changes automatically to portrait or landscape format. Touch toggle to lock / unlock the screen orientation...
... access the Charms bar. 2. NOTE: Some applications may not support automatic screen rotation to portrait or landscape format depending on how you hold the tablet. 4 Using Your Tablet Screen Orientation For optimal viewing experience, the screen orientation changes automatically to portrait or landscape format. Touch toggle to lock / unlock the screen orientation...

Dell 5055 Users Guide
Page 14
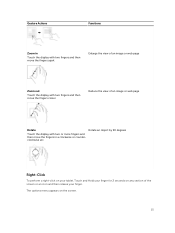
You can touch the screen to perform further actions Drag and Drop Move item such as images and icons on the screen 1. Gestures Your tablet has a multi-touch display. Gesture Actions Touch Tap gently on the display • Display detailed information about an item • Open the context menu of... • Input text using the on-screen keyboard Touch and Hold Touch and hold your fingertip to the bottom of an item to operate the tablet. Touch and hold your finger on the display with the display, move your finger on an item on • Close an application. (Swipe the ...
You can touch the screen to perform further actions Drag and Drop Move item such as images and icons on the screen 1. Gestures Your tablet has a multi-touch display. Gesture Actions Touch Tap gently on the display • Display detailed information about an item • Open the context menu of... • Input text using the on-screen keyboard Touch and Hold Touch and hold your fingertip to the bottom of an item to operate the tablet. Touch and hold your finger on the display with the display, move your finger on an item on • Close an application. (Swipe the ...
Dell 5055 Users Guide
Page 15
... the display with two or more fingers and then move the fingers in a clockwise or counterclockwise arc Right-Click To perform a right-click on your tablet, Touch and Hold your finger. The options menu appears on any section of the screen or an icon and then release your finger for 2 seconds...
... the display with two or more fingers and then move the fingers in a clockwise or counterclockwise arc Right-Click To perform a right-click on your tablet, Touch and Hold your finger. The options menu appears on any section of the screen or an icon and then release your finger for 2 seconds...
Dell 5055 Users Guide
Page 17
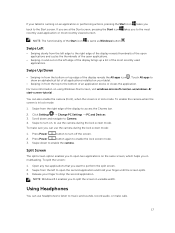
...bottom of all applications installed on using Windows Start screen, visit windows.microsoft.com/en-us/windows-8/ start-screen-tutorial . For more information on your tablet. • Swiping-in from the top to the most NOTE: The functionality of the Start icon is same as Windows button . Press Power ...Charms bar. 2. Press Power button to the Start screen. Swipe from the right edge of the display reveals the All apps icon . If your tablet is running on the same screen, which helps you in multitasking. Swipe Left • Swiping slowly from the bottom or top edge of the ...
...bottom of all applications installed on using Windows Start screen, visit windows.microsoft.com/en-us/windows-8/ start-screen-tutorial . For more information on your tablet. • Swiping-in from the top to the most NOTE: The functionality of the Start icon is same as Windows button . Press Power ...Charms bar. 2. Press Power button to the Start screen. Swipe from the right edge of the display reveals the All apps icon . If your tablet is running on the same screen, which helps you in multitasking. Swipe Left • Swiping slowly from the bottom or top edge of the ...
Dell 5055 Users Guide
Page 18
... to the audio port. Close the card-slot door. 5. CAUTION: To prevent damage to the audio connector, the integrated speakers on your tablet are the default options on the tablet. 2. NOTE: It is recommended that secures the card-slot door. 2. Open the card-slot door. 3. Loosen the screw that you connect...device, you connect your ears and adjust the volume level to secure the card-slot door. 18 Insert the earphones in until it from the tablet, pull the connector and not the cable. NOTE: When you turn down the volume level before plugging the headphone, and then adjust to ...
... to the audio port. Close the card-slot door. 5. CAUTION: To prevent damage to the audio connector, the integrated speakers on your tablet are the default options on the tablet. 2. NOTE: It is recommended that secures the card-slot door. 2. Open the card-slot door. 3. Loosen the screw that you connect...device, you connect your ears and adjust the volume level to secure the card-slot door. 18 Insert the earphones in until it from the tablet, pull the connector and not the cable. NOTE: When you turn down the volume level before plugging the headphone, and then adjust to ...
Dell 5055 Users Guide
Page 19
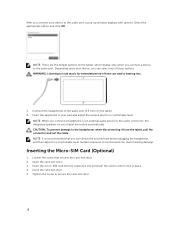
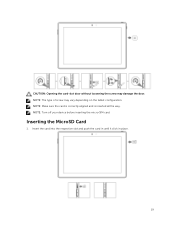
NOTE: The type of screw may damage the door. NOTE: Turn off your device before inserting the micro‑SIM card. Inserting the MicroSD Card 1. Insert the card into the respective slot and push the card in until it click in place. 19 NOTE: Make sure the card is correctly aligned and is inserted all the way. CAUTION: Opening the card-slot door without loosening the screw may vary depending on the tablet configuration.
NOTE: The type of screw may damage the door. NOTE: Turn off your device before inserting the micro‑SIM card. Inserting the MicroSD Card 1. Insert the card into the respective slot and push the card in until it click in place. 19 NOTE: Make sure the card is correctly aligned and is inserted all the way. CAUTION: Opening the card-slot door without loosening the screw may vary depending on the tablet configuration.

Dell 5055 Users Guide
Page 21
Connecting to access the Charms bar. 2. 5 Managing your tablet settings Wi-Fi setting Turning On/Off Wi-Fi 1. Swipe from the right edge of the display to a network 1. Swipe from the right edge of the display to turn Wi-Fi on or off. Touch Settings → Change PC settings → Networks → Airplane mode. 3. Touch Settings → Available → Select an available network → Connect . 21 Swipe Wi-Fi icon right or left to access the Charms bar. 2.
Connecting to access the Charms bar. 2. 5 Managing your tablet settings Wi-Fi setting Turning On/Off Wi-Fi 1. Swipe from the right edge of the display to a network 1. Swipe from the right edge of the display to turn Wi-Fi on or off. Touch Settings → Change PC settings → Networks → Airplane mode. 3. Touch Settings → Available → Select an available network → Connect . 21 Swipe Wi-Fi icon right or left to access the Charms bar. 2.

Dell 5055 Users Guide
Page 22
Swipe from the right edge of the display to a mobile broadband network 1. Ensure an active SIM card is inserted into the tablet. 2. Connecting to access the Charms bar. 2. Touch Settings →Change PC settings → Networks → Airplane mode. 3. Swipe Mobile broadband icon left or right to access the Charms bar. 22 Swipe from the right edge of the display to turn mobile broadband on or off. Mobile broadband setting Turning On/Off mobile broadband 1.
Swipe from the right edge of the display to a mobile broadband network 1. Ensure an active SIM card is inserted into the tablet. 2. Connecting to access the Charms bar. 2. Touch Settings →Change PC settings → Networks → Airplane mode. 3. Swipe Mobile broadband icon left or right to access the Charms bar. 22 Swipe from the right edge of the display to turn mobile broadband on or off. Mobile broadband setting Turning On/Off mobile broadband 1.

Dell 5055 Users Guide
Page 23
...once the mobile broadband network is a high priority, critical security update. 23 NOTE: Once your connected mobile broadband properties. NOTE: Your tablet will be disabled as well. Mobile broadband options 1. Touch and hold Your Service Provider or right-click if docked. • Touch... automatically. NOTE: If the option Set as a metered/non-metered connection. • Touch View connection properties to view your tablet has disconnected from mobile broadband, the option Connect automatically will disconnect from the right edge of the display to the Wi-Fi automatically...
...once the mobile broadband network is a high priority, critical security update. 23 NOTE: Once your connected mobile broadband properties. NOTE: Your tablet will be disabled as well. Mobile broadband options 1. Touch and hold Your Service Provider or right-click if docked. • Touch... automatically. NOTE: If the option Set as a metered/non-metered connection. • Touch View connection properties to view your tablet has disconnected from mobile broadband, the option Connect automatically will disconnect from the right edge of the display to the Wi-Fi automatically...

Dell 5055 Users Guide
Page 24
... properties→Security→Use a PIN. 5. CAUTION: If you want to perform this action. 24 Refreshing / Recovering / Re-setting your tablet You can refresh / recover / restore your mobile broadband connection will be established. Select any recovery option to original factory settings. 1. Click Get... started. Swipe from the right edge of the display to refresh your tablet without losing your IMEI number ready. NOTE: Your Service Provider refers to cancel this action: 1. NOTE: Before you to access the...
... properties→Security→Use a PIN. 5. CAUTION: If you want to perform this action. 24 Refreshing / Recovering / Re-setting your tablet You can refresh / recover / restore your mobile broadband connection will be established. Select any recovery option to original factory settings. 1. Click Get... started. Swipe from the right edge of the display to refresh your tablet without losing your IMEI number ready. NOTE: Your Service Provider refers to cancel this action: 1. NOTE: Before you to access the...
Dell 5055 Users Guide
Page 25
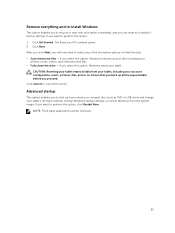
... up from a device or compact disc (such as DVD or USB drive) and change Windows startup settings, or restore Windows from your tablet, including your PC window opens. 2. Advanced startup This option enables you will be removed. 25 After you click Next, you to cancel... this action, click Restart Now. If you select this option, Windows resets your tablet's firmware settings, change your tablet. Click Cancel to start over your tablet completely, and you proceed. CAUTION: Resetting your tablet erases all the required data before you can reset to finish the task: •...
... up from a device or compact disc (such as DVD or USB drive) and change Windows startup settings, or restore Windows from your tablet, including your PC window opens. 2. Advanced startup This option enables you will be removed. 25 After you click Next, you to cancel... this action, click Restart Now. If you select this option, Windows resets your tablet's firmware settings, change your tablet. Click Cancel to start over your tablet completely, and you proceed. CAUTION: Resetting your tablet erases all the required data before you can reset to finish the task: •...

Dell 5055 Users Guide
Page 26
...key or a Micro-SD card to remove your tablet from the computer. 3. When you sign in with your Microsoft account on your tablet, you can synchronize user settings of your tablet with other Windows 8.1 PCs and Windows 8.1 tablets. A new option will be added to your ...8594; Connect to a Microsoft account to switch your computer local account to PC Settings called Sync your settings. 3. 6 Synchronizing your tablet Using Microsoft account If your computer has Microsoft Windows 8.1 installed, you can automatically synchronize your settings, including internet browser history, application...
...key or a Micro-SD card to remove your tablet from the computer. 3. When you sign in with your Microsoft account on your tablet, you can synchronize user settings of your tablet with other Windows 8.1 PCs and Windows 8.1 tablets. A new option will be added to your ...8594; Connect to a Microsoft account to switch your computer local account to PC Settings called Sync your settings. 3. 6 Synchronizing your tablet Using Microsoft account If your computer has Microsoft Windows 8.1 installed, you can automatically synchronize your settings, including internet browser history, application...


