User Manual
Page 11
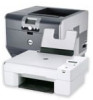
..., and if this connection method is installed in the printer. 21 Jam clearance cover Remove jammed pages. Note: The carrier moves to the printhead access area when no printhead is supported in or removing a USB cable or installation cable. 16 LINE port Connect the printer to an active telephone line (through a standard... a power source using a USB cable. About your printer 11 Use the To 12 Scanner unit Access the ink cartridges. 13 Ink cartridge access area Install, replace, or remove the ink cartridges. 14 Ethernet port Connect your country or region.
..., and if this connection method is installed in the printer. 21 Jam clearance cover Remove jammed pages. Note: The carrier moves to the printhead access area when no printhead is supported in or removing a USB cable or installation cable. 16 LINE port Connect the printer to an active telephone line (through a standard... a power source using a USB cable. About your printer 11 Use the To 12 Scanner unit Access the ink cartridges. 13 Ink cartridge access area Install, replace, or remove the ink cartridges. 14 Ethernet port Connect your country or region.
User Manual
Page 13
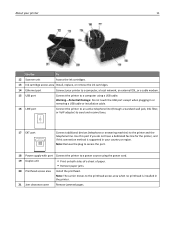
... then remove the used ink cartridge or cartridges. You must install new cartridges immediately after removing the old ones, or the ink remaining in the printhead nozzles may dry out. Removing ink cartridges 1 Turn on your printer. 2 Open the printer. Installing ink cartridges 1 Remove the ink cartridge from the ...pack, and then remove the protective cap from the ink cartridge. Ordering and replacing supplies 13 Replacing ink cartridges Make sure you have a new ink cartridge or cartridges before you begin.
... then remove the used ink cartridge or cartridges. You must install new cartridges immediately after removing the old ones, or the ink remaining in the printhead nozzles may dry out. Removing ink cartridges 1 Turn on your printer. 2 Open the printer. Installing ink cartridges 1 Remove the ink cartridge from the ...pack, and then remove the protective cap from the ink cartridge. Ordering and replacing supplies 13 Replacing ink cartridges Make sure you have a new ink cartridge or cartridges before you begin.
User Manual
Page 125
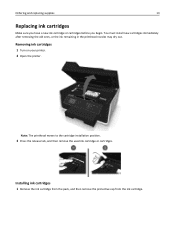
... paper exit tray. Notes: • Cleaning the printhead nozzles uses ink, so clean them only when necessary. • Deep cleaning uses more ink, so try the Clean Printhead option first to save ink. • If the ink levels are too low, you must replace the ink cartridges before you may need to... clean the printhead nozzles to improve the quality of the printer, unplug the power cord from...
... paper exit tray. Notes: • Cleaning the printhead nozzles uses ink, so clean them only when necessary. • Deep cleaning uses more ink, so try the Clean Printhead option first to save ink. • If the ink levels are too low, you must replace the ink cartridges before you may need to... clean the printhead nozzles to improve the quality of the printer, unplug the power cord from...
User Manual
Page 131
... port on the printer. If the cartridges do not seem to fit, then make sure the printhead is busy or does not respond If the "Before you continue to have connected to Deep Clean Printhead, and then press . Printer is properly seated, and then try one . 2 Firmly plug ...Note: Do not remove the alignment page until printing is marked with . REINSTALL THE INK CARTRIDGES AND DEEP CLEAN AND ALIGN THE PRINTHEAD 1 Reinstall the ink cartridges, see "Replacing ink cartridges" on and off slowly, then the printer is damaged, then use a new one or more information. Troubleshooting 131 ...
... port on the printer. If the cartridges do not seem to fit, then make sure the printhead is busy or does not respond If the "Before you continue to have connected to Deep Clean Printhead, and then press . Printer is properly seated, and then try one . 2 Firmly plug ...Note: Do not remove the alignment page until printing is marked with . REINSTALL THE INK CARTRIDGES AND DEEP CLEAN AND ALIGN THE PRINTHEAD 1 Reinstall the ink cartridges, see "Replacing ink cartridges" on and off slowly, then the printer is damaged, then use a new one or more information. Troubleshooting 131 ...
User Manual
Page 138
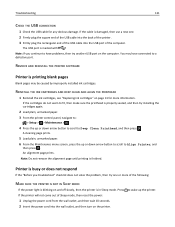
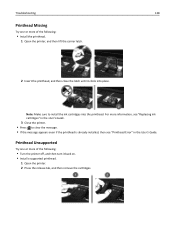
... Turn the printer off, and then turn it clicks into the printhead. Printhead Unsupported Try one or more of the following : • Install the printhead. 1 Open the printer, and then lift the carrier latch. 2 Insert the printhead, and then close the latch until it back on. • ...Install a supported printhead. 1 Open the printer. 2 Press the release tab, and then remove the cartridges. Note: Make sure to clear the message. • If the message appears even if the printhead is already installed, then see "Replacing...
... Turn the printer off, and then turn it clicks into the printhead. Printhead Unsupported Try one or more of the following : • Install the printhead. 1 Open the printer, and then lift the carrier latch. 2 Insert the printhead, and then close the latch until it back on. • ...Install a supported printhead. 1 Open the printer. 2 Press the release tab, and then remove the cartridges. Note: Make sure to clear the message. • If the message appears even if the printhead is already installed, then see "Replacing...
User Manual
Page 139
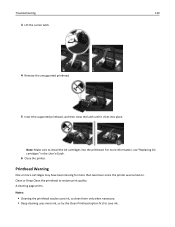
... One or more cartridges may have been missing for more information, see "Replacing ink cartridges" in the User's Guide. 6 Close the printer. Clean or Deep Clean the printhead to install the ink cartridges into place. Notes: • Cleaning the printhead nozzles uses ink, so clean them only when necessary. • Deep cleaning uses...
... One or more cartridges may have been missing for more information, see "Replacing ink cartridges" in the User's Guide. 6 Close the printer. Clean or Deep Clean the printhead to install the ink cartridges into place. Notes: • Cleaning the printhead nozzles uses ink, so clean them only when necessary. • Deep cleaning uses...
User Manual
Page 140
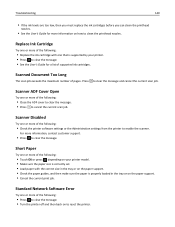
... ink cartridge with the correct size in the tray or on to reset the printer. Replace Ink Cartridge Try one or more information on how to clean the printhead nozzles. Standard Network Software Error Try one or more of the following: • Close the ADF cover to clear the message. • Press... to cancel the current scan job. Troubleshooting 140 • If the ink levels are too low, then you must replace the ink cartridges before you can clean the printhead nozzles. • See the User's Guide for a list of supported ink cartridges.
... ink cartridge with the correct size in the tray or on to reset the printer. Replace Ink Cartridge Try one or more information on how to clean the printhead nozzles. Standard Network Software Error Try one or more of the following: • Close the ADF cover to clear the message. • Press... to cancel the current scan job. Troubleshooting 140 • If the ink levels are too low, then you must replace the ink cartridges before you can clean the printhead nozzles. • See the User's Guide for a list of supported ink cartridges.
User Manual
Page 149
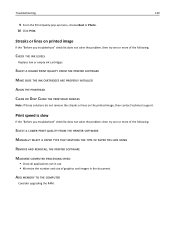
... COMPUTER PROCESSING SPEED • Close all applications not in use. • Minimize the number and size of the following: CHECK THE INK LEVELS Replace low or empty ink cartridges. Troubleshooting 149 9 From the Print Quality pop‑up menu, choose Best or Photo. 10 Click Print. SELECT ...A HIGHER PRINT QUALITY FROM THE PRINTER SOFTWARE MAKE SURE THE INK CARTRIDGES ARE PROPERLY INSTALLED ALIGN THE PRINTHEAD CLEAN OR DEEP CLEAN THE PRINTHEAD NOZZLES Note: If these solutions do not remove the streaks or lines on printed image If the "Before you troubleshoot" ...
... COMPUTER PROCESSING SPEED • Close all applications not in use. • Minimize the number and size of the following: CHECK THE INK LEVELS Replace low or empty ink cartridges. Troubleshooting 149 9 From the Print Quality pop‑up menu, choose Best or Photo. 10 Click Print. SELECT ...A HIGHER PRINT QUALITY FROM THE PRINTER SOFTWARE MAKE SURE THE INK CARTRIDGES ARE PROPERLY INSTALLED ALIGN THE PRINTHEAD CLEAN OR DEEP CLEAN THE PRINTHEAD NOZZLES Note: If these solutions do not remove the streaks or lines on printed image If the "Before you troubleshoot" ...
User Manual
Page 183
...Paper in Tray [x] 136 Paper Tray [x] Detected 136 Paper Tray [x] Removed 136 Printer Memory Full 136 Printhead Cannot Move 136 Printhead Missing 138 Printhead Unsupported 138 Printhead Warning 139 Replace Ink Cartridge 140 Scanned Document Too Long 140 Scanner ADF Cover Open 140 Scanner Disabled 140 Short Paper ... using 103 R received history report 93 receiving faxes Auto Answer setting 87, 88 automatically 87 manually 88 tips 87, 88 recycling 7 Dell products 14 WEEE statement 170 redial attempts, fax setting 82 redial time, fax setting 82 reducing an image 56 registering fax user information...
...Paper in Tray [x] 136 Paper Tray [x] Detected 136 Paper Tray [x] Removed 136 Printer Memory Full 136 Printhead Cannot Move 136 Printhead Missing 138 Printhead Unsupported 138 Printhead Warning 139 Replace Ink Cartridge 140 Scanned Document Too Long 140 Scanner ADF Cover Open 140 Scanner Disabled 140 Short Paper ... using 103 R received history report 93 receiving faxes Auto Answer setting 87, 88 automatically 87 manually 88 tips 87, 88 recycling 7 Dell products 14 WEEE statement 170 redial attempts, fax setting 82 redial time, fax setting 82 reducing an image 56 registering fax user information...


