User Manual
Page 4
... Setting up the printer to e-mail...68 Sending e-mail...69 Canceling an e‑mail...70 Faxing...71 Setting up the printer to fax...71 Configuring the fax settings...82 Creating a contact list...84 Sending faxes...85 Receiving faxes...87 Faxing FAQ...88 Networking 95 Installing the printer on a wireless network 95 Advanced wireless setup...102 Installing... does not solve your problem 128 Setup troubleshooting...128 Understanding printer messages...133 Clearing paper jams...141 Print troubleshooting...148 Copy and scan troubleshooting...150 Fax troubleshooting...152
... Setting up the printer to e-mail...68 Sending e-mail...69 Canceling an e‑mail...70 Faxing...71 Setting up the printer to fax...71 Configuring the fax settings...82 Creating a contact list...84 Sending faxes...85 Receiving faxes...87 Faxing FAQ...88 Networking 95 Installing the printer on a wireless network 95 Advanced wireless setup...102 Installing... does not solve your problem 128 Setup troubleshooting...128 Understanding printer messages...133 Clearing paper jams...141 Print troubleshooting...148 Copy and scan troubleshooting...150 Fax troubleshooting...152

User Manual
Page 6
...walls. CAUTION-POTENTIAL INJURY: Do not cut, twist, bind, crush, or place heavy objects on the power cord. Do not place or use the fax feature during a lightning storm. CAUTION-POTENTIAL INJURY: To reduce risk of fire, use of explosion if a lithium battery is not intended to be obvious.... Do not pinch the power cord between objects such as the fax feature, power cord, or telephone, during a lightning storm. Inspect the power cord regularly for the use only the telecommunications (RJ‑11) ...
...walls. CAUTION-POTENTIAL INJURY: Do not cut, twist, bind, crush, or place heavy objects on the power cord. Do not place or use the fax feature during a lightning storm. CAUTION-POTENTIAL INJURY: To reduce risk of fire, use of explosion if a lithium battery is not intended to be obvious.... Do not pinch the power cord between objects such as the fax feature, power cord, or telephone, during a lightning storm. Inspect the power cord regularly for the use only the telecommunications (RJ‑11) ...
User Manual
Page 8
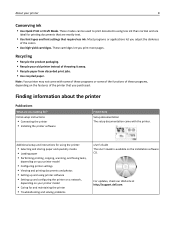
... up and configuring the printer on a network, depending on the installation software CD. For updates, check our Web site at http://support.dell.com. Initial setup instructions: • Connecting the printer • Installing the printer software Find it away. • Recycle paper from ...printer: • Selecting and storing paper and specialty media • Loading paper • Performing printing, copying, scanning, and faxing tasks, depending on your old printer instead of throwing it here Setup documentation The setup documentation came with some of these programs or...
... up and configuring the printer on a network, depending on the installation software CD. For updates, check our Web site at http://support.dell.com. Initial setup instructions: • Connecting the printer • Installing the printer software Find it away. • Recycle paper from ...printer: • Selecting and storing paper and specialty media • Loading paper • Performing printing, copying, scanning, and faxing tasks, depending on your old printer instead of throwing it here Setup documentation The setup documentation came with some of these programs or...
User Manual
Page 10
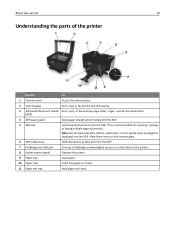
... the printer. 9 Paper tray Load paper. 10 Paper stop Catch the paper as it exits. This is recommended for scanning, copying, or faxing multiple-page documents. About your printer 10 Understanding the parts of the printer Use the To 1 Scanner cover Access the scanner glass. 2 Scanner... glass Scan, copy or fax photos and documents. 3 Automatic Document Feeder Scan, copy, or fax multiple‑page letter‑, legal‑, and A4‑size documents. (ADF) 4 ADF paper guide Keep paper...
... the printer. 9 Paper tray Load paper. 10 Paper stop Catch the paper as it exits. This is recommended for scanning, copying, or faxing multiple-page documents. About your printer 10 Understanding the parts of the printer Use the To 1 Scanner cover Access the scanner glass. 2 Scanner... glass Scan, copy or fax photos and documents. 3 Automatic Document Feeder Scan, copy, or fax multiple‑page letter‑, legal‑, and A4‑size documents. (ADF) 4 ADF paper guide Keep paper...
User Manual
Page 11
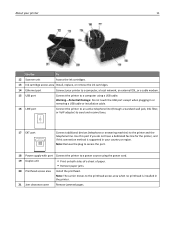
Use this port if you do not have a dedicated fax line for the printer, and if this connection method is installed in the printer. 21 Jam clearance cover Remove jammed pages. About your printer 11 ... cable. 16 LINE port Connect the printer to an active telephone line (through a standard wall jack, DSL filter, or VoIP adapter) to send and receive faxes. 17 EXT port Connect additional devices (telephone or answering machine) to a power source using a USB cable. Note: Remove the plug to access the port. 18...
Use this port if you do not have a dedicated fax line for the printer, and if this connection method is installed in the printer. 21 Jam clearance cover Remove jammed pages. About your printer 11 ... cable. 16 LINE port Connect the printer to an active telephone line (through a standard wall jack, DSL filter, or VoIP adapter) to send and receive faxes. 17 EXT port Connect additional devices (telephone or answering machine) to a power source using a USB cable. Note: Remove the plug to access the port. 18...
User Manual
Page 17
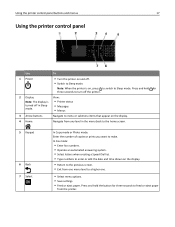
... buttons and menus 17 Using the printer control panel Use To 1 Power • Turn the printer on , press to switch to Sleep mode. In Fax mode: • Enter fax numbers. • Operate an automated answering system. • Select letters when creating a Speed Dial list. • Type numbers to enter or edit the...
... buttons and menus 17 Using the printer control panel Use To 1 Power • Turn the printer on , press to switch to Sleep mode. In Fax mode: • Enter fax numbers. • Operate an automated answering system. • Select letters when creating a Speed Dial list. • Type numbers to enter or edit the...

User Manual
Page 18
...of a menu. • Exit from a saved list of your printer. Dial the telephone number manually using the keypad before sending the fax. 11 Address Book Access fax numbers from a menu level of the Setup menu to the top level of the previous mode. • Clear current settings or error ... through an automated answering system. Start a job, depending on which mode is selected. 15 Cancel • Cancel a print, copy, scan, or fax job in a fax number to black‑and‑white mode. Using the printer control panel buttons and menus 18 8 Redial 9 Pause 10 Dial tone Display the...
...of a menu. • Exit from a saved list of your printer. Dial the telephone number manually using the keypad before sending the fax. 11 Address Book Access fax numbers from a menu level of the Setup menu to the top level of the previous mode. • Clear current settings or error ... through an automated answering system. Start a job, depending on which mode is selected. 15 Cancel • Cancel a print, copy, scan, or fax job in a fax number to black‑and‑white mode. Using the printer control panel buttons and menus 18 8 Redial 9 Pause 10 Dial tone Display the...
User Manual
Page 19
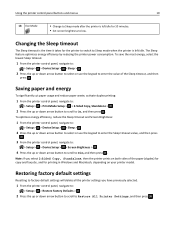
... > > Sleep > 2 Press the up or down arrow button to select or use the keypad to enter the value of the paper (duplex) for copy and fax jobs, and for printing in Windows and Macintosh, depending on your printer model. To optimize energy efficiency, reduce the Sleep timeout and Screen Brightness: 1 From...
... > > Sleep > 2 Press the up or down arrow button to select or use the keypad to enter the value of the paper (duplex) for copy and fax jobs, and for printing in Windows and Macintosh, depending on your printer model. To optimize energy efficiency, reduce the Sleep timeout and Screen Brightness: 1 From...
User Manual
Page 21
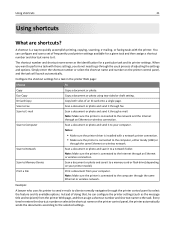
...Memory Device Print a File To Copy a document or photo. Example: A lawyer who uses his printer to send e-mails to clients normally navigates through fax. A shortcut is a way to the Internet through e‑mail. Copy a document or photo using two‑sided or draft setting. Note: ... or photo and send it . Note: Make sure the printer is connected to quickly accomplish printing, copying, scanning, e‑mailing, or faxing tasks with the printer. Simply enter the shortcut number or select the shortcut name and number on your computer. Every time he can configure ...
...Memory Device Print a File To Copy a document or photo. Example: A lawyer who uses his printer to send e-mails to clients normally navigates through fax. A shortcut is a way to the Internet through e‑mail. Copy a document or photo using two‑sided or draft setting. Note: ... or photo and send it . Note: Make sure the printer is connected to quickly accomplish printing, copying, scanning, e‑mailing, or faxing tasks with the printer. Simply enter the shortcut number or select the shortcut name and number on your computer. Every time he can configure ...
User Manual
Page 25
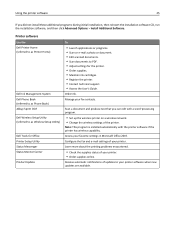
...updates are available. Printer software Use the Dell Printer Home (referred to as Printer Home) Dell Ink Management System Dell Phone Book (referred to as Phone Book) Abbyy Sprint OCR Dell Wireless Setup Utility (referred to as Wireless Setup Utility) Dell Tools for the printer. • Order ...supplies. • Maintain ink cartridges. • Register the printer. • Contact technical support. • Access the User's Guide. Configure the fax and e‑mail...
...updates are available. Printer software Use the Dell Printer Home (referred to as Printer Home) Dell Ink Management System Dell Phone Book (referred to as Phone Book) Abbyy Sprint OCR Dell Wireless Setup Utility (referred to as Wireless Setup Utility) Dell Tools for the printer. • Order ...supplies. • Maintain ink cartridges. • Register the printer. • Contact technical support. • Access the User's Guide. Configure the fax and e‑mail...

User Manual
Page 26
... with some of these programs or some of the functions of these applications, depending on the features of the printer that you select options for fax jobs. • Create and edit the Contacts list. • Configure e‑mail connectivity settings. • Configure the language, country, date, and time. Using the Macintosh...
... with some of these programs or some of the functions of these applications, depending on the features of the printer that you select options for fax jobs. • Create and edit the Contacts list. • Configure e‑mail connectivity settings. • Configure the language, country, date, and time. Using the Macintosh...

User Manual
Page 39
Loading paper and original documents 39 Loading original documents into the ADF You can load A4‑, letter‑, or legal‑size paper into the ADF. 1 Adjust the paper guide on the ADF tray to 35 sheets of the original document. 2 Load the original document faceup and top edge first into the ADF for scanning, copying, and faxing. You can load up to the width of an original document into the ADF until you hear a sound from the ADF.
Loading paper and original documents 39 Loading original documents into the ADF You can load A4‑, letter‑, or legal‑size paper into the ADF. 1 Adjust the paper guide on the ADF tray to 35 sheets of the original document. 2 Load the original document faceup and top edge first into the ADF for scanning, copying, and faxing. You can load up to the width of an original document into the ADF until you hear a sound from the ADF.

User Manual
Page 50
... OK or Apply Changes. Note: Under conditions of high humidity, or if the normal drying time does not allow the ink to : System Preferences > Print & Fax > select your prints.
... OK or Apply Changes. Note: Under conditions of high humidity, or if the normal drying time does not allow the ink to : System Preferences > Print & Fax > select your prints.
User Manual
Page 51
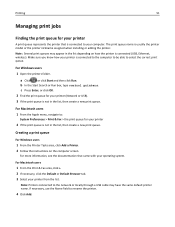
... printer is not in the list depending on the computer screen. For Windows users 1 Open the printers folder. For Macintosh users 1 From the Print & Fax area, click +. 2 If necessary, click the Default or Default Browser tab. 3 Select your computer. a Click , or click Start and then click Run... b In the Start Search or Run box, type control printers. For Macintosh users 1 From the Apple menu, navigate to: System Preferences > Print & Fax > the print queue for your printer A print queue represents the printer that came with your printer (Network or USB). 3 If the print queue is ...
... printer is not in the list depending on the computer screen. For Windows users 1 Open the printers folder. For Macintosh users 1 From the Print & Fax area, click +. 2 If necessary, click the Default or Default Browser tab. 3 Select your computer. a Click , or click Start and then click Run... b In the Start Search or Run box, type control printers. For Macintosh users 1 From the Apple menu, navigate to: System Preferences > Print & Fax > the print queue for your printer A print queue represents the printer that came with your printer (Network or USB). 3 If the print queue is ...
User Manual
Page 52
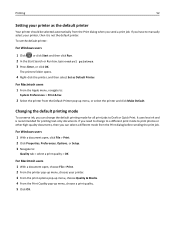
..., then it is recommended for all print jobs to Draft or Quick Print. For Macintosh users 1 From the Apple menu, navigate to: System Preferences > Print & Fax 2 Select the printer from the Default Printer pop‑up menu, choose a print quality. 5 Click OK. It uses less ink and is not the default...
..., then it is recommended for all print jobs to Draft or Quick Print. For Macintosh users 1 From the Apple menu, navigate to: System Preferences > Print & Fax 2 Select the printer from the Default Printer pop‑up menu, choose a print quality. 5 Click OK. It uses less ink and is not the default...
User Manual
Page 53
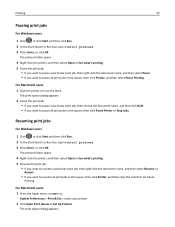
... want to pause a particular print job, then right‑click the document name, and then select Pause. • If you want to : System Preferences > Print & Fax > select your printer 2 Click Open Print Queue or Set Up Printers. The print queue dialog appears. For Macintosh users 1 From the Apple menu, navigate to...
... want to pause a particular print job, then right‑click the document name, and then select Pause. • If you want to : System Preferences > Print & Fax > select your printer 2 Click Open Print Queue or Set Up Printers. The print queue dialog appears. For Macintosh users 1 From the Apple menu, navigate to...

User Manual
Page 69
...addresses. 5 Select the contact that you want to add, and then click Add to or change list to view the help information for the fax software. For more information, click Help or to import the contact. 6 Click OK. Sending e-mail ADF Scanner glass Use the ADF for... as postcards or photos), transparencies, photo paper, or thin media (such as magazine clippings). E-mailing 69 3 Navigate to: Printer Home > select your printer > Fax > Edit contact list > Select from the Address Book on your printer folder 2 Double‑click Printer Settings. 3 Navigate to: Contacts tab > Individuals tab ...
...addresses. 5 Select the contact that you want to add, and then click Add to or change list to view the help information for the fax software. For more information, click Help or to import the contact. 6 Click OK. Sending e-mail ADF Scanner glass Use the ADF for... as postcards or photos), transparencies, photo paper, or thin media (such as magazine clippings). E-mailing 69 3 Navigate to: Printer Home > select your printer > Fax > Edit contact list > Select from the Address Book on your printer folder 2 Double‑click Printer Settings. 3 Navigate to: Contacts tab > Individuals tab ...

User Manual
Page 71
... the power supply cord or telephone, during a lightning storm. Setting up the printer to fax Scenario 1: Standard telephone line Setup 1: Printer is connected to a dedicated fax line To connect: Connect the cable from the wall jack to receive faxes automatically (Auto Answer On) or manually (Auto Answer Off). • If you want. CAUTION... this product or a UL Listed 26 AWG or larger replacement when connecting this product or make any number of rings that you want to receive faxes automatically (Auto Answer On), then set the printer to the port of the printer...
... the power supply cord or telephone, during a lightning storm. Setting up the printer to fax Scenario 1: Standard telephone line Setup 1: Printer is connected to a dedicated fax line To connect: Connect the cable from the wall jack to receive faxes automatically (Auto Answer On) or manually (Auto Answer Off). • If you want. CAUTION... this product or a UL Listed 26 AWG or larger replacement when connecting this product or make any number of rings that you want to receive faxes automatically (Auto Answer On), then set the printer to the port of the printer...

User Manual
Page 72
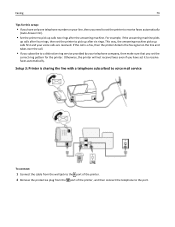
Faxing 72 Setup 2: Printer is sharing the line with an answering machine Connected to the same telephone wall jack To connect: 1 Connect the cable from the wall jack to the port of the printer. 2 Remove the protective plug from the wall jack to the port of the printer, and then connect the answering machine to different wall jacks To connect: Connect the cable from the port of the printer. Connected to the port.
Faxing 72 Setup 2: Printer is sharing the line with an answering machine Connected to the same telephone wall jack To connect: 1 Connect the cable from the wall jack to the port of the printer. 2 Remove the protective plug from the wall jack to the port of the printer, and then connect the answering machine to different wall jacks To connect: Connect the cable from the port of the printer. Connected to the port.
User Manual
Page 73
...machine. This way, the answering machine picks up calls first and your telephone company, then make sure that you set the printer to receive faxes automatically (Auto Answer On). • Set the printer to a distinctive ring service provided by your voice calls are received. Setup 3: Printer is... a fax, then the printer detects the fax signal on your line, then you need to set the correct ring pattern for this setup: • If you have set the printer to...
...machine. This way, the answering machine picks up calls first and your telephone company, then make sure that you set the printer to receive faxes automatically (Auto Answer On). • Set the printer to a distinctive ring service provided by your voice calls are received. Setup 3: Printer is... a fax, then the printer detects the fax signal on your line, then you need to set the correct ring pattern for this setup: • If you have set the printer to...


