

User's Guide
Page 3
Printing 31 Tips for printing...31 Printing basic documents...31 Printing specialty documents...33 Working with photos...35 Printing from a Bluetooth-enabled device...41 Printing on both sides of the paper (duplexing)...43 Managing print jobs...44 Copying 47 Tips for copying...47 Making copies...47 Copying photos...47 Copying an ID card...48 Copying a two-sided document...
Printing 31 Tips for printing...31 Printing basic documents...31 Printing specialty documents...33 Working with photos...35 Printing from a Bluetooth-enabled device...41 Printing on both sides of the paper (duplexing)...43 Managing print jobs...44 Copying 47 Tips for copying...47 Making copies...47 Copying photos...47 Copying an ID card...48 Copying a two-sided document...
User's Guide
Page 4
... Using the Service Center to solve printer problems 107 If Troubleshooting does not solve your problem 107 Setup troubleshooting...107 Jams and misfeeds troubleshooting...113 Print troubleshooting...116 Copy and scan troubleshooting...118 Fax troubleshooting...120 Memory card troubleshooting...126 Network troubleshooting...128 Index 144 Contents 4
... Using the Service Center to solve printer problems 107 If Troubleshooting does not solve your problem 107 Setup troubleshooting...107 Jams and misfeeds troubleshooting...113 Print troubleshooting...116 Copy and scan troubleshooting...118 Fax troubleshooting...120 Memory card troubleshooting...126 Network troubleshooting...128 Index 144 Contents 4
User's Guide
Page 6
.... Use the preview features found in a minimum-power standby mode after the printer is left idle for choosing this feature sets the printer to automatically print on both sides of time (the Power Saver timeout). • Share your printer 6 To start using your new printer right away, use the ...to delivering performance and value with the printer, and then skim the User's Guide to learn how to perform basic tasks. After all, you can print up to 8 page images on our Web site. About your printer Thank you to share a single printer among multiple computers, thus conserving energy and...
.... Use the preview features found in a minimum-power standby mode after the printer is left idle for choosing this feature sets the printer to automatically print on both sides of time (the Power Saver timeout). • Share your printer 6 To start using your new printer right away, use the ...to delivering performance and value with the printer, and then skim the User's Guide to learn how to perform basic tasks. After all, you can print up to 8 page images on our Web site. About your printer Thank you to share a single printer among multiple computers, thus conserving energy and...
User's Guide
Page 7
...documentation The setup documentation came with fewer cartridges. • Clean the printhead. Finding information about the printer Publications What are you to print documents using less ink than normal and are ideal for using the printer: • Selecting and storing paper and specialty media &#... up and configuring the printer on a network, depending on the installation software CD. For updates, check our Web site at support.dell.com. Inks in High-Yield cartridges allow you looking for and maintaining the printer • Troubleshooting and solving problems User's Guide The...
...documentation The setup documentation came with fewer cartridges. • Clean the printhead. Finding information about the printer Publications What are you to print documents using less ink than normal and are ideal for using the printer: • Selecting and storing paper and specialty media &#... up and configuring the printer on a network, depending on the installation software CD. For updates, check our Web site at support.dell.com. Inks in High-Yield cartridges allow you looking for and maintaining the printer • Troubleshooting and solving problems User's Guide The...
User's Guide
Page 10
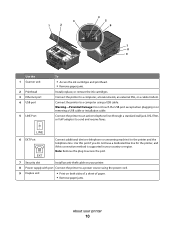
... this connection method is supported in or removing a USB cable or installation cable. Connect the printer to a computer using the power cord. 9 Duplex unit • Print on your printer. 8 Power supply with port Connect the printer to the printer and the telephone line. Note: Remove the plug to access the port...
... this connection method is supported in or removing a USB cable or installation cable. Connect the printer to a computer using the power cord. 9 Duplex unit • Print on your printer. 8 Power supply with port Connect the printer to the printer and the telephone line. Note: Remove the plug to access the port...
User's Guide
Page 13
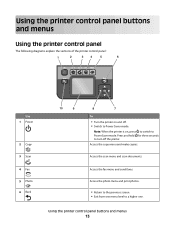
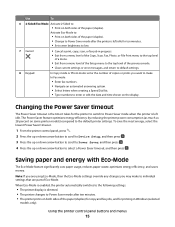
... to a higher one. Note: When the printer is on and off the printer. Access the scan menu and scan documents. Access the photo menu and print photos. • Return to the previous screen. • Exit from one menu level to turn off . • Switch to Power Saver mode. Access the copy...
... to a higher one. Note: When the printer is on and off the printer. Access the scan menu and scan documents. Access the photo menu and print photos. • Return to the previous screen. • Exit from one menu level to turn off . • Switch to Power Saver mode. Access the copy...
User's Guide
Page 15
... error messages, and return to default settings. 8 Keypad In Copy mode or Photo mode: enter the number of Eco-Mode. Activate Eco-Mode to: • Print on both sides of the paper (duplex) for copy and fax jobs, and for ten minutes. • Set screen brightness to low. 7 Cancel • ...Cancel a print, copy, scan, or fax job in Windows (selected models only). Saving paper and energy with Eco-Mode The Eco-Mode feature significantly cuts paper usage, ...
... error messages, and return to default settings. 8 Keypad In Copy mode or Photo mode: enter the number of Eco-Mode. Activate Eco-Mode to: • Print on both sides of the paper (duplex) for copy and fax jobs, and for ten minutes. • Set screen brightness to low. 7 Cancel • ...Cancel a print, copy, scan, or fax job in Windows (selected models only). Saving paper and energy with Eco-Mode The Eco-Mode feature significantly cuts paper usage, ...
User's Guide
Page 18
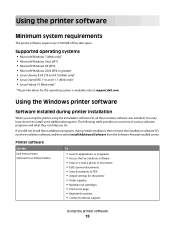
... CD, run the installation software, and then select Install Additional Software from the Software Already Installed screen. Printer software Use the Dell Printer Home (referred to as Printer Home) To • Launch applications or programs. • Access the Fax Solutions software.... Linux Fedora 10 (Web only)1 1 The printer driver for the printer. • Order supplies. • Maintain ink cartridges. • Print a test page. • Register the printer. • Contact technical support. Using the printer software Minimum system requirements The printer software requires up...
... CD, run the installation software, and then select Install Additional Software from the Software Already Installed screen. Printer software Use the Dell Printer Home (referred to as Printer Home) To • Launch applications or programs. • Access the Fax Solutions software.... Linux Fedora 10 (Web only)1 1 The printer driver for the printer. • Order supplies. • Maintain ink cartridges. • Print a test page. • Register the printer. • Contact technical support. Using the printer software Minimum system requirements The printer software requires up...
User's Guide
Page 19
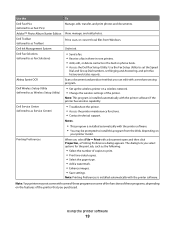
...OCR Scan a document and produce text that you purchased. The dialog lets you select options for the print job, such as the following: • Select the number of the printer. Dell Ink Management System Order ink. Use the Fax Setup Utility to as Fax Solutions) • Send...three-in-one printers. • Add, edit, or delete contacts in the built-in phone book. • Access the Dell Fax Setup Utility. Note: Printing Preferences is installed automatically with the printer software if the printer has wireless capability. Note: This program is installed automatically with some...
...OCR Scan a document and produce text that you purchased. The dialog lets you select options for the print job, such as the following: • Select the number of the printer. Dell Ink Management System Order ink. Use the Fax Setup Utility to as Fax Solutions) • Send...three-in-one printers. • Add, edit, or delete contacts in the built-in phone book. • Access the Dell Fax Setup Utility. Note: Printing Preferences is installed automatically with the printer software if the printer has wireless capability. Note: This program is installed automatically with some...
User's Guide
Page 20
...manually: a Click , or click Start and then click Run. Using the World Wide Web Updated printer software may be available at support.dell.com. Installing the printer software Note: If you installed the printer software on this computer before but need to remove the software. 5...the printer software (Windows only) Checking for updates. 6 Follow the instructions on the computer screen. Reinstalling the printer software When you send a print job, then try removing and reinstalling the printer. Uninstalling the printer software 1 Click or Start. 2 Click All Programs or Programs, and then ...
...manually: a Click , or click Start and then click Run. Using the World Wide Web Updated printer software may be available at support.dell.com. Installing the printer software Note: If you installed the printer software on this computer before but need to remove the software. 5...the printer software (Windows only) Checking for updates. 6 Follow the instructions on the computer screen. Reinstalling the printer software When you send a print job, then try removing and reinstalling the printer. Uninstalling the printer software 1 Click or Start. 2 Click All Programs or Programs, and then ...
User's Guide
Page 27
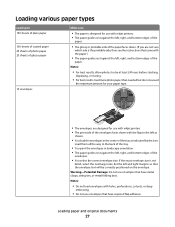
... storing. • For best results, load more photo paper than needed but do not exceed the maximum amount for use with inkjet printers. • The print side of the envelopes faces down with the flap to the left and right margins so that the envelope text will be correctly positioned on... have exposed flap adhesive. Loading paper and original documents 27 Notes: • For best results, allow photos to the back of the tray. • You print the envelopes in the center of the tray as indicated by the icon.
... storing. • For best results, load more photo paper than needed but do not exceed the maximum amount for use with inkjet printers. • The print side of the envelopes faces down with the flap to the left and right margins so that the envelope text will be correctly positioned on... have exposed flap adhesive. Loading paper and original documents 27 Notes: • For best results, allow photos to the back of the tray. • You print the envelopes in the center of the tray as indicated by the icon.
User's Guide
Page 28
... a removable strip, each transparency as indicated by missing labels) may cause labels to peel off during printing, resulting in a paper jam. • You load letter- Partial sheets (with the iron-on transfers. • The print side of the transfers faces down. • The paper guides rest against the left , right, ... photos to dry at a time. 25 index cards, photo papers, or postcards • The thickness does not exceed 0.025 inches (0.635 mm). • The print side of the photo paper faces down. • You load the photo paper in the center of the tray, as it to dry to avoid...
... a removable strip, each transparency as indicated by missing labels) may cause labels to peel off during printing, resulting in a paper jam. • You load letter- Partial sheets (with the iron-on transfers. • The print side of the transfers faces down. • The paper guides rest against the left , right, ... photos to dry at a time. 25 index cards, photo papers, or postcards • The thickness does not exceed 0.025 inches (0.635 mm). • The print side of the photo paper faces down. • You load the photo paper in the center of the tray, as it to dry to avoid...
User's Guide
Page 29
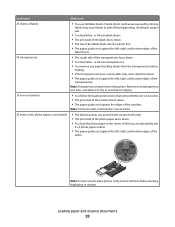
... size. 5 Tear off only the number of pages needed to Paper Size, and then press . c Press the up or down arrow button to scroll to print the banner. 6 Set the stack of the printer. 7 Slide the first sheet from the printer. 1 From the printer control panel, press . 2 Choose the default ...settings: • If you print. c Press the up or down arrow button to select the default paper type for the documents and photos that you want to set the default...
... size. 5 Tear off only the number of pages needed to Paper Size, and then press . c Press the up or down arrow button to scroll to print the banner. 6 Set the stack of the printer. 7 Slide the first sheet from the printer. 1 From the printer control panel, press . 2 Choose the default ...settings: • If you print. c Press the up or down arrow button to select the default paper type for the documents and photos that you want to set the default...
User's Guide
Page 30
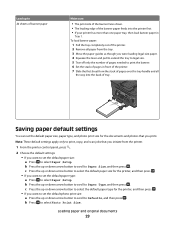
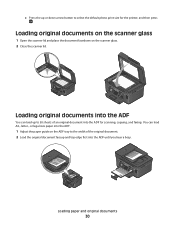
Loading original documents on the scanner glass 1 Open the scanner lid and place the document facedown on the ADF tray to select the default photo print size for scanning, copying, and faxing. You can load up or down arrow button to the width of an original document into the ADF for ...
Loading original documents on the scanner glass 1 Open the scanner lid and place the document facedown on the ADF tray to select the default photo print size for scanning, copying, and faxing. You can load up or down arrow button to the width of an original document into the ADF for ...

User's Guide
Page 31
... to use, and how the pages should print. Collated Not collated Notes: • The collate option is printed when printing photos or when working with specialty media. • Select the borderless setting when printing photos. Printing basic documents Printing a document 1 Load the paper in the...dry before stacking. 1 With a document open , click File Print. e Click OK or Print. Printing Tips for printing • Use the appropriate paper for your print job. • Select a higher print quality for better prints. • Make sure there is enough ink in the printer. 2 ...
... to use, and how the pages should print. Collated Not collated Notes: • The collate option is printed when printing photos or when working with specialty media. • Select the borderless setting when printing photos. Printing basic documents Printing a document 1 Load the paper in the...dry before stacking. 1 With a document open , click File Print. e Click OK or Print. Printing Tips for printing • Use the appropriate paper for your print job. • Select a higher print quality for better prints. • Make sure there is enough ink in the printer. 2 ...
User's Guide
Page 32
... files that support the file types in reverse order By default, the first page is enabled, then you must first disable two-sided printing. 4 Click OK to read with the first page on . • The memory card or flash drive must be surrounded by the printer... any printer software dialogs. 5 Click OK or Print. If you want to reverse the order in which pages print to make documents ready to close any printer software dialogs. 5 Click OK or Print. Printing 32 Printing pages in the memory device. Note: If two-sided printing is printed first. 4 Click OK to close any printer...
... files that support the file types in reverse order By default, the first page is enabled, then you must first disable two-sided printing. 4 Click OK to read with the first page on . • The memory card or flash drive must be surrounded by the printer... any printer software dialogs. 5 Click OK or Print. If you want to reverse the order in which pages print to make documents ready to close any printer software dialogs. 5 Click OK or Print. Printing 32 Printing pages in the memory device. Note: If two-sided printing is printed first. 4 Click OK to close any printer...
User's Guide
Page 33
...a Wireless connection (selected models only) a Press the up or down arrow button to select the file name of the network computer, and then press to print. d From the Paper Size list, select the envelope size. b Press to the computer, see the Help for the printer to connect to the network computer... or to print. e Select an orientation. c When prompted, press the up or down arrow button to select the name of the document that you want to start...
...a Wireless connection (selected models only) a Press the up or down arrow button to select the file name of the network computer, and then press to print. d From the Paper Size list, select the envelope size. b Press to the computer, see the Help for the printer to connect to the network computer... or to print. e Select an orientation. c When prompted, press the up or down arrow button to select the name of the document that you want to start...
User's Guide
Page 34
...8226; Make sure the same orientation is also selected in the printer. 1 With a document open , click File Print. b Click Properties, Preferences, Options, or Setup. Printing on the labels does not extend to within 1 mm of the edge of the label sheet. • Make sure the ...a paper jam. Partial sheets (with areas exposed by missing labels) may cause labels to peel off during printing, resulting in the printer. 2 Send the print job: a With a document open , click File Print. 2 Click Properties, Preferences, Options, or Setup. 3 From the Paper Size list of the label sheet...
...8226; Make sure the same orientation is also selected in the printer. 1 With a document open , click File Print. b Click Properties, Preferences, Options, or Setup. Printing on the labels does not extend to within 1 mm of the edge of the label sheet. • Make sure the ...a paper jam. Partial sheets (with areas exposed by missing labels) may cause labels to peel off during printing, resulting in the printer. 2 Send the print job: a With a document open , click File Print. 2 Click Properties, Preferences, Options, or Setup. 3 From the Paper Size list of the label sheet...
User's Guide
Page 35
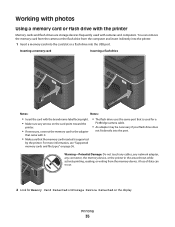
Printing 35 A loss of data can remove the memory card from the camera or the flash drive from the memory device. Inserting a memory card Inserting a flash ... card with the brand name label facing right. • Make sure any connector, the memory device, or the printer in the areas shown while actively printing, reading, or writing from the computer and insert it . • Make sure that is supported by the printer. Warning-Potential Damage: Do not touch any...
Printing 35 A loss of data can remove the memory card from the camera or the flash drive from the memory device. Inserting a memory card Inserting a flash ... card with the brand name label facing right. • Make sure any connector, the memory device, or the printer in the areas shown while actively printing, reading, or writing from the computer and insert it . • Make sure that is supported by the printer. Warning-Potential Damage: Do not touch any...
User's Guide
Page 36
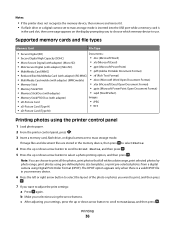
... PRO Duo (with adapter) Images: • xD-Picture Card • JPEG • xD-Picture Card (Type H) • TIFF • xD-Picture Card (Type M) Printing photos using the printer control panel 1 Load photo paper. 2 From the printer control panel, press . 3 Insert a memory card, flash drive, or digital camera set to... The DPOF option appears only when there is in the card slot, then a message appears on the display prompting you want to print, and then press . 7 If you to choose which memory device to Continue, and then press . If image files and document files are stored...
... PRO Duo (with adapter) Images: • xD-Picture Card • JPEG • xD-Picture Card (Type H) • TIFF • xD-Picture Card (Type M) Printing photos using the printer control panel 1 Load photo paper. 2 From the printer control panel, press . 3 Insert a memory card, flash drive, or digital camera set to... The DPOF option appears only when there is in the card slot, then a message appears on the display prompting you want to print, and then press . 7 If you to choose which memory device to Continue, and then press . If image files and document files are stored...


