
UltraSharp Monitor Users Guide
Page 3
...8 Identifying Parts and Controls 9 Front View 9 Back View 10 Side View 11 Bottom View 12 Monitor Specifications 14 Flat Panel Specifications 14 Resolution Specifications 15 Supported Video Modes 16 Preset Display Modes 16 Electrical Specifications 17 Speaker Specifications 17 Physical Characteristics 18 Environmental Characteristics 19 Power Management Modes 19 Pin Assignments 21 Plug and Play Capability 23 Universal Serial Bus (USB) Interface 23 USB Upstream Connector 24 USB Downstream Connector 24 USB Type-C Connector 25 USB Ports 25 LCD Monitor Quality and Pixel Policy...
...8 Identifying Parts and Controls 9 Front View 9 Back View 10 Side View 11 Bottom View 12 Monitor Specifications 14 Flat Panel Specifications 14 Resolution Specifications 15 Supported Video Modes 16 Preset Display Modes 16 Electrical Specifications 17 Speaker Specifications 17 Physical Characteristics 18 Environmental Characteristics 19 Power Management Modes 19 Pin Assignments 21 Plug and Play Capability 23 Universal Serial Bus (USB) Interface 23 USB Upstream Connector 24 USB Downstream Connector 24 USB Type-C Connector 25 USB Ports 25 LCD Monitor Quality and Pixel Policy...

UltraSharp Monitor Users Guide
Page 4
... Stand 27 Connecting Your Monitor 30 Connecting the HDMI cable 30 Connecting the DisplayPort (DP to DP) cable 31 Connecting the USB Type-C cable 32 Connecting the USB 3.0 cable 33 Organizing Your Cables 34 Removing the Monitor Stand 35 Wall Mounting (Optional 35 Operating the Monitor 37 Power On the Monitor 37 Using the Front Panel Controls 37 Front Panel Button 38 Using the On-Screen Display (OSD) Menu 39 Accessing the Menu System 39 OSD Warning Messages 54 Setting the Maximum Resolution 57 Setting the KVM Switch 58 Setting...
... Stand 27 Connecting Your Monitor 30 Connecting the HDMI cable 30 Connecting the DisplayPort (DP to DP) cable 31 Connecting the USB Type-C cable 32 Connecting the USB 3.0 cable 33 Organizing Your Cables 34 Removing the Monitor Stand 35 Wall Mounting (Optional 35 Operating the Monitor 37 Power On the Monitor 37 Using the Front Panel Controls 37 Front Panel Button 38 Using the On-Screen Display (OSD) Menu 39 Accessing the Menu System 39 OSD Warning Messages 54 Setting the Maximum Resolution 57 Setting the KVM Switch 58 Setting...
UltraSharp Monitor Users Guide
Page 8
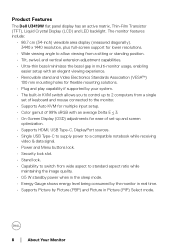
... keyboard and mouse connected to the monitor. • Supports Auto KVM for multiple input setup. • Color gamut of 99% sRGB with an average Delta E < 3. • On-Screen Display (OSD) adjustments for ease of set-up and screen optimization. • Supports HDMI, USB Type-C, DisplayPort sources. • Single USB Type-C to supply power to a compatible notebook while receiving video & data signal. • Power and Menu buttons lock. • Security lock slot. • Stand lock. • Capability to switch from wide aspect to standard...
... keyboard and mouse connected to the monitor. • Supports Auto KVM for multiple input setup. • Color gamut of 99% sRGB with an average Delta E < 3. • On-Screen Display (OSD) adjustments for ease of set-up and screen optimization. • Supports HDMI, USB Type-C, DisplayPort sources. • Single USB Type-C to supply power to a compatible notebook while receiving video & data signal. • Power and Menu buttons lock. • Security lock slot. • Stand lock. • Capability to switch from wide aspect to standard...

UltraSharp Monitor Users Guide
Page 13
...-C port Connect the USB Type-C cable that came with your monitor to the adjacent port(s). USB downstream port Connect your USB device. Charging Stand lock feature To lock the stand to the monitor using a M3 x 6 mm screw (screws not included). * Headphone usage is not supported for the audio line out connector. ** To avoid signal interference, when a wireless USB device has been connected to a USB downstream port, it is not supported on the monitor. This port supports USB Power Delivery, Data, and DisplayPort video signal...
...-C port Connect the USB Type-C cable that came with your monitor to the adjacent port(s). USB downstream port Connect your USB device. Charging Stand lock feature To lock the stand to the monitor using a M3 x 6 mm screw (screws not included). * Headphone usage is not supported for the audio line out connector. ** To avoid signal interference, when a wireless USB device has been connected to a USB downstream port, it is not supported on the monitor. This port supports USB Power Delivery, Data, and DisplayPort video signal...

UltraSharp Monitor Users Guide
Page 15
Dell Display Manager Yes (DDM) Compatibility Security • Security lock slot (cable lock sold separately) • Anti-theft stand lock slot (to 76 Hz (automatic) 3440 x 1440 at 60Hz About Your Monitor │ 15 Resolution Specifications Model Horizontal scan range (HDMI & DP & USB Type-C alternate mode) Vertical scan range (HDMI & DP & USB Type-C alternate mode) Maximum preset resolution U3419W 30 kHz to 134 kHz (automatic) 48 Hz to panel) * At panel native only, under Custom Mode preset. Connectivity • 2 x HDMI 2.0 (HDCP...
Dell Display Manager Yes (DDM) Compatibility Security • Security lock slot (cable lock sold separately) • Anti-theft stand lock slot (to 76 Hz (automatic) 3440 x 1440 at 60Hz About Your Monitor │ 15 Resolution Specifications Model Horizontal scan range (HDMI & DP & USB Type-C alternate mode) Vertical scan range (HDMI & DP & USB Type-C alternate mode) Maximum preset resolution U3419W 30 kHz to 134 kHz (automatic) 48 Hz to panel) * At panel native only, under Custom Mode preset. Connectivity • 2 x HDMI 2.0 (HDCP...

UltraSharp Monitor Users Guide
Page 19
The following table shows the power consumption and signaling of this automatic power saving feature. VESA Horizontal Vertical Video Power Modes Sync Sync Indicator Power Consumption Normal Active operation Active Active White 250 W (maximum)** 54 W (typical) Active-off Inactive mode Inactive Blanked White (blinking) Less than 0.5 W About Your Monitor │ 19 Environmental Characteristics Model U3419W Compliant Standards • BFR/PVC-free (Halogen-free) excluding external cables • Meets NFPA 99 leakage current requirements •...
The following table shows the power consumption and signaling of this automatic power saving feature. VESA Horizontal Vertical Video Power Modes Sync Sync Indicator Power Consumption Normal Active operation Active Active White 250 W (maximum)** 54 W (typical) Active-off Inactive mode Inactive Blanked White (blinking) Less than 0.5 W About Your Monitor │ 19 Environmental Characteristics Model U3419W Compliant Standards • BFR/PVC-free (Halogen-free) excluding external cables • Meets NFPA 99 leakage current requirements •...

UltraSharp Monitor Users Guide
Page 34
... by changing the USB Selection settings from the OSD menu. (See USB Selection and Setting the KVM Switch for cable attachment,) organize all necessary cables to organize the cables. If your monitor and computer, (See Connecting Your Monitor for details). 4. Organizing Your Cables After attaching all cables as shown above. 34 │ Setting Up the Monitor Turn On the monitor and the computer(s). Use the cable slot on the monitor stand to your monitor displays an image, installation...
... by changing the USB Selection settings from the OSD menu. (See USB Selection and Setting the KVM Switch for cable attachment,) organize all necessary cables to organize the cables. If your monitor and computer, (See Connecting Your Monitor for details). 4. Organizing Your Cables After attaching all cables as shown above. 34 │ Setting Up the Monitor Turn On the monitor and the computer(s). Use the cable slot on the monitor stand to your monitor displays an image, installation...

UltraSharp Monitor Users Guide
Page 41
... USB Type-C connector. Use the Input Source menu to select between darkness and lightness on the function allows you are using the HDMI 2 connector. Select the HDMI 2 input when you to the factory settings. The Contrast function adjusts the degree of difference between the different video signals that may be connected to decrease the contrast (min. 0 / max. 100). Select the HDMI 1 input when you are using the DisplayPort (DP) connector. Turning on the monitor screen. Press the button...
... USB Type-C connector. Use the Input Source menu to select between darkness and lightness on the function allows you are using the HDMI 2 connector. Select the HDMI 2 input when you to the factory settings. The Contrast function adjusts the degree of difference between the different video signals that may be connected to decrease the contrast (min. 0 / max. 100). Select the HDMI 1 input when you are using the DisplayPort (DP) connector. Turning on the monitor screen. Press the button...
UltraSharp Monitor Users Guide
Page 43
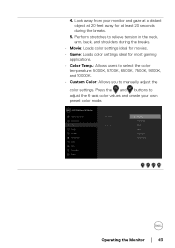
... at 20 feet away for most gaming applications. • Color Temp.: Allows users to select the color temperature: 5000K, 5700K, 6500K, 7500K, 9300K, and 10000K. • Custom Color: Allows you to adjust the 6-axis color values and create your monitor and gaze at a distant object at least 20 seconds during the breaks. 5. Press the and buttons to manually adjust the color settings.
... at 20 feet away for most gaming applications. • Color Temp.: Allows users to select the color temperature: 5000K, 5700K, 6500K, 7500K, 9300K, and 10000K. • Custom Color: Allows you to adjust the 6-axis color values and create your monitor and gaze at a distant object at least 20 seconds during the breaks. 5. Press the and buttons to manually adjust the color settings.

UltraSharp Monitor Users Guide
Page 45
... color saturation of the video image. Use to increase the monochrome appearance of the video image. Reset Color Display Use to increase the colorful appearance of the video image. NOTE: Saturation adjustment is available only when you to set the Response Time to adjust images. Reset your monitor color settings to Wide 21:9, Auto Resize, 4:3, or 1:1. Use or to adjust the sharpness from '0' to '100'. Operating the Monitor │ 45 Aspect Ratio Adjusts the image ratio to the factory settings...
... color saturation of the video image. Use to increase the monochrome appearance of the video image. Reset Color Display Use to increase the colorful appearance of the video image. NOTE: Saturation adjustment is available only when you to set the Response Time to adjust images. Reset your monitor color settings to Wide 21:9, Auto Resize, 4:3, or 1:1. Use or to adjust the sharpness from '0' to '100'. Operating the Monitor │ 45 Aspect Ratio Adjusts the image ratio to the factory settings...

UltraSharp Monitor Users Guide
Page 46
... HDMI 1 HDMI 2 USB Type-C X Sub-Window DP HDMI 1 X X HDMI 2 X NOTE: The images under PBP will be displayed at the center of the screen with respect to the center to restore default display settings. For optimal screen performance, Brightness and Contrast for some preset modes (Standard, Color Temp.) will be disabled when Uniformity Compensation is turned on the Factory Calibration Report. Reset Display Select this option to achieve uniform brightness and color over the entire screen. Compensation Calibrated is factory calibrated setting...
... HDMI 1 HDMI 2 USB Type-C X Sub-Window DP HDMI 1 X X HDMI 2 X NOTE: The images under PBP will be displayed at the center of the screen with respect to the center to restore default display settings. For optimal screen performance, Brightness and Contrast for some preset modes (Standard, Color Temp.) will be disabled when Uniformity Compensation is turned on the Factory Calibration Report. Reset Display Select this option to achieve uniform brightness and color over the entire screen. Compensation Calibrated is factory calibrated setting...

UltraSharp Monitor Users Guide
Page 51
... 2 Brightness/Contrast, Input Source, Aspect Ratio, Volume, PIP/PBP Mode, USB Select Switch, or Video Swap and set the lock options. NOTE: This option is only available when the USB Type-C (Upstream Port) cable is not accessible. Reset all OSD settings to enable or disable USB Type-A (Downstream Ports) charging function during monitor standby mode. USB-A Charging Allows you to set the power LED indicator On or Off to LED save energy. Operating the Monitor │ 51 Reset Menu Personalize Alternative Lock...
... 2 Brightness/Contrast, Input Source, Aspect Ratio, Volume, PIP/PBP Mode, USB Select Switch, or Video Swap and set the lock options. NOTE: This option is only available when the USB Type-C (Upstream Port) cable is not accessible. Reset all OSD settings to enable or disable USB Type-A (Downstream Ports) charging function during monitor standby mode. USB-A Charging Allows you to set the power LED indicator On or Off to LED save energy. Operating the Monitor │ 51 Reset Menu Personalize Alternative Lock...
UltraSharp Monitor Users Guide
Page 57
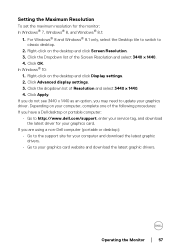
... Advanced display settings. 3. Click Apply. Click the Dropdown list of Resolution and select 3440 x 1440. 4. Operating the Monitor │ 57 Setting the Maximum Resolution To set the maximum resolution for your computer and download the latest graphic drivers. • Go to classic desktop. 2. If you may need to http://www.dell.com/support, enter your service tag, and download the latest driver for your graphics card. In Windows...
... Advanced display settings. 3. Click Apply. Click the Dropdown list of Resolution and select 3440 x 1440. 4. Operating the Monitor │ 57 Setting the Maximum Resolution To set the maximum resolution for your computer and download the latest graphic drivers. • Go to classic desktop. 2. If you may need to http://www.dell.com/support, enter your service tag, and download the latest driver for your graphics card. In Windows...

UltraSharp Monitor Users Guide
Page 65
...-test mode, the power LED remains white. Troubleshooting │ 65 Troubleshooting WARNING: Before you to the connected input signal. 4. Turn off both your monitor and computer are properly connected but the monitor screen remains dark, run the monitor self-test by performing the following steps: 1. If your monitor screen remains blank after you use the previous procedure, check your video controller and computer, because your computer and the monitor. 2. Turn Off your monitor is working...
...-test mode, the power LED remains white. Troubleshooting │ 65 Troubleshooting WARNING: Before you to the connected input signal. 4. Turn off both your monitor and computer are properly connected but the monitor screen remains dark, run the monitor self-test by performing the following steps: 1. If your monitor screen remains blank after you use the previous procedure, check your video controller and computer, because your computer and the monitor. 2. Turn Off your monitor is working...
UltraSharp Monitor Users Guide
Page 67
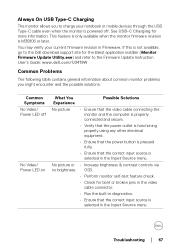
... in the video cable connector. • Run the built-in diagnostics. • Ensure that the correct input source is not available, go to the Dell download support site for the latest application installer (Monitor Firmware Update Utility.exe) and refer to the Firmware Update Instruction User's Guide: www.dell.com/U3419W Common Problems The following table contains general information about common monitor problems you to charge your current firmware revision in the Input Source menu. If...
... in the video cable connector. • Run the built-in diagnostics. • Ensure that the correct input source is not available, go to the Dell download support site for the latest application installer (Monitor Firmware Update Utility.exe) and refer to the Firmware Update Instruction User's Guide: www.dell.com/U3419W Common Problems The following table contains general information about common monitor problems you to charge your current firmware revision in the Input Source menu. If...

UltraSharp Monitor Users Guide
Page 69
... Color Picture missing color Wrong Color Picture color not good • Reset the monitor to factory settings. • Perform monitor self-test feature check to determine if the scrambled screen appears in self-test mode. • Check for bent or broken pins in the video cable connector. • Restart the computer in the safe mode. • Do not perform any troubleshooting steps. • Contact Dell immediately. • Ensure that the video cable connecting the monitor...
... Color Picture missing color Wrong Color Picture color not good • Reset the monitor to factory settings. • Perform monitor self-test feature check to determine if the scrambled screen appears in self-test mode. • Check for bent or broken pins in the video cable connector. • Restart the computer in the safe mode. • Do not perform any troubleshooting steps. • Contact Dell immediately. • Ensure that the video cable connecting the monitor...

UltraSharp Monitor Users Guide
Page 70
No Input Signal when user controls are pressed No picture, the LED light is white • Check the signal source. Re-plug the signal cable if necessary. • Reset the computer or video player. does not fill entire viewing area Cannot adjust the monitor with the buttons on the front panel OSD does not appear on the screen • Turn Off the monitor, unplug the power cord, plug it back, and then turn off the monitor at all times when not...
No Input Signal when user controls are pressed No picture, the LED light is white • Check the signal source. Re-plug the signal cable if necessary. • Reset the computer or video player. does not fill entire viewing area Cannot adjust the monitor with the buttons on the front panel OSD does not appear on the screen • Turn Off the monitor, unplug the power cord, plug it back, and then turn off the monitor at all times when not...

UltraSharp Monitor Users Guide
Page 72
... factory settings. 72 │ Troubleshooting Speakers Specific Problems Specific Symptoms No sound coming from the speakers What You Experience Cannot hear any sound Possible Solutions • Turn Off the monitor, unplug the monitor power cord, replug it, and then turn On the monitor. • Check the audio cable connection is not working or lagging Do not respond or responds s lowl y • Increase the distance between the USB 3.0 peripherals and the wireless USB receiver. • Position...
... factory settings. 72 │ Troubleshooting Speakers Specific Problems Specific Symptoms No sound coming from the speakers What You Experience Cannot hear any sound Possible Solutions • Turn Off the monitor, unplug the monitor power cord, replug it, and then turn On the monitor. • Check the audio cable connection is not working or lagging Do not respond or responds s lowl y • Increase the distance between the USB 3.0 peripherals and the wireless USB receiver. • Position...

Display Manager Users Guide
Page 1
... automatic settings, energy management, window organization, image rotation, and other features on select Dell monitors. Dell Display Manager User's Guide │ 1 Information about monitors connected to the system is a Microsoft Windows application used to communicate with your monitor. Dell Display Manager User's Guide Overview Dell Display Manager is available when hovering over the notification-tray icon. Once installed, Dell Display Manager runs each time the system starts and places its icon in the menu as...
... automatic settings, energy management, window organization, image rotation, and other features on select Dell monitors. Dell Display Manager User's Guide │ 1 Information about monitors connected to the system is a Microsoft Windows application used to communicate with your monitor. Dell Display Manager User's Guide Overview Dell Display Manager is available when hovering over the notification-tray icon. Once installed, Dell Display Manager runs each time the system starts and places its icon in the menu as...

Display Manager Users Guide
Page 4
... the open windows and then click Save. 4 │ Dell Display Manager User's Guide You first choose a pre-defined layout pattern which suits your application windows on each connected monitor, or it . Assigning Preset Modes to Applications The Auto Mode tab allows you to associate a specific Preset Mode with Easy Arrange Easy Arrange helps you to effectively organize your work, then you just need to drag the application windows into...
... the open windows and then click Save. 4 │ Dell Display Manager User's Guide You first choose a pre-defined layout pattern which suits your application windows on each connected monitor, or it . Assigning Preset Modes to Applications The Auto Mode tab allows you to associate a specific Preset Mode with Easy Arrange Easy Arrange helps you to effectively organize your work, then you just need to drag the application windows into...


