
UltraSharp Users Guide
Page 3
... Features 6 Identifying Parts and Controls 7 Monitor Specifications 10 Plug-and-Play 21 LCD Monitor Quality and Pixel Policy 21 Setting Up the Monitor 22 Attaching the Stand 22 Using the Tilt, Swivel, and Vertical Extension 25 Adjusting the Rotation Display Settings of Your System 26 Connecting Your Monitor 26 Organizing Your Cables 29 Removing the Monitor Stand 29 Wall Mounting (Optional 30 Operating the Monitor 31 Turning on the Monitor 31 Using the Front Panel Controls 31 Using the On-Screen Display (OSD) Menu 34 ...
... Features 6 Identifying Parts and Controls 7 Monitor Specifications 10 Plug-and-Play 21 LCD Monitor Quality and Pixel Policy 21 Setting Up the Monitor 22 Attaching the Stand 22 Using the Tilt, Swivel, and Vertical Extension 25 Adjusting the Rotation Display Settings of Your System 26 Connecting Your Monitor 26 Organizing Your Cables 29 Removing the Monitor Stand 29 Wall Mounting (Optional 30 Operating the Monitor 31 Turning on the Monitor 31 Using the Front Panel Controls 31 Using the On-Screen Display (OSD) Menu 34 ...

UltraSharp Users Guide
Page 6
... elegant viewing experience. • Extensive digital connectivity with DP, mDP, HDMI, and USB 3.0 helps future-proof your monitor. • Plug and play capability if supported by your system. • On-Screen Display (OSD) adjustments for ease of set-up and screen optimization. • Security lock slot. • Asset Management Capability. • Arsenic-Free glass and Mercury Free for U2518D) HDMI cable (U2518DX & U2518DR) • Quick Setup Guide • Safety,Environmental,and Regulatory Information • Factory Calibration Report...
... elegant viewing experience. • Extensive digital connectivity with DP, mDP, HDMI, and USB 3.0 helps future-proof your monitor. • Plug and play capability if supported by your system. • On-Screen Display (OSD) adjustments for ease of set-up and screen optimization. • Security lock slot. • Asset Management Capability. • Arsenic-Free glass and Mercury Free for U2518D) HDMI cable (U2518DX & U2518DR) • Quick Setup Guide • Safety,Environmental,and Regulatory Information • Factory Calibration Report...
UltraSharp Users Guide
Page 8
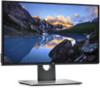
... port Port with security cable lock (sold separately). 5 Barcode, serial number, and Service Refer to this label if you need to contact Dell Tag label for technical support. 6 Cable management slot Use to organize cables by placing them through the slot. Back View Label Description Use 1 VESA mounting holes (100 mm x 100 Wall mount monitor using VESA- mm-behind attached VESA cover) compatible wall mount kit (100 mm x 100 mm). 2 Regulatory label Lists the regulatory approvals. 3 Stand release button...
... port Port with security cable lock (sold separately). 5 Barcode, serial number, and Service Refer to this label if you need to contact Dell Tag label for technical support. 6 Cable management slot Use to organize cables by placing them through the slot. Back View Label Description Use 1 VESA mounting holes (100 mm x 100 Wall mount monitor using VESA- mm-behind attached VESA cover) compatible wall mount kit (100 mm x 100 mm). 2 Regulatory label Lists the regulatory approvals. 3 Stand release button...

UltraSharp Users Guide
Page 9
... port USB upstream port Connect speakers to the monitor using a M3 x 6 mm screw (screw not included). WARNING: Excessive sound pressure from earphones or headphones can only be connected as the last monitor in ) Connect your computer with DP cable. USB downstream ports (2) Connect your computer with mDP to the computer. Stand lock Lock the stand to playback audio coming through HDMI or DP audio channels. mDP connector (in the MST chain. NOTE: Remove the rubber plug when use...
... port USB upstream port Connect speakers to the monitor using a M3 x 6 mm screw (screw not included). WARNING: Excessive sound pressure from earphones or headphones can only be connected as the last monitor in ) Connect your computer with DP cable. USB downstream ports (2) Connect your computer with mDP to the computer. Stand lock Lock the stand to playback audio coming through HDMI or DP audio channels. mDP connector (in the MST chain. NOTE: Remove the rubber plug when use...

UltraSharp Users Guide
Page 10
... Color gamut Calibration accuracy Connectivity Active matrix - Monitor Specifications Screen type Panel Type Aspect ratio Viewable image dimensions Diagonal Active Area Horizontal Vertical Area Pixel pitch Pixel per inch (PPI) Viewing angle Horizontal Vertical Brightness Contrast ratio Display screen coating Backlight Response Time (Gray to 1 (typical) Anti-glare treatment of the front polarizer (3H) hard coating LED 5 ms (FAST mode) 8 ms (NORMAL mode) 16.78 million colors 99% sRGB 99% REC709 79% DCI-P3 Delta...
... Color gamut Calibration accuracy Connectivity Active matrix - Monitor Specifications Screen type Panel Type Aspect ratio Viewable image dimensions Diagonal Active Area Horizontal Vertical Area Pixel pitch Pixel per inch (PPI) Viewing angle Horizontal Vertical Brightness Contrast ratio Display screen coating Backlight Response Time (Gray to 1 (typical) Anti-glare treatment of the front polarizer (3H) hard coating LED 5 ms (FAST mode) 8 ms (NORMAL mode) 16.78 million colors 99% sRGB 99% REC709 79% DCI-P3 Delta...

UltraSharp Users Guide
Page 11
... of monitor to active area) Adjustability Height adjustable stand Tilt Swivel Cable management Dell Display Manager (DDM) Compatibility Security 7.30 mm (Top) 7.30 mm (Left/Right) 8.80 mm (Bottom) 130 mm -5° to 21° -45° to 45° Yes Easy Arrange and other key features Security lock slot (cable lock sold separately) Antitheft stand lock slot (to panel) Resolution Specifications Horizontal scan range Vertical scan range Maximum preset resolution Video display capabilities (DP & HDMI...
... of monitor to active area) Adjustability Height adjustable stand Tilt Swivel Cable management Dell Display Manager (DDM) Compatibility Security 7.30 mm (Top) 7.30 mm (Left/Right) 8.80 mm (Bottom) 130 mm -5° to 21° -45° to 45° Yes Easy Arrange and other key features Security lock slot (cable lock sold separately) Antitheft stand lock slot (to panel) Resolution Specifications Horizontal scan range Vertical scan range Maximum preset resolution Video display capabilities (DP & HDMI...

UltraSharp Users Guide
Page 15
... button in the activeoff mode, the following table shows the power consumption and signaling of On Mode measured with maximum luminance, and USB active. No warranty as power save mode*. About Your Monitor | 15 VESA Modes Normal operation Active-off mode Switch off Horizontal Vertical Video Power Indicator Sync Sync Active Active Active White Inactive - NOTE: Pon: Power consumption of this information in OFF mode can automatically reduce its power consumption when not in use. Power...
... button in the activeoff mode, the following table shows the power consumption and signaling of On Mode measured with maximum luminance, and USB active. No warranty as power save mode*. About Your Monitor | 15 VESA Modes Normal operation Active-off mode Switch off Horizontal Vertical Video Power Indicator Sync Sync Active Active Active White Inactive - NOTE: Pon: Power consumption of this information in OFF mode can automatically reduce its power consumption when not in use. Power...
UltraSharp Users Guide
Page 26
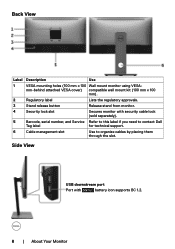
..., and then set the preferred rotation. No image when using the monitor with a non-Dell computer, you need to complete the procedure below to www.dell.com/support and download the latest driver for cable connection. A DP 1.1 Graphic card may experience performance degradation in graphic-intensive applications (3D Gaming and etc.). See Rotating the Monitor.) 3 Switch on your monitor. 4 Select the correct input source at Monitor OSD Menu and turn on your...
..., and then set the preferred rotation. No image when using the monitor with a non-Dell computer, you need to complete the procedure below to www.dell.com/support and download the latest driver for cable connection. A DP 1.1 Graphic card may experience performance degradation in graphic-intensive applications (3D Gaming and etc.). See Rotating the Monitor.) 3 Switch on your monitor. 4 Select the correct input source at Monitor OSD Menu and turn on your...

UltraSharp Users Guide
Page 36
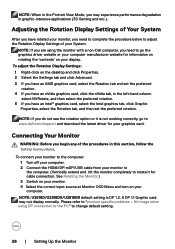
Icon Menu and Submenus DP mDP HDMI Description Select DP input when you are using the HDMI connector. Use to adjust the color setting mode. 36 | Operating the Monitor Select the HDMI input when you are using the DP (DisplayPort) connector. Use the Color menu to select the HDMI input source. Resets your monitor's Input Source settings to select Auto Select, the monitor scans for available input sources. Auto Select Reset Input Source Color Use to the factory defaults. Use to select the DP input source. Use to select the mDP input source. Select mDP input when...
Icon Menu and Submenus DP mDP HDMI Description Select DP input when you are using the HDMI connector. Use to adjust the color setting mode. 36 | Operating the Monitor Select the HDMI input when you are using the DP (DisplayPort) connector. Use the Color menu to select the HDMI input source. Resets your monitor's Input Source settings to select Auto Select, the monitor scans for available input sources. Auto Select Reset Input Source Color Use to the factory defaults. Use to select the DP input source. Use to select the mDP input source. Select mDP input when...
UltraSharp Users Guide
Page 37
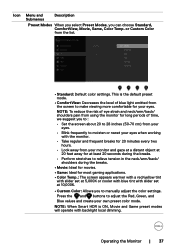
... preset color mode. NOTE: When Smart HDR is the default preset mode. • ComfortView: Decreases the level of time, we suggest you to : • Set the screen about 20 to 28 inches (50-70 cm) from your eyes when working with backlight local dimming. Icon Menu and Submenus Description Preset Modes When you select Preset Modes, you to manually adjust the color settings. Operating the Monitor | 37...
... preset color mode. NOTE: When Smart HDR is the default preset mode. • ComfortView: Decreases the level of time, we suggest you to : • Set the screen about 20 to 28 inches (50-70 cm) from your eyes when working with backlight local dimming. Icon Menu and Submenus Description Preset Modes When you select Preset Modes, you to manually adjust the color settings. Operating the Monitor | 37...

UltraSharp Users Guide
Page 42
Enable this feature for best user experience and optimum performance of your computer. DDC/CI (Display Data Channel/Command Interface) allows you to adjust the OSD settings, such as the DDC/CI, LCD conditioning, and so on your monitor. 42 | Operating the Monitor Select Off to turn off this option to adjust the monitor settings using software on . Displays the monitor's current settings. Icon Menu and Submenus Other Description Display Info DDC/CI Select this feature.
Enable this feature for best user experience and optimum performance of your computer. DDC/CI (Display Data Channel/Command Interface) allows you to adjust the OSD settings, such as the DDC/CI, LCD conditioning, and so on your monitor. 42 | Operating the Monitor Select Off to turn off this option to adjust the monitor settings using software on . Displays the monitor's current settings. Icon Menu and Submenus Other Description Display Info DDC/CI Select this feature.

UltraSharp Users Guide
Page 47
..., remove all digital and the analog cables from the back of computer. 3 Turn on -screen (against a black background), if the monitor cannot sense a video signal and is functioning properly. If your monitor and computer are properly connected but the monitor screen remains dark, run the monitor self-test by performing the following steps: 1 Turn off both your monitor is working correctly. While in this section, follow the Safety Instructions...
..., remove all digital and the analog cables from the back of computer. 3 Turn on -screen (against a black background), if the monitor cannot sense a video signal and is functioning properly. If your monitor and computer are properly connected but the monitor screen remains dark, run the monitor self-test by performing the following steps: 1 Turn off both your monitor is working correctly. While in this section, follow the Safety Instructions...

UltraSharp Users Guide
Page 48
or 4 This box also appears during normal system operation, if the video cable becomes disconnected or damaged. 5 Turn off your monitor is functioning properly. 48 | Troubleshooting If your monitor screen remains blank after you use the previous procedure, check your video controller and computer, because your monitor and reconnect the video cable; then turn on both your computer and the monitor.
or 4 This box also appears during normal system operation, if the video cable becomes disconnected or damaged. 5 Turn off your monitor is functioning properly. 48 | Troubleshooting If your monitor screen remains blank after you use the previous procedure, check your video controller and computer, because your monitor and reconnect the video cable; then turn on both your computer and the monitor.

UltraSharp Users Guide
Page 49
... screen changes to inspect the display in self-test mode. The color of the computer or monitor. Troubleshooting | 49 If you do not detect any abnormalities. 7 Repeat steps 5 and 6 to red. 6 Inspect the display for any screen abnormalities upon using the built-in diagnostics: 1 Make sure that helps you determine if the screen abnormality you are experiencing is in green, blue, black, white, and text screens. To exit, press Button...
... screen changes to inspect the display in self-test mode. The color of the computer or monitor. Troubleshooting | 49 If you do not detect any abnormalities. 7 Repeat steps 5 and 6 to red. 6 Inspect the display for any screen abnormalities upon using the built-in diagnostics: 1 Make sure that helps you determine if the screen abnormality you are experiencing is in green, blue, black, white, and text screens. To exit, press Button...

UltraSharp Users Guide
Page 50
..., see Dell Support site at: http://www.dell.com/support/monitors. • Reset the monitor to factory settings. • Adjust brightness & contrast controls via OSD. • Do not perform any troubleshooting steps. • Contact Dell immediately. • Ensure that the video cable connecting the monitor to the computer is connected properly and is secure. • Reset the monitor to factory settings. • Perform monitor self-test feature check to determine if the intermittent problem occurs in selftest mode. 50 | Troubleshooting
..., see Dell Support site at: http://www.dell.com/support/monitors. • Reset the monitor to factory settings. • Adjust brightness & contrast controls via OSD. • Do not perform any troubleshooting steps. • Contact Dell immediately. • Ensure that the video cable connecting the monitor to the computer is connected properly and is secure. • Reset the monitor to factory settings. • Perform monitor self-test feature check to determine if the intermittent problem occurs in selftest mode. 50 | Troubleshooting

UltraSharp Users Guide
Page 51
... the video cable connector. Product Specific Problems Specific Symptoms What You Experience Possible Solutions Screen image is too small Image is plugged in properly. Troubleshooting | 51 Color in Color menu OSD. • Change the Input Color Format to different video formats (aspect ratio) of the Preset Modes in the good Color menu OSD depending on screen, but does not fill entire viewing area • Check the Aspect Ratio setting in the Display menu OSD. • Reset the monitor to factory settings. Picture color not • Change the settings...
... the video cable connector. Product Specific Problems Specific Symptoms What You Experience Possible Solutions Screen image is too small Image is plugged in properly. Troubleshooting | 51 Color in Color menu OSD. • Change the Input Color Format to different video formats (aspect ratio) of the Preset Modes in the good Color menu OSD depending on screen, but does not fill entire viewing area • Check the Aspect Ratio setting in the Display menu OSD. • Reset the monitor to factory settings. Picture color not • Change the settings...
UltraSharp Users Guide
Page 54
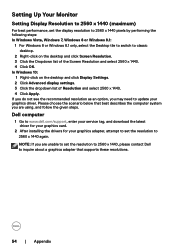
... download the latest driver for your graphics card. 2 After installing the drivers for your graphics driver. Please choose the scenario below that best describes the computer system you are unable to set the resolution to 2560 x 1440, please contact Dell to inquire about a graphics adapter that supports these resolutions. 54 | Appendix Setting Up Your Monitor Setting Display Resolution to 2560 x 1440 (maximum) For best performance, set the display resolution to 2560 x 1440 pixels...
... download the latest driver for your graphics card. 2 After installing the drivers for your graphics driver. Please choose the scenario below that best describes the computer system you are unable to set the resolution to 2560 x 1440, please contact Dell to inquire about a graphics adapter that supports these resolutions. 54 | Appendix Setting Up Your Monitor Setting Display Resolution to 2560 x 1440 (maximum) For best performance, set the display resolution to 2560 x 1440 pixels...
UltraSharp Users Guide
Page 55
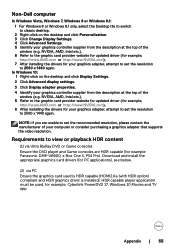
... capable player application must be used is HDR capable [HDMI2.0a (with HDR option) compliant and HDR graphics driver is installed]. In Windows 10: 1 Right-click on the desktop and click Personalization. 3 Click Change Display Settings. 4 Click Advanced Settings. 5 Identify your graphics adapter, attempt to set the resolution to 2560 x 1440 again. Download and install the appropriate graphics card drivers (for PC applications), see below...
... capable player application must be used is HDR capable [HDMI2.0a (with HDR option) compliant and HDR graphics driver is installed]. In Windows 10: 1 Right-click on the desktop and click Personalization. 3 Click Change Display Settings. 4 Click Advanced Settings. 5 Identify your graphics adapter, attempt to set the resolution to 2560 x 1440 again. Download and install the appropriate graphics card drivers (for PC applications), see below...
UltraSharp Display Manager Users Guide
Page 4
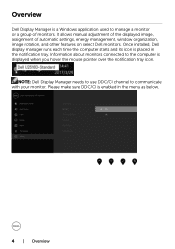
Once installed, Dell display manager runs each time the computer starts and its icon is placed in the menu as below. 4 | Overview NOTE: Dell Display Manager needs to use DDC/CI channel to the computer is displayed when you hover the mouse pointer over the notification tray icon. Information about monitors connected to communicate with your monitor. Please make sure DDC/CI is enabled in...
Once installed, Dell display manager runs each time the computer starts and its icon is placed in the menu as below. 4 | Overview NOTE: Dell Display Manager needs to use DDC/CI channel to the computer is displayed when you hover the mouse pointer over the notification tray icon. Information about monitors connected to communicate with your monitor. Please make sure DDC/CI is enabled in...

UltraSharp Display Manager Users Guide
Page 7
... list take priority over the general Direct3D setting. Applications present in full-screen mode. Dell Display Manager is enabled, Dell Display Manager automatically switches to Applications | 7 To add a new application to the assignment list, simply drag the application from one monitor to the next. In addition an option can vary from the desktop, Windows Start Menu, or elsewhere, and drop it can...
... list take priority over the general Direct3D setting. Applications present in full-screen mode. Dell Display Manager is enabled, Dell Display Manager automatically switches to Applications | 7 To add a new application to the assignment list, simply drag the application from one monitor to the next. In addition an option can vary from the desktop, Windows Start Menu, or elsewhere, and drop it can...


