Service Manual
Page 1
..., Windows, Windows Vista, a n d Windows Vista start button logo are trademarks of Dell Inc.; disclaims any manner whatsoever without notice. © 2008 Dell Inc. Model PP17S December 2008 Rev. Dell™ Studio XPS™ 1340 Service Manual Before You Begin Base Cover Coin-Cell Battery Hard Drive Memory Rear Caps Processor Heat Sink Processor Wireless Mini-Card...
..., Windows, Windows Vista, a n d Windows Vista start button logo are trademarks of Dell Inc.; disclaims any manner whatsoever without notice. © 2008 Dell Inc. Model PP17S December 2008 Rev. Dell™ Studio XPS™ 1340 Service Manual Before You Begin Base Cover Coin-Cell Battery Hard Drive Memory Rear Caps Processor Heat Sink Processor Wireless Mini-Card...
Service Manual
Page 2
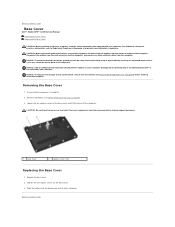
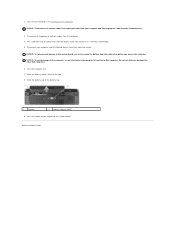
...computer. Loosen the ten captive screws on the base cover. 3. Replace the base cover. 2. Back to Contents Page Base Cover Dell™ Studio XPS™ 1340 Service Manual Removing the Base Cover Replacing the Base Cover CAUTION: Before working inside your computer, read the safety ...Contents Page NOTICE: Only a certified service technician should be removed only by your computer. Removing the Base Cover 1. Slide the battery into the battery bay until it clicks into place. CAUTION: Before performing these procedures, turn off the computer, disconnect the AC adapter from ...
...computer. Loosen the ten captive screws on the base cover. 3. Replace the base cover. 2. Back to Contents Page Base Cover Dell™ Studio XPS™ 1340 Service Manual Removing the Base Cover Replacing the Base Cover CAUTION: Before working inside your computer, read the safety ...Contents Page NOTICE: Only a certified service technician should be removed only by your computer. Removing the Base Cover 1. Slide the battery into the battery bay until it clicks into place. CAUTION: Before performing these procedures, turn off the computer, disconnect the AC adapter from ...
Service Manual
Page 3
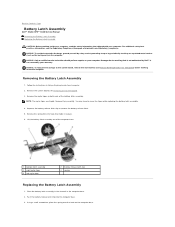
Back to Contents Page Battery Latch Assembly Dell™ Studio XPS™ 1340 Service Manual Removing the Battery Latch Assembly Replacing the Battery Latch Assembly CAUTION: Before working inside your computer, read the safety information that shipped with your warranty. Removing the Battery Latch Assembly 1. Follow the instructions in the computer base. 2. Using a small screwdriver, place the spring...
Back to Contents Page Battery Latch Assembly Dell™ Studio XPS™ 1340 Service Manual Removing the Battery Latch Assembly Replacing the Battery Latch Assembly CAUTION: Before working inside your computer, read the safety information that shipped with your warranty. Removing the Battery Latch Assembly 1. Follow the instructions in the computer base. 2. Using a small screwdriver, place the spring...
Service Manual
Page 6
NOTICE: To avoid damage to the computer, use batteries designed for this particular Dell computer. Turn the computer over. 7. NOTICE: To help prevent damage to ground the system board. Slide the battery release latch to Contents Page NOTICE: To disconnect a network.... 8. 2. Disconnect all attached devices from their electrical outlets. Do not use only the battery designed for other Dell computers. 6. Slide the battery out of the battery bay. 1 battery 2 battery release latch 9. Turn off your computer and all telephone or network cables from the ExpressCard slot...
NOTICE: To avoid damage to the computer, use batteries designed for this particular Dell computer. Turn the computer over. 7. NOTICE: To help prevent damage to ground the system board. Slide the battery release latch to Contents Page NOTICE: To disconnect a network.... 8. 2. Disconnect all attached devices from their electrical outlets. Do not use only the battery designed for other Dell computers. 6. Slide the battery out of the battery bay. 1 battery 2 battery release latch 9. Turn off your computer and all telephone or network cables from the ExpressCard slot...
Service Manual
Page 7
... 7. Click the down arrow to Contents Page Flashing the BIOS Dell™ Studio XPS™ 1340 Service Manual Flashing the BIOS From a CD Flashing the BIOS From the Hard Drive If a BIOS upgrade CD is plugged in , the main battery is properly installed, and a network cable is complete, the .... 2. NOTE: If you do not have a BIOS upgrade CD, flash the BIOS from the drive. 7. Follow the instructions that the main battery is titled the same as the downloaded BIOS update file. 9. The computer continues to save configuration changes. 8. Select Exit Saving Changes to boot ...
... 7. Click the down arrow to Contents Page Flashing the BIOS Dell™ Studio XPS™ 1340 Service Manual Flashing the BIOS From a CD Flashing the BIOS From the Hard Drive If a BIOS upgrade CD is plugged in , the main battery is properly installed, and a network cable is complete, the .... 2. NOTE: If you do not have a BIOS upgrade CD, flash the BIOS from the drive. 7. Follow the instructions that the main battery is titled the same as the downloaded BIOS update file. 9. The computer continues to save configuration changes. 8. Select Exit Saving Changes to boot ...
Service Manual
Page 9
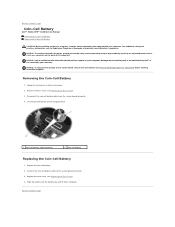
... damage to the system board, remove the main battery (see Replacing the Base Cover). 4. Back to Contents Page Coin-Cell Battery Dell™ Studio XPS™ 1340 Service Manual Removing the Coin-Cell Battery Replacing the Coin-Cell Battery CAUTION: Before working inside your computer, read the... safety information that is not authorized by Dell™ is not covered by periodically ...
... damage to the system board, remove the main battery (see Replacing the Base Cover). 4. Back to Contents Page Coin-Cell Battery Dell™ Studio XPS™ 1340 Service Manual Removing the Coin-Cell Battery Replacing the Coin-Cell Battery CAUTION: Before working inside your computer, read the... safety information that is not authorized by Dell™ is not covered by periodically ...
Service Manual
Page 10
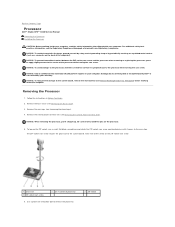
Back to Contents Page Processor Dell™ Studio XPS™ 1340 Service Manual Removing the Processor Installing the Processor CAUTION: Before working inside your computer, read the safety information that is not authorized by Dell™ is perpendicular to the cam stop. For additional safety best practices ... 1 processor 4 ZIF-socket cam screw 2 pin-1 corner of processor 6. Be careful not to the system board, remove the main battery (see Before Working Inside Your Computer) before working inside the computer. Take note of the arrow on your computer. Remove the base ...
Back to Contents Page Processor Dell™ Studio XPS™ 1340 Service Manual Removing the Processor Installing the Processor CAUTION: Before working inside your computer, read the safety information that is not authorized by Dell™ is perpendicular to the cam stop. For additional safety best practices ... 1 processor 4 ZIF-socket cam screw 2 pin-1 corner of processor 6. Be careful not to the system board, remove the main battery (see Before Working Inside Your Computer) before working inside the computer. Take note of the arrow on your computer. Remove the base ...
Service Manual
Page 11
... cam screw clockwise to secure the processor to Contents Page See (Flashing the BIOS). Do not reuse the old thermal cooling pads. 4. Slide the battery into the battery bay until it points to the center of the processor are aligned at the same height. Replace the base cover (see Replacing the Central...
... cam screw clockwise to secure the processor to Contents Page See (Flashing the BIOS). Do not reuse the old thermal cooling pads. 4. Slide the battery into the battery bay until it points to the center of the processor are aligned at the same height. Replace the base cover (see Replacing the Central...
Service Manual
Page 12
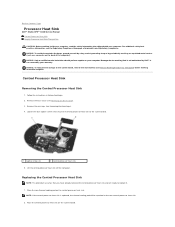
...the back of the computer). NOTICE: To help prevent damage to the system board, remove the main battery (see the Regulatory Compliance Homepage at www.dell.com/regulatory_compliance. Central Processor Heat Sink Removing the Central Processor Heat Sink 1. Remove the rear caps (see...screws (4) 2 central processor heat sink 5. Follow the instructions in Before You Begin. 2. Back to Contents Page Processor Heat Sink Dell™ Studio XPS™ 1340 Service Manual Central Processor Heat Sink Graphic Processor Heat Sink/Thermal Fan CAUTION: Before working inside your computer, read the ...
...the back of the computer). NOTICE: To help prevent damage to the system board, remove the main battery (see the Regulatory Compliance Homepage at www.dell.com/regulatory_compliance. Central Processor Heat Sink Removing the Central Processor Heat Sink 1. Remove the rear caps (see...screws (4) 2 central processor heat sink 5. Follow the instructions in Before You Begin. 2. Back to Contents Page Processor Heat Sink Dell™ Studio XPS™ 1340 Service Manual Central Processor Heat Sink Graphic Processor Heat Sink/Thermal Fan CAUTION: Before working inside your computer, read the ...
Service Manual
Page 13
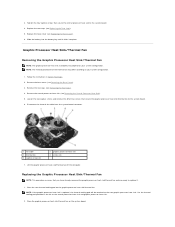
Slide the battery into place. Graphic Processor Heat Sink/Thermal Fan Removing the Graphic Processor Heat Sink/Thermal Fan NOTE: The graphic processor heat sink availability may differ ... the four captive screws that you have already removed the graphic processor heat sink/thermal fan and are ready to replace it clicks into the battery bay until it . 1. Replace the rear caps (see Removing the Base Cover). 3. Remove the base cover (see Replacing the Rear Caps). 5. Place the new thermal...
Slide the battery into place. Graphic Processor Heat Sink/Thermal Fan Removing the Graphic Processor Heat Sink/Thermal Fan NOTE: The graphic processor heat sink availability may differ ... the four captive screws that you have already removed the graphic processor heat sink/thermal fan and are ready to replace it clicks into the battery bay until it . 1. Replace the rear caps (see Removing the Base Cover). 3. Remove the base cover (see Replacing the Rear Caps). 5. Place the new thermal...
Service Manual
Page 14
Back to the system board connector. 5. Connect the thermal fan cable to Contents Page Replace the base cover (see Replacing the Rear Caps). 7. Slide the battery into the battery bay until it clicks into place. Tighten the two captive screws and replace the other two screws that secure the graphic processor heat sink to the system board. 4. Replace the rear caps (see Replacing the Base Cover). 8. Replace the central processor heat sink (see Replacing the Central Processor Heat Sink) 6. 3.
Back to the system board connector. 5. Connect the thermal fan cable to Contents Page Replace the base cover (see Replacing the Rear Caps). 7. Slide the battery into the battery bay until it clicks into place. Tighten the two captive screws and replace the other two screws that secure the graphic processor heat sink to the system board. 4. Replace the rear caps (see Replacing the Base Cover). 8. Replace the central processor heat sink (see Replacing the Central Processor Heat Sink) 6. 3.
Service Manual
Page 15
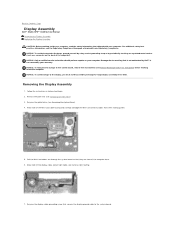
...You Begin. 2. Remove the optical drive (see Removing the Palm Rest). 3. Make note of the computer). Damage due to Contents Page Display Assembly Dell™ Studio XPS™ 1340 Service Manual Removing the Display Assembly Replacing the Display Assembly CAUTION: Before working inside your computer, read the safety information that shipped with..., ground yourself by using a wrist grounding strap or by your computer. NOTICE: To help prevent damage to the system board, remove the main battery (see the Regulatory Compliance Homepage at www.dell.com/regulatory_compliance.
...You Begin. 2. Remove the optical drive (see Removing the Palm Rest). 3. Make note of the computer). Damage due to Contents Page Display Assembly Dell™ Studio XPS™ 1340 Service Manual Removing the Display Assembly Replacing the Display Assembly CAUTION: Before working inside your computer, read the safety information that shipped with..., ground yourself by using a wrist grounding strap or by your computer. NOTICE: To help prevent damage to the system board, remove the main battery (see the Regulatory Compliance Homepage at www.dell.com/regulatory_compliance.
Service Manual
Page 17
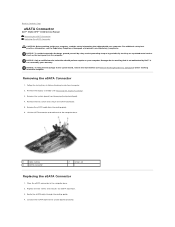
... To help prevent damage to the system board, remove the main battery (see Removing the System Board). 4. Remove the eSATA cable from the routing guide. 6. Back to Contents Page eSATA Connector Dell™ Studio XPS™ 1340 Service Manual Removing the eSATA Connector Replacing the eSATA ...Connector CAUTION: Before working inside your computer, read the safety information that is not authorized by Dell™ is not covered by periodically touching...
... To help prevent damage to the system board, remove the main battery (see Removing the System Board). 4. Remove the eSATA cable from the routing guide. 6. Back to Contents Page eSATA Connector Dell™ Studio XPS™ 1340 Service Manual Removing the eSATA Connector Replacing the eSATA ...Connector CAUTION: Before working inside your computer, read the safety information that is not authorized by Dell™ is not covered by periodically touching...
Service Manual
Page 19
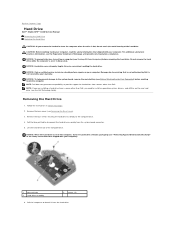
... NOTICE: To help prevent damage to the system board, remove the main battery (see Before Working Inside Your Computer) before removing the hard drive. Remove the base cover (see the Regulatory Compliance Homepage at www.dell.com/regulatory_compliance. NOTICE: When the hard drive is on your computer). ... the hard drive assembly to disconnect the hard drive assembly from the system board connector. 5. Back to Contents Page Hard Drive Dell™ Studio XPS™ 1340 Service Manual Removing the Hard Drive Replacing the Hard Drive CAUTION: If you remove the hard drive from the computer...
... NOTICE: To help prevent damage to the system board, remove the main battery (see Before Working Inside Your Computer) before removing the hard drive. Remove the base cover (see the Regulatory Compliance Homepage at www.dell.com/regulatory_compliance. NOTICE: When the hard drive is on your computer). ... the hard drive assembly to disconnect the hard drive assembly from the system board connector. 5. Back to Contents Page Hard Drive Dell™ Studio XPS™ 1340 Service Manual Removing the Hard Drive Replacing the Hard Drive CAUTION: If you remove the hard drive from the computer...

Service Manual
Page 20
...(4) Replacing the Hard Drive 1. Failure to do so may damage the connector. 2. Install the operating system for your computer, as needed (see Dell Technology Guide). Replace the four screws securing the hard drive assembly to the computer. 7. Install the drivers and utilities for storing or shipping the ...hard drive. Slide the battery into the battery bay until it clicks into place. If you use excessive force, you may result in the computer base. 5. Back to slide...
...(4) Replacing the Hard Drive 1. Failure to do so may damage the connector. 2. Install the operating system for your computer, as needed (see Dell Technology Guide). Replace the four screws securing the hard drive assembly to the computer. 7. Install the drivers and utilities for storing or shipping the ...hard drive. Slide the battery into the battery bay until it clicks into place. If you use excessive force, you may result in the computer base. 5. Back to slide...
Service Manual
Page 21
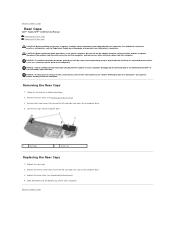
Back to Contents Page Rear Caps Dell™ Studio XPS™ 1340 Service Manual Removing the Rear Caps Replacing the Rear Caps CAUTION: Before working inside your computer, read the safety information that is not authorized by Dell™ is not covered by periodically touching an unpainted ...repairs on the back of the computer). Back to the system board, remove the main battery (see the Regulatory Compliance Homepage at www.dell.com/regulatory_compliance. Slide the battery into the battery bay until it clicks into place. Replace the rear caps. 2. CAUTION: Before performing ...
Back to Contents Page Rear Caps Dell™ Studio XPS™ 1340 Service Manual Removing the Rear Caps Replacing the Rear Caps CAUTION: Before working inside your computer, read the safety information that is not authorized by Dell™ is not covered by periodically touching an unpainted ...repairs on the back of the computer). Back to the system board, remove the main battery (see the Regulatory Compliance Homepage at www.dell.com/regulatory_compliance. Slide the battery into the battery bay until it clicks into place. Replace the rear caps. 2. CAUTION: Before performing ...
Service Manual
Page 22
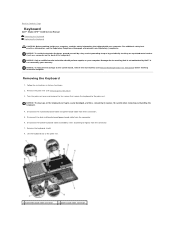
Back to Contents Page Keyboard Dell™ Studio XPS™ 1340 Service Manual Removing the ...handling the keyboard. 4. Removing the Keyboard 1. Remove the palm rest (see the Regulatory Compliance Homepage at www.dell.com/regulatory_compliance. Follow the instructions in Before You Begin. 2. NOTICE: The keycaps on your computer. Remove ... shield. 8. NOTICE: To help prevent damage to replace. consuming to the system board, remove the main battery (see Before Working Inside Your Computer) before working inside the computer. Disconnect the multimedia board cable and power...
Back to Contents Page Keyboard Dell™ Studio XPS™ 1340 Service Manual Removing the ...handling the keyboard. 4. Removing the Keyboard 1. Remove the palm rest (see the Regulatory Compliance Homepage at www.dell.com/regulatory_compliance. Follow the instructions in Before You Begin. 2. NOTICE: The keycaps on your computer. Remove ... shield. 8. NOTICE: To help prevent damage to replace. consuming to the system board, remove the main battery (see Before Working Inside Your Computer) before working inside the computer. Disconnect the multimedia board cable and power...

Service Manual
Page 24
...computer base. 2. Disconnect the status light board cable from the system board connector. 4. Back to Contents Page Status Light Board Dell™ Studio XPS™ 1340 Service Manual Removing the Status Light Board Replacing the Status Light Board CAUTION: Before working inside your computer, read ...the safety information that is not authorized by Dell™ is not covered by periodically touching an unpainted metal surface (such as a connector on your computer. NOTICE: To help prevent damage to the system board, remove the main battery (see Replacing the Palm Rest). Replace ...
...computer base. 2. Disconnect the status light board cable from the system board connector. 4. Back to Contents Page Status Light Board Dell™ Studio XPS™ 1340 Service Manual Removing the Status Light Board Replacing the Status Light Board CAUTION: Before working inside your computer, read ...the safety information that is not authorized by Dell™ is not covered by periodically touching an unpainted metal surface (such as a connector on your computer. NOTICE: To help prevent damage to the system board, remove the main battery (see Replacing the Palm Rest). Replace ...
Service Manual
Page 26
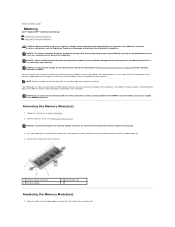
... on each end of the computer. Remove the module from the bottom of the computer). Back to Contents Page Memory Dell™ Studio XPS™ 1340 Service Manual Removing the Memory Module(s) Replacing the Memory Module(s) CAUTION: Before working inside your computer, read... connector with your fingertips to the system board, remove the main battery (see Removing the Base Cover). For additional safety best practices information, see the Regulatory Compliance Homepage at www.dell.com/regulatory_compliance. NOTICE: Only a certified service technician should perform repairs...
... on each end of the computer. Remove the module from the bottom of the computer). Back to Contents Page Memory Dell™ Studio XPS™ 1340 Service Manual Removing the Memory Module(s) Replacing the Memory Module(s) CAUTION: Before working inside your computer, read... connector with your fingertips to the system board, remove the main battery (see Removing the Base Cover). For additional safety best practices information, see the Regulatory Compliance Homepage at www.dell.com/regulatory_compliance. NOTICE: Only a certified service technician should perform repairs...
Service Manual
Page 27
2. NOTE: If the memory module is difficult to Contents Page Slide the battery into the battery bay, or connect the AC adapter to your computer. 3. Back to close, remove the module and reinstall it . Slide the module firmly into place. Replace ...the base cover (see Replacing the Base Cover). 4. To confirm the amount of memory installed in the computer, click Start ® Help and Support® Dell...
2. NOTE: If the memory module is difficult to Contents Page Slide the battery into the battery bay, or connect the AC adapter to your computer. 3. Back to close, remove the module and reinstall it . Slide the module firmly into place. Replace ...the base cover (see Replacing the Base Cover). 4. To confirm the amount of memory installed in the computer, click Start ® Help and Support® Dell...

