Service Manual
Page 1
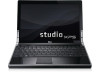
... Corporation in trademarks and trade names other countries. Bluetooth is strictly forbidden. All rights reserved. A00 Dell™ Studio XPS™ 1340 Service Manual Before You Begin Base Cover Coin-Cell Battery Hard Drive Memory Rear Caps Processor Heat Sink Processor Wireless Mini-Card Palm Rest Keyboard Display Assembly Optical Drive Status Light Board System Board eSATA Connector AC Adapter Connector Battery Latch Assembly Flashing the BIOS Notes, Notices, and Cautions NOTE: A NOTE...
... Corporation in trademarks and trade names other countries. Bluetooth is strictly forbidden. All rights reserved. A00 Dell™ Studio XPS™ 1340 Service Manual Before You Begin Base Cover Coin-Cell Battery Hard Drive Memory Rear Caps Processor Heat Sink Processor Wireless Mini-Card Palm Rest Keyboard Display Assembly Optical Drive Status Light Board System Board eSATA Connector AC Adapter Connector Battery Latch Assembly Flashing the BIOS Notes, Notices, and Cautions NOTE: A NOTE...

Service Manual
Page 5
... Begin Dell™ Studio XPS™ 1340 Service Manual Recommended Tools Turning Off Your Computer Before Working Inside Your Computer This section provides procedures for removing and installing the components in your operating system, press and hold the power button for at www.dell.com/regulatory_compliance. if you disconnect the cable. Ensure that the computer and any connector pins. In Microsoft® Windows Vista®, click Start...
... Begin Dell™ Studio XPS™ 1340 Service Manual Recommended Tools Turning Off Your Computer Before Working Inside Your Computer This section provides procedures for removing and installing the components in your operating system, press and hold the power button for at www.dell.com/regulatory_compliance. if you disconnect the cable. Ensure that the computer and any connector pins. In Microsoft® Windows Vista®, click Start...
Service Manual
Page 7
... as the downloaded BIOS update file. 9. If the Export Compliance Disclaimer window appears, click Yes, I Accept this program to disk and then click OK. The file icon appears on the screen. Back to Contents Page Flashing the BIOS Dell™ Studio XPS™ 1340 Service Manual Flashing the BIOS From a CD Flashing the BIOS From the Hard Drive If a BIOS upgrade CD is installed properly. Follow the instructions that the AC adapter is plugged...
... as the downloaded BIOS update file. 9. If the Export Compliance Disclaimer window appears, click Yes, I Accept this program to disk and then click OK. The file icon appears on the screen. Back to Contents Page Flashing the BIOS Dell™ Studio XPS™ 1340 Service Manual Flashing the BIOS From a CD Flashing the BIOS From the Hard Drive If a BIOS upgrade CD is installed properly. Follow the instructions that the AC adapter is plugged...
Service Manual
Page 15
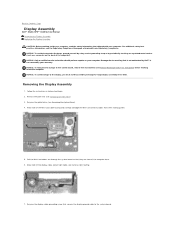
...-Card cable routing and carefully dislodge the Mini-Card antenna cables from their routing guides. 5. Back to Contents Page Display Assembly Dell™ Studio XPS™ 1340 Service Manual Removing the Display Assembly Replacing the Display Assembly CAUTION: Before working inside your computer, read the safety information that secures the display ground cable to the system board. Remove the palm rest (see Removing the Optical Drive). 4. Removing the Display Assembly 1. Make note of the display cable, power light cable, and camera cable...
...-Card cable routing and carefully dislodge the Mini-Card antenna cables from their routing guides. 5. Back to Contents Page Display Assembly Dell™ Studio XPS™ 1340 Service Manual Removing the Display Assembly Replacing the Display Assembly CAUTION: Before working inside your computer, read the safety information that secures the display ground cable to the system board. Remove the palm rest (see Removing the Optical Drive). 4. Removing the Display Assembly 1. Make note of the display cable, power light cable, and camera cable...
Service Manual
Page 19
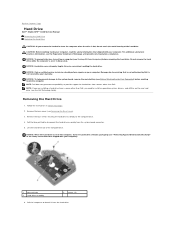
... the hard drive assembly from the system board connector. 5. Pull the interposer to detach it in Before You Begin. 2. Back to Contents Page Hard Drive Dell™ Studio XPS™ 1340 Service Manual Removing the Hard Drive Replacing the Hard Drive CAUTION: If you remove the hard drive from the computer when the drive is not covered by Dell is hot, do not touch the metal housing of the computer base. CAUTION: Before working inside...
... the hard drive assembly from the system board connector. 5. Pull the interposer to detach it in Before You Begin. 2. Back to Contents Page Hard Drive Dell™ Studio XPS™ 1340 Service Manual Removing the Hard Drive Replacing the Hard Drive CAUTION: If you remove the hard drive from the computer when the drive is not covered by Dell is hot, do not touch the metal housing of the computer base. CAUTION: Before working inside...
Service Manual
Page 26
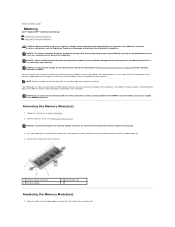
... servicing that are covered under your computer warranty. Follow the instructions in your Setup Guide for your computer. NOTICE: To prevent damage to the memory module connector, do not use tools to carefully spread apart the securing clips on the memory supported by your fingertips to spread the memory module securing clips. 3. Back to Contents Page Memory Dell™ Studio XPS™ 1340 Service Manual Removing the Memory Module(s) Replacing the Memory Module(s) CAUTION: Before working...
... servicing that are covered under your computer warranty. Follow the instructions in your Setup Guide for your computer. NOTICE: To prevent damage to the memory module connector, do not use tools to carefully spread apart the securing clips on the memory supported by your fingertips to spread the memory module securing clips. 3. Back to Contents Page Memory Dell™ Studio XPS™ 1340 Service Manual Removing the Memory Module(s) Replacing the Memory Module(s) CAUTION: Before working...
Service Manual
Page 28
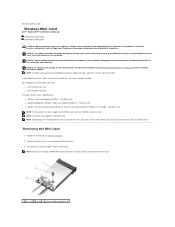
..., one Half Mini-Card slot The types of the Mini-Card slots may not have Min-Cards installed in Before You Begin. 2. Full Mini-Card NOTE: Your computer can only support two Full Mini-Cards and one Half Mini-Card at www.dell.com/regulatory_compliance. Back to Contents Page Wireless Mini-Card Dell™ Studio XPS™ 1340 Service Manual Removing the Mini-Card Replacing the Mini-Card CAUTION: Before working inside your computer...
..., one Half Mini-Card slot The types of the Mini-Card slots may not have Min-Cards installed in Before You Begin. 2. Full Mini-Card NOTE: Your computer can only support two Full Mini-Cards and one Half Mini-Card at www.dell.com/regulatory_compliance. Back to Contents Page Wireless Mini-Card Dell™ Studio XPS™ 1340 Service Manual Removing the Mini-Card Replacing the Mini-Card CAUTION: Before working inside your computer...

Service Manual
Page 29
... more information, see the Dell Technology Guide. Press the other than Dell, you are installing. Connect the appropriate antenna cables to the Mini-Card you may damage the connector. 2. Connectors on the system board. 4. Replace the base cover (see "Protecting Against Electrostatic Discharge" in the computer, store it clicks into place. Install the drivers and utilities for the MiniCard supported by your computer, as...
... more information, see the Dell Technology Guide. Press the other than Dell, you are installing. Connect the appropriate antenna cables to the Mini-Card you may damage the connector. 2. Connectors on the system board. 4. Replace the base cover (see "Protecting Against Electrostatic Discharge" in the computer, store it clicks into place. Install the drivers and utilities for the MiniCard supported by your computer, as...
Service Manual
Page 37
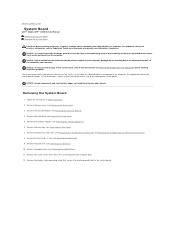
...-Cell Battery). 4. Remove the coin-cell battery (see Removing the Base Cover). 3. Remove the palm rest (see the Regulatory Compliance Homepage at www.dell.com/regulatory_compliance. For additional safety best practices information, see Removing the Palm Rest). 10. Damage due to the replacement system board. The system board's BIOS chip contains the Service Tag, which is any (see Removing the Hard Drive). 5. Remove the hard drive (see Removing the Mini-Card). 9. Remove...
...-Cell Battery). 4. Remove the coin-cell battery (see Removing the Base Cover). 3. Remove the palm rest (see the Regulatory Compliance Homepage at www.dell.com/regulatory_compliance. For additional safety best practices information, see Removing the Palm Rest). 10. Damage due to the replacement system board. The system board's BIOS chip contains the Service Tag, which is any (see Removing the Hard Drive). 5. Remove the hard drive (see Removing the Mini-Card). 9. Remove...
Setup Guide
Page 5
...7 Connect the Network Cable (Optional 8 Press the Power Control 9 Set Up Windows Vista 10 Connecting to the Internet (Optional 10 Setting Up 5.1 Audio Connections 12 Removing and Replacing the Battery 13 Using Your Studio XPS 14 Device Status Lights 14 Right Side Features 16 Left Side Features 20 Display Features 22 Media, Wireless, and Power Controls 23 Computer Base and Keyboard Features 24 Optional Graphics Processor Feature 26 Software Features 26 Solving Problems 29 Network Problems 29 Power Problems 30 Memory Problems 31 Lockups and Software Problems 31 Using Support...
...7 Connect the Network Cable (Optional 8 Press the Power Control 9 Set Up Windows Vista 10 Connecting to the Internet (Optional 10 Setting Up 5.1 Audio Connections 12 Removing and Replacing the Battery 13 Using Your Studio XPS 14 Device Status Lights 14 Right Side Features 16 Left Side Features 20 Display Features 22 Media, Wireless, and Power Controls 23 Computer Base and Keyboard Features 24 Optional Graphics Processor Feature 26 Software Features 26 Solving Problems 29 Network Problems 29 Power Problems 30 Memory Problems 31 Lockups and Software Problems 31 Using Support...
Setup Guide
Page 28
... the given order). Using Your Studio XPS™ Backlit Keyboard/Touch Pad Brightness Settings - The three lighting states are: • full keyboard/touch pad brightness • no lighting • half keyboard/touch pad brightness Touchpad Circular Scrolling and Zoom Settings To change the circular scrolling and zoom settings, double-click the Dell Touchpad icon on your computer. 26 Hybrid SLI allows the central processor and graphics processor to create presentations, brochures, greeting cards, fliers, and spreadsheets. Press keys to toggle...
... the given order). Using Your Studio XPS™ Backlit Keyboard/Touch Pad Brightness Settings - The three lighting states are: • full keyboard/touch pad brightness • no lighting • half keyboard/touch pad brightness Touchpad Circular Scrolling and Zoom Settings To change the circular scrolling and zoom settings, double-click the Dell Touchpad icon on your computer. 26 Hybrid SLI allows the central processor and graphics processor to create presentations, brochures, greeting cards, fliers, and spreadsheets. Press keys to toggle...
Setup Guide
Page 29
... videos, play games, create your operating system to configure the power settings on by accessing the Personalize appearance and sounds window. Entertainment and Multimedia You can be recorded to a disc, saved on portable products such as digital cameras and cell phones. Click Personalize, to open area of inactivity. 27 Using Your Studio XPS™ After connecting to the Internet, you can access websites, setup an e-mail account, upload and download...
... videos, play games, create your operating system to configure the power settings on by accessing the Personalize appearance and sounds window. Entertainment and Multimedia You can be recorded to a disc, saved on portable products such as digital cameras and cell phones. Click Personalize, to open area of inactivity. 27 Using Your Studio XPS™ After connecting to the Internet, you can access websites, setup an e-mail account, upload and download...
Setup Guide
Page 31
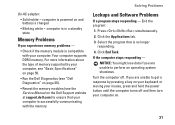
... "Using Support Tools" on page 33 or "Contacting Dell" on the center control cover and then release. If you cannot solve your wireless connection. To turn on wireless again, with the computer turned on, gently touch the wireless control on page 47. You can also use Windows Wireless Network Connections, accessed from the Control Panel, to your wireless radios. Solving Problems This section provides troubleshooting information for advanced service and troubleshooting instructions. CAUTION: Only trained service personnel should remove...
... "Using Support Tools" on page 33 or "Contacting Dell" on the center control cover and then release. If you cannot solve your wireless connection. To turn on wireless again, with the computer turned on, gently touch the wireless control on page 47. You can also use Windows Wireless Network Connections, accessed from the Control Panel, to your wireless radios. Solving Problems This section provides troubleshooting information for advanced service and troubleshooting instructions. CAUTION: Only trained service personnel should remove...
Setup Guide
Page 33
... "Basic Specifications" on page 50. • Run the Dell Diagnostics (see "Dell Diagnostics" on page 36). • Reseat the memory modules (see the Service Manual on your keyboard or moving your mouse, press and hold the power button until the computer turns off . Click End Task. Your computer supports DDR3 memory. Click the Applications tab. 3. NOTICE: You might lose data if you experience memory problems - •...
... "Basic Specifications" on page 50. • Run the Dell Diagnostics (see "Dell Diagnostics" on page 36). • Reseat the memory modules (see the Service Manual on your keyboard or moving your mouse, press and hold the power button until the computer turns off . Click End Task. Your computer supports DDR3 memory. Click the Applications tab. 3. NOTICE: You might lose data if you experience memory problems - •...
Setup Guide
Page 36
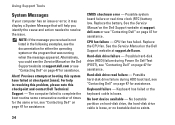
.... See the Service Manual on the Dell Support website at support.dell.com or see the documentation for assistance. See the Service Manual on the Dell Support website at checkpoint [nnnn]. Keyboard failure - No boot device available - Alert! Keyboard has failed or the keyboard cable is loose. Possible system board failure or real-time clock (RTC) battery low. CPU fan has failed. Replace the battery. Possible hard‑disk drive failure during Power On Self Test...
.... See the Service Manual on the Dell Support website at support.dell.com or see the documentation for assistance. See the Service Manual on the Dell Support website at checkpoint [nnnn]. Keyboard failure - No boot device available - Alert! Keyboard has failed or the keyboard cable is loose. Possible system board failure or real-time clock (RTC) battery low. CPU fan has failed. Replace the battery. Possible hard‑disk drive failure during Power On Self Test...
Setup Guide
Page 37
... Start → Help and Support. 2. Type hardware troubleshooter in the BIOS setup. Use an external power source to start the Hardware Troubleshooter: 1. To start the search. 3. USB over current error - See "Contacting Dell" on the system board might be enabled or disabled in the search field and press to connect the USB device, or if your device has two USB cables, connect both of range may or may not indicate a potential hard drive problem - Your USB device needs more power to resolve the incompatibility. Hard Drive SELF MONITORING...
... Start → Help and Support. 2. Type hardware troubleshooter in the BIOS setup. Use an external power source to start the Hardware Troubleshooter: 1. To start the search. 3. USB over current error - See "Contacting Dell" on the system board might be enabled or disabled in the search field and press to connect the USB device, or if your device has two USB cables, connect both of range may or may not indicate a potential hard drive problem - Your USB device needs more power to resolve the incompatibility. Hard Drive SELF MONITORING...
Setup Guide
Page 43
... operating system logo appears, continue to Boot from CD-ROM. Click Exit if the Install Windows message appears. 4. When the DELL logo appears, press immediately. Save and close any open files and exit any key to wait until you must also reinstall the device drivers, virus protection program, and other software. 1. Insert the Operating System disc. 3. When the boot device list appears, highlight CD/DVD/CD-RW Drive...
... operating system logo appears, continue to Boot from CD-ROM. Click Exit if the Install Windows message appears. 4. When the DELL logo appears, press immediately. Save and close any open files and exit any key to wait until you must also reinstall the device drivers, virus protection program, and other software. 1. Insert the Operating System disc. 3. When the boot device list appears, highlight CD/DVD/CD-RW Drive...
Setup Guide
Page 50
.... See: the Operating System media. reinstall or replace a worn or defective part. Check your warranty and return policies before working inside your computer with new or additional memory, or a new hard drive. the Dell Technology Guide installed on the Dell Support website at support.dell.com. the Drivers and Utilities media. run a diagnostic program for your computer, reinstall Notebook system software, or update drivers for your hard drive. learn more about your operating system. the Service Manual on your...
.... See: the Operating System media. reinstall or replace a worn or defective part. Check your warranty and return policies before working inside your computer with new or additional memory, or a new hard drive. the Dell Technology Guide installed on the Dell Support website at support.dell.com. the Drivers and Utilities media. run a diagnostic program for your computer, reinstall Notebook system software, or update drivers for your hard drive. learn more about your operating system. the Service Manual on your...
Setup Guide
Page 52
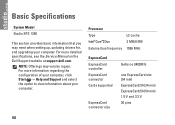
... (54 mm) 1.5 V and 3.3 V 26 pins 50 Basic Specifications System Model Studio XPS 1340 This section provides basic information that you may vary by region. For more information regarding the configuration of your computer, click Start → Help and Support and select the option to view information about your computer. NOTE: Offerings may need when setting up, updating drivers for, and upgrading your computer.
... (54 mm) 1.5 V and 3.3 V 26 pins 50 Basic Specifications System Model Studio XPS 1340 This section provides basic information that you may vary by region. For more information regarding the configuration of your computer, click Start → Help and Support and select the option to view information about your computer. NOTE: Offerings may need when setting up, updating drivers for, and upgrading your computer.
Setup Guide
Page 62
Index Dell Technology Guide for futher information 48 Device Status Lights 14 Diagnostic Checklist 46 disc drive supported disc sizes 19 discs ejecting 19 using 19 drivers and downloads 49 DVDs, playing and creating 27 E email addresses for technical support 44 energy conserving 27 expansion bus 51 60 F finding more information 48 FTP login, anonymous 44 H hardware problems diagnosing 35 Hardware Troubleshooter 35 horizontal and vertical stand options 5 I installing the stand 5 internet connection 10 ISP Internet Service Provider 10 M memory support 50, 51
Index Dell Technology Guide for futher information 48 Device Status Lights 14 Diagnostic Checklist 46 disc drive supported disc sizes 19 discs ejecting 19 using 19 drivers and downloads 49 DVDs, playing and creating 27 E email addresses for technical support 44 energy conserving 27 expansion bus 51 60 F finding more information 48 FTP login, anonymous 44 H hardware problems diagnosing 35 Hardware Troubleshooter 35 horizontal and vertical stand options 5 I installing the stand 5 internet connection 10 ISP Internet Service Provider 10 M memory support 50, 51


