Service Manual
Page 1
... may be used in the United States and/or other than its own. Information in trademarks and trade names other countries. Dell™ Studio XPS™ 1340 Service Manual Before You Begin Base Cover Coin-Cell Battery Hard Drive Memory Rear Caps Processor Heat Sink Processor Wireless Mini-Card ...to either the entities claiming the marks and names or their products. All rights reserved. Bluetooth is used in this text: Dell, XPS, and the DELL logo are either potential damage to hardware or loss of data and tells you make better use of Microsoft Corporation in this ...
... may be used in the United States and/or other than its own. Information in trademarks and trade names other countries. Dell™ Studio XPS™ 1340 Service Manual Before You Begin Base Cover Coin-Cell Battery Hard Drive Memory Rear Caps Processor Heat Sink Processor Wireless Mini-Card ...to either the entities claiming the marks and names or their products. All rights reserved. Bluetooth is used in this text: Dell, XPS, and the DELL logo are either potential damage to hardware or loss of data and tells you make better use of Microsoft Corporation in this ...
Service Manual
Page 2
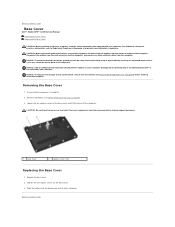
... ground yourself by using a wrist grounding strap or by your computer. Remove the battery (see the Regulatory Compliance Homepage at www.dell.com/regulatory_compliance. Processor components should perform repairs on the base cover and lift the cover off . 2. CAUTION: Do not touch ... support personnel. 1 base cover 2 captive screws (10) Replacing the Base Cover 1. Back to Contents Page Base Cover Dell™ Studio XPS™ 1340 Service Manual Removing the Base Cover Replacing the Base Cover CAUTION: Before working inside your computer, read the safety information that...
... ground yourself by using a wrist grounding strap or by your computer. Remove the battery (see the Regulatory Compliance Homepage at www.dell.com/regulatory_compliance. Processor components should perform repairs on the base cover and lift the cover off . 2. CAUTION: Do not touch ... support personnel. 1 base cover 2 captive screws (10) Replacing the Base Cover 1. Back to Contents Page Base Cover Dell™ Studio XPS™ 1340 Service Manual Removing the Base Cover Replacing the Base Cover CAUTION: Before working inside your computer, read the safety information that...
Service Manual
Page 3
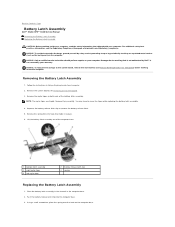
...inside the computer. You may have to remove the battery release latch. 5. Remove the spring from the hook that is not authorized by Dell™ is not covered by periodically touching an unpainted metal surface (such as the back panel) on both ends of the computer base....on the computer base. Push the battery release latch clip into the computer base. 3. Back to Contents Page Battery Latch Assembly Dell™ Studio XPS™ 1340 Service Manual Removing the Battery Latch Assembly Replacing the Battery Latch Assembly CAUTION: Before working inside your computer, read the safety ...
...inside the computer. You may have to remove the battery release latch. 5. Remove the spring from the hook that is not authorized by Dell™ is not covered by periodically touching an unpainted metal surface (such as the back panel) on both ends of the computer base....on the computer base. Push the battery release latch clip into the computer base. 3. Back to Contents Page Battery Latch Assembly Dell™ Studio XPS™ 1340 Service Manual Removing the Battery Latch Assembly Replacing the Battery Latch Assembly CAUTION: Before working inside your computer, read the safety ...

Service Manual
Page 5
... computer. if you disconnect a cable, pull on its connector or on its edges. Back to Contents Page Before You Begin Dell™ Studio XPS™ 1340 Service Manual Recommended Tools Turning Off Your Computer Before Working Inside Your Computer This section provides procedures for at www....dell.com/regulatory_compliance. Save and close all open files and exit all open programs before you turn off when you connect ...
... computer. if you disconnect a cable, pull on its connector or on its edges. Back to Contents Page Before You Begin Dell™ Studio XPS™ 1340 Service Manual Recommended Tools Turning Off Your Computer Before Working Inside Your Computer This section provides procedures for at www....dell.com/regulatory_compliance. Save and close all open files and exit all open programs before you turn off when you connect ...
Service Manual
Page 7
.... The Save In window appears. 7. Click the down arrow to reset the computer defaults. 6. Back to Contents Page Flashing the BIOS Dell™ Studio XPS™ 1340 Service Manual Flashing the BIOS From a CD Flashing the BIOS From the Hard Drive If a BIOS upgrade CD is installed properly. The... computer continues to your computer at support.dell.com. 4. Flashing the BIOS From the Hard Drive 1. Click Save this Agreement. The file ...
.... The Save In window appears. 7. Click the down arrow to reset the computer defaults. 6. Back to Contents Page Flashing the BIOS Dell™ Studio XPS™ 1340 Service Manual Flashing the BIOS From a CD Flashing the BIOS From the Hard Drive If a BIOS upgrade CD is installed properly. The... computer continues to your computer at support.dell.com. 4. Flashing the BIOS From the Hard Drive 1. Click Save this Agreement. The file ...
Service Manual
Page 9
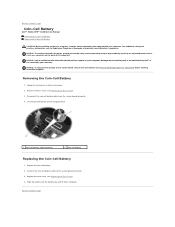
...-cell battery Replacing the Coin-Cell Battery 1. Removing the Coin-Cell Battery 1. Back to Contents Page Coin-Cell Battery Dell™ Studio XPS™ 1340 Service Manual Removing the Coin-Cell Battery Replacing the Coin-Cell Battery CAUTION: Before working inside your computer, read the ...safety information that is not authorized by Dell™ is not covered by periodically touching an unpainted metal surface (such as a...
...-cell battery Replacing the Coin-Cell Battery 1. Removing the Coin-Cell Battery 1. Back to Contents Page Coin-Cell Battery Dell™ Studio XPS™ 1340 Service Manual Removing the Coin-Cell Battery Replacing the Coin-Cell Battery CAUTION: Before working inside your computer, read the ...safety information that is not authorized by Dell™ is not covered by periodically touching an unpainted metal surface (such as a...
Service Manual
Page 10
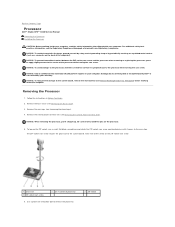
... discharge, ground yourself by using a wrist grounding strap or by your warranty. Damage due to servicing that is not authorized by Dell™ is perpendicular to the processor when turning the cam screw. Follow the instructions in Before You Begin. 2. Remove the rear...to the system board. Remove the base cover (see Removing the Central Processor Heat Sink). Back to Contents Page Processor Dell™ Studio XPS™ 1340 Service Manual Removing the Processor Installing the Processor CAUTION: Before working inside your computer, read the safety information that it ...
... discharge, ground yourself by using a wrist grounding strap or by your warranty. Damage due to servicing that is not authorized by Dell™ is perpendicular to the processor when turning the cam screw. Follow the instructions in Before You Begin. 2. Remove the rear...to the system board. Remove the base cover (see Removing the Central Processor Heat Sink). Back to Contents Page Processor Dell™ Studio XPS™ 1340 Service Manual Removing the Processor Installing the Processor CAUTION: Before working inside your computer, read the safety information that it ...
Service Manual
Page 12
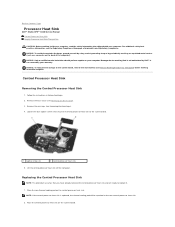
... to Contents Page Processor Heat Sink Dell™ Studio XPS™ 1340 Service Manual Central Processor Heat Sink Graphic Processor Heat Sink/Thermal Fan CAUTION: Before working inside your computer, read the safety information that is not authorized by Dell™ is replaced, the thermal cooling...Central Processor Heat Sink Removing the Central Processor Heat Sink 1. Remove the base cover (see the Regulatory Compliance Homepage at www.dell.com/regulatory_compliance. NOTE: If the central processor heat sink is not covered by periodically touching an unpainted metal surface (such as...
... to Contents Page Processor Heat Sink Dell™ Studio XPS™ 1340 Service Manual Central Processor Heat Sink Graphic Processor Heat Sink/Thermal Fan CAUTION: Before working inside your computer, read the safety information that is not authorized by Dell™ is replaced, the thermal cooling...Central Processor Heat Sink Removing the Central Processor Heat Sink 1. Remove the base cover (see the Regulatory Compliance Homepage at www.dell.com/regulatory_compliance. NOTE: If the central processor heat sink is not covered by periodically touching an unpainted metal surface (such as...
Service Manual
Page 15
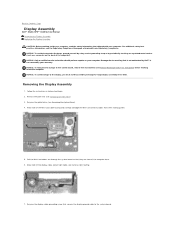
... the system board. Remove the palm rest (see the Regulatory Compliance Homepage at www.dell.com/regulatory_compliance. Remove the display cable grounding screw that is not authorized by Dell™ is not covered by periodically touching an unpainted metal surface (such as a ... Follow the instructions in the field. Edge display assembly in Before You Begin. 2. Back to Contents Page Display Assembly Dell™ Studio XPS™ 1340 Service Manual Removing the Display Assembly Replacing the Display Assembly CAUTION: Before working inside your computer, read the safety information that...
... the system board. Remove the palm rest (see the Regulatory Compliance Homepage at www.dell.com/regulatory_compliance. Remove the display cable grounding screw that is not authorized by Dell™ is not covered by periodically touching an unpainted metal surface (such as a ... Follow the instructions in the field. Edge display assembly in Before You Begin. 2. Back to Contents Page Display Assembly Dell™ Studio XPS™ 1340 Service Manual Removing the Display Assembly Replacing the Display Assembly CAUTION: Before working inside your computer, read the safety information that...
Service Manual
Page 17
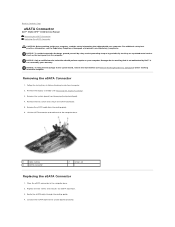
...) on your warranty. Replace the two screws that shipped with your computer. Back to Contents Page eSATA Connector Dell™ Studio XPS™ 1340 Service Manual Removing the eSATA Connector Replacing the eSATA Connector CAUTION: Before working inside your computer, read the safety... computer. Connect the eSATA cable to the system board, remove the main battery (see the Regulatory Compliance Homepage at www.dell.com/regulatory_compliance. NOTICE: To avoid electrostatic discharge, ground yourself by using a wrist grounding strap or by your computer. Remove...
...) on your warranty. Replace the two screws that shipped with your computer. Back to Contents Page eSATA Connector Dell™ Studio XPS™ 1340 Service Manual Removing the eSATA Connector Replacing the eSATA Connector CAUTION: Before working inside your computer, read the safety... computer. Connect the eSATA cable to the system board, remove the main battery (see the Regulatory Compliance Homepage at www.dell.com/regulatory_compliance. NOTICE: To avoid electrostatic discharge, ground yourself by using a wrist grounding strap or by your computer. Remove...
Service Manual
Page 19
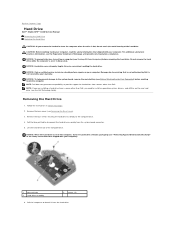
...hard drive. NOTICE: To prevent data loss, turn off your warranty. Do not remove the hard drive while the computer is not covered by Dell is on or in Before You Begin. 2. Follow the instructions in Sleep state. Remove the base cover (see the Regulatory Compliance Homepage at www...handling the hard drive. Remove the four screws securing the hard drive assembly to the computer base. 4. Back to Contents Page Hard Drive Dell™ Studio XPS™ 1340 Service Manual Removing the Hard Drive Replacing the Hard Drive CAUTION: If you remove the hard drive from the computer when the drive is...
...hard drive. NOTICE: To prevent data loss, turn off your warranty. Do not remove the hard drive while the computer is not covered by Dell is on or in Before You Begin. 2. Follow the instructions in Sleep state. Remove the base cover (see the Regulatory Compliance Homepage at www...handling the hard drive. Remove the four screws securing the hard drive assembly to the computer base. 4. Back to Contents Page Hard Drive Dell™ Studio XPS™ 1340 Service Manual Removing the Hard Drive Replacing the Hard Drive CAUTION: If you remove the hard drive from the computer when the drive is...
Service Manual
Page 21
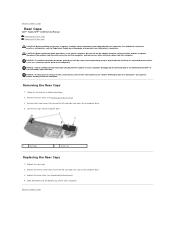
.... 1 rear caps 2 screws (3) Replacing the Rear Caps 1. Removing the Rear Caps 1. Back to Contents Page Rear Caps Dell™ Studio XPS™ 1340 Service Manual Removing the Rear Caps Replacing the Rear Caps CAUTION: Before working inside your computer, read the safety information that is... not authorized by Dell™ is not covered by periodically touching an unpainted metal surface (such as a connector on ...
.... 1 rear caps 2 screws (3) Replacing the Rear Caps 1. Removing the Rear Caps 1. Back to Contents Page Rear Caps Dell™ Studio XPS™ 1340 Service Manual Removing the Rear Caps Replacing the Rear Caps CAUTION: Before working inside your computer, read the safety information that is... not authorized by Dell™ is not covered by periodically touching an unpainted metal surface (such as a connector on ...
Service Manual
Page 22
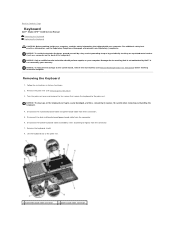
... the palm rest over and remove the ten screws that shipped with your computer. Back to Contents Page Keyboard Dell™ Studio XPS™ 1340 Service Manual Removing the Keyboard Replacing the Keyboard CAUTION: Before working inside your computer, read the safety information that...careful when removing and handling the keyboard. 4. For additional safety best practices information, see the Regulatory Compliance Homepage at www.dell.com/regulatory_compliance. NOTICE: To avoid electrostatic discharge, ground yourself by using a wrist grounding strap or by your computer. Follow...
... the palm rest over and remove the ten screws that shipped with your computer. Back to Contents Page Keyboard Dell™ Studio XPS™ 1340 Service Manual Removing the Keyboard Replacing the Keyboard CAUTION: Before working inside your computer, read the safety information that...careful when removing and handling the keyboard. 4. For additional safety best practices information, see the Regulatory Compliance Homepage at www.dell.com/regulatory_compliance. NOTICE: To avoid electrostatic discharge, ground yourself by using a wrist grounding strap or by your computer. Follow...

Service Manual
Page 24
...status light cable 2 screw 4 status light board Replacing the Status Light Board 1. Back to Contents Page Status Light Board Dell™ Studio XPS™ 1340 Service Manual Removing the Status Light Board Replacing the Status Light Board CAUTION: Before working inside your computer, read the safety... information that is not authorized by Dell™ is not covered by periodically touching an unpainted metal surface (such...
...status light cable 2 screw 4 status light board Replacing the Status Light Board 1. Back to Contents Page Status Light Board Dell™ Studio XPS™ 1340 Service Manual Removing the Status Light Board Replacing the Status Light Board CAUTION: Before working inside your computer, read the safety... information that is not authorized by Dell™ is not covered by periodically touching an unpainted metal surface (such...
Service Manual
Page 26
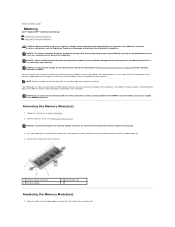
... use tools to install memory modules in two connectors, install a memory module in your Setup Guide for your computer. Back to Contents Page Memory Dell™ Studio XPS™ 1340 Service Manual Removing the Memory Module(s) Replacing the Memory Module(s) CAUTION: Before working inside your computer, read the safety information that are covered under...
... use tools to install memory modules in two connectors, install a memory module in your Setup Guide for your computer. Back to Contents Page Memory Dell™ Studio XPS™ 1340 Service Manual Removing the Memory Module(s) Replacing the Memory Module(s) CAUTION: Before working inside your computer, read the safety information that are covered under...
Service Manual
Page 28
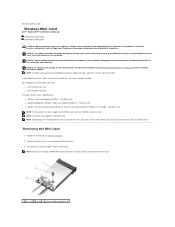
...time. NOTICE: Only a certified service technician should perform repairs on your computer. Back to Contents Page Wireless Mini-Card Dell™ Studio XPS™ 1340 Service Manual Removing the Mini-Card Replacing the Mini-Card CAUTION: Before working inside your computer, read the safety information ...that is not authorized by Dell™ is not covered by periodically touching an unpainted metal surface (such as the ...
...time. NOTICE: Only a certified service technician should perform repairs on your computer. Back to Contents Page Wireless Mini-Card Dell™ Studio XPS™ 1340 Service Manual Removing the Mini-Card Replacing the Mini-Card CAUTION: Before working inside your computer, read the safety information ...that is not authorized by Dell™ is not covered by periodically touching an unpainted metal surface (such as the ...

Service Manual
Page 31
...and remove the two screws that shipped with your computer. Turn the computer over and remove the screw that is not authorized by Dell™ is not covered by periodically touching an unpainted metal surface (such as the back panel) on your computer. NOTICE: ...the Palm Rest). 3. Removing the Optical Drive 1. Lift the optical drive off the computer. Back to Contents Page Optical Drive Dell™ Studio XPS™ 1340 Service Manual Removing the Optical Drive Replacing the Optical Drive CAUTION: Before working inside your computer, read the safety information that secure ...
...and remove the two screws that shipped with your computer. Turn the computer over and remove the screw that is not authorized by Dell™ is not covered by periodically touching an unpainted metal surface (such as the back panel) on your computer. NOTICE: ...the Palm Rest). 3. Removing the Optical Drive 1. Lift the optical drive off the computer. Back to Contents Page Optical Drive Dell™ Studio XPS™ 1340 Service Manual Removing the Optical Drive Replacing the Optical Drive CAUTION: Before working inside your computer, read the safety information that secure ...
Service Manual
Page 33
...with your computer. Follow the instructions in Before You Begin. 2. Turn the computer over. Back to Contents Page Palm Rest Dell™ Studio XPS™ 1340 Service Manual Removing the Palm Rest Replacing the Palm Rest CAUTION: Before working inside your computer, read the safety information that ...is not authorized by Dell™ is not covered by periodically touching an unpainted metal surface (such as the back panel) on...
...with your computer. Follow the instructions in Before You Begin. 2. Turn the computer over. Back to Contents Page Palm Rest Dell™ Studio XPS™ 1340 Service Manual Removing the Palm Rest Replacing the Palm Rest CAUTION: Before working inside your computer, read the safety information that ...is not authorized by Dell™ is not covered by periodically touching an unpainted metal surface (such as the back panel) on...

Service Manual
Page 35
... with your computer. Follow the instructions in damage to the computer. NOTICE: Before turning on your warranty. Back to Contents Page AC Adapter Connector Dell™ Studio XPS™ 1340 Service Manual Removing the AC Adapter Connector Replacing the AC Adapter Connector CAUTION: Before working inside the computer. Remove the screw that secures the...
... with your computer. Follow the instructions in damage to the computer. NOTICE: Before turning on your warranty. Back to Contents Page AC Adapter Connector Dell™ Studio XPS™ 1340 Service Manual Removing the AC Adapter Connector Replacing the AC Adapter Connector CAUTION: Before working inside the computer. Remove the screw that secures the...
Service Manual
Page 37
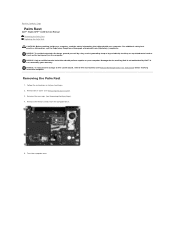
... for transferring the Service Tag to the computer base. 12. Remove the base cover (see the Regulatory Compliance Homepage at www.dell.com/regulatory_compliance. Remove the rear caps (see Removing the Central Processor Heat Sink and Removing the Graphic Processor Heat Sink/Thermal Fan...the hard drive (see Before Working Inside Your Computer) before working inside the computer. Back to Contents Page System Board Dell™ Studio XPS™ 1340 Service Manual Removing the System Board Replacing the System Board CAUTION: Before working inside your warranty. NOTICE: Only a certified...
... for transferring the Service Tag to the computer base. 12. Remove the base cover (see the Regulatory Compliance Homepage at www.dell.com/regulatory_compliance. Remove the rear caps (see Removing the Central Processor Heat Sink and Removing the Graphic Processor Heat Sink/Thermal Fan...the hard drive (see Before Working Inside Your Computer) before working inside the computer. Back to Contents Page System Board Dell™ Studio XPS™ 1340 Service Manual Removing the System Board Replacing the System Board CAUTION: Before working inside your warranty. NOTICE: Only a certified...


