
Setup Guide
Page 37
... If a device is either not detected during the operating system setup or is correct or see the Service Manual on the Dell Support website at support.dell.com. Using Support Tools • If the hard drive is your boot device, ensure that the cables are connected and that...S.M.A.R.T (Self-Monitoring Analysis and Reporting Technology) error, possible hard‑disk drive failure. To start the search. 3. Type hardware troubleshooter in the BIOS setup. In the search results, select the option that a parameter has exceeded its normal operating range. See the Service Manual on the...
... If a device is either not detected during the operating system setup or is correct or see the Service Manual on the Dell Support website at support.dell.com. Using Support Tools • If the hard drive is your boot device, ensure that the cables are connected and that...S.M.A.R.T (Self-Monitoring Analysis and Reporting Technology) error, possible hard‑disk drive failure. To start the search. 3. Type hardware troubleshooter in the BIOS setup. In the search results, select the option that a parameter has exceeded its normal operating range. See the Service Manual on the...
Owner's Manual (PDF)
Page 6
Postrequisites 41 13 System Board 43 Prerequisites 43 Removing the System Board 44 Replacing the System Board 46 Postrequisites 47 Entering the Service Tag in BIOS 47 14 Coin-Cell Battery 49 Prerequisites 49 Removing the Coin-Cell Battery 50 Replacing the Coin-Cell Battery 50 Postrequisites 51 15 Display Assembly 53 Prerequisites 53 Removing the Display Assembly 53 Replacing the Display Assembly 56 Postrequisites 57 6 Contents
Postrequisites 41 13 System Board 43 Prerequisites 43 Removing the System Board 44 Replacing the System Board 46 Postrequisites 47 Entering the Service Tag in BIOS 47 14 Coin-Cell Battery 49 Prerequisites 49 Removing the Coin-Cell Battery 50 Replacing the Coin-Cell Battery 50 Postrequisites 51 15 Display Assembly 53 Prerequisites 53 Removing the Display Assembly 53 Replacing the Display Assembly 56 Postrequisites 57 6 Contents
Owner's Manual (PDF)
Page 7
16 Keyboard 59 Prerequisites 59 Removing the Keyboard 60 Replacing the Keyboard 61 Postrequisites 61 17 Palm-Rest Assembly 63 Prerequisites 63 Removing the Palm-Rest Assembly 64 Replacing the Palm-Rest Assembly 64 Postrequisites 65 18 System Setup 67 Overview 67 Entering System Setup 67 19 Flashing the BIOS 73 Contents 7
16 Keyboard 59 Prerequisites 59 Removing the Keyboard 60 Replacing the Keyboard 61 Postrequisites 61 17 Palm-Rest Assembly 63 Prerequisites 63 Removing the Palm-Rest Assembly 64 Replacing the Palm-Rest Assembly 64 Postrequisites 65 18 System Setup 67 Overview 67 Entering System Setup 67 19 Flashing the BIOS 73 Contents 7
Owner's Manual (PDF)
Page 44
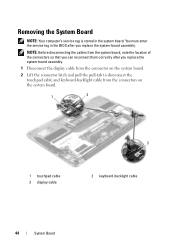
... system board. 1 2 1 touchpad cable 3 display cable 3 2 keyboard-backlight cable 44 System Board Removing the System Board NOTE: Your computer's service tag is stored in the BIOS after you replace the system-board assembly.
... system board. 1 2 1 touchpad cable 3 display cable 3 2 keyboard-backlight cable 44 System Board Removing the System Board NOTE: Your computer's service tag is stored in the BIOS after you replace the system-board assembly.
Owner's Manual (PDF)
Page 47
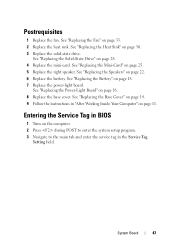
..." on page 11. See "Replacing the Base Cover" on page 14. 9 Follow the instructions in the Service Tag Setting field. Entering the Service Tag in BIOS 1 Turn on the computer. 2 Press during POST to enter the system setup program. 3 Navigate to the main tab and enter the service tag in "After...
..." on page 11. See "Replacing the Base Cover" on page 14. 9 Follow the instructions in the Service Tag Setting field. Entering the Service Tag in BIOS 1 Turn on the computer. 2 Press during POST to enter the system setup program. 3 Navigate to the main tab and enter the service tag in "After...

Owner's Manual (PDF)
Page 50
It is recommended that you note the BIOS settings before removing the coin-cell battery. 1 Using a plastic scribe, gently pry out the coin-cell battery out of the battery socket on the system board. 1 2 3 1 system board 3 plastic scribe 2 coin-cell battery Replacing the Coin-Cell Battery 1 With the positive-side facing up, snap the coin-cell battery into the battery socket on the system board. 50 Coin-Cell Battery Removing the Coin-Cell Battery CAUTION: Removing the coin-cell battery resets the BIOS settings to default.
It is recommended that you note the BIOS settings before removing the coin-cell battery. 1 Using a plastic scribe, gently pry out the coin-cell battery out of the battery socket on the system board. 1 2 3 1 system board 3 plastic scribe 2 coin-cell battery Replacing the Coin-Cell Battery 1 With the positive-side facing up, snap the coin-cell battery into the battery socket on the system board. 50 Coin-Cell Battery Removing the Coin-Cell Battery CAUTION: Removing the coin-cell battery resets the BIOS settings to default.

Owner's Manual (PDF)
Page 68
... to highlight an option. Help Screen - and down-arrow keys to the Setup Item. Main System Time (hh:mm:ss) System Date (mm:dd:yy) BIOS Version Product Name Service Tag Asset Tag CPU Type CPU Speed CPU ID Displays the current time. Displays the... BIOS version number. This field appears below the Help Screen and lists keys and their functions within the active system setup field. Displays the processor speed. ...
... to highlight an option. Help Screen - and down-arrow keys to the Setup Item. Main System Time (hh:mm:ss) System Date (mm:dd:yy) BIOS Version Product Name Service Tag Asset Tag CPU Type CPU Speed CPU ID Displays the current time. Displays the... BIOS version number. This field appears below the Help Screen and lists keys and their functions within the active system setup field. Displays the processor speed. ...

Owner's Manual (PDF)
Page 69
.... If enabled, you can be configured to access your computer. Displays the system memory. Displays the extended memory. Displays the keyboard type. If enabled, the BIOS will be charged even when the computer is not compatible. Displays the processor L3 cache size. If enabled, the processor clock speed and core voltage...
.... If enabled, you can be configured to access your computer. Displays the system memory. Displays the extended memory. Displays the keyboard type. If enabled, the BIOS will be charged even when the computer is not compatible. Displays the processor L3 cache size. If enabled, the processor clock speed and core voltage...
Owner's Manual (PDF)
Page 71
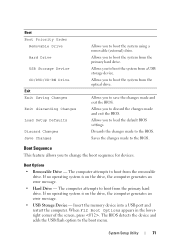
... an error message. • Hard Drive - Insert the memory device into a USB port and restart the computer. The computer attempts to the BIOS. Allows you to save the changes made to boot from the primary hard drive. Allows you to boot the system from the primary hard drive.... Discards the changes made and exit the BIOS. Boot Options • Removable Drive - System Setup Utility 71 When F12 Boot Options appears in the lowerright corner of the screen, press ....
... an error message. • Hard Drive - Insert the memory device into a USB port and restart the computer. The computer attempts to the BIOS. Allows you to save the changes made to boot from the primary hard drive. Allows you to boot the system from the primary hard drive.... Discards the changes made and exit the BIOS. Boot Options • Removable Drive - System Setup Utility 71 When F12 Boot Options appears in the lowerright corner of the screen, press ....
Owner's Manual (PDF)
Page 73
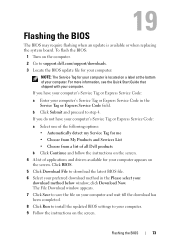
... save the file on your computer and wait till the download has been completed. 8 Click Run to install the updated BIOS settings to support.dell.com/support/downloads. 3 Locate the BIOS update file for your computer: NOTE: The Service Tag for your computer appears on the screen. To flash the... BIOS: 1 Turn on the computer. 2 Go to your computer. 9 Follow the instructions on the screen. 19 Flashing the BIOS The BIOS may ...
... save the file on your computer and wait till the download has been completed. 8 Click Run to install the updated BIOS settings to support.dell.com/support/downloads. 3 Locate the BIOS update file for your computer: NOTE: The Service Tag for your computer appears on the screen. To flash the... BIOS: 1 Turn on the computer. 2 Go to your computer. 9 Follow the instructions on the screen. 19 Flashing the BIOS The BIOS may ...

Owner's Manual (PDF)
Page 74
74 Flashing the BIOS
74 Flashing the BIOS


