Dell™ Technology Guide
Page 204
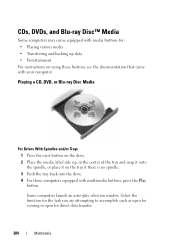
... the documentation that came with your computer. Playing a CD, DVD, or Blu-ray Disc Media For Drives With Spindles and/or Trays 1 Press the eject button on the drive. 2 Place the media, label side up data • Entertainment For instructions on the tray if there is no spindle. 3 Push ...the tray back into the drive. 4 For those computers equipped with multimedia buttons, press the Play button. Some computers launch an auto-play selection window. CDs, DVDs, and Blu-ray Disc™ Media Some computers may come equipped with media...
... the documentation that came with your computer. Playing a CD, DVD, or Blu-ray Disc Media For Drives With Spindles and/or Trays 1 Press the eject button on the drive. 2 Place the media, label side up data • Entertainment For instructions on the tray if there is no spindle. 3 Push ...the tray back into the drive. 4 For those computers equipped with multimedia buttons, press the Play button. Some computers launch an auto-play selection window. CDs, DVDs, and Blu-ray Disc™ Media Some computers may come equipped with media...
Dell™ Technology Guide
Page 205
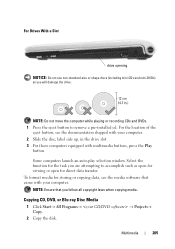
To format media for storing or copying data, see the documentation shipped with multimedia buttons, press the Play button. NOTE: Ensure that came with your computer. 2 Slide the disc, label side up, in the drive slot. 3 For those computers equipped with your computer. For ... CD, DVD, or Blu-ray Disc Media 1 Click Start→ All Programs→ → Projects→ Copy. 2 Copy the disk. For the location of the eject button, see the media software that you will damage the drive. NOTE: Do not move the computer while playing or recording CDs and DVDs. 1 Press the...
To format media for storing or copying data, see the documentation shipped with multimedia buttons, press the Play button. NOTE: Ensure that came with your computer. 2 Slide the disc, label side up, in the drive slot. 3 For those computers equipped with your computer. For ... CD, DVD, or Blu-ray Disc Media 1 Click Start→ All Programs→ → Projects→ Copy. 2 Copy the disk. For the location of the eject button, see the media software that you will damage the drive. NOTE: Do not move the computer while playing or recording CDs and DVDs. 1 Press the...
Setup Guide
Page 19
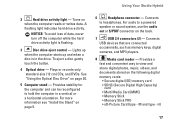
...eject control - Plays or records only standard-size (12 cm) CDs, and DVDs. M and type - H) 17 A flashing light indicates hard drive activity. Connects to a powered speaker or sound system, use the audio out or S/PDIF connector on page 5. 6 Headphone connector - Using Your Studio Hybrid.... For more information see "Install the Stand" on the back. 7 USB 2.0 connectors (2) - For audio to headphones. To eject a disc gently touch the button. 4 Optical drive - See "Using the Optical Disc Drive" on page 20. 5 Computer stand - Connects USB devices that are...
...eject control - Plays or records only standard-size (12 cm) CDs, and DVDs. M and type - H) 17 A flashing light indicates hard drive activity. Connects to a powered speaker or sound system, use the audio out or S/PDIF connector on page 5. 6 Headphone connector - Using Your Studio Hybrid.... For more information see "Install the Stand" on the back. 7 USB 2.0 connectors (2) - For audio to headphones. To eject a disc gently touch the button. 4 Optical drive - See "Using the Optical Disc Drive" on page 20. 5 Computer stand - Connects USB devices that are...
Setup Guide
Page 58
Index E eject button 17 email addresses for technical support 42 energy conserving 23 expansion bus 49 Express Service Code 19 F finding more information 46 front-side connectors 16 FTP login, anonymous 42 H hard drive type 48 hard drive activity light 17 56 hardware problems diagnosing 32 Hardware Troubleshooter 32 HDMI connector location 19 display 8 headphone back connector 19 front connector 17 help getting assistance and support 40 horizontal and vertical stand options 5 horizontal stand using or changing 6 I IEEE 1394 connector 19 installing the stand 5
Index E eject button 17 email addresses for technical support 42 energy conserving 23 expansion bus 49 Express Service Code 19 F finding more information 46 front-side connectors 16 FTP login, anonymous 42 H hard drive type 48 hard drive activity light 17 56 hardware problems diagnosing 32 Hardware Troubleshooter 32 HDMI connector location 19 display 8 headphone back connector 19 front connector 17 help getting assistance and support 40 horizontal and vertical stand options 5 horizontal stand using or changing 6 I IEEE 1394 connector 19 installing the stand 5


