
Service Manual
Page 1
... Rev. Microsoft, Windows, Windows Vista, and Windows Vista start button logo are either the entities claiming the marks and names or their products. A00 Dell Studio™ 1555 Service Manual Before You Begin Base Cover Hard Drive Memory Communication Cards Coin-Cell Battery Center Control Cover Keyboard Display Power Button Board Camera (Optional) Palm Rest Speaker Assembly Optical Drive ExpressCard Board AC Adapter Connector USB Connector System Board Assembly Processor Heat Sink Processor Module Fan Subwoofer Assembly Battery Latch Assembly Flashing the BIOS Notes, Cautions...
... Rev. Microsoft, Windows, Windows Vista, and Windows Vista start button logo are either the entities claiming the marks and names or their products. A00 Dell Studio™ 1555 Service Manual Before You Begin Base Cover Hard Drive Memory Communication Cards Coin-Cell Battery Center Control Cover Keyboard Display Power Button Board Camera (Optional) Palm Rest Speaker Assembly Optical Drive ExpressCard Board AC Adapter Connector USB Connector System Board Assembly Processor Heat Sink Processor Module Fan Subwoofer Assembly Battery Latch Assembly Flashing the BIOS Notes, Cautions...
Service Manual
Page 3
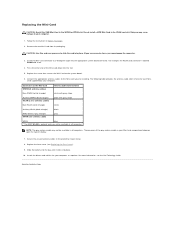
... Dell Studio™ 1555 Service Manual Recommended Tools Turning Off Your Computer Before Working Inside Your Computer This document provides procedures for at least 8 to prevent the computer cover from potential damage and to help ensure your operating system, press and hold the power button for removing and installing the components in your computer (see Turning Off Your Computer). Save and close all open...
... Dell Studio™ 1555 Service Manual Recommended Tools Turning Off Your Computer Before Working Inside Your Computer This document provides procedures for at least 8 to prevent the computer cover from potential damage and to help ensure your operating system, press and hold the power button for removing and installing the components in your computer (see Turning Off Your Computer). Save and close all open...
Service Manual
Page 5
... the flash update is installed properly. Click Download Now to change the default boot order. 2. The Save In window appears. 7. The File Download window appears. 6. The file downloads to enter the system setup program. 4. Ensure that appear on your desktop. 8. Press during POST to your desktop and is attached. 2. Flashing the BIOS From the Hard Drive CAUTION: Plug the AC adapter into a known, good power source to save configuration changes. 6. Locate the latest BIOS update...
... the flash update is installed properly. Click Download Now to change the default boot order. 2. The Save In window appears. 7. The File Download window appears. 6. The file downloads to enter the system setup program. 4. Ensure that appear on your desktop. 8. Press during POST to your desktop and is attached. 2. Flashing the BIOS From the Hard Drive CAUTION: Plug the AC adapter into a known, good power source to save configuration changes. 6. Locate the latest BIOS update...
Service Manual
Page 7
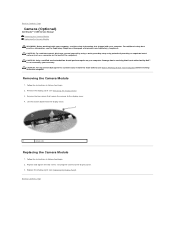
... board, remove the main battery (see Removing the Display Panel). 3. Lift the camera board from the display cover. 1 screws (2) Replacing the Camera Module 1. Follow the instructions in Before You Begin. 2. Follow the instructions in Before You Begin. 2. Damage due to servicing that secure the camera to the display cover. 4. CAUTION: Only a certified service technician should perform repairs on the back of the computer). Remove the two screws that is not authorized by Dell...
... board, remove the main battery (see Removing the Display Panel). 3. Lift the camera board from the display cover. 1 screws (2) Replacing the Camera Module 1. Follow the instructions in Before You Begin. 2. Follow the instructions in Before You Begin. 2. Damage due to servicing that secure the camera to the display cover. 4. CAUTION: Only a certified service technician should perform repairs on the back of the computer). Remove the two screws that is not authorized by Dell...
Service Manual
Page 8
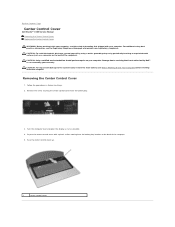
... Center Control Cover Dell Studio™ 1555 Service Manual Removing the Center Control Cover Replacing the Center Control Cover WARNING: Before working inside your computer, read the safety information that is not authorized by Dell™ is not covered by periodically touching an unpainted metal surface (such as possible. 4. Follow the procedures in Before You Begin. 2. Remove the screw securing the center control cover from the battery bay location at www.dell...
... Center Control Cover Dell Studio™ 1555 Service Manual Removing the Center Control Cover Replacing the Center Control Cover WARNING: Before working inside your computer, read the safety information that is not authorized by Dell™ is not covered by periodically touching an unpainted metal surface (such as possible. 4. Follow the procedures in Before You Begin. 2. Remove the screw securing the center control cover from the battery bay location at www.dell...
Service Manual
Page 11
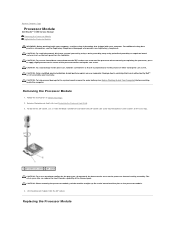
... not covered by periodically touching an unpainted metal surface (such as the back panel) on the processor thermal-cooling assembly. Replacing the Processor Module Damage due to servicing that it comes to the center of the thermal pads. The oils in Before You Begin. 2. Back to Contents Page Processor Module Dell Studio™ 1555 Service Manual Removing the Processor Module Replacing the Processor Module WARNING: Before working...
... not covered by periodically touching an unpainted metal surface (such as the back panel) on the processor thermal-cooling assembly. Replacing the Processor Module Damage due to servicing that it comes to the center of the thermal pads. The oils in Before You Begin. 2. Back to Contents Page Processor Module Dell Studio™ 1555 Service Manual Removing the Processor Module Replacing the Processor Module WARNING: Before working...
Service Manual
Page 24
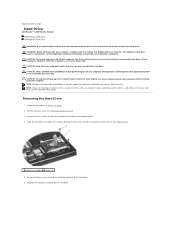
... the hard drive assembly to the system board, remove the main battery (see Before Working Inside Your Computer) before working inside your computer, read the safety information that is not authorized by your computer. Remove the four screws securing the hard drive bracket to install an operating system, drivers, and utilities on your warranty. Do not remove the hard drive while the computer is not covered by Dell™...
... the hard drive assembly to the system board, remove the main battery (see Before Working Inside Your Computer) before working inside your computer, read the safety information that is not authorized by your computer. Remove the four screws securing the hard drive bracket to install an operating system, drivers, and utilities on your warranty. Do not remove the hard drive while the computer is not covered by Dell™...
Service Manual
Page 28
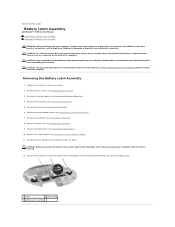
... ensure proper installation when the latch is not covered by your warranty. Remove the palm rest (see Removing the Memory Module(s)). 4. CAUTION: Before you remove the battery release latch, observe the orientation of the computer). Remove all memory modules (see Removing the Palm Rest). 9. Back to Contents Page Battery Latch Assembly Dell Studio™ 1555 Service Manual Removing the Battery Latch Assembly Replacing the Battery Latch Assembly WARNING: Before working inside your...
... ensure proper installation when the latch is not covered by your warranty. Remove the palm rest (see Removing the Memory Module(s)). 4. CAUTION: Before you remove the battery release latch, observe the orientation of the computer). Remove all memory modules (see Removing the Palm Rest). 9. Back to Contents Page Battery Latch Assembly Dell Studio™ 1555 Service Manual Removing the Battery Latch Assembly Replacing the Battery Latch Assembly WARNING: Before working inside your...

Service Manual
Page 30
... spread apart the securing clips on the system board. See "Specifications" in the connector slot. 2. Removing the Memory Module(s) 1. Use your fingertips to servicing that is not authorized by Dell™ is not covered by periodically touching an unpainted metal surface (such as a connector on your computer warranty. If you do not use tools to Contents Page Memory Dell Studio™ 1555 Service Manual Removing the Memory Module(s) Replacing the Memory Module(s) WARNING: Before working...
... spread apart the securing clips on the system board. See "Specifications" in the connector slot. 2. Removing the Memory Module(s) 1. Use your fingertips to servicing that is not authorized by Dell™ is not covered by periodically touching an unpainted metal surface (such as a connector on your computer warranty. If you do not use tools to Contents Page Memory Dell Studio™ 1555 Service Manual Removing the Memory Module(s) Replacing the Memory Module(s) WARNING: Before working...
Service Manual
Page 34
... WPAN slot. Connect the appropriate antenna cables to the Mini-Card you may cause damage to slide the card into the appropriate system board connector. Replacing the Mini-Card CAUTION: Install the UWB Mini-Card in the WLAN card slot. Insert the Mini-Card connector at a 45-degree angle into place. Install the drivers and utilities for each MiniCard supported by your Mini-Card compartment depends upon the type...
... WPAN slot. Connect the appropriate antenna cables to the Mini-Card you may cause damage to slide the card into the appropriate system board connector. Replacing the Mini-Card CAUTION: Install the UWB Mini-Card in the WLAN card slot. Insert the Mini-Card connector at a 45-degree angle into place. Install the drivers and utilities for each MiniCard supported by your Mini-Card compartment depends upon the type...
Service Manual
Page 45
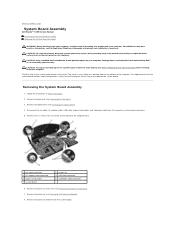
... due to servicing that secure the system board to the computer base. 1 fan cable connector 3 AC adapter cable connector 5 ExpressCard cables 7 system board 2 screws (6) 4 USB cable connector 6 subwoofer cable connector 6. Back to Contents Page System Board Assembly Dell Studio™ 1555 Service Manual Removing the System Board Assembly Replacing the System Board Assembly WARNING: Before working inside your computer, read the safety information that provides a utility for the system board includes media that shipped...
... due to servicing that secure the system board to the computer base. 1 fan cable connector 3 AC adapter cable connector 5 ExpressCard cables 7 system board 2 screws (6) 4 USB cable connector 6 subwoofer cable connector 6. Back to Contents Page System Board Assembly Dell Studio™ 1555 Service Manual Removing the System Board Assembly Replacing the System Board Assembly WARNING: Before working inside your computer, read the safety information that provides a utility for the system board includes media that shipped...
Setup Guide
Page 5
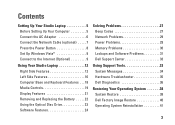
...6 Connect the Network Cable (optional 7 Press the Power Button 8 Set Up Windows Vista 9 Connect to the Internet (Optional 9 Using Your Studio Laptop 12 Right Side Features 12 Left Side Features 16 Computer Base and Keyboard Features 18 Media Controls 19 Display Features 21 Removing and Replacing the Battery 22 Using the Optical Disc Drive 23 Software Features 24 Solving Problems 27 Beep Codes 27 Network Problems 29 Power Problems 29 Memory Problems 30 Lockups and Software Problems 31 Dell Support Center 33 Using Support Tools 33 System Messages 34 Hardware Troubleshooter...
...6 Connect the Network Cable (optional 7 Press the Power Button 8 Set Up Windows Vista 9 Connect to the Internet (Optional 9 Using Your Studio Laptop 12 Right Side Features 12 Left Side Features 16 Computer Base and Keyboard Features 18 Media Controls 19 Display Features 21 Removing and Replacing the Battery 22 Using the Optical Disc Drive 23 Software Features 24 Solving Problems 27 Beep Codes 27 Network Problems 29 Power Problems 29 Memory Problems 30 Lockups and Software Problems 31 Dell Support Center 33 Using Support Tools 33 System Messages 34 Hardware Troubleshooter...
Setup Guide
Page 21
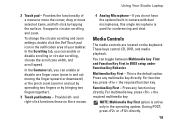
... change the circular scrolling and zoom settings, double click the Dell Touch pad icon in and out by spreading two fingers or by tapping the surface. Media Controls The media controls are located on like a mouse. 4 Analog Microphone - These keys control CD, DVD, and media playback. For function key, press + the required function key. NOTE: Multimedia Key First option is used for conferencing and chat. and right-click functions those on the keyboard. You can enable or disable scrolling...
... change the circular scrolling and zoom settings, double click the Dell Touch pad icon in and out by spreading two fingers or by tapping the surface. Media Controls The media controls are located on like a mouse. 4 Analog Microphone - These keys control CD, DVD, and media playback. For function key, press + the required function key. NOTE: Multimedia Key First option is used for conferencing and chat. and right-click functions those on the keyboard. You can enable or disable scrolling...
Setup Guide
Page 27
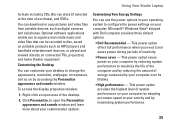
... on your computer by adapting processor speed to disc, saved on connected TVs, projectors, and home theater equipment. This power option provides the highest level of energy consumed by accessing the Personalize appearance and sounds window. To access the display properties window: 1. Optional software applications enable you need it and saves power during periods of purchase), and DVDs. Using Your Studio Laptop formats including CDs, Blu-ray discs (if selected at the...
... on your computer by adapting processor speed to disc, saved on connected TVs, projectors, and home theater equipment. This power option provides the highest level of energy consumed by accessing the Personalize appearance and sounds window. To access the display properties window: 1. Optional software applications enable you need it and saves power during periods of purchase), and DVDs. Using Your Studio Laptop formats including CDs, Blu-ray discs (if selected at the...
Setup Guide
Page 32
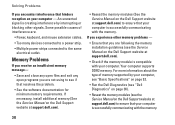
... that hinders reception on the Dell Support website at support.dell.com). • Check if the memory module is compatible with your computer. Memory Problems If you receive an insufficient memory message- • Save and close any open files and exit any open programs you are : • Power, keyboard, and mouse extension cables. • Too many devices connected to a power strip. • Multiple power strips connected to ensure that your...
... that hinders reception on the Dell Support website at support.dell.com). • Check if the memory module is compatible with your computer. Memory Problems If you receive an insufficient memory message- • Save and close any open files and exit any open programs you are : • Power, keyboard, and mouse extension cables. • Too many devices connected to a power strip. • Multiple power strips connected to ensure that your...
Setup Guide
Page 36
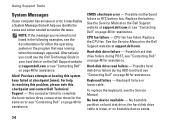
... the following examples, see the Service Manual. Previous attempts at booting this checkpoint and contact Dell Technical Support - Possible motherboard failure or RTC battery low. Keyboard failure - See the Service Manual on page 48 for the same error see "Contacting Dell" on hard disk drive, the hard disk drive cable is not listed in resolving this problem, please note this system have failed at support.dell.com. No boot device available - NOTE: If the message...
... the following examples, see the Service Manual. Previous attempts at booting this checkpoint and contact Dell Technical Support - Possible motherboard failure or RTC battery low. Keyboard failure - See the Service Manual on page 48 for the same error see "Contacting Dell" on hard disk drive, the hard disk drive cable is not listed in resolving this problem, please note this system have failed at support.dell.com. No boot device available - NOTE: If the message...
Setup Guide
Page 44
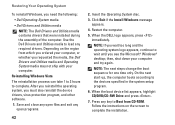
... boot device list appears, highlight CD/DVD/CD-RW Drive and press . 7. Press any key to load any open files and exit any required drivers. Use the Dell Drivers and Utilities media to Boot from which you ordered your computer and try again. Follow the instructions on the region from CD-ROM. Reinstalling Windows Vista The reinstallation process can take 1 to 2 hours to complete the installation. Restoring Your Operating System To reinstall Windows...
... boot device list appears, highlight CD/DVD/CD-RW Drive and press . 7. Press any key to load any open files and exit any required drivers. Use the Dell Drivers and Utilities media to Boot from which you ordered your computer and try again. Follow the instructions on the region from CD-ROM. Reinstalling Windows Vista The reinstallation process can take 1 to 2 hours to complete the installation. Restoring Your Operating System To reinstall Windows...
Setup Guide
Page 52
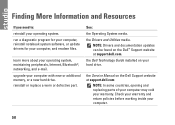
... hard drive. run a diagnostic program for your computer, reinstall notebook system software, or update drivers for your computer with new or additional memory, or a new hard drive. the Dell Technology Guide installed on the Dell™ Support website at support.dell.com NOTE: In some countries, opening and replacing parts of your computer may void your operating system. Finding More Information and Resources If you need to: reinstall your warranty. See: the Operating System media...
... hard drive. run a diagnostic program for your computer, reinstall notebook system software, or update drivers for your computer with new or additional memory, or a new hard drive. the Dell Technology Guide installed on the Dell™ Support website at support.dell.com NOTE: In some countries, opening and replacing parts of your computer may void your operating system. Finding More Information and Resources If you need to: reinstall your warranty. See: the Operating System media...
Setup Guide
Page 54
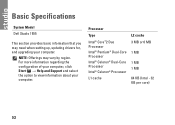
... (Intel - 32 KB per core) 52 Basic Specifications System Model Dell Studio 1555 This section provides basic information that you may vary by region. NOTE: Offerings may need when setting up, updating drivers for, and upgrading your computer. For more information regarding the configuration of your computer, click Start → Help and Support and select the option to view information about your computer.
... (Intel - 32 KB per core) 52 Basic Specifications System Model Dell Studio 1555 This section provides basic information that you may vary by region. NOTE: Offerings may need when setting up, updating drivers for, and upgrading your computer. For more information regarding the configuration of your computer, click Start → Help and Support and select the option to view information about your computer.

Tech Sheet Windows® 7
Page 4
... to change the boot sequence for one time only. Follow the instructions on the screen to wait until you must also reinstall the device drivers, virus protection program, and other software. After you reinstall the operating system, you see the Microsoft Windows desktop; Other trademarks and trade names may take about 1 to 2 hours to Boot from CD-ROM. On the next start...
... to change the boot sequence for one time only. Follow the instructions on the screen to wait until you must also reinstall the device drivers, virus protection program, and other software. After you reinstall the operating system, you see the Microsoft Windows desktop; Other trademarks and trade names may take about 1 to 2 hours to Boot from CD-ROM. On the next start...


