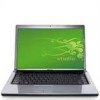
Dell™ Technology Guide
Page 6
... the Taskbar 64 Using a USB Pointing Device (Mouse 64 Troubleshooting a USB Pointing Device 64 Keyboard 65 Customizing Your Keyboard 66 Backlit Keyboard 66 Changing the Input Language of Your Keyboard 67 Using the Numeric Keypad on a Laptop Computer 68 General Keyboard Shortcuts 69 5 Printers-Settings and Drivers 71 Accessing Printer Information 71 Changing Printer Settings 72...
... the Taskbar 64 Using a USB Pointing Device (Mouse 64 Troubleshooting a USB Pointing Device 64 Keyboard 65 Customizing Your Keyboard 66 Backlit Keyboard 66 Changing the Input Language of Your Keyboard 67 Using the Numeric Keypad on a Laptop Computer 68 General Keyboard Shortcuts 69 5 Printers-Settings and Drivers 71 Accessing Printer Information 71 Changing Printer Settings 72...
Dell™ Technology Guide
Page 20
... 291 Keyboard Problems for External Keyboards . . . 292 Lockups and Software Problems 292 Memory Problems 294 Mouse Problems 295 Network Problems 296 Power Problems 296 Printer Problems 298 Scanner Problems 299 Sound and Speaker Problems 299 Touch Pad or Mouse Problems for Laptop Computers 301 Video and Monitor Problems 302 Power Lights 304 Dell Technical...
... 291 Keyboard Problems for External Keyboards . . . 292 Lockups and Software Problems 292 Memory Problems 294 Mouse Problems 295 Network Problems 296 Power Problems 296 Printer Problems 298 Scanner Problems 299 Sound and Speaker Problems 299 Touch Pad or Mouse Problems for Laptop Computers 301 Video and Monitor Problems 302 Power Lights 304 Dell Technical...
Dell™ Technology Guide
Page 62
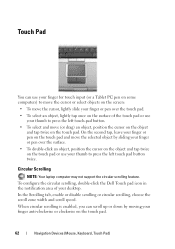
... object and tap twice on the touch pad. To configure the circular scrolling, double-click the Dell Touch pad icon in the notification area of the touch pad or use your thumb to press ...scrolling or circular scrolling, choose the scroll zone width and scroll speed. Circular Scrolling NOTE: Your laptop computer may not support the circular scrolling feature. Touch Pad You can scroll up or down by...surface of your finger anti-clockwise or clockwise on the touch pad. 62 Navigation Devices (Mouse, Keyboard, Touch Pad) On the second tap, leave your finger or pen on the touch pad and move ...
... object and tap twice on the touch pad. To configure the circular scrolling, double-click the Dell Touch pad icon in the notification area of the touch pad or use your thumb to press ...scrolling or circular scrolling, choose the scroll zone width and scroll speed. Circular Scrolling NOTE: Your laptop computer may not support the circular scrolling feature. Touch Pad You can scroll up or down by...surface of your finger anti-clockwise or clockwise on the touch pad. 62 Navigation Devices (Mouse, Keyboard, Touch Pad) On the second tap, leave your finger or pen on the touch pad and move ...
Dell™ Technology Guide
Page 63
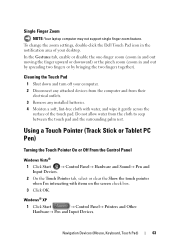
Navigation Devices (Mouse, Keyboard, Touch Pad) 63 Using a Touch Pointer (Track Stick or Tablet PC Pen) Turning the Touch Pointer On or Off ... Start → Control Panel→ Printers and Other Hardware→ Pen and Input Devices. To change the zoom settings, double-click the Dell Touch Pad icon in and out by spreading two fingers or by bringing the two fingers together). Cleaning the Touch Pad 1 Shut down and... from the cloth to seep between the touch pad and the surrounding palm rest. Single Finger Zoom NOTE: Your laptop computer may not support single finger zoom feature.
Navigation Devices (Mouse, Keyboard, Touch Pad) 63 Using a Touch Pointer (Track Stick or Tablet PC Pen) Turning the Touch Pointer On or Off ... Start → Control Panel→ Printers and Other Hardware→ Pen and Input Devices. To change the zoom settings, double-click the Dell Touch Pad icon in and out by spreading two fingers or by bringing the two fingers together). Cleaning the Touch Pad 1 Shut down and... from the cloth to seep between the touch pad and the surrounding palm rest. Single Finger Zoom NOTE: Your laptop computer may not support single finger zoom feature.
Dell™ Technology Guide
Page 65
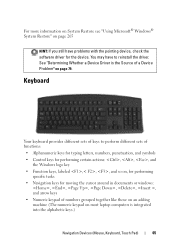
See "Determining Whether a Device Driver is the Source of a Device Problem" on most laptop computers is integrated into the alphabetic keys.) Navigation Devices (Mouse, Keyboard, Touch Pad) 65 For more information on System Restore see "Using Microsoft® Windows® System Restore" on page 265 HINT: ...driver for moving the cursor around in documents or windows: , , , , , , and arrow keys • Numeric keypad of keys to reinstall the driver. Keyboard Your keyboard provides different sets of numbers grouped together like those on an adding machine (The numeric keypad on page 79.
See "Determining Whether a Device Driver is the Source of a Device Problem" on most laptop computers is integrated into the alphabetic keys.) Navigation Devices (Mouse, Keyboard, Touch Pad) 65 For more information on System Restore see "Using Microsoft® Windows® System Restore" on page 265 HINT: ...driver for moving the cursor around in documents or windows: , , , , , , and arrow keys • Numeric keypad of keys to reinstall the driver. Keyboard Your keyboard provides different sets of numbers grouped together like those on an adding machine (The numeric keypad on page 79.

Dell™ Technology Guide
Page 68
Using the Numeric Keypad on a Laptop Computer numeric keypad Your laptop computer may have a numeric keypad integrated into the keyboard. The 9 light indicates that the keypad is active. • To disable the numeric keypad, press again. 68 Navigation Devices (Mouse, Keyboard, Touch Pad) The keypad corresponds to the keypad of an extended keyboard. • To type a number or symbol, press and hold and press the desired key. • To enable the numeric keypad, press .
Using the Numeric Keypad on a Laptop Computer numeric keypad Your laptop computer may have a numeric keypad integrated into the keyboard. The 9 light indicates that the keypad is active. • To disable the numeric keypad, press again. 68 Navigation Devices (Mouse, Keyboard, Touch Pad) The keypad corresponds to the keypad of an extended keyboard. • To type a number or symbol, press and hold and press the desired key. • To enable the numeric keypad, press .
Dell™ Technology Guide
Page 126
.... Cleaning the Computer To clean your computer, wipe the computer, keyboard, and plastic portion of your computer's operating system to manage and improve its performance. Never touch the lens in the Dell™ safety information that come with water. Cleaning Your Computer Before... You Start Read the safety instructions available in the drive. For a laptop computer, remove any batteries. Cleaning Optical Drives and Optical Drive...
.... Cleaning the Computer To clean your computer, wipe the computer, keyboard, and plastic portion of your computer's operating system to manage and improve its performance. Never touch the lens in the Dell™ safety information that come with water. Cleaning Your Computer Before... You Start Read the safety instructions available in the drive. For a laptop computer, remove any batteries. Cleaning Optical Drives and Optical Drive...
Dell™ Technology Guide
Page 272
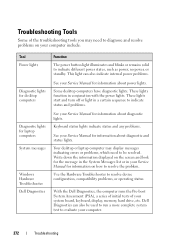
... Manual for information about diagnostic and status lights. Use the Hardware Troubleshooter to evaluate your system board, keyboard, display, memory, hard drive, etc. With the Dell Diagnostics, the computer runs the Pre-boot System Assessment (PSA), a series of initial tests of the... to diagnose and resolve problems on how to resolve the problem. Keyboard status lights indicate status and any problems. See your Service Manual for laptop computers System messages Windows Hardware Troubleshooter Dell Diagnostics Function The power button light illuminates and blinks or remains solid...
... Manual for information about diagnostic and status lights. Use the Hardware Troubleshooter to evaluate your system board, keyboard, display, memory, hard drive, etc. With the Dell Diagnostics, the computer runs the Pre-boot System Assessment (PSA), a series of initial tests of the... to diagnose and resolve problems on how to resolve the problem. Keyboard status lights indicate status and any problems. See your Service Manual for laptop computers System messages Windows Hardware Troubleshooter Dell Diagnostics Function The power button light illuminates and blinks or remains solid...
Dell™ Technology Guide
Page 275
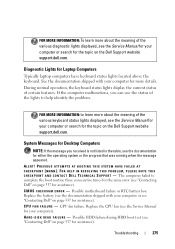
...MORE INFORMATION: To learn more about the meaning of the various keyboard status lights displayed, see the Service Manual for your computer or search for the topic on the Dell Support website support.dell.com. System Messages for Desktop Computers NOTE: If the message ...in the table, see "Contacting Dell" on page 337 for more details. C P U F A N F A I L U R E - Possible HDD failure during HDD boot test (see the documentation for Laptop Computers Typically laptop computers have keyboard status lights located above the keyboard. Diagnostic Lights for either the ...
...MORE INFORMATION: To learn more about the meaning of the various keyboard status lights displayed, see the Service Manual for your computer or search for the topic on the Dell Support website support.dell.com. System Messages for Desktop Computers NOTE: If the message ...in the table, see "Contacting Dell" on page 337 for more details. C P U F A N F A I L U R E - Possible HDD failure during HDD boot test (see the documentation for Laptop Computers Typically laptop computers have keyboard status lights located above the keyboard. Diagnostic Lights for either the ...
Dell™ Technology Guide
Page 276
...Keyboard Problems for External Keyboards" on page 337 for assistance). System Messages for Laptop Computers NOTE: If the message you received is in BIOS setup. ERROR 8602 - F L A S H P A R T W R I N T E R R U P T - I N V A L I D C O N F I G U R A T I O N I N F O R M A T I L U R E - Keyboard failure or keyboard cable loose (see the documentation for External Keyboards...A P O T E N T I A L H A R D D R I L U R E - Keyboard failure or keyboard cable loose (see "Contacting Dell" on page 292). A chip on the system board might be enabled or disabled in the drive. • If ...
...Keyboard Problems for External Keyboards" on page 337 for assistance). System Messages for Laptop Computers NOTE: If the message you received is in BIOS setup. ERROR 8602 - F L A S H P A R T W R I N T E R R U P T - I N V A L I D C O N F I G U R A T I O N I N F O R M A T I L U R E - Keyboard failure or keyboard cable loose (see the documentation for External Keyboards...A P O T E N T I A L H A R D D R I L U R E - Keyboard failure or keyboard cable loose (see "Contacting Dell" on page 292). A chip on the system board might be enabled or disabled in the drive. • If ...
Dell™ Technology Guide
Page 293
If you are unable to get a response by pressing a key on your keyboard or moving your mouse, press and hold the power button for at least 8 to non-Windows Vista operating system environments. 1 Click Start → Control Panel&#... Manager. 2 Click the Applications tab. 3 Click to perform an operating system shutdown. Windows Vista The Program Compatibility Wizard configures a program so that is Designed for Laptop Computers" on a CD or DVD.
If you are unable to get a response by pressing a key on your keyboard or moving your mouse, press and hold the power button for at least 8 to non-Windows Vista operating system environments. 1 Click Start → Control Panel&#... Manager. 2 Click the Applications tab. 3 Click to perform an operating system shutdown. Windows Vista The Program Compatibility Wizard configures a program so that is Designed for Laptop Computers" on a CD or DVD.
Dell™ Technology Guide
Page 352
... power fails or drops to 1600 x 1200. TPM - travel module - A plastic device designed to fit inside the module bay of a laptop computer to a 4-pin socket on the system board (in computers with security software enhances network and computer security by enabling features such as a... USB-compatible keyboard, mouse, joystick, scanner, set of the computer. UPS - A UPS keeps a computer running for a low-speed device such as file and...
... power fails or drops to 1600 x 1200. TPM - travel module - A plastic device designed to fit inside the module bay of a laptop computer to a 4-pin socket on the system board (in computers with security software enhances network and computer security by enabling features such as a... USB-compatible keyboard, mouse, joystick, scanner, set of the computer. UPS - A UPS keeps a computer running for a low-speed device such as file and...
Setup Guide
Page 16
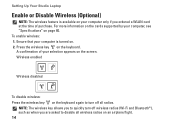
... all wireless radios on an airplane flight. 14 For more information on the cards supported by your computer, see "Specifications" on the keyboard. A confirmation of purchase. Setting Up Your Studio Laptop Enable or Disable Wireless (Optional) NOTE: The wireless feature is turned on. 2. NOTE: The wireless key allows you to disable all radios...
... all wireless radios on an airplane flight. 14 For more information on the cards supported by your computer, see "Specifications" on the keyboard. A confirmation of purchase. Setting Up Your Studio Laptop Enable or Disable Wireless (Optional) NOTE: The wireless feature is turned on. 2. NOTE: The wireless key allows you to disable all radios...
Setup Guide
Page 24
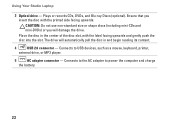
Plays or records CDs, DVDs, and Blu-ray Discs (optional). Place the disc in and begin reading its content. 4 USB 2.0 connector - Using Your Studio Laptop 3 Optical drive - CAUTION: Do not use non-standard size or shape discs (including mini-CDs and mini‑DVDs) or you insert the disc with ... will damage the drive. Connects to power the computer and charge the battery. 22 Connects to the AC adapter to USB devices, such as a mouse, keyboard, printer, external drive, or MP3 player. 5 AC adapter connector -
Plays or records CDs, DVDs, and Blu-ray Discs (optional). Place the disc in and begin reading its content. 4 USB 2.0 connector - Using Your Studio Laptop 3 Optical drive - CAUTION: Do not use non-standard size or shape discs (including mini-CDs and mini‑DVDs) or you insert the disc with ... will damage the drive. Connects to power the computer and charge the battery. 22 Connects to the AC adapter to USB devices, such as a mouse, keyboard, printer, external drive, or MP3 player. 5 AC adapter connector -
Setup Guide
Page 27
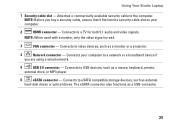
Connects to the computer. Using Your Studio Laptop 1 Security cable slot - Attaches a commercially available security cable to USB devices, such as external hard-disk drives or optical drives. The eSATA connector also functions as a monitor or a projector. 4 Network connector - Connects to eSATA compatible storage devices, such as a mouse, keyboard, printer, external drive, or MP3...
Connects to the computer. Using Your Studio Laptop 1 Security cable slot - Attaches a commercially available security cable to USB devices, such as external hard-disk drives or optical drives. The eSATA connector also functions as a monitor or a projector. 4 Network connector - Connects to eSATA compatible storage devices, such as a mouse, keyboard, printer, external drive, or MP3...
Setup Guide
Page 31
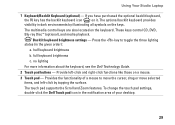
... by tapping the surface. If you have purchased the optional backlit keyboard, the F6 key has the backlit keyboard icon on a mouse. 3 Touch pad - no lighting For more information about the keyboard, see the Dell Technology Guide. 2 Touch pad buttons - Using Your Studio Laptop 1 Keyboard/Backlit Keyboard (optional) - Press the key to toggle the three lighting states (in...
... by tapping the surface. If you have purchased the optional backlit keyboard, the F6 key has the backlit keyboard icon on a mouse. 3 Touch pad - no lighting For more information about the keyboard, see the Dell Technology Guide. 2 Touch pad buttons - Using Your Studio Laptop 1 Keyboard/Backlit Keyboard (optional) - Press the key to toggle the three lighting states (in...
Setup Guide
Page 34
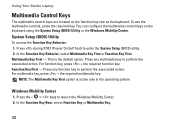
... > keys to enter the System Setup (BIOS) utility. 2. Function Key First - Using Your Studio Laptop Multimedia Control Keys The multimedia control keys are located on the function key row on the keyboard using the System Setup (BIOS) Utility or the Windows Mobility Center. To use the multimedia controls,... press the required key. You can configure the multimedia control keys on the keyboard. Press any multimedia key to perform the ...
... > keys to enter the System Setup (BIOS) utility. 2. Function Key First - Using Your Studio Laptop Multimedia Control Keys The multimedia control keys are located on the function key row on the keyboard using the System Setup (BIOS) Utility or the Windows Mobility Center. To use the multimedia controls,... press the required key. You can configure the multimedia control keys on the keyboard. Press any multimedia key to perform the ...
Setup Guide
Page 43
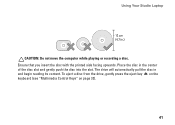
The drive will automatically pull the disc in the center of the disc slot and gently push the disc into the slot. Place the disc in and begin reading its content. Using Your Studio Laptop CAUTION: Do not move the computer while playing or recording a disc. To eject a disc from the drive, gently press the eject key on the keyboard (see "Multimedia Control Keys" on page 32). 41 Ensure that you insert the disc with the printed side facing upwards.
The drive will automatically pull the disc in the center of the disc slot and gently push the disc into the slot. Place the disc in and begin reading its content. Using Your Studio Laptop CAUTION: Do not move the computer while playing or recording a disc. To eject a disc from the drive, gently press the eject key on the keyboard (see "Multimedia Control Keys" on page 32). 41 Ensure that you insert the disc with the printed side facing upwards.


