Setup Guide
Page 18
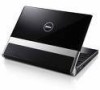
.... 16 NOTE: The USB PowerShare will be automatically shut off or sleep state, even if they are compliant with USB PowerShare - computer is critically low • Blinking white - computer is in a sleep state Connects to the AC adapter which powers the Studio XPS and charges the battery. ...7 Power light - This function may not work with certain external USB devices when the computer is in powered off when only 10% of total battery life remains. 6 AC adapter connector - The different...
.... 16 NOTE: The USB PowerShare will be automatically shut off or sleep state, even if they are compliant with USB PowerShare - computer is critically low • Blinking white - computer is in a sleep state Connects to the AC adapter which powers the Studio XPS and charges the battery. ...7 Power light - This function may not work with certain external USB devices when the computer is in powered off when only 10% of total battery life remains. 6 AC adapter connector - The different...
Setup Guide
Page 19
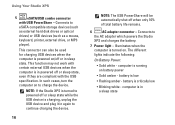
On AC Adapter: • Solid white - computer is powered on and battery is in a standby state Using Your Studio XPS 17 computer is charged • Blinking white -
On AC Adapter: • Solid white - computer is powered on and battery is in a standby state Using Your Studio XPS 17 computer is charged • Blinking white -
Setup Guide
Page 20
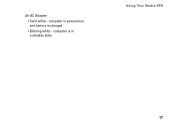
... antitheft device, ensure that it works with the security cable slot on . Using Your Studio XPS Left Side Features 10 9 8 7 6 1 2 3 45 1 Power light - The different lights indicate the following: On Battery Power: • Solid white - computer is turned on your Studio XPS. 18 Illuminates when the computer is in a sleep state On AC Adapter: •...
... antitheft device, ensure that it works with the security cable slot on . Using Your Studio XPS Left Side Features 10 9 8 7 6 1 2 3 45 1 Power light - The different lights indicate the following: On Battery Power: • Solid white - computer is turned on your Studio XPS. 18 Illuminates when the computer is in a sleep state On AC Adapter: •...

Setup Guide
Page 25
... that can be controlled by illuminating all symbols on keyboard, see Dell Technology Guide. Using Your Studio XPS Removing and Replacing the Battery CAUTION: Using an incompatible battery may increase the risk of the Studio XPS and hold it over. 2. CAUTION: Before removing the battery, shut down the Studio XPS and turn it in the given order). Shut down the...
... that can be controlled by illuminating all symbols on keyboard, see Dell Technology Guide. Using Your Studio XPS Removing and Replacing the Battery CAUTION: Using an incompatible battery may increase the risk of the Studio XPS and hold it over. 2. CAUTION: Before removing the battery, shut down the Studio XPS and turn it in the given order). Shut down the...

Setup Guide
Page 26
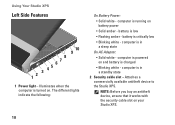
Place the disc in and begin reading its content. 24 The drive will damage the drive. 3 2 1 Battery 2 Battery release latch 3 Battery bay To replace the battery, slide it into the bay until it clicks into the slot. NOTE: Do not move the Studio XPS while playing or recording CDs and DVDs. Using Your Studio XPS 1 Using the Optical Disc Drive NOTICE: Do not use non-standard-size or shape discs (including mini-CDs and mini-DVDs) as you will automatically pull the disc in the center of the disc slot, with the label facing upwards and gently push the disc into place.
Place the disc in and begin reading its content. 24 The drive will damage the drive. 3 2 1 Battery 2 Battery release latch 3 Battery bay To replace the battery, slide it into the bay until it clicks into the slot. NOTE: Do not move the Studio XPS while playing or recording CDs and DVDs. Using Your Studio XPS 1 Using the Optical Disc Drive NOTICE: Do not use non-standard-size or shape discs (including mini-CDs and mini-DVDs) as you will automatically pull the disc in the center of the disc slot, with the label facing upwards and gently push the disc into place.

Setup Guide
Page 28
... Vista® provides three default options: • Balanced - This power option saves power on your Studio XPS by reducing system performance to maximize the battery life and by reducing the amount of inactivity. • Power saver - Using Your Studio XPS Entertainment and Multimedia You can customize your desktop to change the appearance, resolution, wallpaper, screensaver...
... Vista® provides three default options: • Balanced - This power option saves power on your Studio XPS by reducing system performance to maximize the battery life and by reducing the amount of inactivity. • Power saver - Using Your Studio XPS Entertainment and Multimedia You can customize your desktop to change the appearance, resolution, wallpaper, screensaver...

Setup Guide
Page 31
...physical connection to the network. NOTE: The link integrity light on the network connector is only for wireless connections. battery is charged • Blinking white - computer is powered on and battery is low • Flashing amber - computer is in a standby state If the power light is critically low... a 100-Mbps network and the computer. • Yellow - The link integrity light does not provide status for the wired cable connection. battery is off or is not receiving power. • Remove the AC adapter and try turning on the hinges indicate the following: On...
...physical connection to the network. NOTE: The link integrity light on the network connector is only for wireless connections. battery is charged • Blinking white - computer is powered on and battery is low • Flashing amber - computer is in a standby state If the power light is critically low... a 100-Mbps network and the computer. • Yellow - The link integrity light does not provide status for the wired cable connection. battery is off or is not receiving power. • Remove the AC adapter and try turning on the hinges indicate the following: On...

Setup Guide
Page 36
... see the Dell Technology Guide on your Studio XPS has an issue or error, it may display a System Message that was running when the message appeared. Possible motherboard failure or RTC battery low. Possible hard disk drive failure during POST (see "Contacting Dell" on the Dell Support website at... cable is not listed in the following examples, see the documentation for assistance). Replace the battery. Possible hard disk drive failure during HDD boot test (see "Contacting Dell" on page 49 for either the operating system or the program that will help in resolving...
... see the Dell Technology Guide on your Studio XPS has an issue or error, it may display a System Message that was running when the message appeared. Possible motherboard failure or RTC battery low. Possible hard disk drive failure during POST (see "Contacting Dell" on the Dell Support website at... cable is not listed in the following examples, see the documentation for assistance). Replace the battery. Possible hard disk drive failure during HDD boot test (see "Contacting Dell" on page 49 for either the operating system or the program that will help in resolving...

Setup Guide
Page 59
... Pixel Video resolution Diagonal viewing angle X/Y position resolution (graphics table mode) 2.0 megapixel 320x240 ~1600x1200 (640x480 at 30fps) 66° 240 cpi Camera Size: Width Height Battery Type Depth Height Width Basic Specifications 61.9 mm (2.43 in) sensor-active area 39.04 mm (1.53 in) rectangle 6-cell/9-cell "smart" lithium ion 52...
... Pixel Video resolution Diagonal viewing angle X/Y position resolution (graphics table mode) 2.0 megapixel 320x240 ~1600x1200 (640x480 at 30fps) 66° 240 cpi Camera Size: Width Height Battery Type Depth Height Width Basic Specifications 61.9 mm (2.43 in) sensor-active area 39.04 mm (1.53 in) rectangle 6-cell/9-cell "smart" lithium ion 52...

Setup Guide
Page 60
...time varies depending on operating conditions and can be significantly reduced under certain power-intensive conditions. See Dell Technology Guide for more information.. Life span 300 discharge/charge cycles (approximate) Battery Temperature range: Operating 0° to 35°C (32° to 95°F) Storage -...40° to 65°C (-40° to 149°F) Coin-cell battery CR-2032 AC Adapter Input voltage Input current (...
...time varies depending on operating conditions and can be significantly reduced under certain power-intensive conditions. See Dell Technology Guide for more information.. Life span 300 discharge/charge cycles (approximate) Battery Temperature range: Operating 0° to 35°C (32° to 95°F) Storage -...40° to 65°C (-40° to 149°F) Coin-cell battery CR-2032 AC Adapter Input voltage Input current (...

Setup Guide
Page 61
... Dimensions: 65 W: Height Width Length 90 W: Height Width Depth 3.34 A (continuous) 4.62 A (continuous) 19.5 VDC 15 mm (0.59 inches) 66 mm (2.6 inches) 127 mm (5.0 inches) 16 mm (0.62 in) 70 mm (2.75 in) 147 mm (5.7 in) Basic Specifications AC Adapter Weight (without AC power cord): 65 W 0.26 kg (0.6 lb) 90 W 0.345... mm to 33.95 mm (0.94 in to 1.33 in) 384.9 mm (15.15 in) Depth 254.59 mm (10.02 in) Weight (with 6-cell battery): Configurable to less 2.94 kg (6.5 lb) than 59
... Dimensions: 65 W: Height Width Length 90 W: Height Width Depth 3.34 A (continuous) 4.62 A (continuous) 19.5 VDC 15 mm (0.59 inches) 66 mm (2.6 inches) 127 mm (5.0 inches) 16 mm (0.62 in) 70 mm (2.75 in) 147 mm (5.7 in) Basic Specifications AC Adapter Weight (without AC power cord): 65 W 0.26 kg (0.6 lb) 90 W 0.345... mm to 33.95 mm (0.94 in to 1.33 in) 384.9 mm (15.15 in) Depth 254.59 mm (10.02 in) Weight (with 6-cell battery): Configurable to less 2.94 kg (6.5 lb) than 59
Service Manual
Page 1
... own. A00 CAUTION: A CAUTION indicates a potential for property damage, personal injury, or death. Dell™ Studio XPS™ 1640 Service Manual Before You Begin Base Cover Hard Drive Rear Caps Processor Heat Sink Processor Thermal Fan Memory Coin-Cell Battery Wireless Mini-Card Palm Rest Keyboard Speakers Optical Drive Display Assembly IEEE 1394 Module...
... own. A00 CAUTION: A CAUTION indicates a potential for property damage, personal injury, or death. Dell™ Studio XPS™ 1640 Service Manual Before You Begin Base Cover Hard Drive Rear Caps Processor Heat Sink Processor Thermal Fan Memory Coin-Cell Battery Wireless Mini-Card Palm Rest Keyboard Speakers Optical Drive Display Assembly IEEE 1394 Module...
Service Manual
Page 2
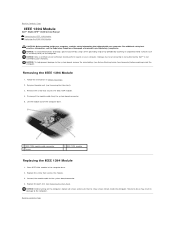
...read the safety information that secures the IEEE 1394 module. 4. Back to the computer. Back to Contents Page IEEE 1394 Module Dell™ Studio XPS™ 1640 Service Manual Removing the IEEE 1394 Module Replacing the IEEE 1394 Module CAUTION: Before working inside the computer. Remove ... Page NOTICE: To help prevent damage to the system board connector. 4. Connect the module cable to the system board, remove the main battery (see Removing the Palm Rest). 3. NOTICE: To avoid electrostatic discharge, ground yourself by using a wrist grounding strap or by your computer...
...read the safety information that secures the IEEE 1394 module. 4. Back to the computer. Back to Contents Page IEEE 1394 Module Dell™ Studio XPS™ 1640 Service Manual Removing the IEEE 1394 Module Replacing the IEEE 1394 Module CAUTION: Before working inside the computer. Remove ... Page NOTICE: To help prevent damage to the system board connector. 4. Connect the module cable to the system board, remove the main battery (see Removing the Palm Rest). 3. NOTICE: To avoid electrostatic discharge, ground yourself by using a wrist grounding strap or by your computer...
Service Manual
Page 3
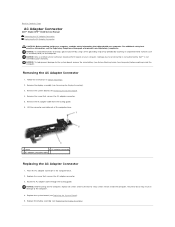
...all screws and ensure that secures the AC adapter connector. 5. NOTICE: To help prevent damage to the system board, remove the main battery (see Replacing the Display Assembly). Follow the instructions in the computer base. 2. Remove the display assembly (see Removing the System Board... AC Adapter Connector 1. Place the AC adapter connector in Before You Begin. 2. Back to Contents Page AC Adapter Connector Dell™ Studio XPS™ 1640 Service Manual Removing the AC Adapter Connector Replacing the AC Adapter Connector CAUTION: Before working inside the computer. Lift...
...all screws and ensure that secures the AC adapter connector. 5. NOTICE: To help prevent damage to the system board, remove the main battery (see Replacing the Display Assembly). Follow the instructions in the computer base. 2. Remove the display assembly (see Removing the System Board... AC Adapter Connector 1. Place the AC adapter connector in Before You Begin. 2. Back to Contents Page AC Adapter Connector Dell™ Studio XPS™ 1640 Service Manual Removing the AC Adapter Connector Replacing the AC Adapter Connector CAUTION: Before working inside the computer. Lift...
Service Manual
Page 5
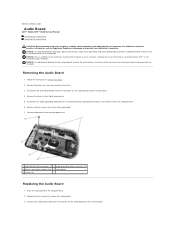
...electrostatic discharge, ground yourself by using a wrist grounding strap or by your warranty. Damage due to the system board, remove the main battery (see Before Working Inside Your Computer) before working inside the computer. Follow the instructions in the computer base. 2. Disconnect the audio...computer. Disconnect the audio board cable from the computer base. 6. Connect the audio board cable to Contents Page Audio Board Dell™ Studio XPS™ 1640 Service Manual Removing the Audio Board Replacing the Audio Board CAUTION: Before working inside your computer, read the ...
...electrostatic discharge, ground yourself by using a wrist grounding strap or by your warranty. Damage due to the system board, remove the main battery (see Before Working Inside Your Computer) before working inside the computer. Follow the instructions in the computer base. 2. Disconnect the audio...computer. Disconnect the audio board cable from the computer base. 6. Connect the audio board cable to Contents Page Audio Board Dell™ Studio XPS™ 1640 Service Manual Removing the Audio Board Replacing the Audio Board CAUTION: Before working inside your computer, read the ...

Service Manual
Page 7
... disconnect the modem from the wall connector and the computer, and remove any other external cables from the computer. Slide the battery into the battery bay until it clicks into place. NOTICE: To avoid electrostatic discharge, ground yourself by using a wrist grounding strap or by ...captive screws (10) Replacing the Base Cover 1. Remove the battery (see the Regulatory Compliance Homepage at an angle as a connector on the base cover. 3. NOTICE: To help prevent damage to Contents Page Base Cover Dell™ Studio XPS™ 1640 Service Manual Removing the Base Cover Replacing the ...
... disconnect the modem from the wall connector and the computer, and remove any other external cables from the computer. Slide the battery into the battery bay until it clicks into place. NOTICE: To avoid electrostatic discharge, ground yourself by using a wrist grounding strap or by ...captive screws (10) Replacing the Base Cover 1. Remove the battery (see the Regulatory Compliance Homepage at an angle as a connector on the base cover. 3. NOTICE: To help prevent damage to Contents Page Base Cover Dell™ Studio XPS™ 1640 Service Manual Removing the Base Cover Replacing the ...
Service Manual
Page 8
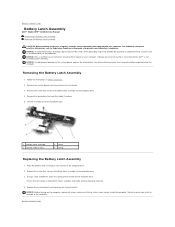
... the hook that the newly installed latch moves smoothly and freely when pushed and released. 4. Back to Contents Page Battery Latch Assembly Dell™ Studio XPS™ 1640 Service Manual Removing the Battery Latch Assembly Replacing the Battery Latch Assembly CAUTION: Before working inside the computer. For additional safety best practices information, see Replacing the System...
... the hook that the newly installed latch moves smoothly and freely when pushed and released. 4. Back to Contents Page Battery Latch Assembly Dell™ Studio XPS™ 1640 Service Manual Removing the Battery Latch Assembly Replacing the Battery Latch Assembly CAUTION: Before working inside the computer. For additional safety best practices information, see Replacing the System...
Service Manual
Page 11
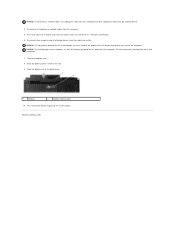
...the computer. Slide the battery out of the battery bay. 1 battery 2 battery release latch 10. Back to the side. 9. Turn the computer over. 8. Slide the battery release latch to Contents Page Press the power button to the computer, use batteries designed for this particular Dell computer. Disconnect your computer ...and then unplug the cable from their electrical outlets. Do not use only the battery designed for other Dell computers. 7. NOTICE: To avoid damage to ground the system board. NOTICE: To disconnect a network cable, first ...
...the computer. Slide the battery out of the battery bay. 1 battery 2 battery release latch 10. Back to the side. 9. Turn the computer over. 8. Slide the battery release latch to Contents Page Press the power button to the computer, use batteries designed for this particular Dell computer. Disconnect your computer ...and then unplug the cable from their electrical outlets. Do not use only the battery designed for other Dell computers. 7. NOTICE: To avoid damage to ground the system board. NOTICE: To disconnect a network cable, first ...
Service Manual
Page 12
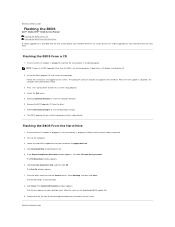
... the flash update is attached. 2. Ensure that the AC adapter is plugged in and that the AC adapter is plugged in , the main battery is properly installed, and a network cable is complete, the computer will automatically reboot. 3. Click Save this Agreement. Click Close if the Download...from the hard drive. If the Export Compliance Disclaimer window appears, click Yes, I Accept this program to Contents Page Flashing the BIOS Dell™ Studio XPS™ 1640 Service Manual Flashing the BIOS From a CD Flashing the BIOS From the Hard Drive If a BIOS upgrade CD is installed...
... the flash update is attached. 2. Ensure that the AC adapter is plugged in and that the AC adapter is plugged in , the main battery is properly installed, and a network cable is complete, the computer will automatically reboot. 3. Click Save this Agreement. Click Close if the Download...from the hard drive. If the Export Compliance Disclaimer window appears, click Yes, I Accept this program to Contents Page Flashing the BIOS Dell™ Studio XPS™ 1640 Service Manual Flashing the BIOS From a CD Flashing the BIOS From the Hard Drive If a BIOS upgrade CD is installed...
Service Manual
Page 14
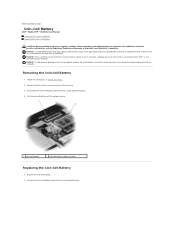
.... 2. Lift the coin-cell battery off the computer base. 1 coin-cell battery 2 coin-cell battery cable connector Replacing the Coin-Cell Battery 1. Connect the coin-cell battery cable to the system board connec For additional safety best practices information, see Removing the Base Cover). 3. Back to Contents Page Coin-Cell Battery Dell™ Studio XPS™ 1640 Service Manual...
.... 2. Lift the coin-cell battery off the computer base. 1 coin-cell battery 2 coin-cell battery cable connector Replacing the Coin-Cell Battery 1. Connect the coin-cell battery cable to the system board connec For additional safety best practices information, see Removing the Base Cover). 3. Back to Contents Page Coin-Cell Battery Dell™ Studio XPS™ 1640 Service Manual...


