Setup Guide
Page 5
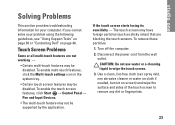
... the Power Button 8 Windows Vista® Setup 9 Connect to the Internet (Optional 9 Using Your Studio One 12 Front View Features 12 Left Side Features 14 Back Panel Features 16 Locating the Service Tag 17 Using the Optical Disc Drive 17 Using the Touch Screen (Optional 18 Software Features... 21 Solving Problems 23 Touch Screen Problems 23 Wireless Keyboard or Mouse Problems 24 Network Problems 25 Power Problems 26 Memory Problems 27 Lockups and Software Problems 27 Using Support Tools 30 Dell Support Center 30 ...
... the Power Button 8 Windows Vista® Setup 9 Connect to the Internet (Optional 9 Using Your Studio One 12 Front View Features 12 Left Side Features 14 Back Panel Features 16 Locating the Service Tag 17 Using the Optical Disc Drive 17 Using the Touch Screen (Optional 18 Software Features... 21 Solving Problems 23 Touch Screen Problems 23 Wireless Keyboard or Mouse Problems 24 Network Problems 25 Power Problems 26 Memory Problems 27 Lockups and Software Problems 27 Using Support Tools 30 Dell Support Center 30 ...
Setup Guide
Page 20
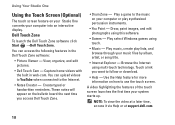
.... • Notes Creator - Play select Windows games using this software. • Games - Dell Touch Zone To launch the Dell Touch Zone software click Start →Dell Touch Zone. Capture home videos with the built in the Dell Touch Zone software: • Picture Viewer - ...Internet Explorer - Using Your Studio One Using the Touch Screen (Optional) The touch screen feature on the bulletin board the next time you want to follow or download. • Help - View, organize, and edit pictures. • Dell Touch Cam - Touch a link you access Dell Touch Zone. • Drum Zone...
.... • Notes Creator - Play select Windows games using this software. • Games - Dell Touch Zone To launch the Dell Touch Zone software click Start →Dell Touch Zone. Capture home videos with the built in the Dell Touch Zone software: • Picture Viewer - ...Internet Explorer - Using Your Studio One Using the Touch Screen (Optional) The touch screen feature on the bulletin board the next time you want to follow or download. • Help - View, organize, and edit pictures. • Dell Touch Cam - Touch a link you access Dell Touch Zone. • Drum Zone...
Setup Guide
Page 21
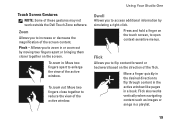
Pinch - Press and hold a finger on the touch screen, to reduce the view of the active window. Touch Screen Gestures NOTE: Some of the flick. To zoom out: Move two fingers close together to open context-sensitive menus. Flick also works ...decrease the magnification of the active window. To zoom in a book. Allows you to zoom in a playlist. 19 Using Your Studio One Dwell Allows you to access additional information by moving two fingers apart or bringing them closer together on the direction of these gestures may not work outside the Dell Touch Zone software.
Pinch - Press and hold a finger on the touch screen, to reduce the view of the active window. Touch Screen Gestures NOTE: Some of the flick. To zoom out: Move two fingers close together to open context-sensitive menus. Flick also works ...decrease the magnification of the active window. To zoom in a book. Allows you to zoom in a playlist. 19 Using Your Studio One Dwell Allows you to access additional information by moving two fingers apart or bringing them closer together on the direction of these gestures may not work outside the Dell Touch Zone software.
Setup Guide
Page 25
..." on page 30 or "Contacting Dell" on screen) and wipe the surface and sides of the touch screen to wipe the touch screen. 3. If you cannot solve your computer. To enable multi-touch features, click the Multi-touch settings icon in the system tray. • Certain touch screen features may not be disabled. If the touch screen starts losing its sensitivity - Turn...
..." on page 30 or "Contacting Dell" on screen) and wipe the surface and sides of the touch screen to wipe the touch screen. 3. If you cannot solve your computer. To enable multi-touch features, click the Multi-touch settings icon in the system tray. • Certain touch screen features may not be disabled. If the touch screen starts losing its sensitivity - Turn...
Setup Guide
Page 53
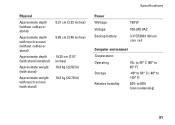
... cables or stand) Approximate depth (with stand installed) Approximate weight (with stand) Approximate weight with touch screen (with stand) 8.21 cm (3.23 inches) 8.85 cm (3.48 inches) 19.25 cm (7.57 inches) 10.4 kg (22.92 lb) 10.3 kg (22.70 lb) Specifications Power Wattage Voltage Backup battery 190 W 100-240 VAC 3-V CR2032...
... cables or stand) Approximate depth (with stand installed) Approximate weight (with stand) Approximate weight with touch screen (with stand) 8.21 cm (3.23 inches) 8.85 cm (3.48 inches) 19.25 cm (7.57 inches) 10.4 kg (22.92 lb) 10.3 kg (22.70 lb) Specifications Power Wattage Voltage Backup battery 190 W 100-240 VAC 3-V CR2032...
Setup Guide
Page 59
processor 48 products information and purchasing 42 R reinstalling Windows 35 resources, finding more 46 restoring factory image 36 S SD card reader 14 setup, before you begin 5 shipping products for return or repair 42 software features 21 software problems 27 solving problems 23 specifications 48 support email addresses 42 support sites worldwide 41 system messages 31 system reinstall options 35 System Restore 35 T technical support 41 touch screen 18 touch screen gestures gestures multi-touch gestures 19 U USB 2.0 back connectors 14, 16 V ventilation, ensuring 5 Index 57
processor 48 products information and purchasing 42 R reinstalling Windows 35 resources, finding more 46 restoring factory image 36 S SD card reader 14 setup, before you begin 5 shipping products for return or repair 42 software features 21 software problems 27 solving problems 23 specifications 48 support email addresses 42 support sites worldwide 41 system messages 31 system reinstall options 35 System Restore 35 T technical support 41 touch screen 18 touch screen gestures gestures multi-touch gestures 19 U USB 2.0 back connectors 14, 16 V ventilation, ensuring 5 Index 57


