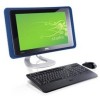
Setup Guide
Page 5
... Cable 7 Set Up the Wireless Keyboard and Mouse (Optional 7 Press the Power Button 8 Windows Vista® Setup 9 Connect to the Internet (Optional 9 Using Your Studio One 12 Front View Features 12 Left Side Features 14 Back Panel Features 16 Locating the Service Tag 17 Using the Optical Disc Drive 17 Using the Touch Screen (Optional 18 Software Features 21 Solving Problems 23 Touch Screen Problems 23 Wireless Keyboard or Mouse Problems 24 Network Problems 25 Power Problems 26 Memory Problems 27 Lockups and Software Problems 27 Using Support Tools 30 Dell Support Center...
... Cable 7 Set Up the Wireless Keyboard and Mouse (Optional 7 Press the Power Button 8 Windows Vista® Setup 9 Connect to the Internet (Optional 9 Using Your Studio One 12 Front View Features 12 Left Side Features 14 Back Panel Features 16 Locating the Service Tag 17 Using the Optical Disc Drive 17 Using the Touch Screen (Optional 18 Software Features 21 Solving Problems 23 Touch Screen Problems 23 Wireless Keyboard or Mouse Problems 24 Network Problems 25 Power Problems 26 Memory Problems 27 Lockups and Software Problems 27 Using Support Tools 30 Dell Support Center...
Setup Guide
Page 8
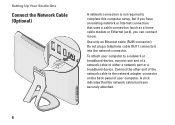
... the network adapter connector on the back panel of a network cable to either a network port or a broadband device. Do not plug a telephone cable (RJ11 connector) into the network connector. To attach your computer. Setting Up Your Studio One Connect the Network Cable (Optional) A network connection is not required to a network or broadband device, connect one end of your computer to complete this computer setup, but if you can connect it now. A click indicates that uses a cable connection (such as a home cable modem or Ethernet...
... the network adapter connector on the back panel of a network cable to either a network port or a broadband device. Do not plug a telephone cable (RJ11 connector) into the network connector. To attach your computer. Setting Up Your Studio One Connect the Network Cable (Optional) A network connection is not required to a network or broadband device, connect one end of your computer to complete this computer setup, but if you can connect it now. A click indicates that uses a cable connection (such as a home cable modem or Ethernet...
Setup Guide
Page 9
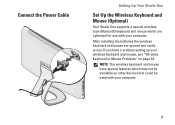
... synced and ready to use with your computer. 7 NOTE: The wireless keyboard and mouse have a problem setting up your wireless keyboard and mouse, see "Wireless Keyboard or Mouse Problems" on other devices that could be used with your computer. Connect the Power Cable Setting Up Your Studio One Set Up the Wireless Keyboard and Mouse (Optional) Your Studio One supports a special wireless (non-Bluetooth) keyboard and mouse which may not be available on page 24. After installing the batteries the wireless keyboard and mouse are optimized for...
... synced and ready to use with your computer. 7 NOTE: The wireless keyboard and mouse have a problem setting up your wireless keyboard and mouse, see "Wireless Keyboard or Mouse Problems" on other devices that could be used with your computer. Connect the Power Cable Setting Up Your Studio One Set Up the Wireless Keyboard and Mouse (Optional) Your Studio One supports a special wireless (non-Bluetooth) keyboard and mouse which may not be available on page 24. After installing the batteries the wireless keyboard and mouse are optimized for...

Setup Guide
Page 12
... Dell website at the time of your ISP or cellular telephone service for dial-up connections that provide Internet access through a telephone line. Wireless LAN support requires optional internal components that may or may not be used for setup instructions. Setting Up a Wired Connection • If you are using a dial-up connection, connect the telephone line to the external USB modem (optional) and to your Internet connection. • If you can use your wireless Internet connection, you need to connect...
... Dell website at the time of your ISP or cellular telephone service for dial-up connections that provide Internet access through a telephone line. Wireless LAN support requires optional internal components that may or may not be used for setup instructions. Setting Up a Wired Connection • If you are using a dial-up connection, connect the telephone line to the external USB modem (optional) and to your Internet connection. • If you can use your wireless Internet connection, you need to connect...
Setup Guide
Page 15
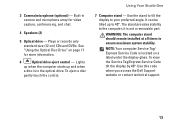
.... Use this code when you access the Dell Support website or contact technical support. 13 it is located on page 17 for video capture, conferencing, and chat. 4 Speakers (2) 5 Optical drive - Lights up when the computer starts up to the computer; It can be tilted up and when a disc is in camera and microphone array for more information. 6 Optical drive eject control - To view the Service Tag/Express Service Code tilt the display...
.... Use this code when you access the Dell Support website or contact technical support. 13 it is located on page 17 for video capture, conferencing, and chat. 4 Speakers (2) 5 Optical drive - Lights up when the computer starts up to the computer; It can be tilted up and when a disc is in camera and microphone array for more information. 6 Optical drive eject control - To view the Service Tag/Express Service Code tilt the display...
Setup Guide
Page 17
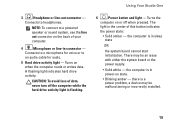
... for audio. 5 Hard drive activity light - there is flashing. 6 Power button and light - Using Your Studio One 3 Headphone or line-out connector - Turns on or off the computer while the hard drive activity light is a power problem, a device may be malfunctioning or incorrectly installed. 15 A flashing light indicates hard drive activity. CAUTION: To avoid loss of this button indicates the power state: • Solid amber - The light in connector - NOTE: To connect to a powered speaker or sound system, use the line out connector on...
... for audio. 5 Hard drive activity light - there is flashing. 6 Power button and light - Using Your Studio One 3 Headphone or line-out connector - Turns on or off the computer while the hard drive activity light is a power problem, a device may be malfunctioning or incorrectly installed. 15 A flashing light indicates hard drive activity. CAUTION: To avoid loss of this button indicates the power state: • Solid amber - The light in connector - NOTE: To connect to a powered speaker or sound system, use the line out connector on...
Setup Guide
Page 20
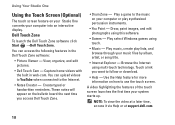
... lists, and browse through your computer into an interactive display. You can access the following features in web-cam. Dell Touch Zone To launch the Dell Touch Zone software click Start →Dell Touch Zone. You can upload videos to YouTube when connected to use the touch screen. Play select Windows games using touch. • Music - Using Your Studio One Using the Touch Screen (Optional) The touch screen feature on your Studio One...
... lists, and browse through your computer into an interactive display. You can access the following features in web-cam. Dell Touch Zone To launch the Dell Touch Zone software click Start →Dell Touch Zone. You can upload videos to YouTube when connected to use the touch screen. Play select Windows games using touch. • Music - Using Your Studio One Using the Touch Screen (Optional) The touch screen feature on your Studio One...

Setup Guide
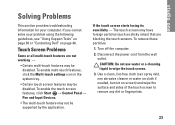
Page 23
... software feature is selected at support.dell.com. You can download or copy pictures and video files from portable devices, such as digital cameras and cell phones. For more information about the features described in this information yourself (such as for software installed on . Optional software applications enable you would normally enter this section, see the Dell Technology Guide available on your computer. Using Your Studio One Software...
... software feature is selected at support.dell.com. You can download or copy pictures and video files from portable devices, such as digital cameras and cell phones. For more information about the features described in this information yourself (such as for software installed on . Optional software applications enable you would normally enter this section, see the Dell Technology Guide available on your computer. Using Your Studio One Software...
Setup Guide
Page 24
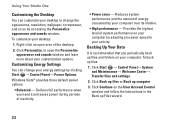
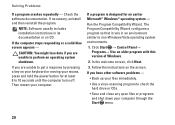
... energy consumed by adapting processor speed to change your activity. Provides the highest level of the desktop. 2. Click Back up files or Back up files: 1. Customizing Energy Settings You can customize your desktop to your energy settings by accessing the Personalize appearance and sounds window. Click Start → Control Panel→ System and Maintenance→ Welcome Center→ Transfer files and settings. 2. Windows Vista® provides three default power options: • Balanced...
... energy consumed by adapting processor speed to change your activity. Provides the highest level of the desktop. 2. Click Back up files or Back up files: 1. Customizing Energy Settings You can customize your desktop to your energy settings by accessing the Personalize appearance and sounds window. Click Start → Control Panel→ System and Maintenance→ Welcome Center→ Transfer files and settings. 2. Windows Vista® provides three default power options: • Balanced...
Setup Guide
Page 25
... screen features, click Start → Control Panel→ Pen and Input Devices. • The multi-touch feature may be disabled. The touch screen may have foreign particles (such as sticky notes) that are not working - • Certain multi-touch features may not be supported by the application. To remove these particles: 1. Disconnect the power cord from the wall outlet. Use a clean, lint-free...
... screen features, click Start → Control Panel→ Pen and Input Devices. • The multi-touch feature may be disabled. The touch screen may have foreign particles (such as sticky notes) that are not working - • Certain multi-touch features may not be supported by the application. To remove these particles: 1. Disconnect the power cord from the wall outlet. Use a clean, lint-free...
Setup Guide
Page 30
... software problems - • Back up your files immediately. • Use a virus-scanning program to perform an operating system shutdown. Then restart your mouse, press and hold the power button for an earlier Microsoft® Windows® operating system - Follow the instructions on your keyboard or moving your computer. If you are unable to 10 seconds until the computer turns off. Click Start → Control Panel...
... software problems - • Back up your files immediately. • Use a virus-scanning program to perform an operating system shutdown. Then restart your mouse, press and hold the power button for an earlier Microsoft® Windows® operating system - Follow the instructions on your keyboard or moving your computer. If you are unable to 10 seconds until the computer turns off. Click Start → Control Panel...
Setup Guide
Page 32
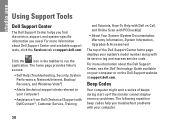
..., Upgrades & Accessories) The top of beeps during start-up if the monitor cannot display errors or problems. The following repetitive beep codes help you need. For more information about the Dell Support Center, see the Dell Technology Guide available on the Dell Support website at support.dell.com. For more information about Dell Support Center and available support tools, click the Services tab at support.dell.com. Beep Codes Your computer might emit a series of the Dell Support Center home page displays your...
..., Upgrades & Accessories) The top of beeps during start-up if the monitor cannot display errors or problems. The following repetitive beep codes help you need. For more information about the Dell Support Center, see the Dell Technology Guide available on the Dell Support website at support.dell.com. For more information about Dell Support Center and available support tools, click the Services tab at support.dell.com. Beep Codes Your computer might emit a series of the Dell Support Center home page displays your...
Setup Guide
Page 33
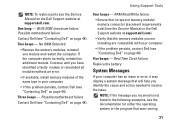
... all modules without an error. • If available, install memory modules of the same type in the following examples, see "Contacting Dell" on page 44). Using Support Tools NOTE: To replace parts see the Service Manual on page 44). Two beeps - Continue until you are installing are compatible with your computer has an issue or error, it may display a system message that was running 31 One beep - Three beeps -
... all modules without an error. • If available, install memory modules of the same type in the following examples, see "Contacting Dell" on page 44). Using Support Tools NOTE: To replace parts see the Service Manual on page 44). Two beeps - Continue until you are installing are compatible with your computer has an issue or error, it may display a system message that was running 31 One beep - Three beeps -

Setup Guide
Page 34
... USB cables, connect both of them. Hard-disk drive failure - See "Contacting Dell" on page 44 for the same error. No timer tick interrupt - Hardware Troubleshooter If a device is detected but incorrectly configured, you could see "Contacting Dell" on page 44 for it to resolve the incompatibility. CPU fan failure - Your USB device needs more power for assistance. Using Support Tools when the message appeared. Replace the battery. Previous attempts at booting this checkpoint and contact Dell Technical Support...
... USB cables, connect both of them. Hard-disk drive failure - See "Contacting Dell" on page 44 for the same error. No timer tick interrupt - Hardware Troubleshooter If a device is detected but incorrectly configured, you could see "Contacting Dell" on page 44 for it to resolve the incompatibility. CPU fan failure - Your USB device needs more power for assistance. Using Support Tools when the message appeared. Replace the battery. Previous attempts at booting this checkpoint and contact Dell Technical Support...

Setup Guide
Page 35
..., perform the checks in the system setup program and is known to start the search. 3. NOTE: The Drivers and Utilities media is located on a hidden diagnostic utility partition on your computer cannot display a screen image, see "Contacting Dell" on (or restart) your hard drive or from the Drivers and Utilities media. Using Support Tools See the System Setup section in the Service Manual to test displays in "Lockups and Software Problems" on Dell computers. In the search results...
..., perform the checks in the system setup program and is known to start the search. 3. NOTE: The Drivers and Utilities media is located on a hidden diagnostic utility partition on your computer cannot display a screen image, see "Contacting Dell" on (or restart) your hard drive or from the Drivers and Utilities media. Using Support Tools See the System Setup section in the Service Manual to test displays in "Lockups and Software Problems" on Dell computers. In the search results...
Setup Guide
Page 38
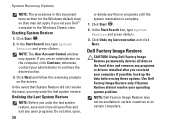
... data before using these options. In the Start Search box, type System Restore and press . 3. Click Undo my last restoration and click Next. Starting System Restore 1. NOTE: The User Account Control window may not be available in this document were written for the Windows default view, so they may undo the last system restore. Click Start . 2. NOTE: Dell Factory Image Restore may appear. If you set your operating system problem. Use Dell Factory Image Restore only if...
... data before using these options. In the Start Search box, type System Restore and press . 3. Click Undo my last restoration and click Next. Starting System Restore 1. NOTE: The User Account Control window may not be available in this document were written for the Windows default view, so they may undo the last system restore. Click Start . 2. NOTE: Dell Factory Image Restore may appear. If you set your operating system problem. Use Dell Factory Image Restore only if...
Setup Guide
Page 41
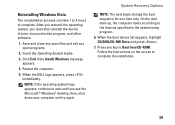
... you must also reinstall the device drivers, virus protection program, and other software. 1. On the next start-up, the computer boots according to complete the installation. 39 Click Exit if the Install Windows message appears. 4. Follow the instructions on the screen to the devices specified in the system setup program. 6. When the boot device list appears, highlight CD/DVD/CD-RW Drive and press . 7. Save and close...
... you must also reinstall the device drivers, virus protection program, and other software. 1. On the next start-up, the computer boots according to complete the installation. 39 Click Exit if the Install Windows message appears. 4. Follow the instructions on the screen to the devices specified in the system setup program. 6. When the boot device list appears, highlight CD/DVD/CD-RW Drive and press . 7. Save and close...
Setup Guide
Page 48
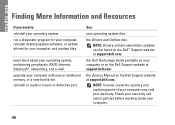
... Service Manual on the Dell Support website at support.dell.com. the Drivers and Utilities disc. See: your warranty. NOTE: In some countries, opening and replacing parts of your computer may void your operating system disc. Check your warranty and return policies before working inside your operating system, maintaining peripherals, RAID, Internet, Bluetooth®, networking, and e-mail. learn more about your computer. 46 run a diagnostic program for your computer, reinstall desktop system software, or update drivers...
... Service Manual on the Dell Support website at support.dell.com. the Drivers and Utilities disc. See: your warranty. NOTE: In some countries, opening and replacing parts of your computer may void your operating system disc. Check your warranty and return policies before working inside your operating system, maintaining peripherals, RAID, Internet, Bluetooth®, networking, and e-mail. learn more about your computer. 46 run a diagnostic program for your computer, reinstall desktop system software, or update drivers...
Setup Guide
Page 50
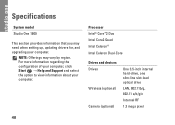
... information about your computer. NOTE: Offerings may need when setting up, updating drivers for, and upgrading your computer. Processor Intel® Core™2 Duo Intel Core2 Quad Intel Celeron® Intel Celeron Dual-Core Drives and devices Drives Wireless (optional) Camera (optional) One 3.5-inch internal hard-drive, one slim‑line slot-load optical drive LAN, 802.11b/g, 802.11 a/b/g/n Internal RF 1.3 mega pixel 48 Specifications System model Studio One 1909 This section provides information that you...
... information about your computer. NOTE: Offerings may need when setting up, updating drivers for, and upgrading your computer. Processor Intel® Core™2 Duo Intel Core2 Quad Intel Celeron® Intel Celeron Dual-Core Drives and devices Drives Wireless (optional) Camera (optional) One 3.5-inch internal hard-drive, one slim‑line slot-load optical drive LAN, 802.11b/g, 802.11 a/b/g/n Internal RF 1.3 mega pixel 48 Specifications System model Studio One 1909 This section provides information that you...
Setup Guide
Page 57
D DellConnect 41 Dell Diagnostics 33 Dell Factory Image Restore 35 Dell Support Center 30 Dell support website 47 Dell Technology Guide for futher information 46 Dell Touch Zone 18 drivers and downloads 47 drives and devices 48 DVDs, playing and creating 21 E email addresses for technical support 42 energy conserving 22 expansion bus 50 F finding more information 46 flick 19 front-side connectors 12 FTP login, anonymous 42 G gestures 19 H hard drive activity light 15 hardware problems diagnosing 33 Hardware Troubleshooter 32 headphone front connector 15 Index 55
D DellConnect 41 Dell Diagnostics 33 Dell Factory Image Restore 35 Dell Support Center 30 Dell support website 47 Dell Technology Guide for futher information 46 Dell Touch Zone 18 drivers and downloads 47 drives and devices 48 DVDs, playing and creating 21 E email addresses for technical support 42 energy conserving 22 expansion bus 50 F finding more information 46 flick 19 front-side connectors 12 FTP login, anonymous 42 G gestures 19 H hard drive activity light 15 hardware problems diagnosing 33 Hardware Troubleshooter 32 headphone front connector 15 Index 55


