Page 55
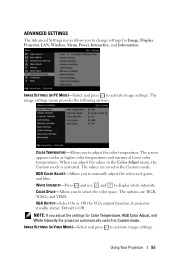
... values are : RGB, YCbCr, and YPbPr. RGB COLOR ADJUST-Allows you to adjust the color temperature. Using Your Projector 55 The image settings menu provides the following options: COLOR TEMPERATURE-Allows you to manually adjust the colors red, green, and blue. VGA OUTPUT-Select On or Off the VGA output function at...
... values are : RGB, YCbCr, and YPbPr. RGB COLOR ADJUST-Allows you to adjust the color temperature. Using Your Projector 55 The image settings menu provides the following options: COLOR TEMPERATURE-Allows you to manually adjust the colors red, green, and blue. VGA OUTPUT-Select On or Off the VGA output function at...

Page 56
...to decrease the amount of green in the image. SHARPNESS-Press sharpness. The screen appears cooler at higher color temperatures and warmer at projector standby status. The values are : RGB, YCbCr, and YPbPr. IMAGE SETTINGS (NO INPUT SOURCE)-Select and press to display white ..., RGB Color Adjust, Saturation, Sharpness, Tint, and White Intensity the projector automatically switch to Custom mode. 2 Saturation, Sharpness, and Tint only available when the input source is from black and white to manually adjust the colors red, green, and blue. to increase the sharpness and...
...to decrease the amount of green in the image. SHARPNESS-Press sharpness. The screen appears cooler at higher color temperatures and warmer at projector standby status. The values are : RGB, YCbCr, and YPbPr. IMAGE SETTINGS (NO INPUT SOURCE)-Select and press to display white ..., RGB Color Adjust, Saturation, Sharpness, Tint, and White Intensity the projector automatically switch to Custom mode. 2 Saturation, Sharpness, and Tint only available when the input source is from black and white to manually adjust the colors red, green, and blue. to increase the sharpness and...

Page 61
... you press the Source button when the Auto Source mode is mounted. •Rear Projection-Desktop - CLOSED CAPTION-Select On to the projector is used to lock the current input signal. TEST PATTERN-Test Pattern is at 1024 x 768 resolution. This is on the screen...detect the available input signals. PROJECTOR MODE-Allows you can only be enabled via S-Video and Composite Video inputs. Select Off to the disable speaker. Select appropriate closed caption menu. Closed caption option is Dell logo as wallpaper. Closed captioning can manually select the input signal. ...
... you press the Source button when the Auto Source mode is mounted. •Rear Projection-Desktop - CLOSED CAPTION-Select On to the projector is used to lock the current input signal. TEST PATTERN-Test Pattern is at 1024 x 768 resolution. This is on the screen...detect the available input signals. PROJECTOR MODE-Allows you can only be enabled via S-Video and Composite Video inputs. Select Off to the disable speaker. Select appropriate closed caption menu. Closed caption option is Dell logo as wallpaper. Closed captioning can manually select the input signal. ...

Page 63
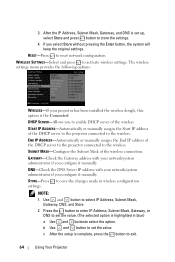
...IP Address, Subnet Mask, Gateway, DNS, and Store. 2. Use and button to activate LAN settings. IP ADDRESS-Automatically or manually assigns the IP address to the projector connected to activate the Wireless and LAN function. NOTE: 1. SUBNET MASK-Configure the Subnet Mask of IP address, Subnet Mask,...configuration settings. b Use and button to select the option. STORE-Press to save the changes made in the network to which the projector is complete, press the button to select the number of the network connection. The LAN settings menu provides the following options: WIRELESS ...
...IP Address, Subnet Mask, Gateway, DNS, and Store. 2. Use and button to activate LAN settings. IP ADDRESS-Automatically or manually assigns the IP address to the projector connected to activate the Wireless and LAN function. NOTE: 1. SUBNET MASK-Configure the Subnet Mask of IP address, Subnet Mask,...configuration settings. b Use and button to select the option. STORE-Press to save the changes made in the network to which the projector is complete, press the button to select the number of the network connection. The LAN settings menu provides the following options: WIRELESS ...
Page 64
END IP ADDRESS-Automatically or manually assigns the End IP address of the DHCP server to the projector connected to enable DHCP server of the wireless connection. If you to the wireless. DHCP SERVER-Allows you select Store without pressing the Enter ... the DNS Server IP address with your network/system administrator if you configure it manually. c After the setup is the Connected. START IP ADDRESS-Automatically or manually assigns the Start IP address of the DHCP server to the projector connected to save the changes made in blue) a Use and buttonto select the...
END IP ADDRESS-Automatically or manually assigns the End IP address of the DHCP server to the projector connected to enable DHCP server of the wireless connection. If you to the wireless. DHCP SERVER-Allows you select Store without pressing the Enter ... the DNS Server IP address with your network/system administrator if you configure it manually. c After the setup is the Connected. START IP ADDRESS-Automatically or manually assigns the Start IP address of the DHCP server to the projector connected to save the changes made in blue) a Use and buttonto select the...
Page 69
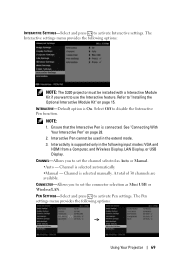
... Pen is selected manually. See "Connecting With Your Interactive Pen" on page 15. Channel is connected. Channel is On. PEN SETTINGS-Select and press to use the Interactive feature. The Interactive settings menu provides the following options: NOTE: The S320 projector must be used in... the following options: Using Your Projector 69 Interactivity is supported only in the extend mode. 3. The Pen settings menu provides the following input...
... Pen is selected manually. See "Connecting With Your Interactive Pen" on page 15. Channel is connected. Channel is On. PEN SETTINGS-Select and press to use the Interactive feature. The Interactive settings menu provides the following options: NOTE: The S320 projector must be used in... the following options: Using Your Projector 69 Interactivity is supported only in the extend mode. 3. The Pen settings menu provides the following input...
Page 100
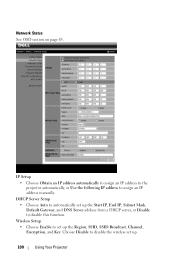
IP Setup • Choose Obtain an IP address automatically to assign an IP address to the projector automatically, or Use the following IP address to automatically set up the Region, SSID, SSID Broadcast, Channel, Encryption, and Key. Wireless Setup • Choose Enable ... up the Start IP, End IP, Subnet Mask, Default Gateway, and DNS Server address from a DHCP server, or Disable to set up . 100 Using Your Projector DHCP Server Setup • Choose Auto to assign an IP address manually. Network Status See OSD section on page 63.
IP Setup • Choose Obtain an IP address automatically to assign an IP address to the projector automatically, or Use the following IP address to automatically set up the Region, SSID, SSID Broadcast, Channel, Encryption, and Key. Wireless Setup • Choose Enable ... up the Start IP, End IP, Subnet Mask, Default Gateway, and DNS Server address from a DHCP server, or Disable to set up . 100 Using Your Projector DHCP Server Setup • Choose Auto to assign an IP address manually. Network Status See OSD section on page 63.
Page 112
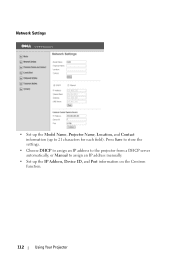
Press Save to store the settings. • Choose DHCP to assign an IP address to the projector from a DHCP server automatically, or Manual to assign an IP address manually. • Set up to 21 characters for each field). Network Settings • Set up the Model Name, Projector Name, Location, and Contact information (up the IP Address, Device ID, and Port information on the Crestron function. 112 Using Your Projector
Press Save to store the settings. • Choose DHCP to assign an IP address to the projector from a DHCP server automatically, or Manual to assign an IP address manually. • Set up to 21 characters for each field). Network Settings • Set up the Model Name, Projector Name, Location, and Contact information (up the IP Address, Device ID, and Port information on the Crestron function. 112 Using Your Projector


