Monitor Users Guide
Page 3
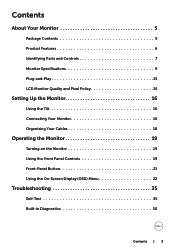
Contents About Your Monitor 5 Package Contents 5 Product Features 6 Identifying Parts and Controls 7 Monitor Specifications 9 Plug-and-Play 15 LCD Monitor Quality and Pixel Policy 15 Setting Up the Monitor 16 Using the Tilt 16 Connecting Your Monitor 16 Organizing Your Cables 18 Operating the Monitor 19 Turning on the Monitor 19 Using the Front Panel Controls 19 Front‑Panel Button 21 Using the On-Screen Display (OSD) Menu 22 Troubleshooting 35 Self-Test 35 Built-in Diagnostics 36 Contents | 3
Contents About Your Monitor 5 Package Contents 5 Product Features 6 Identifying Parts and Controls 7 Monitor Specifications 9 Plug-and-Play 15 LCD Monitor Quality and Pixel Policy 15 Setting Up the Monitor 16 Using the Tilt 16 Connecting Your Monitor 16 Organizing Your Cables 18 Operating the Monitor 19 Turning on the Monitor 19 Using the Front Panel Controls 19 Front‑Panel Button 21 Using the On-Screen Display (OSD) Menu 22 Troubleshooting 35 Self-Test 35 Built-in Diagnostics 36 Contents | 3
Monitor Users Guide
Page 4
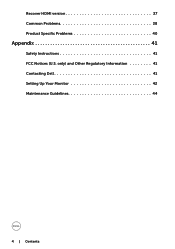
only) and Other Regulatory Information 41 Contacting Dell 41 Setting Up Your Monitor 42 Maintenance Guidelines 44 4 | Contents Recover HDMI version 37 Common Problems 38 Product Specific Problems 40 Appendix 41 Safety Instructions 41 FCC Notices (U.S.
only) and Other Regulatory Information 41 Contacting Dell 41 Setting Up Your Monitor 42 Maintenance Guidelines 44 4 | Contents Recover HDMI version 37 Common Problems 38 Product Specific Problems 40 Appendix 41 Safety Instructions 41 FCC Notices (U.S.
Monitor Users Guide
Page 5
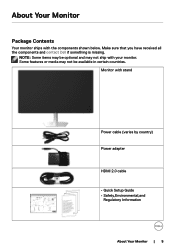
Make sure that you have received all the components and contact Dell if something is missing. About Your Monitor Package Contents Your monitor ships with stand Power cable (varies by country) Power adapter HDMI 2.0 cable • Quick Setup Guide • Safety,Environmental,and Regulatory Information About Your Monitor | 5 Some features or media may not be optional and may be available in certain countries. NOTE: Some items may not ship with your monitor. Monitor with the components shown below.
Make sure that you have received all the components and contact Dell if something is missing. About Your Monitor Package Contents Your monitor ships with stand Power cable (varies by country) Power adapter HDMI 2.0 cable • Quick Setup Guide • Safety,Environmental,and Regulatory Information About Your Monitor | 5 Some features or media may not be optional and may be available in certain countries. NOTE: Some items may not ship with your monitor. Monitor with the components shown below.
Monitor Users Guide
Page 6
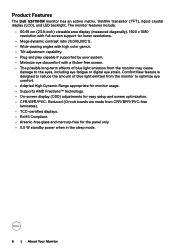
...Dell S2419HM monitor has an active matrix, thinfilm transistor (TFT), liquid crystal display (LCD), and LED backlight. Reduced (Circuit boards are made from the monitor to the eyes, including eye fatigue or digital eye strain. ComfortView feature is designed to reduce the amount of blue light emission from the monitor...display (OSD) adjustments for the panel only. • 0.5 W standby power when in the sleep mode. 6 | About Your Monitor The monitor features include: • 60.45 cm (23.8-inch) viewable area display (measured diagonally). 1920 x 1080 resolution with full-screen ...
...Dell S2419HM monitor has an active matrix, thinfilm transistor (TFT), liquid crystal display (LCD), and LED backlight. Reduced (Circuit boards are made from the monitor to the eyes, including eye fatigue or digital eye strain. ComfortView feature is designed to reduce the amount of blue light emission from the monitor...display (OSD) adjustments for the panel only. • 0.5 W standby power when in the sleep mode. 6 | About Your Monitor The monitor features include: • 60.45 cm (23.8-inch) viewable area display (measured diagonally). 1920 x 1080 resolution with full-screen ...
Monitor Users Guide
Page 7
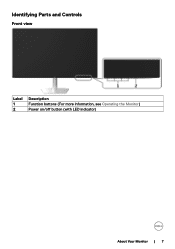
Identifying Parts and Controls Front view Label 1 2 Description Function buttons (For more information, see Operating the Monitor) Power on/off button (with LED indicator) About Your Monitor | 7
Identifying Parts and Controls Front view Label 1 2 Description Function buttons (For more information, see Operating the Monitor) Power on/off button (with LED indicator) About Your Monitor | 7
Monitor Users Guide
Page 8
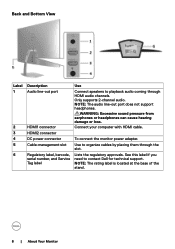
NOTE: The rating label is located at the base of the stand. 8 | About Your Monitor Only supports 2-channel audio. To connect the monitor power adapter. See this label if you need to organize cables by placing them through HDMI audio channels. WARNING: Excessive sound ...Regulatory label, barcode, serial number, and Service Tag label Use Connect speakers to playback audio coming through the slot. Use to contact Dell for technical support. Connect your computer with HDMI cable. NOTE: The audio line-out port does not support headphones. Lists the regulatory approvals.
NOTE: The rating label is located at the base of the stand. 8 | About Your Monitor Only supports 2-channel audio. To connect the monitor power adapter. See this label if you need to organize cables by placing them through HDMI audio channels. WARNING: Excessive sound ...Regulatory label, barcode, serial number, and Service Tag label Use Connect speakers to playback audio coming through the slot. Use to contact Dell for technical support. Connect your computer with HDMI cable. NOTE: The audio line-out port does not support headphones. Lists the regulatory approvals.
Monitor Users Guide
Page 9
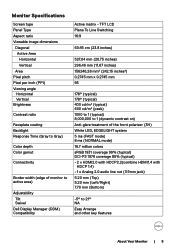
Monitor Specifications Screen type Panel Type Aspect ratio Viewable image dimensions Diagonal Active Area Horizontal Vertical Area ...audio line out (3.5mm jack) 5.20 mm (Top) 5.20 mm (Left/Right) 7.70 mm (Bottom) -5° to active area) Adjustability Tilt Swivel Dell Display Manager (DDM) Compatibility Active matrix - TFT LCD Plane To Line Switching 16:9 60.45 cm (23.8 inches) 527.04 mm (20.75 inches)...178; (typical) 600 cd/m² (peak) 1000 to 1 (typical) 8,000,000 to 1 (dynamic contrast on) Anti-glare treatment of monitor to 21° NA Easy Arrange and other key features About Your...
Monitor Specifications Screen type Panel Type Aspect ratio Viewable image dimensions Diagonal Active Area Horizontal Vertical Area ...audio line out (3.5mm jack) 5.20 mm (Top) 5.20 mm (Left/Right) 7.70 mm (Bottom) -5° to active area) Adjustability Tilt Swivel Dell Display Manager (DDM) Compatibility Active matrix - TFT LCD Plane To Line Switching 16:9 60.45 cm (23.8 inches) 527.04 mm (20.75 inches)...178; (typical) 600 cd/m² (peak) 1000 to 1 (typical) 8,000,000 to 1 (dynamic contrast on) Anti-glare treatment of monitor to 21° NA Easy Arrange and other key features About Your...
Monitor Users Guide
Page 11
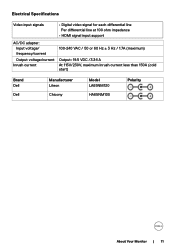
Electrical Specifications Video input signals • Digital video signal for each differential line Per differential line at 100 ohm impedance • HDMI signal input support AC/DC adapter: Input voltage/ frequency/current Output voltage/current Inrush current 100-240 VAC / 50 or 60 Hz ± 3 Hz / 1.7A (maximum) Output: 19.5 VDC /3.34 A At 115V/230V, maximum inrush current less than 150A (cold start) Brand Dell Dell Manufacturer Liteon Chicony Model LA65NM130 HA65NM130 Polarity About Your Monitor | 11
Electrical Specifications Video input signals • Digital video signal for each differential line Per differential line at 100 ohm impedance • HDMI signal input support AC/DC adapter: Input voltage/ frequency/current Output voltage/current Inrush current 100-240 VAC / 50 or 60 Hz ± 3 Hz / 1.7A (maximum) Output: 19.5 VDC /3.34 A At 115V/230V, maximum inrush current less than 150A (cold start) Brand Dell Dell Manufacturer Liteon Chicony Model LA65NM130 HA65NM130 Polarity About Your Monitor | 11
Monitor Users Guide
Page 12
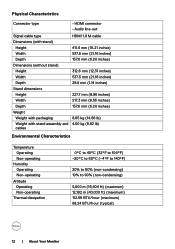
...-condensing) 5,000 m (16,404 ft) (maximum) 12,192 m (40,000 ft) (maximum) 112.59 BTU/hour (maximum) 68.24 BTU/hour (typical) 12 | About Your Monitor
...-condensing) 5,000 m (16,404 ft) (maximum) 12,192 m (40,000 ft) (maximum) 112.59 BTU/hour (maximum) 68.24 BTU/hour (typical) 12 | About Your Monitor
Monitor Users Guide
Page 13
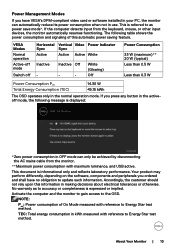
...If you press any button in making decisions about electrical tolerances or otherwise. Inactive Off - - Activate the computer and the monitor to gain access to Energy Star test method. About Your Monitor | 13 White (Glowing) Off Power Consumption 33 W (maximum)** 20 W (typical) Less than 0.5 W Less than .... No warranty as to accuracy or completeness is referred to as power save mode*. If the computer detects input from the monitor. **Maximum power consumption with maximum luminance, and USB active. TEC: Total energy consumption in OFF mode can automatically reduce its...
...If you press any button in making decisions about electrical tolerances or otherwise. Inactive Off - - Activate the computer and the monitor to gain access to Energy Star test method. About Your Monitor | 13 White (Glowing) Off Power Consumption 33 W (maximum)** 20 W (typical) Less than 0.5 W Less than .... No warranty as to accuracy or completeness is referred to as power save mode*. If the computer detects input from the monitor. **Maximum power consumption with maximum luminance, and USB active. TEC: Total energy consumption in OFF mode can automatically reduce its...

Monitor Users Guide
Page 14
Pin Assignments_HDMI connector Pin number 1 2 3 4 5 6 7 8 9 10 11 12 13 14 15 16 17 18 19 19-pin side of the connected signal cable TMDS DATA 2+ TMDS DATA 2 SHIELD TMDS DATA 2TMDS DATA 1+ TMDS DATA 1 SHIELD TMDS DATA 1TMDS DATA 0+ TMDS DATA 0 SHIELD TMDS DATA 0TMDS CLOCK+ TMDS CLOCK SHIELD TMDS CLOCKCEC Reserved (N.C. on device) DDC CLOCK (SCL) DDC DATA (SDA) DDC/CEC Ground +5 V POWER HOT PLUG DETECT 14 | About Your Monitor
Pin Assignments_HDMI connector Pin number 1 2 3 4 5 6 7 8 9 10 11 12 13 14 15 16 17 18 19 19-pin side of the connected signal cable TMDS DATA 2+ TMDS DATA 2 SHIELD TMDS DATA 2TMDS DATA 1+ TMDS DATA 1 SHIELD TMDS DATA 1TMDS DATA 0+ TMDS DATA 0 SHIELD TMDS DATA 0TMDS CLOCK+ TMDS CLOCK SHIELD TMDS CLOCKCEC Reserved (N.C. on device) DDC CLOCK (SCL) DDC DATA (SDA) DDC/CEC Ground +5 V POWER HOT PLUG DETECT 14 | About Your Monitor
Monitor Users Guide
Page 15
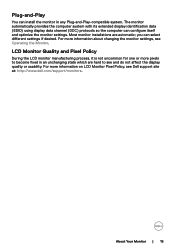
... are hard to become fixed in any Plug-and-Play-compatible system. For more information about changing the monitor settings, see Dell support site at: http://www.dell.com/support/monitors. About Your Monitor | 15 The monitor automatically provides the computer system with its extended display identification data (EDID) using display data channel (DDC) protocols so...
... are hard to become fixed in any Plug-and-Play-compatible system. For more information about changing the monitor settings, see Dell support site at: http://www.dell.com/support/monitors. About Your Monitor | 15 The monitor automatically provides the computer system with its extended display identification data (EDID) using display data channel (DDC) protocols so...
Monitor Users Guide
Page 16
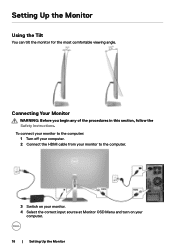
To connect your monitor to the computer: 1 Turn off your computer. 2 Connect the HDMI cable from your monitor to the computer. 3 Switch on your monitor. 4 Select the correct input source at Monitor OSD Menu and turn on your computer. 16 | Setting Up the Monitor Setting Up the Monitor Using the Tilt You can tilt the monitor for the most comfortable viewing angle. Connecting Your Monitor WARNING: Before you begin any of the procedures in this section, follow the Safety Instructions.
To connect your monitor to the computer: 1 Turn off your computer. 2 Connect the HDMI cable from your monitor to the computer. 3 Switch on your monitor. 4 Select the correct input source at Monitor OSD Menu and turn on your computer. 16 | Setting Up the Monitor Setting Up the Monitor Using the Tilt You can tilt the monitor for the most comfortable viewing angle. Connecting Your Monitor WARNING: Before you begin any of the procedures in this section, follow the Safety Instructions.
Monitor Users Guide
Page 17
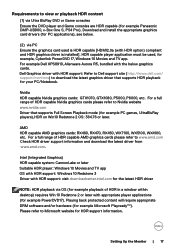
AMD HDR capable AMD graphics cards: RX480, RX470, RX460, WX7100, WX5100, WX4100, etc. Setting Up the Monitor | 17 Dell Graphics driver with the below . (2) via Ultra BluRay DVD or Game consoles Ensure the DVD player and Game consoles are HDR capable (...Nvidia website www.nvidia.com Driver that supports HDR playback for your PC/Notebook. For example Dell XPS8910, Alienware Aurora R5, bundled with HDR support: Refer to Dell support site (http://www.dell.com/ support/monitors) to download the latest graphics driver that supports Full Screen Playback mode (for example PC games...
AMD HDR capable AMD graphics cards: RX480, RX470, RX460, WX7100, WX5100, WX4100, etc. Setting Up the Monitor | 17 Dell Graphics driver with the below . (2) via Ultra BluRay DVD or Game consoles Ensure the DVD player and Game consoles are HDR capable (...Nvidia website www.nvidia.com Driver that supports HDR playback for your PC/Notebook. For example Dell XPS8910, Alienware Aurora R5, bundled with HDR support: Refer to Dell support site (http://www.dell.com/ support/monitors) to download the latest graphics driver that supports Full Screen Playback mode (for example PC games...
Monitor Users Guide
Page 18
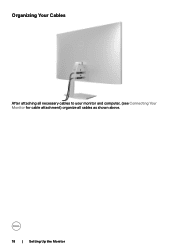
Organizing Your Cables After attaching all necessary cables to your monitor and computer, (see Connecting Your Monitor for cable attachment) organize all cables as shown above. 18 | Setting Up the Monitor
Organizing Your Cables After attaching all necessary cables to your monitor and computer, (see Connecting Your Monitor for cable attachment) organize all cables as shown above. 18 | Setting Up the Monitor
Monitor Users Guide
Page 19
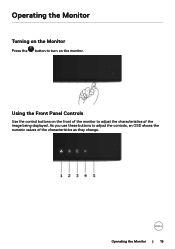
Using the Front Panel Controls Use the control buttons on the monitor. Operating the Monitor Turning on the Monitor Press the button to turn on the front of the monitor to adjust the controls, an OSD shows the numeric values of the image being displayed. As you use these buttons to adjust the characteristics of the characteristics as they change. Operating the Monitor | 19
Using the Front Panel Controls Use the control buttons on the monitor. Operating the Monitor Turning on the Monitor Press the button to turn on the front of the monitor to adjust the controls, an OSD shows the numeric values of the image being displayed. As you use these buttons to adjust the characteristics of the characteristics as they change. Operating the Monitor | 19
Monitor Users Guide
Page 20
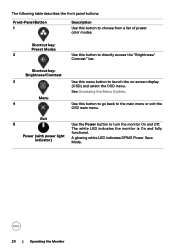
... the on-screen display (OSD) and select the OSD menu. A glowing white LED indicates DPMS Power Save Mode. 20 | Operating the Monitor The following table describes the front panel buttons: Front‑Panel Button 1 Description Use this button to directly access the "Brightness/ Contrast" bar.... The white LED indicates the monitor is On and fully Power (with power light indicator) functional. Shortcut key: Preset Modes 2 Use this button to turn the monitor On and Off.
... the on-screen display (OSD) and select the OSD menu. A glowing white LED indicates DPMS Power Save Mode. 20 | Operating the Monitor The following table describes the front panel buttons: Front‑Panel Button 1 Description Use this button to directly access the "Brightness/ Contrast" bar.... The white LED indicates the monitor is On and fully Power (with power light indicator) functional. Shortcut key: Preset Modes 2 Use this button to turn the monitor On and Off.

Monitor Users Guide
Page 21
Front‑Panel Button Use the buttons on the front of the monitor to the previous menu. Back Operating the Monitor | 21 OK 3 Use the Back button to go back to adjust the image settings. Up 2 Down Use the OK button to adjust items in the OSD menu. Front Panel Button 1 Description Use the Up (increase) and Down (decrease) keys to confirm your selection.
Front‑Panel Button Use the buttons on the front of the monitor to the previous menu. Back Operating the Monitor | 21 OK 3 Use the Back button to go back to adjust the image settings. Up 2 Down Use the OK button to adjust items in the OSD menu. Front Panel Button 1 Description Use the Up (increase) and Down (decrease) keys to confirm your selection.
Monitor Users Guide
Page 22
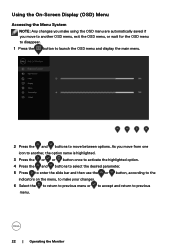
... on the menu, to make your changes. 6 Select the to return to previous menu or to accept and return to previous menu. 22 | Operating the Monitor As you move between options.
... on the menu, to make your changes. 6 Select the to return to previous menu or to accept and return to previous menu. 22 | Operating the Monitor As you move between options.
Monitor Users Guide
Page 23
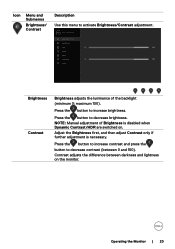
... Brightness/Contrast adjustment. Adjust the Brightness first, and then adjust Contrast only if further adjustment is disabled when Dynamic Contrast/HDR are switched on the monitor. Press the button to decrease contrast (between darkness and lightness on . Brightness Contrast Brightness adjusts the luminance of Brightness is necessary. maximum 100). NOTE: Manual...
... Brightness/Contrast adjustment. Adjust the Brightness first, and then adjust Contrast only if further adjustment is disabled when Dynamic Contrast/HDR are switched on the monitor. Press the button to decrease contrast (between darkness and lightness on . Brightness Contrast Brightness adjusts the luminance of Brightness is necessary. maximum 100). NOTE: Manual...


