PowerEdge T610 Tower - Dell
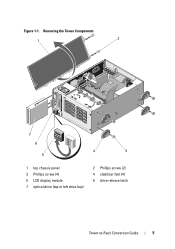
PowerEdge T610 Tower
View Results Below
Free Dell PowerEdge T610 manuals!
Problems with Dell PowerEdge T610?
Ask a Question
Free Dell PowerEdge T610 manuals!
Problems with Dell PowerEdge T610?
Ask a Question
Related Manual Pages


Similar Questions

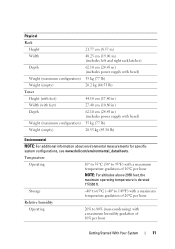
Physical Dimensions Of The Poweredge T630 Tower Type
I need the outer Physical Dimensions of the PowerEdge T630 Tower type
I need the outer Physical Dimensions of the PowerEdge T630 Tower type
(Posted by Anonymous-153937 8 years ago)

How To Format A Dell Poweredge T610 Tower Server Hard Drive
(Posted by ijjcanncel 9 years ago)

Is Field Install Tower To Rack Conversion Kit Available For T320?
Tower to rack conversion kit to be purchased APOS!
Tower to rack conversion kit to be purchased APOS!
(Posted by dkolisev 10 years ago)