Hardware Owner's Manual
Page 5
... 80 Opening the System 80 Closing the System 81 Hard Drives 82 Removing a Hard-Drive Blank 83 Installing a Hard-Drive Blank 84 Removing a Hot-Swap Hard Drive 84 Installing a Hot-Swap Hard Drive 85 Removing a Hard Drive From a Hard-Drive Carrier 86 Installing a Hard Drive Into a Hard-Drive Carrier 86 Power Supplies 88 Removing...
... 80 Opening the System 80 Closing the System 81 Hard Drives 82 Removing a Hard-Drive Blank 83 Installing a Hard-Drive Blank 84 Removing a Hot-Swap Hard Drive 84 Installing a Hot-Swap Hard Drive 85 Removing a Hard Drive From a Hard-Drive Carrier 86 Installing a Hard Drive Into a Hard-Drive Carrier 86 Power Supplies 88 Removing...
Hardware Owner's Manual
Page 22
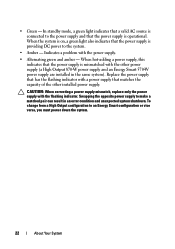
... standby mode, a green light indicates that has the flashing indicator with the flashing indicator. When hot-adding a power supply, this indicates that the power supply is mismatched with the power supply. • Alternating green and amber - Swapping the opposite power supply to the power supply and that the power supply is operational.
... standby mode, a green light indicates that has the flashing indicator with the flashing indicator. When hot-adding a power supply, this indicates that the power supply is mismatched with the power supply. • Alternating green and amber - Swapping the opposite power supply to the power supply and that the power supply is operational.
Hardware Owner's Manual
Page 80
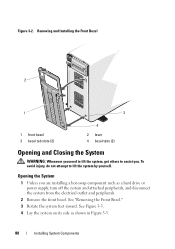
... System 1 Unless you . See "Removing the Front Bezel." 3 Rotate the system feet inward. Figure 3-2. To avoid injury, do not attempt to assist you are installing a hot-swap component such as shown in Figure 3-3. 80 Installing System Components
... System 1 Unless you . See "Removing the Front Bezel." 3 Rotate the system feet inward. Figure 3-2. To avoid injury, do not attempt to assist you are installing a hot-swap component such as shown in Figure 3-3. 80 Installing System Components
Hardware Owner's Manual
Page 82
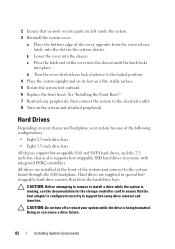
...on the system and attached peripherals. See "Installing the Front Bezel." 7 Reattach any peripherals, then connect the system to support hot-swap drive removal and insertion. Hard drives are supplied in special hotswappable hard-drive carriers that no tools or extra parts are installed at...configurations: • Eight 2.5-inch drive bays • Eight 3.5-inch drive bays All chassis support hot-swappable SAS and SATA hard drives, and the 2.5inch-bay chassis also supports hot-swappable SSD hard drives in systems with integrated PERC controllers. CAUTION: Before attempting to remove or ...
...on the system and attached peripherals. See "Installing the Front Bezel." 7 Reattach any peripherals, then connect the system to support hot-swap drive removal and insertion. Hard drives are supplied in special hotswappable hard-drive carriers that no tools or extra parts are installed at...configurations: • Eight 2.5-inch drive bays • Eight 3.5-inch drive bays All chassis support hot-swappable SAS and SATA hard drives, and the 2.5inch-bay chassis also supports hot-swappable SSD hard drives in systems with integrated PERC controllers. CAUTION: Before attempting to remove or ...
Hardware Owner's Manual
Page 84
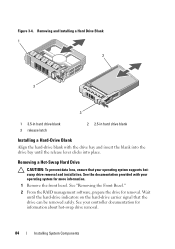
... release lever clicks into the drive bay until the hard-drive indicators on the hard-drive carrier signal that your controller documentation for information about hot-swap drive removal. 84 Installing System Components See the documentation provided with the drive bay and insert the blank into place. See your operating system supports...
... release lever clicks into the drive bay until the hard-drive indicators on the hard-drive carrier signal that your controller documentation for information about hot-swap drive removal. 84 Installing System Components See the documentation provided with the drive bay and insert the blank into place. See your operating system supports...
Hardware Owner's Manual
Page 85
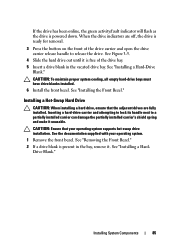
... carrier and attempting to lock its handle next to release the drive. See the documentation supplied with your operating system supports hot-swap drive installation. Installing System Components 85 Drive Blank." Installing a Hot-Swap Hard Drive CAUTION: When installing a hard drive, ensure that your operating system. 1 Remove the front bezel. CAUTION: To maintain proper...
... carrier and attempting to lock its handle next to release the drive. See the documentation supplied with your operating system supports hot-swap drive installation. Installing System Components 85 Drive Blank." Installing a Hot-Swap Hard Drive CAUTION: When installing a hard drive, ensure that your operating system. 1 Remove the front bezel. CAUTION: To maintain proper...
Hardware Owner's Manual
Page 86
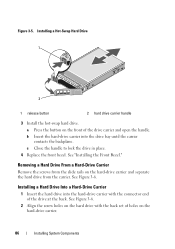
... Drive 1 2 1 release button 2 hard drive carrier handle 3 Install the hot-swap hard drive. Removing a Hard Drive From a Hard-Drive Carrier Remove the screws from the slide rails on the hard-drive carrier. 86 Installing System Components ...
... Drive 1 2 1 release button 2 hard drive carrier handle 3 Install the hot-swap hard drive. Removing a Hard Drive From a Hard-Drive Carrier Remove the screws from the slide rails on the hard-drive carrier. 86 Installing System Components ...
Hardware Owner's Manual
Page 90
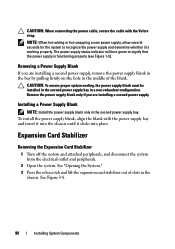
... a second power supply. CAUTION: When connecting the power cable, secure the cable with the power supply bay and insert it into place. NOTE: When hot-adding or hot-swapping a new power supply, allow several seconds for the system to signify that the power supply is working properly. Installing a Power Supply Blank NOTE: Install...
... a second power supply. CAUTION: When connecting the power cable, secure the cable with the power supply bay and insert it into place. NOTE: When hot-adding or hot-swapping a new power supply, allow several seconds for the system to signify that the power supply is working properly. Installing a Power Supply Blank NOTE: Install...
Hardware Owner's Manual
Page 142
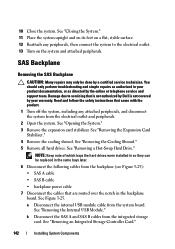
... and simple repairs as directed by the online or telephone service and support team. Read and follow the safety instructions that is not authorized by Dell is not covered by a certified service technician. NOTE: Keep note of which bays the hard drives were installed in so they can be done by... your product documentation, or as authorized in the backplane board. See "Removing the Expansion Card Stabilizer." 4 Remove the cooling shroud. See "Removing a Hot-Swap Hard Drive." See "Removing the Internal USB Module."
... and simple repairs as directed by the online or telephone service and support team. Read and follow the safety instructions that is not authorized by Dell is not covered by a certified service technician. NOTE: Keep note of which bays the hard drives were installed in so they can be done by... your product documentation, or as authorized in the backplane board. See "Removing the Expansion Card Stabilizer." 4 Remove the cooling shroud. See "Removing a Hot-Swap Hard Drive." See "Removing the Internal USB Module."
Hardware Owner's Manual
Page 145
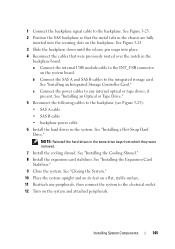
... into place. 4 Reconnect the cables that the metal tabs in the same drive bays from which they were removed. 7 Install the cooling shroud. See "Installing a Hot-Swap Hard Drive." See "Closing the System." 10 Place the system upright and on its feet on the backplane. See "Installing the Expansion Card Stabilizer." 9 Close...
... into place. 4 Reconnect the cables that the metal tabs in the same drive bays from which they were removed. 7 Install the cooling shroud. See "Installing a Hot-Swap Hard Drive." See "Closing the System." 10 Place the system upright and on its feet on the backplane. See "Installing the Expansion Card Stabilizer." 9 Close...
Hardware Owner's Manual
Page 193
... A systems management hardware and software solution that provides remote management capabilities, crashed system recovery, and power control functions for Dell™ PowerEdge™ systems. iDRAC6 refers to replace a device, typically a hard drive, power supply, or an internal cooling fan...in a board. iSCSI - Integrated Dell Remote Access Controller. Two devices can be assigned an IRQ number. File transfer protocol. Input/output. IRQ - Internet package exchange. Glossary 193 FTP - Kb - KB - Gigabit(s); 1024 megabits or 1,073,741,824 bits. hot-swap - In general, I /O -...
... A systems management hardware and software solution that provides remote management capabilities, crashed system recovery, and power control functions for Dell™ PowerEdge™ systems. iDRAC6 refers to replace a device, typically a hard drive, power supply, or an internal cooling fan...in a board. iSCSI - Integrated Dell Remote Access Controller. Two devices can be assigned an IRQ number. File transfer protocol. Input/output. IRQ - Internet package exchange. Glossary 193 FTP - Kb - KB - Gigabit(s); 1024 megabits or 1,073,741,824 bits. hot-swap - In general, I /O -...
Hardware Owner's Manual
Page 200
... G guidelines expansion card installation, 119 memory installation, 124 H hard drive drive carrier, 86 installing, 85 mixed configurations, 83 removing, 84 troubleshooting, 169 heat sink, 133 hot-swap hard drives, 82 power supplies, 88 I iDRAC Configuration Utility, 75 iDRAC6 Enterprise card installing, 103 removing, 105 indicators back-panel, 20 front-panel, 12 NIC...
... G guidelines expansion card installation, 119 memory installation, 124 H hard drive drive carrier, 86 installing, 85 mixed configurations, 83 removing, 84 troubleshooting, 169 heat sink, 133 hot-swap hard drives, 82 power supplies, 88 I iDRAC Configuration Utility, 75 iDRAC6 Enterprise card installing, 103 removing, 105 indicators back-panel, 20 front-panel, 12 NIC...


