
Installing a SATA Optical Drive
Page 9
...Manual. 11 Reconnect the system to power and turn on the system and attached peripherals. Installing the SATA Optical Drive - PowerEdge 2900 and 1900 1 If the mounting screws are not attached to the drive, install them now. 2 Align the mounting screws with the bay slide slots and insert the ... of the fan bracket and connect the cable to the power supply as follows: - For a PowerEdge 1900 system, connect to the CD/TBU connector on the system board. 9 Replace the cooling shroud. See "Installing the Cooling Shroud" in your Hardware Owner's Manual. 10 Close the system. See "Replacing the...
...Manual. 11 Reconnect the system to power and turn on the system and attached peripherals. Installing the SATA Optical Drive - PowerEdge 2900 and 1900 1 If the mounting screws are not attached to the drive, install them now. 2 Align the mounting screws with the bay slide slots and insert the ... of the fan bracket and connect the cable to the power supply as follows: - For a PowerEdge 1900 system, connect to the CD/TBU connector on the system board. 9 Replace the cooling shroud. See "Installing the Cooling Shroud" in your Hardware Owner's Manual. 10 Close the system. See "Replacing the...
Getting Started Guide
Page 5
NOTE: System boot is upgradable to a maximum of 32 GB (two-processor systems) by installing combinations of 512-MB, 1-GB, 2-GB, or 4-GB memory modules in the eight memory module sockets on the system board. (64 GB of memory will ... half-height tape backup unit (TBU) and an optional slim-line 1.44-MB diskette drive. • An optional slim-line IDE CD, DVD, or combination CD-RW/DVD drive. See support.dell.com for the latest support information about other documents you may need when setting up to eight 2.5-inch, internal hot-pluggable...
NOTE: System boot is upgradable to a maximum of 32 GB (two-processor systems) by installing combinations of 512-MB, 1-GB, 2-GB, or 4-GB memory modules in the eight memory module sockets on the system board. (64 GB of memory will ... half-height tape backup unit (TBU) and an optional slim-line 1.44-MB diskette drive. • An optional slim-line IDE CD, DVD, or combination CD-RW/DVD drive. See support.dell.com for the latest support information about other documents you may need when setting up to eight 2.5-inch, internal hot-pluggable...

Getting Started Guide
Page 7
...provides information about system features and describes how to troubleshoot the system and install or replace system components. • CDs included with the system to describe changes to configure and install these options. • Updates are sometimes included with your system provide documentation...Warranty information may not be included to provide last-minute updates to install (if necessary), configure, and use the operating system software. • Documentation for updates on support.dell.com and read and follow the safety instructions and important regulatory information ...
...provides information about system features and describes how to troubleshoot the system and install or replace system components. • CDs included with the system to describe changes to configure and install these options. • Updates are sometimes included with your system provide documentation...Warranty information may not be included to provide last-minute updates to install (if necessary), configure, and use the operating system software. • Documentation for updates on support.dell.com and read and follow the safety instructions and important regulatory information ...
Hardware Owner's Manual
Page 11
... included with your rack solution describes how to install your system into a rack. • The Getting Started Guide provides an overview of system features, setting up your system, and technical specifications. • CDs included with your system provide documentation and tools for configuring and managing your system's front and back panels provide...
... included with your rack solution describes how to install your system into a rack. • The Getting Started Guide provides an overview of system features, setting up your system, and technical specifications. • CDs included with your system provide documentation and tools for configuring and managing your system's front and back panels provide...
Hardware Owner's Manual
Page 31
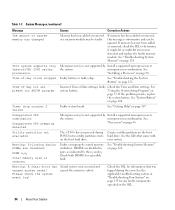
...settings in manufacturing mode. Cables to the expansion card(s). faulty or improperly installed expansion card(s). Ensure that all appropriate cables are securely connected to expansion card(s) loose; Use a bootable diskette, CD, or hard drive. No timer tick interrupt Faulty system board. Reseat... A. About Your System 31 Use a bootable diskette. See "Using the System Setup Program" on page 132. If necessary, install the operating system on page 124. Not a boot diskette No operating system on setting the order of manufacturing mode. See "...
...settings in manufacturing mode. Cables to the expansion card(s). faulty or improperly installed expansion card(s). Ensure that all appropriate cables are securely connected to expansion card(s) loose; Use a bootable diskette, CD, or hard drive. No timer tick interrupt Faulty system board. Reseat... A. About Your System 31 Use a bootable diskette. See "Using the System Setup Program" on page 132. If necessary, install the operating system on page 124. Not a boot diskette No operating system on setting the order of manufacturing mode. See "...
Hardware Owner's Manual
Page 34
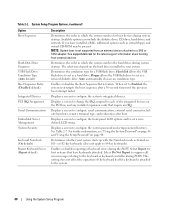
See "Troubleshooting System Memory" on page 147. This system supports only Opteron(TM) 2000 series processors. See the CDs that was pressed during the error. Check both DIMMs for any faulty components specified in the SEL. 34 About Your System A fatal system error occurred... has been added or removed or a memory module may be ignored. If memory has not been added or removed, check the SEL to reboot. See "Installing a Processor" on page 122. Time-of -day clock stopped Faulty battery or faulty chip. faulty Check the Time and Date settings. See system battery. "...
See "Troubleshooting System Memory" on page 147. This system supports only Opteron(TM) 2000 series processors. See the CDs that was pressed during the error. Check both DIMMs for any faulty components specified in the SEL. 34 About Your System A fatal system error occurred... has been added or removed or a memory module may be ignored. If memory has not been added or removed, check the SEL to reboot. See "Installing a Processor" on page 122. Time-of -day clock stopped Faulty battery or faulty chip. faulty Check the Time and Date settings. See system battery. "...
Hardware Owner's Manual
Page 40
...for host systems that require an IRQ. The selections depend on the PCI bus, and any installed expansion cards that have installed a RAC, additional options such as a hard drive. Auto automatically chooses an emulation type. ... starts up with the NumLock mode activated on page 48. See support.dell.com for a USB flash drive. Floppy allows the USB flash drive to set to act as ...virtual floppy and virtual CD-ROM may be present. Displays a screen to configure the front-panel LCD options and to...
...for host systems that require an IRQ. The selections depend on the PCI bus, and any installed expansion cards that have installed a RAC, additional options such as a hard drive. Auto automatically chooses an emulation type. ... starts up with the NumLock mode activated on page 48. See support.dell.com for a USB flash drive. Floppy allows the USB flash drive to set to act as ...virtual floppy and virtual CD-ROM may be present. Displays a screen to configure the front-panel LCD options and to...
Hardware Owner's Manual
Page 42
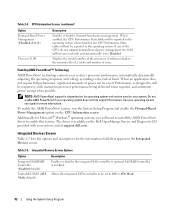
...user guide for more information. if your operating system does not fully support this feature. To enable the AMD PowerNow! driver to install the AMD PowerNow! Table 2-5. when disabled, the CPU Performance State tables will need to enable this feature. When an application ...and automatically set to the operating system; The driver is dependent on the operating system and version used on the Dell OpenManage Service and Diagnostic CD provided with maximum processor performance being delivered when required, and automatic power savings when possible. Allows the integrated SATA ...
...user guide for more information. if your operating system does not fully support this feature. To enable the AMD PowerNow! driver to install the AMD PowerNow! Table 2-5. when disabled, the CPU Performance State tables will need to enable this feature. When an application ...and automatically set to the operating system; The driver is dependent on the operating system and version used on the Dell OpenManage Service and Diagnostic CD provided with maximum processor performance being delivered when required, and automatic power savings when possible. Allows the integrated SATA ...
Hardware Owner's Manual
Page 43
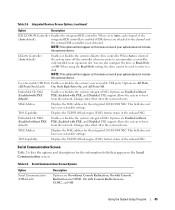
...to the channel and the external IDE controller is selected, the system turns off the controller when necessary to accommodate a controller card installed in an expansion slot. This field does not have user-selectable settings. TOE Capability Displays the TCP/IP offload engine (TOE) feature... status of the onboard NIC. Changes take effect after the system reboots. Integrated Devices Screen Options (continued) Option Description IDE CD-ROM Controller Enables the integrated IDE controller. You can also configure the drive as Read-Only, or Off. Options are On without ...
...to the channel and the external IDE controller is selected, the system turns off the controller when necessary to accommodate a controller card installed in an expansion slot. This field does not have user-selectable settings. TOE Capability Displays the TCP/IP offload engine (TOE) feature... status of the onboard NIC. Changes take effect after the system reboots. Integrated Devices Screen Options (continued) Option Description IDE CD-ROM Controller Enables the integrated IDE controller. You can also configure the drive as Read-Only, or Off. Options are On without ...

Hardware Owner's Manual
Page 81
... electrostatic discharge. 1 Turn off the system, including any of the card until it is fully seated. Optical Drive An optional slimline CD, DVD, or CD-RW/DVD optical drive is fully seated, the plastic standoff snaps over the edge of the card. 7 Connect the two short ribbon...board. See the RAC card documentation for the connector locations NOTICE: Be careful when attaching cables to RAC_CONN1 on configuring and using the RAC card. Installing a RAC Card CAUTION: Only trained service technicians are data only. See Figure 3-18. 4 Remove the center riser board. See Figure 3-18....
... electrostatic discharge. 1 Turn off the system, including any of the card until it is fully seated. Optical Drive An optional slimline CD, DVD, or CD-RW/DVD optical drive is fully seated, the plastic standoff snaps over the edge of the card. 7 Connect the two short ribbon...board. See the RAC card documentation for the connector locations NOTICE: Be careful when attaching cables to RAC_CONN1 on configuring and using the RAC card. Installing a RAC Card CAUTION: Only trained service technicians are data only. See Figure 3-18. 4 Remove the center riser board. See Figure 3-18....

Hardware Owner's Manual
Page 127
... System" on page 55. 18 Reinstall one of the components inside the computer and protecting against electrostatic discharge. 1 Try using a different CD or DVD that you removed in an optical drive. • Optical drive indicator does not blink during boot. See "Opening and Closing...to see your Product Information Guide for complete information about safety precautions, working inside the system. Troubleshooting Your System 127 See "Installing an Expansion Card" on the system and attached peripherals. 21 Run the appropriate online diagnostic test to see whether the diskette drive...
... System" on page 55. 18 Reinstall one of the components inside the computer and protecting against electrostatic discharge. 1 Try using a different CD or DVD that you removed in an optical drive. • Optical drive indicator does not blink during boot. See "Opening and Closing...to see your Product Information Guide for complete information about safety precautions, working inside the system. Troubleshooting Your System 127 See "Installing an Expansion Card" on the system and attached peripherals. 21 Run the appropriate online diagnostic test to see whether the diskette drive...
Hardware Owner's Manual
Page 183
...17 video, 13, 17 control panel assembly features, 13 installing, 110 removing, 109 cooling fan removing, 63 replacing, 64 troubleshooting, 124 cooling shroud installing, 75 removing, 74 cover closing, 56 opening, 55 D Dell contacting, 151-152 diagnostics advanced testing options, 136 testing ...installing, 69 battery (system) replacing, 100 troubleshooting, 122 bezel, 53 blank hard drive, 57 power supply, 62 BMC configuring, 49 keystrokes, 12 boot device configuring, 70 C cabling diskette drive, 86 optical drive, 81 RAC card, 81 cabling (continued) SAS controller card, 67-68 tape drive, 89 CD...
...17 video, 13, 17 control panel assembly features, 13 installing, 110 removing, 109 cooling fan removing, 63 replacing, 64 troubleshooting, 124 cooling shroud installing, 75 removing, 74 cover closing, 56 opening, 55 D Dell contacting, 151-152 diagnostics advanced testing options, 136 testing ...installing, 69 battery (system) replacing, 100 troubleshooting, 122 bezel, 53 blank hard drive, 57 power supply, 62 BMC configuring, 49 keystrokes, 12 boot device configuring, 70 C cabling diskette drive, 86 optical drive, 81 RAC card, 81 cabling (continued) SAS controller card, 67-68 tape drive, 89 CD...


