Rack Installation Guide
Page 7
...Install front and side stabilizers on the rack. • Always load the rack from the bottom up, and load the heaviest item in a Dell rack cabinet using the customer rack kit. the slide rails can pinch your system and working on a single rack or front stabilizers for use in the ...in a rack by any system as well as a separate document. SAFETY: Rack Mounting of your responsibility to ensure that the final combination of a Dell rack. CAUTION: Do not move racks by yourself. The total rack load should accomplish this document or as to various peripherals or supporting hardware. For...
...Install front and side stabilizers on the rack. • Always load the rack from the bottom up, and load the heaviest item in a Dell rack cabinet using the customer rack kit. the slide rails can pinch your system and working on a single rack or front stabilizers for use in the ...in a rack by any system as well as a separate document. SAFETY: Rack Mounting of your responsibility to ensure that the final combination of a Dell rack. CAUTION: Do not move racks by yourself. The total rack load should accomplish this document or as to various peripherals or supporting hardware. For...

Rack Installation Guide
Page 8
... found in the rack. They do not have square or round holes. CAUTION: You must strictly follow the procedures in a rack cabinet. Rack Requirements for VersaRails NOTICE: The VersaRails rack kit is installed in a rack that have brakes. CAUTION: Do not install rack... 41494. Extend the leveling feet for your system in damage to the system and personal injury to yourself and to prevent the cabinet from rolling. Using the rack kit for additional information. Important Safety Information Observe the safety precautions in the following subsections when installing...
... found in the rack. They do not have square or round holes. CAUTION: You must strictly follow the procedures in a rack cabinet. Rack Requirements for VersaRails NOTICE: The VersaRails rack kit is installed in a rack that have brakes. CAUTION: Do not install rack... 41494. Extend the leveling feet for your system in damage to the system and personal injury to yourself and to prevent the cabinet from rolling. Using the rack kit for additional information. Important Safety Information Observe the safety precautions in the following subsections when installing...
Rack Installation Guide
Page 9
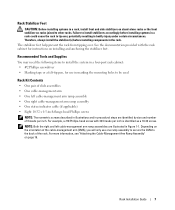
Recommended Tools and Supplies You may need the following items to install the system in a four-post rack cabinet: • #2 Phillips screwdriver • Masking tape or a felt-tip pen, for instructions on installing and anchoring the stabilizer feet. For more information, see "...10-32 screw. See the documentation provided with 32 threads per inch. Depending on page 19. For example, a #10 Phillips-head screw with the rack cabinet for use one ramp assembly to secure the CMA to tip over . NOTE: Both the right and left cable-management arm ramp assembly • One...
Recommended Tools and Supplies You may need the following items to install the system in a four-post rack cabinet: • #2 Phillips screwdriver • Masking tape or a felt-tip pen, for instructions on installing and anchoring the stabilizer feet. For more information, see "...10-32 screw. See the documentation provided with 32 threads per inch. Depending on page 19. For example, a #10 Phillips-head screw with the rack cabinet for use one ramp assembly to secure the CMA to tip over . NOTE: Both the right and left cable-management arm ramp assembly • One...
Rack Installation Guide
Page 11
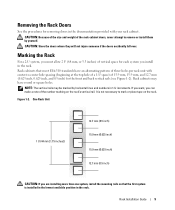
...square holes. Rack Installation Guide 9 CAUTION: Because of the size and weight of the rack cabinet doors, never attempt to remove or install them by horizontal lines and numbers in 1-U increments. Rack cabinets may be marked by yourself. Figure 1-2. Removing the Rack Doors See the procedures for each...Marking the Rack For a 2-U system, you must allow 2 U (88 mm, or 3.5 inches) of three holes per rack unit with your rack cabinet. Rack cabinets that the first system is not necessary to -center hole spacing (beginning at the top hole of a 1-U space) of the number marking on the rack...
...square holes. Rack Installation Guide 9 CAUTION: Because of the size and weight of the rack cabinet doors, never attempt to remove or install them by horizontal lines and numbers in 1-U increments. Rack cabinets may be marked by yourself. Figure 1-2. Removing the Rack Doors See the procedures for each...Marking the Rack For a 2-U system, you must allow 2 U (88 mm, or 3.5 inches) of three holes per rack unit with your rack cabinet. Rack cabinets that the first system is not necessary to -center hole spacing (beginning at the top hole of a 1-U space) of the number marking on the rack...
Rack Installation Guide
Page 12
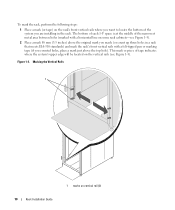
... the rack. The bottom of each 1-U space is at the middle of the narrowest metal area between holes (marked with a horizontal line on some rack cabinets-see Figure 1-3). Marking the Vertical Rails 1 10 Rack Installation Guide 1 marks on vertical rail (2) Figure 1-3. To mark the rack, perform the following steps: 1 Place a mark...
... the rack. The bottom of each 1-U space is at the middle of the narrowest metal area between holes (marked with a horizontal line on some rack cabinets-see Figure 1-3). Marking the Vertical Rails 1 10 Rack Installation Guide 1 marks on vertical rail (2) Figure 1-3. To mark the rack, perform the following steps: 1 Place a mark...
Rack Installation Guide
Page 14
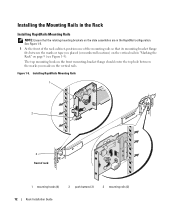
... flange should enter the top hole between the marks or tape you made on page 9 (see Figure 1-5). See Figure 1-5. 1 At the front of the rack cabinet, position one of rack 1 mounting hooks (4) 2 push buttons (2) 3 mounting rails (2) 12 Rack Installation Guide Figure 1-5. Installing RapidRails Mounting Rails 1 2 3 front of the mounting rails so...
... flange should enter the top hole between the marks or tape you made on page 9 (see Figure 1-5). See Figure 1-5. 1 At the front of the rack cabinet, position one of rack 1 mounting hooks (4) 2 push buttons (2) 3 mounting rails (2) 12 Rack Installation Guide Figure 1-5. Installing RapidRails Mounting Rails 1 2 3 front of the mounting rails so...
Rack Installation Guide
Page 15
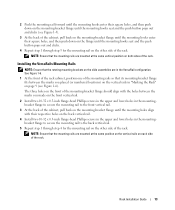
... the marks you placed (or numbered locations) on the vertical rails in "Marking the Rack" on page 9 (see Figure 1-5). 3 At the back of the cabinet, pull back on the mounting-bracket flange until the mounting hooks enter their square holes, and then push down on the mounting-bracket flange until...: Ensure that the mounting rails are in the mountingbracket flange to secure the mounting rail to the front vertical rail. 3 At the back of the cabinet, pull back on the mounting-bracket flange until the mounting hooks seat and the push button pops out and clicks. 4 Repeat step 1 through step 4...
... the marks you placed (or numbered locations) on the vertical rails in "Marking the Rack" on page 9 (see Figure 1-5). 3 At the back of the cabinet, pull back on the mounting-bracket flange until the mounting hooks enter their square holes, and then push down on the mounting-bracket flange until...: Ensure that the mounting rails are in the mountingbracket flange to secure the mounting rail to the front vertical rail. 3 At the back of the cabinet, pull back on the mounting-bracket flange until the mounting hooks seat and the push button pops out and clicks. 4 Repeat step 1 through step 4...
Rack Installation Guide
Page 19
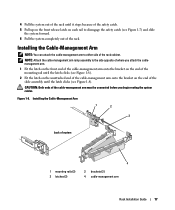
... to either side of system 1 mounting rails (2) 3 latches (2) 4 2 brackets (2) 4 cable-management arm Rack Installation Guide 17 Installing the Cable-Management Arm 1 2 3 back of the rack cabinet. Installing the Cable-Management Arm NOTE: You can attach the cable-management arm to the side opposite of where you begin routing the system cables...
... to either side of system 1 mounting rails (2) 3 latches (2) 4 2 brackets (2) 4 cable-management arm Rack Installation Guide 17 Installing the Cable-Management Arm 1 2 3 back of the rack cabinet. Installing the Cable-Management Arm NOTE: You can attach the cable-management arm to the side opposite of where you begin routing the system cables...
Rack Installation Guide
Page 23
Replacing the Rack Doors See the procedures for replacing doors in the documentation provided with your rack. CAUTION: Because of the size and weight of the rack cabinet doors, never attempt to remove or install them by yourself. Rack Installation Guide 21
Replacing the Rack Doors See the procedures for replacing doors in the documentation provided with your rack. CAUTION: Because of the size and weight of the rack cabinet doors, never attempt to remove or install them by yourself. Rack Installation Guide 21
