
Installing the 1 x 2 SCSI Backplane
Page 8
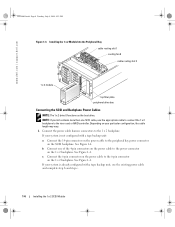
... cable to connect the 1 x 2 backplane to the 1 x 2 backplane. See Figure 1-4. If your particular configuration, the cable length may vary. 1 Connect the power cable harness connectors to the riser card or RAID controller. Installing the 1 x 2 Module Into the Peripheral Bay cable routing slot 1 cooling fan 8 cable routing slot... kit contains more than one of the 4-pin connectors on the power cable to the power connector on the SCSI backplane. www.dell.com | support.dell.com F6590bk0.book Page 6 Tuesday, July 6, 2004 4:33 PM Figure 1-3. b Connect one SCSI cable, use the existing power...
... cable to connect the 1 x 2 backplane to the 1 x 2 backplane. See Figure 1-4. If your particular configuration, the cable length may vary. 1 Connect the power cable harness connectors to the riser card or RAID controller. Installing the 1 x 2 Module Into the Peripheral Bay cable routing slot 1 cooling fan 8 cable routing slot... kit contains more than one of the 4-pin connectors on the power cable to the power connector on the SCSI backplane. www.dell.com | support.dell.com F6590bk0.book Page 6 Tuesday, July 6, 2004 4:33 PM Figure 1-3. b Connect one SCSI cable, use the existing power...
Installing the 1 x 2 SCSI Backplane
Page 10
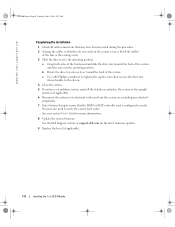
...website at support.dell.com for more information. 8 Update the system firmware. b Rotate the drive tray release lever toward the back of the fans or the cooling vents. 3 Slide the drive tray to the operating position. c Use a #2 Phillips screwdriver to tighten the captive screw that the RAID or SCSI controller.... a Grasp both sides of the front panel and slide the drive tray towards the back of the system until the tray is configured correctly. See your system User's Guide for the latest firmware updates. 9 Replace the bezel (if applicable). 1-8 Installing the 1 x 2 SCSI Module...
...website at support.dell.com for more information. 8 Update the system firmware. b Rotate the drive tray release lever toward the back of the fans or the cooling vents. 3 Slide the drive tray to the operating position. c Use a #2 Phillips screwdriver to tighten the captive screw that the RAID or SCSI controller.... a Grasp both sides of the front panel and slide the drive tray towards the back of the system until the tray is configured correctly. See your system User's Guide for the latest firmware updates. 9 Replace the bezel (if applicable). 1-8 Installing the 1 x 2 SCSI Module...

Installing the SCSI Backplane Daughter Card
Page 6
...use the optional integrated ROMB controller in a split 2 x 4 backplane configuration: a Connect channel A on the riser card to connector SCSIB on ...board SCSI daughter card standoffs (2) 8 To use an optional RAID controller card in the operating position. b Connect SCSI channel B...panel and slide the drive tray backwards until the tray is configured correctly. See your system's User's Guide for more information... Phillips screwdriver to tighten the captive screw that the RAID or SCSI controller card is in a split 2 x 4 backplane configuration: a Connect SCSI channel A (channel 0) on the ...
...use the optional integrated ROMB controller in a split 2 x 4 backplane configuration: a Connect channel A on the riser card to connector SCSIB on ...board SCSI daughter card standoffs (2) 8 To use an optional RAID controller card in the operating position. b Connect SCSI channel B...panel and slide the drive tray backwards until the tray is configured correctly. See your system's User's Guide for more information... Phillips screwdriver to tighten the captive screw that the RAID or SCSI controller card is in a split 2 x 4 backplane configuration: a Connect SCSI channel A (channel 0) on the ...

Installing the SCSI Backplane Daughter Card
Page 9
...system. 12 Enter System Setup to ensure that the RAID or SCSI controller card is connected to the SCSIB backplane connector, the SCSI backplane daughter card must be installed to activate the 2/4 split backplane configuration. This channel controls the boot drive (drive 0) and... drive 1. Installing the SCSI Backplane Daughter Card 1-7 To use the optional RAID controller card in a split backplane configuration: a Connect SCSI channel A (channel 0) on the controller...
...system. 12 Enter System Setup to ensure that the RAID or SCSI controller card is connected to the SCSIB backplane connector, the SCSI backplane daughter card must be installed to activate the 2/4 split backplane configuration. This channel controls the boot drive (drive 0) and... drive 1. Installing the SCSI Backplane Daughter Card 1-7 To use the optional RAID controller card in a split backplane configuration: a Connect SCSI channel A (channel 0) on the controller...

Activating the Integrated RAID Controller
Page 8
...of system operation before you have a PowerEdge 2800 system, go to 4 hours of the RAID hardware. 21 Install and configure the RAID software. Installing the RAID Key hardware key latches (2) 17 If you have a PowerEdge 2850 system, replace the riser card.... 18 Close the system. 19 Reconnect the system to its electrical outlet and turn on the two plastic rivets to secure the insulator. www.dell.com | support.dell...
...of system operation before you have a PowerEdge 2800 system, go to 4 hours of the RAID hardware. 21 Install and configure the RAID software. Installing the RAID Key hardware key latches (2) 17 If you have a PowerEdge 2850 system, replace the riser card.... 18 Close the system. 19 Reconnect the system to its electrical outlet and turn on the two plastic rivets to secure the insulator. www.dell.com | support.dell...


