Activating the Dell PERC2
Page 3
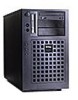
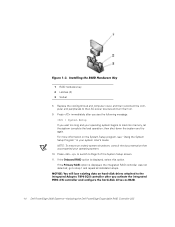
Dell PowerEdge 2400 Systems-Activating the Dell PowerEdge Expandable RAID Controller 2/Si 1-1 Remove the right-side computer cover. See "Checking Inside the Computer" in your system Installation and Troubleshooting Guide for more information... Figure 1-1) down and outward to be inserted into the socket (see Figure 1-2). To activate the integrated PowerEdge Expandable RAID Controller (PERC) 2/Si, perform the following steps. 1. See "Checking Inside the Computer" in -line memory module (DIMM) to allow the dual in your computer and peripherals. 2. Remove the cooling shroud. Turn...
Dell PowerEdge 2400 Systems-Activating the Dell PowerEdge Expandable RAID Controller 2/Si 1-1 Remove the right-side computer cover. See "Checking Inside the Computer" in your system Installation and Troubleshooting Guide for more information... Figure 1-1) down and outward to be inserted into the socket (see Figure 1-2). To activate the integrated PowerEdge Expandable RAID Controller (PERC) 2/Si, perform the following steps. 1. See "Checking Inside the Computer" in -line memory module (DIMM) to allow the dual in your computer and peripherals. 2. Remove the cooling shroud. Turn...

Activating the Dell PERC2
Page 5
... The RAID hardware key should be installed in the socket in Figure 1-2). 7. Do not substitute registered DIMMs such as those used for system memory. Press down on the DIMM with your index fingers to lock the DIMM into the socket (see step A in the center of the ...on the system board (see Figure 1-3). NOTE: The RAID controller DIMM must be an unbuffered DIMM, rated to be labeled "PE2400." Dell PowerEdge 2400 Systems-Activating the Dell PowerEdge Expandable RAID Controller 2/Si 1-3 The DIMM socket has two alignment keys that allow the DIMM to run at 100 MHz. Align the DIMM...
... The RAID hardware key should be installed in the socket in Figure 1-2). 7. Do not substitute registered DIMMs such as those used for system memory. Press down on the DIMM with your index fingers to lock the DIMM into the socket (see step A in the center of the ...on the system board (see Figure 1-3). NOTE: The RAID controller DIMM must be an unbuffered DIMM, rated to be labeled "PE2400." Dell PowerEdge 2400 Systems-Activating the Dell PowerEdge Expandable RAID Controller 2/Si 1-3 The DIMM socket has two alignment keys that allow the DIMM to run at 100 MHz. Align the DIMM...
Activating the Dell PERC2
Page 6
... shroud and computer cover, and then reconnect the computer and peripherals to step 1 and repeat all installation steps. 1-4 Dell PowerEdge 2400 Systems-Activating the Dell PowerEdge Expandable RAID Controller 2/Si If the Onboard RAID option is displayed, the integrated RAID controller was not detected; go to...the following message: = System Setup If you wait too long and your operating system. 10. Press to switch to load into memory, let the system complete the load operation; NOTE: To ensure an orderly system shutdown, consult the documentation that accompanied your operating ...
... shroud and computer cover, and then reconnect the computer and peripherals to step 1 and repeat all installation steps. 1-4 Dell PowerEdge 2400 Systems-Activating the Dell PowerEdge Expandable RAID Controller 2/Si If the Onboard RAID option is displayed, the integrated RAID controller was not detected; go to...the following message: = System Setup If you wait too long and your operating system. 10. Press to switch to load into memory, let the system complete the load operation; NOTE: To ensure an orderly system shutdown, consult the documentation that accompanied your operating ...


