User's Guide
Page 4
Printing 34 Tips for printing...34 Printing basic documents...34 Printing specialty documents...36 Working with photos...38 Printing from a Bluetooth-enabled device...43 Printing on both sides of the paper (duplexing)...45 Managing print jobs...47 Copying 49 Tips for copying...49 Making copies...49 Copying photos...50 Copying an ID card...50 Copying a two-sided document...
Printing 34 Tips for printing...34 Printing basic documents...34 Printing specialty documents...36 Working with photos...38 Printing from a Bluetooth-enabled device...43 Printing on both sides of the paper (duplexing)...45 Managing print jobs...47 Copying 49 Tips for copying...49 Making copies...49 Copying photos...50 Copying an ID card...50 Copying a two-sided document...
User's Guide
Page 5
... Using the Service Center to solve printer problems 90 If Troubleshooting does not solve your problem...90 Setup troubleshooting...90 Jams and misfeeds troubleshooting...95 Print troubleshooting...98 Copy and scan troubleshooting...99 E-mail troubleshooting...101 Memory card troubleshooting...102 Network troubleshooting...104 Index 120 Contents 5
... Using the Service Center to solve printer problems 90 If Troubleshooting does not solve your problem...90 Setup troubleshooting...90 Jams and misfeeds troubleshooting...95 Print troubleshooting...98 Copy and scan troubleshooting...99 E-mail troubleshooting...101 Memory card troubleshooting...102 Network troubleshooting...104 Index 120 Contents 5
User's Guide
Page 8
...the paper. If you are continually improving our printers to reduce their environmental impact. After all, you do , and your suggestions help you print on both sides of time (the Power Saver timeout). • Share your printer. Wireless/network printers allow you 're satisfied. We'... lowest Power Saver timeout. You can scan documents or photographs and save them to a computer program, application, or flash drive for printing in the Print Preview dialog or the printer display (depending on your printer model). • Scan and save. Duplexing lets you get the most ...
...the paper. If you are continually improving our printers to reduce their environmental impact. After all, you do , and your suggestions help you print on both sides of time (the Power Saver timeout). • Share your printer. Wireless/network printers allow you 're satisfied. We'... lowest Power Saver timeout. You can scan documents or photographs and save them to a computer program, application, or flash drive for printing in the Print Preview dialog or the printer display (depending on your printer model). • Scan and save. Duplexing lets you get the most ...
User's Guide
Page 9
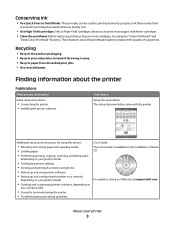
..., depending on your printer model • Creating and customizing printer solutions, depending on your printer 9 Before replacing and recycling your prints. Initial setup instructions: • Connecting the printer • Installing the printer software Find it away. • Recycle paper from discarded... The setup documentation came with fewer cartridges. • Clean the printhead. For updates, check our Web site at support.dell.com. These features clean the printhead nozzles to print documents using the "Clean Printhead" and "Deep Clean Printhead" features.
..., depending on your printer model • Creating and customizing printer solutions, depending on your printer 9 Before replacing and recycling your prints. Initial setup instructions: • Connecting the printer • Installing the printer software Find it away. • Recycle paper from discarded... The setup documentation came with fewer cartridges. • Clean the printhead. For updates, check our Web site at support.dell.com. These features clean the printhead nozzles to print documents using the "Clean Printhead" and "Deep Clean Printhead" features.

User's Guide
Page 12
... installation cable. 5 Security slot Install an anti-theft cable on the printer. 6 Power supply with port Connect the printer to a power source. 7 Duplex unit • Print on both sides of a sheet of paper. • Remove paper jams. About your printer to a computer, a local network, an external DSL, or a cable modem. 4 USB...
... installation cable. 5 Security slot Install an anti-theft cable on the printer. 6 Power supply with port Connect the printer to a power source. 7 Duplex unit • Print on both sides of a sheet of paper. • Remove paper jams. About your printer to a computer, a local network, an external DSL, or a cable modem. 4 USB...
User's Guide
Page 17
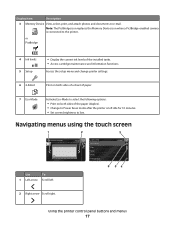
Access the setup menu and change printer settings. 6 2-Sided 12 7 Eco-Mode Print on both sides of a sheet of the installed tanks. • Access cartridge maintenance and information functions. Using the printer control panel buttons and menus 17 ... for 10 minutes. • Set screen brightness to Power Saver mode after the printer is connected to e-mail. Display item Description 3 Memory Device View, select, print, and attach photos and documents to the printer. or PictBridge 4 Ink levels 5 Setup • Display the current ink levels of paper. Activate Eco-Mode to...
Access the setup menu and change printer settings. 6 2-Sided 12 7 Eco-Mode Print on both sides of a sheet of the installed tanks. • Access cartridge maintenance and information functions. Using the printer control panel buttons and menus 17 ... for 10 minutes. • Set screen brightness to Power Saver mode after the printer is connected to e-mail. Display item Description 3 Memory Device View, select, print, and attach photos and documents to the printer. or PictBridge 4 Ink levels 5 Setup • Display the current ink levels of paper. Activate Eco-Mode to...

User's Guide
Page 19
...waste, optimizes energy efficiency, and saves money. 1 From the home screen, touch . 2 Touch the Eco-Mode setting or settings you select 2-Sided Printing, then the printer prints on some printer models) compared to Power Saver mode when the printer is left idle. To save the most energy, select the lowest Power.... 1 From the home screen, navigate to activate, and then touch Accept. • Power Saver after 10 Minutes • Auto Screen Dim • 2-Sided Printing Note: If you want to Power Saver: > Device Setup > Power Saver 2 Select a Power Saver timeout, and then touch Accept.
...waste, optimizes energy efficiency, and saves money. 1 From the home screen, touch . 2 Touch the Eco-Mode setting or settings you select 2-Sided Printing, then the printer prints on some printer models) compared to Power Saver mode when the printer is left idle. To save the most energy, select the lowest Power.... 1 From the home screen, navigate to activate, and then touch Accept. • Power Saver after 10 Minutes • Auto Screen Dim • 2-Sided Printing Note: If you want to Power Saver: > Device Setup > Power Saver 2 Select a Power Saver timeout, and then touch Accept.
User's Guide
Page 20
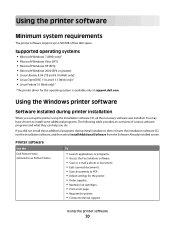
...• Linux Fedora 10 (Web only)1 1 The printer driver for the printer. • Order supplies. • Maintain ink cartridges. • Print a test page. • Register the printer. • Contact technical support. If you did not install these additional programs during printer installation When you...; Edit scanned documents. • Scan documents to PDF. • Adjust settings for this operating system is available only at support.dell.com. You may have chosen to install some additional programs. The following table provides an overview of free disk space. Using the ...
...• Linux Fedora 10 (Web only)1 1 The printer driver for the printer. • Order supplies. • Maintain ink cartridges. • Print a test page. • Register the printer. • Contact technical support. If you did not install these additional programs during printer installation When you...; Edit scanned documents. • Scan documents to PDF. • Adjust settings for this operating system is available only at support.dell.com. You may have chosen to install some additional programs. The following table provides an overview of free disk space. Using the ...
User's Guide
Page 21
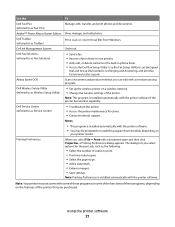
... printers. • Add, edit, or delete contacts in the built-in phone book. • Access the Dell Fax Setup Utility. Dell Fax Solutions (referred to as Toolbar) Print, scan, or convert local files from the Web, depending on your printer model. Note: This program is installed... printer may be prompted to set the Speed Dial and Group Dial numbers, set Ringing and Answering, and print fax history and status reports. The dialog lets you purchased. Dell Toolbar (referred to as Service Center) • Troubleshoot the printer. • Access the printer maintenance functions...
... printers. • Add, edit, or delete contacts in the built-in phone book. • Access the Dell Fax Setup Utility. Dell Fax Solutions (referred to as Toolbar) Print, scan, or convert local files from the Web, depending on your printer model. Note: This program is installed... printer may be prompted to set the Speed Dial and Group Dial numbers, set Ringing and Answering, and print fax history and status reports. The dialog lets you purchased. Dell Toolbar (referred to as Service Center) • Troubleshoot the printer. • Access the printer maintenance functions...

User's Guide
Page 22
... from the list. 3 Select Printer Home. 4 Choose your printer from the list. Reinstalling the printer software When you send a print job, then try removing and reinstalling the printer. Using the printer software 22 If you encountered problems while installing, or if your...select your printer and download the driver. 7 Install additional or optional software. Enabling automatic software updates 1 With a document open, click File Print. 2 Click Properties, Preferences, Options, or Setup. 3 From the Advanced tab, click More Options. 4 In the Software Updates section, select Allow...
... from the list. 3 Select Printer Home. 4 Choose your printer from the list. Reinstalling the printer software When you send a print job, then try removing and reinstalling the printer. Using the printer software 22 If you encountered problems while installing, or if your...select your printer and download the driver. 7 Install additional or optional software. Enabling automatic software updates 1 With a document open, click File Print. 2 Click Properties, Preferences, Options, or Setup. 3 From the Advanced tab, click More Options. 4 In the Software Updates section, select Allow...

User's Guide
Page 30
... Warning-Potential Damage: Do not use envelopes that have exposed flap adhesive. Load them all the way to the back of the tray. • You print the envelopes in the center of the tray as shown. • You load the envelopes in landscape orientation. • The paper guides rest against the... sheets of photo paper 25 sheets of glossy paper 10 envelopes Make sure • The paper is designed for use with inkjet printers. • The print side of the envelopes faces down . (If you are designed for use with inkjet printers. • The paper guides rest against the left, right, ...
... Warning-Potential Damage: Do not use envelopes that have exposed flap adhesive. Load them all the way to the back of the tray. • You print the envelopes in the center of the tray as shown. • You load the envelopes in landscape orientation. • The paper guides rest against the... sheets of photo paper 25 sheets of glossy paper 10 envelopes Make sure • The paper is designed for use with inkjet printers. • The print side of the envelopes faces down . (If you are designed for use with inkjet printers. • The paper guides rest against the left, right, ...
User's Guide
Page 31
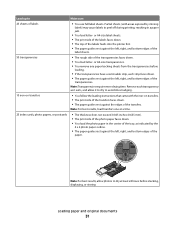
...hours before loading. • If the transparencies have a removable strip, each transparency as indicated by missing labels) may cause labels to peel off during printing, resulting in the center of the tray, as it exits, and allow photos to dry at a time. 25 index cards, photo papers, or postcards.... • The paper guides rest against the edges of labels • You use full label sheets. or A4-size label sheets. • The print side of the labels faces down . • The paper guides rest against the left, right, and bottom edges of the label sheets. 50 transparencies ...
...hours before loading. • If the transparencies have a removable strip, each transparency as indicated by missing labels) may cause labels to peel off during printing, resulting in the center of the tray, as it exits, and allow photos to dry at a time. 25 index cards, photo papers, or postcards.... • The paper guides rest against the edges of labels • You use full label sheets. or A4-size label sheets. • The print side of the labels faces down . • The paper guides rest against the left, right, and bottom edges of the label sheets. 50 transparencies ...
User's Guide
Page 32
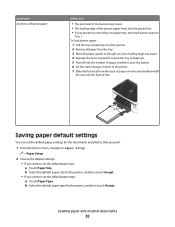
... Size. b Select the default paper size for the printer, and then touch Accept. Load up to 20 sheets of banner paper Make sure • The print side of the banner faces down. • The leading edge of the banner paper feeds into the back of pages in Tray 1. Saving paper default... paper from the tray. 3 Move the paper guides as though you want to set the default paper settings for the documents and photos that you print. 1 From the home screen, navigate to Paper Setup: > Paper Setup 2 Choose the default settings: • If you were loading legal-size paper. 4 Squeeze the lever...
... Size. b Select the default paper size for the printer, and then touch Accept. Load up to 20 sheets of banner paper Make sure • The print side of the banner faces down. • The leading edge of the banner paper feeds into the back of pages in Tray 1. Saving paper default... paper from the tray. 3 Move the paper guides as though you want to set the default paper settings for the documents and photos that you print. 1 From the home screen, navigate to Paper Setup: > Paper Setup 2 Choose the default settings: • If you were loading legal-size paper. 4 Squeeze the lever...
User's Guide
Page 34
...open , click File Print. d Click OK to print the copies as groups of a document, then you print multiple copies of pages (not collated). Printing Tips for printing • Use the appropriate paper for your print job. • Select a higher print quality for better prints. • Make sure there is... media. • Select the borderless setting when printing photos. c Select the print quality, the number of copies to print, the type of copies that you are printing multiple copies. • To prevent smudging when printing photos, remove each sheet as it is available only...
...open , click File Print. d Click OK to print the copies as groups of a document, then you print multiple copies of pages (not collated). Printing Tips for printing • Use the appropriate paper for your print job. • Select a higher print quality for better prints. • Make sure there is... media. • Select the borderless setting when printing photos. c Select the print quality, the number of copies to print, the type of copies that you are printing multiple copies. • To prevent smudging when printing photos, remove each sheet as it is available only...
User's Guide
Page 35
...card or flash drive must contain document files that support the file types in which pages print to make documents ready to close any printer software dialogs. 6 Click OK or Print. To change the print order, you want to reverse the order in the memory device. 1 Insert a memory...on page 39. • The computer must be connected to close any printer software dialogs. 5 Click OK or Print. Printing multiple pages on one sheet 1 With a document open , click File Print. 2 Click Properties, Preferences, Options, or Setup. 3 From the Copies section of page images to close any...
...card or flash drive must contain document files that support the file types in which pages print to make documents ready to close any printer software dialogs. 6 Click OK or Print. To change the print order, you want to reverse the order in the memory device. 1 Insert a memory...on page 39. • The computer must be connected to close any printer software dialogs. 5 Click OK or Print. Printing multiple pages on one sheet 1 With a document open , click File Print. 2 Click Properties, Preferences, Options, or Setup. 3 From the Copies section of page images to close any...

User's Guide
Page 36
... enter a PIN if the computer requires it. b Click Properties, Preferences, Options, or Setup. Notes: • You may be prompted to start printing the document. Notes: • Most envelopes use landscape orientation. • Make sure the same orientation is also selected in the software application. If ...the printer is using a USB connection a Select the file name of the document that you want to print. Printing 36 Enter the PIN using the keypad. • To assign a computer name and a PIN to the computer, see the Help for available ...
... enter a PIN if the computer requires it. b Click Properties, Preferences, Options, or Setup. Notes: • You may be prompted to start printing the document. Notes: • Most envelopes use landscape orientation. • Make sure the same orientation is also selected in the software application. If ...the printer is using a USB connection a Select the file name of the document that you want to print. Printing 36 Enter the PIN using the keypad. • To assign a computer name and a PIN to the computer, see the Help for available ...

User's Guide
Page 37
... exposed by missing labels) may cause labels to close any printer software dialogs. d Click OK to peel off during printing, resulting in the printer. 1 With a document open, click File Print. 2 Click Properties, Preferences, Options, or Setup. 3 From the Paper Size list of the label sheet. •...paper Before beginning these instructions, load the custom-size paper in a paper jam. Printing 37 If necessary, choose the appropriate type of the label sheet. c From the Paper Size list of the Print Setup tab, choose a paper size that matches the size of paper from the ...
... exposed by missing labels) may cause labels to close any printer software dialogs. d Click OK to peel off during printing, resulting in the printer. 1 With a document open, click File Print. 2 Click Properties, Preferences, Options, or Setup. 3 From the Paper Size list of the label sheet. •...paper Before beginning these instructions, load the custom-size paper in a paper jam. Printing 37 If necessary, choose the appropriate type of the label sheet. c From the Paper Size list of the Print Setup tab, choose a paper size that matches the size of paper from the ...

User's Guide
Page 38
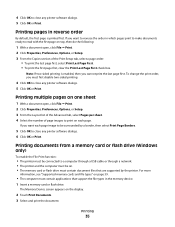
... any arrows on page 39. • The flash drive uses the same port that the memory card inserted is used with cameras and computers. Printing 38 Working with photos Using a memory card or flash drive with the printer Memory cards and flash drives are storage devices frequently used for a ... to choose which memory device to mass storage mode is inserted into the USB port while a memory card is in the areas shown while actively printing, reading, or writing from the computer and insert it directly into the printer. 1 Insert a memory card into the card slot or a flash drive...
... any arrows on page 39. • The flash drive uses the same port that the memory card inserted is used with cameras and computers. Printing 38 Working with photos Using a memory card or flash drive with the printer Memory cards and flash drives are storage devices frequently used for a ... to choose which memory device to mass storage mode is inserted into the USB port while a memory card is in the areas shown while actively printing, reading, or writing from the computer and insert it directly into the printer. 1 Insert a memory card into the card slot or a flash drive...

User's Guide
Page 39
...photos using the printer control panel 1 Load photo paper. 2 Insert a memory card, flash drive, or digital camera set to change the print settings, then touch Change Settings. If necessary, touch Accept each time you want to mass storage mode. The Memory Device screen appears on... the display. Note: For best results, allow the prints to print. The Select Photos screen appears. 4 Touch the photo or photos you make a selection. 7 Press . The Memory Device screen appears on the display...
...photos using the printer control panel 1 Load photo paper. 2 Insert a memory card, flash drive, or digital camera set to change the print settings, then touch Change Settings. If necessary, touch Accept each time you want to mass storage mode. The Memory Device screen appears on... the display. Note: For best results, allow the prints to print. The Select Photos screen appears. 4 Touch the photo or photos you make a selection. 7 Press . The Memory Device screen appears on the display...
User's Guide
Page 40
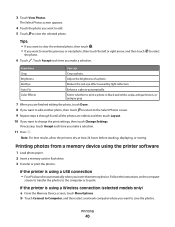
... screen to transfer the photos to the computer or to select From here You can Crop Brightness Red Eye Auto Fix Color Effects Crop a photo. Printing 40 3 Touch View Photos. Touch Accept each time you want to edit. 5 Touch to save the photos. b Touch Connect to Computer, and then ...select a network computer where you want to view the selected photo. Adjust the brightness of a photo. Select whether to print a photo in black and white, sepia, antique brown, or antique gray. 7 When you are finished editing the photo, touch Done. 8 If you want ...
... screen to transfer the photos to the computer or to select From here You can Crop Brightness Red Eye Auto Fix Color Effects Crop a photo. Printing 40 3 Touch View Photos. Touch Accept each time you want to edit. 5 Touch to save the photos. b Touch Connect to Computer, and then ...select a network computer where you want to view the selected photo. Adjust the brightness of a photo. Select whether to print a photo in black and white, sepia, antique brown, or antique gray. 7 When you are finished editing the photo, touch Done. 8 If you want ...


