User's Guide
Page 5
...panel 61 Sending e-mail...62 Canceling an e-mail...64 Networking 65 Installing the printer on a wireless network...65 Advanced wireless setup...69 Installing the printer on an Ethernet network...75 Networking FAQ...76 Maintaining the printer 87 Maintaining ink cartridges...87 Cleaning ...Before you troubleshoot...90 Using the Service Center to solve printer problems 90 If Troubleshooting does not solve your problem...90 Setup troubleshooting...90 Jams and misfeeds troubleshooting...95 Print troubleshooting...98 Copy and scan troubleshooting...99 E-mail troubleshooting...101 Memory card ...
...panel 61 Sending e-mail...62 Canceling an e-mail...64 Networking 65 Installing the printer on a wireless network...65 Advanced wireless setup...69 Installing the printer on an Ethernet network...75 Networking FAQ...76 Maintaining the printer 87 Maintaining ink cartridges...87 Cleaning ...Before you troubleshoot...90 Using the Service Center to solve printer problems 90 If Troubleshooting does not solve your problem...90 Setup troubleshooting...90 Jams and misfeeds troubleshooting...95 Print troubleshooting...98 Copy and scan troubleshooting...99 E-mail troubleshooting...101 Memory card ...
User's Guide
Page 8
... of paper. • Print on both sides of the paper manually or automatically (depending on both sides of your new printer right away, use the setup materials that came with our printers, and we could do encounter any problems along the way, one page image on track fast. To avoid printing...
... of paper. • Print on both sides of the paper manually or automatically (depending on both sides of your new printer right away, use the setup materials that came with our printers, and we could do encounter any problems along the way, one page image on track fast. To avoid printing...
User's Guide
Page 9
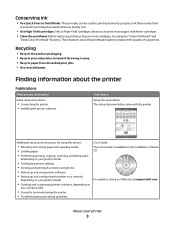
...clean the printhead nozzles to improve the quality of throwing it here Setup documentation The setup documentation came with fewer cartridges. • Clean the printhead. For updates, check our Web site at support.dell.com. About your ink cartridges, try using the "Clean Printhead... and recycling your printer 9 Finding information about the printer Publications What are mostly text. • Use High Yield cartridges. Additional setup and instructions for using the printer: • Selecting and storing paper and specialty media • Loading paper • Performing printing...
...clean the printhead nozzles to improve the quality of throwing it here Setup documentation The setup documentation came with fewer cartridges. • Clean the printhead. For updates, check our Web site at support.dell.com. About your ink cartridges, try using the "Clean Printhead... and recycling your printer 9 Finding information about the printer Publications What are mostly text. • Use High Yield cartridges. Additional setup and instructions for using the printer: • Selecting and storing paper and specialty media • Loading paper • Performing printing...
User's Guide
Page 17
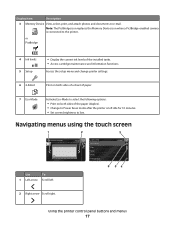
...; Print on both sides of the paper (duplex). • Change to Power Saver mode after the printer is connected to the printer. Access the setup menu and change printer settings. 6 2-Sided 12 7 Eco-Mode Print on both sides of a sheet of the installed tanks. • Access cartridge... 54 Use To 1 Left arrow Scroll left idle for 10 minutes. • Set screen brightness to e-mail. or PictBridge 4 Ink levels 5 Setup • Display the current ink levels of paper. Display item Description 3 Memory Device View, select, print, and attach photos and documents to low.
...; Print on both sides of the paper (duplex). • Change to Power Saver mode after the printer is connected to the printer. Access the setup menu and change printer settings. 6 2-Sided 12 7 Eco-Mode Print on both sides of a sheet of the installed tanks. • Access cartridge... 54 Use To 1 Left arrow Scroll left idle for 10 minutes. • Set screen brightness to e-mail. or PictBridge 4 Ink levels 5 Setup • Display the current ink levels of paper. Display item Description 3 Memory Device View, select, print, and attach photos and documents to low.

User's Guide
Page 19
... Note: If you have previously selected. 1 From the home screen, touch , and then touch Use Factory Defaults. 2 Touch Yes. 3 When prompted to Power Saver: > Device Setup > Power Saver 2 Select a Power Saver timeout, and then touch Accept.
... Note: If you have previously selected. 1 From the home screen, touch , and then touch Use Factory Defaults. 2 Touch Yes. 3 When prompted to Power Saver: > Device Setup > Power Saver 2 Select a Power Saver timeout, and then touch Accept.
User's Guide
Page 21
... fax in three-in-one printers. • Add, edit, or delete contacts in the built-in phone book. • Access the Dell Fax Setup Utility. When you can edit with a document open and then click Properties, a Printing Preferences dialog appears. Note: Printing Preferences is installed ...automatically with the printer software. Dell Wireless Setup Utility (referred to as Fast Pics) Manage, edit, transfer, and print photos and documents. Use the Fax Setup Utility to as Toolbar) Print, scan, or convert local files from the...
... fax in three-in-one printers. • Add, edit, or delete contacts in the built-in phone book. • Access the Dell Fax Setup Utility. When you can edit with a document open and then click Properties, a Printing Preferences dialog appears. Note: Printing Preferences is installed ...automatically with the printer software. Dell Wireless Setup Utility (referred to as Fast Pics) Manage, edit, transfer, and print photos and documents. Use the Fax Setup Utility to as Toolbar) Print, scan, or convert local files from the...

User's Guide
Page 22
... installation software CD, all the necessary software was installed. Enabling automatic software updates 1 With a document open, click File Print. 2 Click Properties, Preferences, Options, or Setup. 3 From the Advanced tab, click More Options. 4 In the Software Updates section, select Allow automatic updates from the printer drop-down list. 5 From the Support...
... installation software CD, all the necessary software was installed. Enabling automatic software updates 1 With a document open, click File Print. 2 Click Properties, Preferences, Options, or Setup. 3 From the Advanced tab, click More Options. 4 In the Software Updates section, select Allow automatic updates from the printer drop-down list. 5 From the Support...
User's Guide
Page 23
b In the Start Search or Run box, type D:\setup.exe, where D is the letter of your CD or DVD drive. 3 Follow the instructions on this computer before but need to remove the software. 5 Once ... launch the CD manually: a Click , or click Start and then click Run. Using the World Wide Web Updated printer software may be available at support.dell.com. 3 Select the uninstall option. 4 Follow the instructions on the computer screen to reinstall the software, then uninstall the current software first. 1 Close all open...
b In the Start Search or Run box, type D:\setup.exe, where D is the letter of your CD or DVD drive. 3 Follow the instructions on this computer before but need to remove the software. 5 Once ... launch the CD manually: a Click , or click Start and then click Run. Using the World Wide Web Updated printer software may be available at support.dell.com. 3 Select the uninstall option. 4 Follow the instructions on the computer screen to reinstall the software, then uninstall the current software first. 1 Close all open...
User's Guide
Page 32
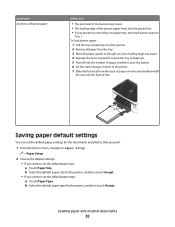
b Select the default paper size for the documents and photos that you print. 1 From the home screen, navigate to Paper Setup: > Paper Setup 2 Choose the default settings: • If you want to set the default paper size: a Touch Paper Size. Saving paper default settings You can set the ...
b Select the default paper size for the documents and photos that you print. 1 From the home screen, navigate to Paper Setup: > Paper Setup 2 Choose the default settings: • If you want to set the default paper size: a Touch Paper Size. Saving paper default settings You can set the ...
User's Guide
Page 34
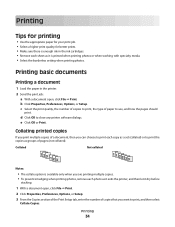
... enough ink in the printer. 2 Send the print job: a With a document open , click File Print. 2 Click Properties, Preferences, Options, or Setup. 3 From the Copies section of the Print Setup tab, enter the number of copies that you want to print the copies as it exits the printer, and then let it...; To prevent smudging when printing photos, remove each copy as a set (collated) or to print, and then select Collate Copies. b Click Properties, Preferences, Options, or Setup.
... enough ink in the printer. 2 Send the print job: a With a document open , click File Print. 2 Click Properties, Preferences, Options, or Setup. 3 From the Copies section of the Print Setup tab, enter the number of copies that you want to print the copies as it exits the printer, and then let it...; To prevent smudging when printing photos, remove each copy as a set (collated) or to print, and then select Collate Copies. b Click Properties, Preferences, Options, or Setup.
User's Guide
Page 35
...: Printing 35 Printing multiple pages on one sheet 1 With a document open , click File Print. 2 Click Properties, Preferences, Options, or Setup. 3 From the Copies section of page images to close any printer software dialogs. 5 Click OK or Print. Printing pages in reverse order By default,...With a document open , click File Print. 2 Click Properties, Preferences, Options, or Setup. 3 From the Layout list of the Advanced tab, select Pages per sheet. 4 Select the number of the Print Setup tab, select a page order: • To print the last page first, select Print Last Page...
...: Printing 35 Printing multiple pages on one sheet 1 With a document open , click File Print. 2 Click Properties, Preferences, Options, or Setup. 3 From the Copies section of page images to close any printer software dialogs. 5 Click OK or Print. Printing pages in reverse order By default,...With a document open , click File Print. 2 Click Properties, Preferences, Options, or Setup. 3 From the Layout list of the Advanced tab, select Pages per sheet. 4 Select the number of the Print Setup tab, select a page order: • To print the last page first, select Print Last Page...

User's Guide
Page 36
Note: To print on a custom-size envelope, select Custom Size, and then specify the height and width of the Print Setup tab, select Plain Paper. Printing specialty documents Printing envelopes 1 Load the envelopes in the printer. 2 Send the print job: a With a document open , click File ... to connect to the network computer or to print. Notes: • You may be prompted to start printing the document. b Click Properties, Preferences, Options, or Setup. c From the Paper Type list of the envelope. e Select an orientation. b Click Properties, Preferences, Options, or...
Note: To print on a custom-size envelope, select Custom Size, and then specify the height and width of the Print Setup tab, select Plain Paper. Printing specialty documents Printing envelopes 1 Load the envelopes in the printer. 2 Send the print job: a With a document open , click File ... to connect to the network computer or to print. Notes: • You may be prompted to start printing the document. b Click Properties, Preferences, Options, or Setup. c From the Paper Type list of the envelope. e Select an orientation. b Click Properties, Preferences, Options, or...

User's Guide
Page 37
... printing, resulting in the printer. 1 With a document open, click File Print. 2 Click Properties, Preferences, Options, or Setup. 3 From the Paper Size list of the Print Setup tab, select Custom Size. Partial sheets (with areas exposed by missing labels) may cause labels to close any printer software dialogs...; Make sure the top of the label sheet. • Use full label sheets. Printing 37 c From the Paper Size list of the Print Setup tab, choose a paper size that matches the size of paper from the Paper Type list. If necessary, choose the appropriate type of the label ...
... printing, resulting in the printer. 1 With a document open, click File Print. 2 Click Properties, Preferences, Options, or Setup. 3 From the Paper Size list of the Print Setup tab, select Custom Size. Partial sheets (with areas exposed by missing labels) may cause labels to close any printer software dialogs...; Make sure the top of the label sheet. • Use full label sheets. Printing 37 c From the Paper Size list of the Print Setup tab, choose a paper size that matches the size of paper from the Paper Type list. If necessary, choose the appropriate type of the label ...
User's Guide
Page 43
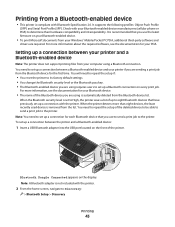
... more information about the required software, see the documentation for your Bluetooth-enabled device manufacturers (cellular phone or PDA) to Discovery: > Bluetooth Setup > Discovery Printing 43 Note: You need to the printer. Note: A Bluetooth adapter is automatically deleted from your Bluetooth device. •... The name of the Bluetooth device you use to send a print job to repeat the setup of the printer. It is recommended that have previously set up a connection with your PDA. For more than eight devices, the least...
... more information about the required software, see the documentation for your Bluetooth-enabled device manufacturers (cellular phone or PDA) to Discovery: > Bluetooth Setup > Discovery Printing 43 Note: You need to the printer. Note: A Bluetooth adapter is automatically deleted from your Bluetooth device. •... The name of the Bluetooth device you use to send a print job to repeat the setup of the printer. It is recommended that have previously set up a connection with your PDA. For more than eight devices, the least...
User's Guide
Page 44
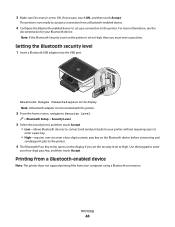
... up a connection to enter your Bluetooth device. Note: A Bluetooth adapter is not included with the printer. 2 From the home screen, navigate to Security Level: > Bluetooth Setup > Security Level 3 Select the security level, and then touch Accept. • Low-allows Bluetooth devices to connect and send print jobs to High. Setting the...
... up a connection to enter your Bluetooth device. Note: A Bluetooth adapter is not included with the printer. 2 From the home screen, navigate to Security Level: > Bluetooth Setup > Security Level 3 Select the security level, and then touch Accept. • Low-allows Bluetooth devices to connect and send print jobs to High. Setting the...
User's Guide
Page 45
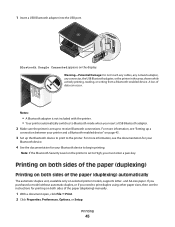
... printer and a Bluetooth-enabled device" on both sides of the paper (duplexing) manually. 1 With a document open, click File Print. 2 Click Properties, Preferences, Options, or Setup. Warning-Potential Damage: Do not touch any cables, any network adapter, any connector, the USB Bluetooth adapter, or the printer in the areas shown while...
... printer and a Bluetooth-enabled device" on both sides of the paper (duplexing) manually. 1 With a document open, click File Print. 2 Click Properties, Preferences, Options, or Setup. Warning-Potential Damage: Do not touch any cables, any network adapter, any connector, the USB Bluetooth adapter, or the printer in the areas shown while...
User's Guide
Page 46
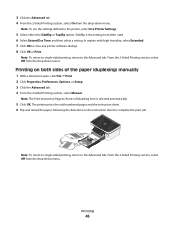
... the paper, following the directions on both sides of the paper (duplexing) manually 1 With a document open, click File Print. 2 Click Properties, Preferences, Options, or Setup. 3 Click the Advanced tab. 4 From the 2-Sided Printing section, select Manual. Printing 46 Sideflip is selected automatically. 5 Click OK. From the 2-Sided Printing section, select...
... the paper, following the directions on both sides of the paper (duplexing) manually 1 With a document open, click File Print. 2 Click Properties, Preferences, Options, or Setup. 3 Click the Advanced tab. 4 From the 2-Sided Printing section, select Manual. Printing 46 Sideflip is selected automatically. 5 Click OK. From the 2-Sided Printing section, select...
User's Guide
Page 47
... the default printer. To change the default printing mode for a single print job 1 With a document open, click File Print. 2 Click Properties, Preferences, Options, or Setup. 3 Select Automatic, Quick Print, Normal, or Best. Note: Printing in Quick Print mode uses less ink and is ideal for printing text-only documents. Changing...
... the default printer. To change the default printing mode for a single print job 1 With a document open, click File Print. 2 Click Properties, Preferences, Options, or Setup. 3 Select Automatic, Quick Print, Normal, or Best. Note: Printing in Quick Print mode uses less ink and is ideal for printing text-only documents. Changing...

User's Guide
Page 60
...address you can attach a saved document or photo from a memory device to set up the e-mail function 1 From the home screen, navigate to E-mail Setup: > E-mail Setup 2 Touch Yes to an e-mail. Setting up the printer to e-mail Setting up e-mail. 3 Enter your e-mail address, and then touch OK....the display, depending on the e-mail address you want to change the SMTP server settings 1 From the home screen, navigate to E-mail Setup: > E-mail Setup > SMTP Setup 2 Touch each item to one of known e-mail providers. 4 Follow the prompts on the list, then the printer automatically assigns the SMTP...
...address you can attach a saved document or photo from a memory device to set up the e-mail function 1 From the home screen, navigate to E-mail Setup: > E-mail Setup 2 Touch Yes to an e-mail. Setting up the printer to e-mail Setting up e-mail. 3 Enter your e-mail address, and then touch OK....the display, depending on the e-mail address you want to change the SMTP server settings 1 From the home screen, navigate to E-mail Setup: > E-mail Setup > SMTP Setup 2 Touch each item to one of known e-mail providers. 4 Follow the prompts on the list, then the printer automatically assigns the SMTP...
User's Guide
Page 61
...-add a new contact. E-mailing 61 b Touch Add Contact Name. g If you want to change the e-mail settings 1 From the home screen, navigate to E-mail Setup: > E-mail Setup 2 Touch each item. • Return E-mail Address-enter your e-mail address. • Send Me a Copy-touch Yes to save each item, and then enter the...
...-add a new contact. E-mailing 61 b Touch Add Contact Name. g If you want to change the e-mail settings 1 From the home screen, navigate to E-mail Setup: > E-mail Setup 2 Touch each item. • Return E-mail Address-enter your e-mail address. • Send Me a Copy-touch Yes to save each item, and then enter the...


