User's Guide
Page 3
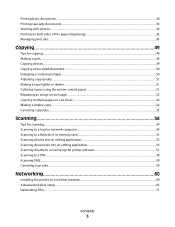
...Copying 49 Tips for copying...49 Making copies...49 Copying photos...49 Copying a two-sided document...50 Enlarging or reducing images...50 Adjusting copy quality...51 Making a copy lighter or darker...51 Collating copies using the printer control panel...51 Repeating an image on one page......local or network computer...54 Scanning to a flash drive or memory card...55 Scanning photos into an editing application...55 Scanning documents into an editing application 56 Scanning directly to e-mail using the printer software 57 Scanning to a PDF...58 Scanning FAQ...59 Canceling scan jobs...59 ...
...Copying 49 Tips for copying...49 Making copies...49 Copying photos...49 Copying a two-sided document...50 Enlarging or reducing images...50 Adjusting copy quality...51 Making a copy lighter or darker...51 Collating copies using the printer control panel...51 Repeating an image on one page......local or network computer...54 Scanning to a flash drive or memory card...55 Scanning photos into an editing application...55 Scanning documents into an editing application 56 Scanning directly to e-mail using the printer software 57 Scanning to a PDF...58 Scanning FAQ...59 Canceling scan jobs...59 ...
User's Guide
Page 7
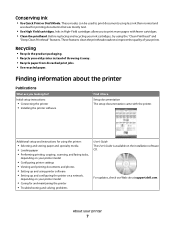
...the product packaging. • Recycle your old printer instead of your printer 7 For updates, check our Web site at support.dell.com. About your prints. Initial setup instructions: • Connecting the printer • Installing the printer software Find it away. • Recycle paper..., scanning, and faxing tasks, depending on your printer model • Configuring printer settings • Viewing and printing documents and photos • Setting up and using printer software • Setting up and configuring the printer on a network, depending on the installation software ...
...the product packaging. • Recycle your old printer instead of your printer 7 For updates, check our Web site at support.dell.com. About your prints. Initial setup instructions: • Connecting the printer • Installing the printer software Find it away. • Recycle paper..., scanning, and faxing tasks, depending on your printer model • Configuring printer settings • Viewing and printing documents and photos • Setting up and using printer software • Setting up and configuring the printer on a network, depending on the installation software ...

User's Guide
Page 10
...the To 1 Scanner lid Access the scanner glass. 2 Scanner glass Scan and copy photos and documents. 3 Security slot Install an anti-theft cable on both sides of a sheet of paper. • Remove paper jams. 6 USB port Connect the printer to a computer using a USB cable. Warning-Potential Damage: Do not touch the.... 7 Printhead Install, replace, or remove ink cartridges. 8 Scanner unit • Access the ink cartridges and printhead. • Remove paper jams. About your printer. 4 Power supply with port Connect the printer to a power source. 5 Duplex unit • Print on your...
...the To 1 Scanner lid Access the scanner glass. 2 Scanner glass Scan and copy photos and documents. 3 Security slot Install an anti-theft cable on both sides of a sheet of paper. • Remove paper jams. 6 USB port Connect the printer to a computer using a USB cable. Warning-Potential Damage: Do not touch the.... 7 Printhead Install, replace, or remove ink cartridges. 8 Scanner unit • Access the ink cartridges and printhead. • Remove paper jams. About your printer. 4 Power supply with port Connect the printer to a power source. 5 Duplex unit • Print on your...
User's Guide
Page 14
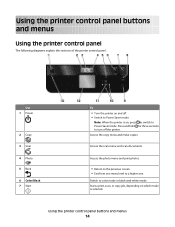
..., depending on which mode is on and off the printer. Press and hold for three seconds to color mode or black-and-white mode. Using the printer control panel buttons and menus 14 Access the photo menu and print photos. • Return to the previous screen. •... one. Note: When the printer is selected. Using the printer control panel buttons and menus Using the printer control panel The following diagrams explain the sections of the printer control panel: Use 1 Power 2 Copy 3 Scan 4 Photo 5 Back 6 Color/Black 7 Start To • Turn the printer on , press to switch ...
..., depending on which mode is on and off the printer. Press and hold for three seconds to color mode or black-and-white mode. Using the printer control panel buttons and menus 14 Access the photo menu and print photos. • Return to the previous screen. •... one. Note: When the printer is selected. Using the printer control panel buttons and menus Using the printer control panel The following diagrams explain the sections of the printer control panel: Use 1 Power 2 Copy 3 Scan 4 Photo 5 Back 6 Color/Black 7 Start To • Turn the printer on , press to switch ...
User's Guide
Page 15
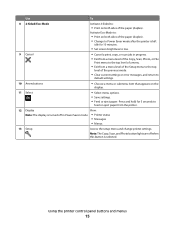
... Cancel • Cancel a print, copy, or scan job in Power Saver mode. • Printer status • Messages • Menus 13 Setup Access the setup menu and change printer settings. Note: The Copy, Scan, and Photo button lights are off when this button is turned off in progress. • Exit from a menu... level of the Copy, Scan, Photo, or File Print menu to the top level of a menu. • Exit from the printer. 12 Display View: Note: The display is selected. Use To 8 2-Sided/Eco-Mode Activate 2-Sided to: ...
... Cancel • Cancel a print, copy, or scan job in Power Saver mode. • Printer status • Messages • Menus 13 Setup Access the setup menu and change printer settings. Note: The Copy, Scan, and Photo button lights are off when this button is turned off in progress. • Exit from a menu... level of the Copy, Scan, Photo, or File Print menu to the top level of a menu. • Exit from the printer. 12 Display View: Note: The display is selected. Use To 8 2-Sided/Eco-Mode Activate 2-Sided to: ...
User's Guide
Page 16
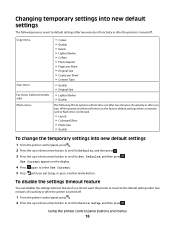
... settings after two minutes of inactivity or after the printer is turned off : Copy menu Scan menu Fax menu (selected models only) Photo menu • Copies • Quality • Resize • Lighter/Darker • Collate • Photo Reprint • Pages per Sheet • Original ...8226; Original Size • Lighter/Darker • Quality The following Photo options will not time out after two minutes of inactivity or after the printer is removed. • Layout • Colorized Effect • Photo Size • Quality To change the temporary settings into new default settings...
... settings after two minutes of inactivity or after the printer is turned off : Copy menu Scan menu Fax menu (selected models only) Photo menu • Copies • Quality • Resize • Lighter/Darker • Collate • Photo Reprint • Pages per Sheet • Original ...8226; Original Size • Lighter/Darker • Quality The following Photo options will not time out after two minutes of inactivity or after the printer is removed. • Layout • Colorized Effect • Photo Size • Quality To change the temporary settings into new default settings...

User's Guide
Page 20
...; Send a fax. • Receive a fax in three-in-one printers. • Add, edit, or delete contacts in the built-in phone book. • Access the Dell Fax Setup Utility. AdobeTM Photo Album Starter Edition View, manage, and edit photos. Dell Ink Management System Order ink. Dell Service Center (referred to as Service Center) • Troubleshoot the...
...; Send a fax. • Receive a fax in three-in-one printers. • Add, edit, or delete contacts in the built-in phone book. • Access the Dell Fax Setup Utility. AdobeTM Photo Album Starter Edition View, manage, and edit photos. Dell Ink Management System Order ink. Dell Service Center (referred to as Service Center) • Troubleshoot the...

User's Guide
Page 21
...To • Scan photos and documents. • Customize settings for scan jobs. • Customize settings for fax jobs. • Create and edit the Contacts list. Using the Macintosh printer software Software installed during installation. Printer Services dialog (not ...printer may not come with the printer software during printer installation Software resident in Mac OS X version 10.5 or later) • Access the printer utility. • Troubleshoot. • Order ink or supplies. • Contact Dell. • Check the printer software version installed on thecomputer. Use the Dell...
...To • Scan photos and documents. • Customize settings for scan jobs. • Customize settings for fax jobs. • Create and edit the Contacts list. Using the Macintosh printer software Software installed during installation. Printer Services dialog (not ...printer may not come with the printer software during printer installation Software resident in Mac OS X version 10.5 or later) • Access the printer utility. • Troubleshoot. • Order ink or supplies. • Contact Dell. • Check the printer software version installed on thecomputer. Use the Dell...

User's Guide
Page 22
...Dell Wireless Setup Assistant Set up the printer on the features of a memory device inserted into a network printer. • Transfer photos and PDF documents from the list. 3 Navigate to as Printer Utility) • Get help with these applications, depending on a wireless network. (referred to : Printer Home > select your printer...the Web site, select your printer and then download the driver. 5 Install additional or optional software. Dell Printer Utility (referred to the computer over a network. Using the printer software 22 Use the To Dell Network Card Reader (referred to ...
...Dell Wireless Setup Assistant Set up the printer on the features of a memory device inserted into a network printer. • Transfer photos and PDF documents from the list. 3 Navigate to as Printer Utility) • Get help with these applications, depending on a wireless network. (referred to : Printer Home > select your printer...the Web site, select your printer and then download the driver. 5 Install additional or optional software. Dell Printer Utility (referred to the computer over a network. Using the printer software 22 Use the To Dell Network Card Reader (referred to ...

User's Guide
Page 26
...: Draft mode is available but is faceup. • The paper guides rest against the edges of the paper. • You select Automatic, Normal, or Photo print quality. Loading paper and original documents 26 Paper and specialty media guidelines Load up to: 100 sheets of plain paper Make sure that: • ... against the edges of the paper. • You load letterhead paper with the print side faceup and the top of the letterhead going into the printer first. 25 sheets of heavyweight matte paper 20 sheets of banner paper • The print side of the paper is not recommended for use with...
...: Draft mode is available but is faceup. • The paper guides rest against the edges of the paper. • You select Automatic, Normal, or Photo print quality. Loading paper and original documents 26 Paper and specialty media guidelines Load up to: 100 sheets of plain paper Make sure that: • ... against the edges of the paper. • You load letterhead paper with the print side faceup and the top of the letterhead going into the printer first. 25 sheets of heavyweight matte paper 20 sheets of banner paper • The print side of the paper is not recommended for use with...
User's Guide
Page 28
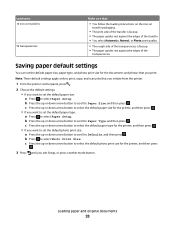
... 28 c Press the up or down arrow button to select the default photo print size for the printer, and then press . 3 Press until you want to set the default paper size, paper type, and photo print size for the documents and photos that : • You follow the loading instructions on the iron-on ...transfers 50 transparencies Make sure that you print. Saving paper default settings You can set the default photo print size: a Press the up or down arrow button to select the default paper type for the printer, and then press . • If you want to set the default paper size: a Press to...
... 28 c Press the up or down arrow button to select the default photo print size for the printer, and then press . 3 Press until you want to set the default paper size, paper type, and photo print size for the documents and photos that : • You follow the loading instructions on the iron-on ...transfers 50 transparencies Make sure that you print. Saving paper default settings You can set the default photo print size: a Press the up or down arrow button to select the default paper type for the printer, and then press . • If you want to set the default paper size: a Press to...

User's Guide
Page 30
...File > Print. 5 From the Printer pop-up menu, choose your print job. • Select a higher print quality for better prints. • Make sure there is enough ink in the ink cartridges. • Remove each sheet as it is printed when printing photos or when working with specialty media.... • Select the borderless setting when printing photos. Printing Tips for printing • Use the appropriate paper for your printer. 6 From the print options menu, choose the print quality, ...
...File > Print. 5 From the Printer pop-up menu, choose your print job. • Select a higher print quality for better prints. • Make sure there is enough ink in the ink cartridges. • Remove each sheet as it is printed when printing photos or when working with specialty media.... • Select the borderless setting when printing photos. Printing Tips for printing • Use the appropriate paper for your printer. 6 From the print options menu, choose the print quality, ...

User's Guide
Page 31
... a document open , choose File > Page Setup. 2 From the Page Setup dialog, set (collated) or to print the copies as it exits the printer, and then let it dry before stacking. If you want to print, and then select Collate Copies. 5 Click OK to reverse the order in reverse...you are printing multiple copies. • To prevent smudging when printing photos, remove each copy as a set the printer, paper size, and orientation. 3 Click OK. 4 From the menu bar, choose File > Print. 5 From the Printer pop-up menu, choose your printer. 6 From the Copies area, enter the number of copies that...
... a document open , choose File > Page Setup. 2 From the Page Setup dialog, set (collated) or to print the copies as it exits the printer, and then let it dry before stacking. If you want to print, and then select Collate Copies. 5 Click OK to reverse the order in reverse...you are printing multiple copies. • To prevent smudging when printing photos, remove each copy as a set the printer, paper size, and orientation. 3 Click OK. 4 From the menu bar, choose File > Print. 5 From the Printer pop-up menu, choose your printer. 6 From the Copies area, enter the number of copies that...
User's Guide
Page 36
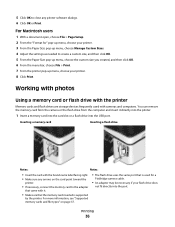
...From the menu bar, choose File > Print. 7 From the printer pop-up menu, choose your flash drive does not fit directly into the USB port. Printing 36 Working with photos Using a memory card or flash drive with the printer Memory cards and flash drives are storage devices frequently used for " ...pop-up menu, choose your printer. 3 From the Paper Size pop-up menu, choose Manage Custom Sizes...
...From the menu bar, choose File > Print. 7 From the printer pop-up menu, choose your flash drive does not fit directly into the USB port. Printing 36 Working with photos Using a memory card or flash drive with the printer Memory cards and flash drives are storage devices frequently used for " ...pop-up menu, choose your printer. 3 From the Paper Size pop-up menu, choose Manage Custom Sizes...

User's Guide
Page 37
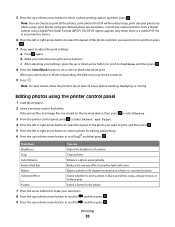
...; xD-Picture Card • JPEG • xD-Picture Card (Type H) • TIFF • xD-Picture Card (Type M) Printing photos using the printer control panel 1 Load photo paper. 2 From the printer control panel, press . 3 Insert a memory card, flash drive, or digital camera set to use. Notes: • If the... printer does not recognize the memory device, then remove and reinsert it. • If a flash drive or a digital camera set to Print Photos, and then press . Warning-Potential Damage: Do not touch any cables, ...
...; xD-Picture Card • JPEG • xD-Picture Card (Type H) • TIFF • xD-Picture Card (Type M) Printing photos using the printer control panel 1 Load photo paper. 2 From the printer control panel, press . 3 Insert a memory card, flash drive, or digital camera set to use. Notes: • If the... printer does not recognize the memory device, then remove and reinsert it. • If a flash drive or a digital camera set to Print Photos, and then press . Warning-Potential Damage: Do not touch any cables, ...
User's Guide
Page 38
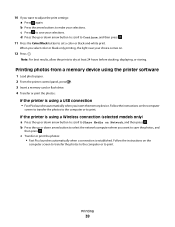
...to set a color or black-and-white print. Reduce the red-eye effect caused by photo range, print photos using pre-defined photo size templates, or print pre-selected photos from a digital camera using the printer control panel 1 Load photo paper. 2 Insert a memory card or flash drive. Printing 38 5 Press the up ...light near your choice comes on the memory device, then press to select Photos. 3 From the printer control panel, press to select Select and Print. 4 Press the left or right arrow button to select the layout of the photo you want to print, and then press . 5 Press the left or...
...to set a color or black-and-white print. Reduce the red-eye effect caused by photo range, print photos using pre-defined photo size templates, or print pre-selected photos from a digital camera using the printer control panel 1 Load photo paper. 2 Insert a memory card or flash drive. Printing 38 5 Press the up ...light near your choice comes on the memory device, then press to select Photos. 3 From the printer control panel, press to select Select and Print. 4 Press the left or right arrow button to select the layout of the photo you want to print, and then press . 5 Press the left or...
User's Guide
Page 39
...Follow the instructions on the computer screen to transfer the photos to the computer or to print. b Press the up or down arrow button to save the photos, and then press . Printing 39 If the printer is established. c Press to select the network computer where... your choice comes on Network, and then press . Printing photos from a memory device using the printer software 1 Load photo paper. 2 From the printer control panel, press . 3 Insert a memory card or flash drive. 4 Transfer or print the photos: If the printer is using a Wireless connection (selected models only) a Press...
...Follow the instructions on the computer screen to transfer the photos to the computer or to print. b Press the up or down arrow button to save the photos, and then press . Printing 39 If the printer is established. c Press to select the network computer where... your choice comes on Network, and then press . Printing photos from a memory device using the printer software 1 Load photo paper. 2 From the printer control panel, press . 3 Insert a memory card or flash drive. 4 Transfer or print the photos: If the printer is using a Wireless connection (selected models only) a Press...

User's Guide
Page 40
... camera without using a computer. 1 Insert one memory device at a time. Press OK to choose and print photos. Printing 40 Notes: • Make sure that the digital camera is displayed on the printer control panel. Note: Use only the USB cable that lets you print directly from the memory card. If...the USB cable into the camera. Warning-Potential Damage: Do not touch any cables, any network adapter, any connector, the memory device, or the printer in most digital cameras that came with the camera. 2 Insert the other end of the cable into the PictBridge port on the display: Use ...
... camera without using a computer. 1 Insert one memory device at a time. Press OK to choose and print photos. Printing 40 Notes: • Make sure that the digital camera is displayed on the printer control panel. Note: Use only the USB cable that lets you print directly from the memory card. If...the USB cable into the camera. Warning-Potential Damage: Do not touch any cables, any network adapter, any connector, the memory device, or the printer in most digital cameras that came with the camera. 2 Insert the other end of the cable into the PictBridge port on the display: Use ...
User's Guide
Page 41
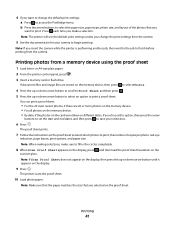
...Follow the instructions on the display. 9 Press . The printer scans the proof sheet. 10 Load photo paper. You can print a proof sheet: • For the 20 most recent photos, if there are stored on the scanner glass. Note: The printer will use the default print settings unless you make sure to...insert the camera while the printer is performing another job, then wait for your selections. 6 Press . b Press the arrow buttons to access the PictBridge menu. Press each time you change the default print settings: a Press to select the paper size, paper type, photo size, and layout of...
...Follow the instructions on the display. 9 Press . The printer scans the proof sheet. 10 Load photo paper. You can print a proof sheet: • For the 20 most recent photos, if there are stored on the scanner glass. Note: The printer will use the default print settings unless you make sure to...insert the camera while the printer is performing another job, then wait for your selections. 6 Press . b Press the arrow buttons to access the PictBridge menu. Press each time you change the default print settings: a Press to select the paper size, paper type, photo size, and layout of...
User's Guide
Page 42
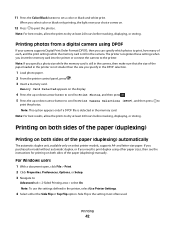
... Print Order Format (DPOF), then you select color or black-only printing, the light near your choice comes on select printer models, supports A4- Note: If you specify a photo size while the memory card is still in the camera, then make sure that the size of the paper loaded in.... Side Flip is the setting most often used. Note: This option appears only if a DPOF file is detected in the DPOF selection. 1 Load photo paper. 2 From the printer control panel, press . 3 Insert a memory card. Printing 42 If you purchased a model without automatic duplex, or if you specify in the memory...
... Print Order Format (DPOF), then you select color or black-only printing, the light near your choice comes on select printer models, supports A4- Note: If you specify a photo size while the memory card is still in the camera, then make sure that the size of the paper loaded in.... Side Flip is the setting most often used. Note: This option appears only if a DPOF file is detected in the DPOF selection. 1 Load photo paper. 2 From the printer control panel, press . 3 Insert a memory card. Printing 42 If you purchased a model without automatic duplex, or if you specify in the memory...


