User's Guide
Page 3
... Printing on both sides of the paper (duplexing)...42 Managing print jobs...45 Copying 49 Tips for copying...49 Making copies...49 Copying photos...49 Copying a two-sided document...50 Enlarging or reducing images...50 Adjusting copy quality...51 Making a copy lighter or darker...51 Collating...53 Scanning 54 Tips for scanning...54 Scanning to a local or network computer...54 Scanning to a flash drive or memory card...55 Scanning photos into an editing application...55 Scanning documents into an editing application 56 Scanning directly to e-mail using the printer software 57 Scanning to a PDF...
... Printing on both sides of the paper (duplexing)...42 Managing print jobs...45 Copying 49 Tips for copying...49 Making copies...49 Copying photos...49 Copying a two-sided document...50 Enlarging or reducing images...50 Adjusting copy quality...51 Making a copy lighter or darker...51 Collating...53 Scanning 54 Tips for scanning...54 Scanning to a local or network computer...54 Scanning to a flash drive or memory card...55 Scanning photos into an editing application...55 Scanning documents into an editing application 56 Scanning directly to e-mail using the printer software 57 Scanning to a PDF...
User's Guide
Page 7
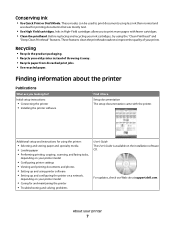
... • Performing printing, copying, scanning, and faxing tasks, depending on your printer model • Configuring printer settings • Viewing and printing documents and photos • Setting up and using printer software • Setting up and configuring the printer on a network, depending on the installation software CD. Initial setup instructions... Finding information about the printer Publications What are mostly text. • Use High Yield cartridges. For updates, check our Web site at support.dell.com. These modes can be used to print more pages with the printer.
... • Performing printing, copying, scanning, and faxing tasks, depending on your printer model • Configuring printer settings • Viewing and printing documents and photos • Setting up and using printer software • Setting up and configuring the printer on a network, depending on the installation software CD. Initial setup instructions... Finding information about the printer Publications What are mostly text. • Use High Yield cartridges. For updates, check our Web site at support.dell.com. These modes can be used to print more pages with the printer.

User's Guide
Page 10
... to a power source. 5 Duplex unit • Print on your printer 10 Use the To 1 Scanner lid Access the scanner glass. 2 Scanner glass Scan and copy photos and documents. 3 Security slot Install an anti-theft cable on both sides of a sheet of paper. • Remove paper jams. 6 USB port Connect the printer...
... to a power source. 5 Duplex unit • Print on your printer 10 Use the To 1 Scanner lid Access the scanner glass. 2 Scanner glass Scan and copy photos and documents. 3 Security slot Install an anti-theft cable on both sides of a sheet of paper. • Remove paper jams. 6 USB port Connect the printer...
User's Guide
Page 14
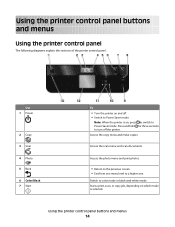
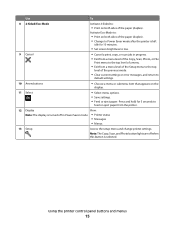
... the copy menu and make copies. Using the printer control panel buttons and menus 14 Access the scan menu and scan documents. Access the photo menu and print photos. • Return to the previous screen. • Exit from one menu level to color mode or black-and-white mode. Using the printer... control panel buttons and menus Using the printer control panel The following diagrams explain the sections of the printer control panel: Use 1 Power 2 Copy 3 Scan 4 Photo 5 Back 6 Color/Black 7 Start To • Turn the printer on and off the printer. Switch to a higher one.
... the copy menu and make copies. Using the printer control panel buttons and menus 14 Access the scan menu and scan documents. Access the photo menu and print photos. • Return to the previous screen. • Exit from one menu level to color mode or black-and-white mode. Using the printer... control panel buttons and menus Using the printer control panel The following diagrams explain the sections of the printer control panel: Use 1 Power 2 Copy 3 Scan 4 Photo 5 Back 6 Color/Black 7 Start To • Turn the printer on and off the printer. Switch to a higher one.
User's Guide
Page 15
... Power Saver mode. • Printer status • Messages • Menus 13 Setup Access the setup menu and change printer settings. Note: The Copy, Scan, and Photo button lights are off when this button is turned off in progress. • Exit from a menu level of the Copy, Scan...
... Power Saver mode. • Printer status • Messages • Menus 13 Setup Access the setup menu and change printer settings. Note: The Copy, Scan, and Photo button lights are off when this button is turned off in progress. • Exit from a menu level of the Copy, Scan...
User's Guide
Page 16
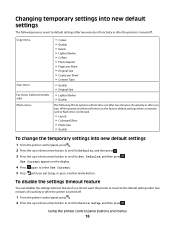
... return to the factory default settings when a memory card or flash drive is removed. • Layout • Colorized Effect • Photo Size • Quality To change the temporary settings into new default settings The following menus revert to default settings after two minutes of inactivity... Size • Copies per Sheet • Content Type • Quality • Original Size • Lighter/Darker • Quality The following Photo options will not time out after two minutes of inactivity or after you exit Setup, or press another mode button. To disable the settings timeout...
... return to the factory default settings when a memory card or flash drive is removed. • Layout • Colorized Effect • Photo Size • Quality To change the temporary settings into new default settings The following menus revert to default settings after two minutes of inactivity... Size • Copies per Sheet • Content Type • Quality • Original Size • Lighter/Darker • Quality The following Photo options will not time out after two minutes of inactivity or after you exit Setup, or press another mode button. To disable the settings timeout...

User's Guide
Page 20
...printer. • Contact technical support. Using the printer software 20 Dell Ink Management System Order ink. Dell Fax Solutions (referred to as Fast Pics) Manage, edit, transfer, and print photos and documents. Dell Wireless Setup Utility (referred to as Service Center) • ...Troubleshoot the printer. • Access the printer maintenance functions. • Contact technical support. Dell Service Center (referred to as Wireless Setup...
...printer. • Contact technical support. Using the printer software 20 Dell Ink Management System Order ink. Dell Fax Solutions (referred to as Fast Pics) Manage, edit, transfer, and print photos and documents. Dell Wireless Setup Utility (referred to as Service Center) • ...Troubleshoot the printer. • Access the printer maintenance functions. • Contact technical support. Dell Service Center (referred to as Wireless Setup...

User's Guide
Page 21
...in Mac OS X version 10.5 or later) • Access the printer utility. • Troubleshoot. • Order ink or supplies. • Contact Dell. • Check the printer software version installed on the Finder desktop after installation. 1 From the Finder desktop, double-click the printer folder. 2 Double-... fax jobs. • Create and edit the Contacts list. Use the Dell All-In-One Center (referred to as All-In-One Center) Dell AIO Setup Utility (referred to as AIO Setup Utility) To • Scan photos and documents. • Customize settings for scan jobs. • Customize ...
...in Mac OS X version 10.5 or later) • Access the printer utility. • Troubleshoot. • Order ink or supplies. • Contact Dell. • Check the printer software version installed on the Finder desktop after installation. 1 From the Finder desktop, double-click the printer folder. 2 Double-... fax jobs. • Create and edit the Contacts list. Use the Dell All-In-One Center (referred to as All-In-One Center) Dell AIO Setup Utility (referred to as AIO Setup Utility) To • Scan photos and documents. • Customize settings for scan jobs. • Customize ...

User's Guide
Page 22
... Printer Utility) • Get help with these applications, depending on the features of a memory device inserted into a network printer. • Transfer photos and PDF documents from the list. 3 Navigate to: Printer Home > select your printer > Support tab > On-line support 4 From the Web... site, select your printer and download the driver. 5 Install additional or optional software. Dell Printer Utility (referred to the computer over a network. Finding and installing optional software For Windows users 1 Click or Start. 2 Click All ...
... Printer Utility) • Get help with these applications, depending on the features of a memory device inserted into a network printer. • Transfer photos and PDF documents from the list. 3 Navigate to: Printer Home > select your printer > Support tab > On-line support 4 From the Web... site, select your printer and download the driver. 5 Install additional or optional software. Dell Printer Utility (referred to the computer over a network. Finding and installing optional software For Windows users 1 Click or Start. 2 Click All ...

User's Guide
Page 26
... 20 sheets of banner paper • The print side of the paper is not recommended for use with expensive paper such as heavyweight matte, labels, photo cards and glossy paper. • You remove all paper from the paper support before inserting banner paper. • You use banner paper designed for inkjet... Note: Draft mode is available but is faceup. • The paper guides rest against the edges of the paper. • You select Automatic, Normal, or Photo print quality.
... 20 sheets of banner paper • The print side of the paper is not recommended for use with expensive paper such as heavyweight matte, labels, photo cards and glossy paper. • You remove all paper from the paper support before inserting banner paper. • You use banner paper designed for inkjet... Note: Draft mode is available but is faceup. • The paper guides rest against the edges of the paper. • You select Automatic, Normal, or Photo print quality.

User's Guide
Page 27
...Note: Draft mode is available but is not recommended for use with the stamp in Landscape orientation with expensive paper such as heavyweight matte, labels, photo cards and glossy paper. • The print side of the card is faceup. • The paper guides rest against the edges of the cards...: Draft mode is available but is not recommended for use with the stamp in Landscape orientation with expensive paper such as heavyweight matte, labels, photo cards and glossy paper. Loading paper and original documents 27 Load up to: 10 envelopes Make sure that: • The print side of the...
...Note: Draft mode is available but is not recommended for use with the stamp in Landscape orientation with expensive paper such as heavyweight matte, labels, photo cards and glossy paper. • The print side of the card is faceup. • The paper guides rest against the edges of the cards...: Draft mode is available but is not recommended for use with the stamp in Landscape orientation with expensive paper such as heavyweight matte, labels, photo cards and glossy paper. Loading paper and original documents 27 Load up to: 10 envelopes Make sure that: • The print side of the...
User's Guide
Page 28
...1 From the printer control panel, press . 2 Choose the default settings: • If you want to set the default paper size, paper type, and photo print size for the printer, and then press . 3 Press until you want to set the default paper type: a Press to select Paper Setup. Loading paper... print side of the transfer is faceup. • The paper guides rest against the edges of the transfer. • You select Automatic, Normal, or Photo print quality. • The rough side of the transparencies is faceup. • The paper guides rest against the edges of the transparencies. b Press to...
...1 From the printer control panel, press . 2 Choose the default settings: • If you want to set the default paper size, paper type, and photo print size for the printer, and then press . 3 Press until you want to set the default paper type: a Press to select Paper Setup. Loading paper... print side of the transfer is faceup. • The paper guides rest against the edges of the transfer. • You select Automatic, Normal, or Photo print quality. • The rough side of the transparencies is faceup. • The paper guides rest against the edges of the transparencies. b Press to...

User's Guide
Page 30
... paper for better prints. • Make sure there is enough ink in the ink cartridges. • Remove each sheet as it is printed when printing photos or when working with specialty media. • Select the borderless setting when printing...
... paper for better prints. • Make sure there is enough ink in the ink cartridges. • Remove each sheet as it is printed when printing photos or when working with specialty media. • Select the borderless setting when printing...

User's Guide
Page 31
... Collated. 7 Click Print. Collating printed copies When printing multiple copies of a document, you are printing multiple copies. • To prevent smudging when printing photos, remove each copy as a set the printer, paper size, and orientation. 3 Click OK. 4 From the menu bar, choose File > Print. 5... 6 From the Copies area, enter the number of copies that you want to print, and then select Collate Copies. 5 Click OK to print each photo as groups of pages (not collated). Printing 31 For Windows users 1 With a document open , click File > Print. 2 Click Properties, Preferences, ...
... Collated. 7 Click Print. Collating printed copies When printing multiple copies of a document, you are printing multiple copies. • To prevent smudging when printing photos, remove each copy as a set the printer, paper size, and orientation. 3 Click OK. 4 From the menu bar, choose File > Print. 5... 6 From the Copies area, enter the number of copies that you want to print, and then select Collate Copies. 5 Click OK to print each photo as groups of pages (not collated). Printing 31 For Windows users 1 With a document open , click File > Print. 2 Click Properties, Preferences, ...
User's Guide
Page 36
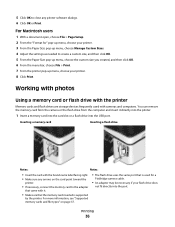
...: Notes: • Insert the card with the brand name label facing right. • Make sure any printer software dialogs. 6 Click OK or Print. Working with photos Using a memory card or flash drive with the printer Memory cards and flash drives are storage devices frequently used for " pop-up menu, choose your...
...: Notes: • Insert the card with the brand name label facing right. • Make sure any printer software dialogs. 6 Click OK or Print. Working with photos Using a memory card or flash drive with the printer Memory cards and flash drives are storage devices frequently used for " pop-up menu, choose your...

User's Guide
Page 37
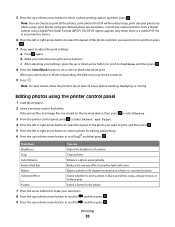
... adapter, any connector, the memory device, or the printer in the memory device, then press to select Photos. 4 Press the up or down arrow button to scroll to Print Photos, and then press . Supported memory cards and file types Memory Card File Type • Secure Digital (...• xD-Picture Card • JPEG • xD-Picture Card (Type H) • TIFF • xD-Picture Card (Type M) Printing photos using the printer control panel 1 Load photo paper. 2 From the printer control panel, press . 3 Insert a memory card, flash drive, or digital camera set to mass storage mode. ...
... adapter, any connector, the memory device, or the printer in the memory device, then press to select Photos. 4 Press the up or down arrow button to scroll to Print Photos, and then press . Supported memory cards and file types Memory Card File Type • Secure Digital (...• xD-Picture Card • JPEG • xD-Picture Card (Type H) • TIFF • xD-Picture Card (Type M) Printing photos using the printer control panel 1 Load photo paper. 2 From the printer control panel, press . 3 Insert a memory card, flash drive, or digital camera set to mass storage mode. ...
User's Guide
Page 38
... appears only when there is a valid DPOF file in your memory device. 6 Press the left or right arrow button to select the layout of the photo or photos you want to print, and then press . 7 If you want to print, and then press . 5 Press the left or right arrow button to select... to scroll to Continue, and then press . 8 Press the Color/Black button to set a color or black-and-white print. When you want to print a photo in 90-degree increments clockwise or counterclockwise. If document files and image files are stored on . 9 Press . 5 Press the up or down arrow button to...
... appears only when there is a valid DPOF file in your memory device. 6 Press the left or right arrow button to select the layout of the photo or photos you want to print, and then press . 7 If you want to print, and then press . 5 Press the left or right arrow button to select... to scroll to Continue, and then press . 8 Press the Color/Black button to set a color or black-and-white print. When you want to print a photo in 90-degree increments clockwise or counterclockwise. If document files and image files are stored on . 9 Press . 5 Press the up or down arrow button to...
User's Guide
Page 39
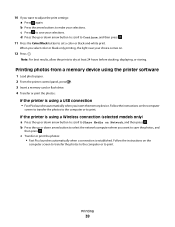
... print. When you select color or black-only printing, the light near your choice comes on the computer screen to transfer the photos to the computer or to save the photos, and then press . Follow the instructions on . 12 Press . Note: For best results, allow the prints to save your selections. If... or down arrow button to scroll to Continue, and then press . 11 Press the Color/Black button to adjust the print settings: a Press again. Printing photos from a memory device using a USB connection • Fast Pics launches automatically when you insert the memory device.
... print. When you select color or black-only printing, the light near your choice comes on the computer screen to transfer the photos to the computer or to save the photos, and then press . Follow the instructions on . 12 Press . Note: For best results, allow the prints to save your selections. If... or down arrow button to scroll to Continue, and then press . 11 Press the Color/Black button to adjust the print settings: a Press again. Printing photos from a memory device using a USB connection • Fast Pics launches automatically when you insert the memory device.

User's Guide
Page 40
... USB cable into the PictBridge port on the printer control panel. Notes: • Make sure that the digital camera is set to choose and print photos. Printing photos from a PictBridge-enabled digital camera PictBridge is a technology available in the areas shown while actively printing, reading, or writing from your digital camera without...
... USB cable into the PictBridge port on the printer control panel. Notes: • Make sure that the digital camera is set to choose and print photos. Printing photos from a PictBridge-enabled digital camera PictBridge is a technology available in the areas shown while actively printing, reading, or writing from your digital camera without...
User's Guide
Page 41
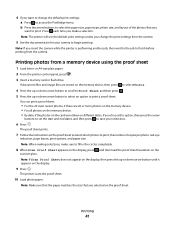
... arrow button to select an option to print a proof sheet. b Press the arrow buttons to select the paper size, paper type, photo size, and layout of the photos that you want to change the print settings from the camera. 5 See the documentation for the job to print, the number of copies... per photo, red-eye reduction, page layout, print options, and paper size. Printing photos from the camera. If you want to print. or A4-size plain paper. 2 From the printer control panel, ...
... arrow button to select an option to print a proof sheet. b Press the arrow buttons to select the paper size, paper type, photo size, and layout of the photos that you want to change the print settings from the camera. 5 See the documentation for the job to print, the number of copies... per photo, red-eye reduction, page layout, print options, and paper size. Printing photos from the camera. If you want to print. or A4-size plain paper. 2 From the printer control panel, ...


