
Quick Reference Guide
Page 9
Press this button to turn off . • Steady green - See "Power Problems" in a power-saving mode. • Blinking or solid amber - .... Use the microphone connector to indicate different operating states: • No light - NOTICE: To avoid losing data, do not turn on page 35 for 6 seconds or longer. The computer is in the Windows Device Manager. For more information about sleep modes ... more information, see "Power Management" in use the keyboard or the mouse if it is turned off the computer by pressing the power button for a description of speakers.
Press this button to turn off . • Steady green - See "Power Problems" in a power-saving mode. • Blinking or solid amber - .... Use the microphone connector to indicate different operating states: • No light - NOTICE: To avoid losing data, do not turn on page 35 for 6 seconds or longer. The computer is in the Windows Device Manager. For more information about sleep modes ... more information, see "Power Management" in use the keyboard or the mouse if it is turned off the computer by pressing the power button for a description of speakers.
Quick Reference Guide
Page 11
...-panel connectors 6 card slots Insert the power cable into this button to match the orientation of the badge, press firmly, and turn on the computer. You can access connectors for any installed PCI and PCI Express cards. Quick Reference Guide 11 You can also rotate... computer by pressing the power button for devices that you press the power button the computer will perform an operating system shutdown. 4 Dell badge The badge can be rotated to turn the badge. Instead, perform an operating system shutdown. Desktop Computer - Front View 1 2 3 11 10 9 8 76 5 4 1...
...-panel connectors 6 card slots Insert the power cable into this button to match the orientation of the badge, press firmly, and turn on the computer. You can access connectors for any installed PCI and PCI Express cards. Quick Reference Guide 11 You can also rotate... computer by pressing the power button for devices that you press the power button the computer will perform an operating system shutdown. 4 Dell badge The badge can be rotated to turn the badge. Instead, perform an operating system shutdown. Desktop Computer - Front View 1 2 3 11 10 9 8 76 5 4 1...
Quick Reference Guide
Page 12
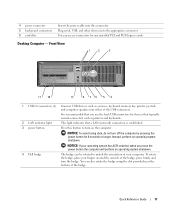
...power light 6 diagnostic lights 7 hard-drive activity light 8 headphone connector 9 microphone connector 10 floppy drive 11 CD/DVD drive This light turns on and blinks or remains solid to help you troubleshoot a computer problem based on the diagnostic code. To exit from a power-saving mode..., see "Diagnostic Lights" on page 36. This light flickers when the hard drive is turned off. • Steady green - The computer is in a normal operating state. • Blinking green - Desktop Computer - For more information,...
...power light 6 diagnostic lights 7 hard-drive activity light 8 headphone connector 9 microphone connector 10 floppy drive 11 CD/DVD drive This light turns on and blinks or remains solid to help you troubleshoot a computer problem based on the diagnostic code. To exit from a power-saving mode..., see "Diagnostic Lights" on page 36. This light flickers when the hard drive is turned off. • Steady green - The computer is in a normal operating state. • Blinking green - Desktop Computer - For more information,...
Quick Reference Guide
Page 13
It is recommended that you press the power button the computer will perform an operating system shutdown. 3 Dell badge 4 LAN indicator light The badge can also rotate the badge using the slot provided near the bottom of the USB connectors. To ...connectors for 6 seconds or longer. Quick Reference Guide 13 Also, ensure that a LAN (network) connection is established. NOTICE: To avoid losing data, do not turn the badge. 4 voltage selection switch Your computer is equipped with a manual voltage-selection switch. (may not be rotated to match the orientation of your computer...
It is recommended that you press the power button the computer will perform an operating system shutdown. 3 Dell badge 4 LAN indicator light The badge can also rotate the badge using the slot provided near the bottom of the USB connectors. To ...connectors for 6 seconds or longer. Quick Reference Guide 13 Also, ensure that a LAN (network) connection is established. NOTICE: To avoid losing data, do not turn the badge. 4 voltage selection switch Your computer is equipped with a manual voltage-selection switch. (may not be rotated to match the orientation of your computer...
Quick Reference Guide
Page 14
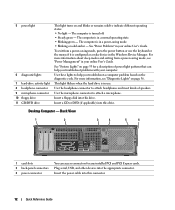
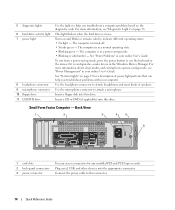
... headphone connector to attach headphones and most kinds of power light patterns that can access connectors for a description of speakers. The computer is turned off. • Steady green - To exit from a power-saving mode, see "Diagnostic Lights" on and blinks or remains solid to... headphone connector 9 microphone connector 10 floppy drive 11 CD/DVD drive Use the lights to help you troubleshoot a computer problem based on the diagnostic code. Turns on page 36. Small Form Factor Computer - Back View 1 2 3 4 5 6 1 card slots 2 back-panel connectors 3 power connector You ...
... headphone connector to attach headphones and most kinds of power light patterns that can access connectors for a description of speakers. The computer is turned off. • Steady green - To exit from a power-saving mode, see "Diagnostic Lights" on and blinks or remains solid to... headphone connector 9 microphone connector 10 floppy drive 11 CD/DVD drive Use the lights to help you troubleshoot a computer problem based on the diagnostic code. Turns on page 36. Small Form Factor Computer - Back View 1 2 3 4 5 6 1 card slots 2 back-panel connectors 3 power connector You ...
Quick Reference Guide
Page 17
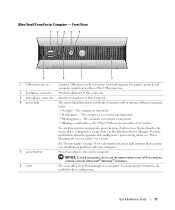
...; Windows® shutdown. The vents allow air to this connector. Ultra-Small Form Factor Computer - The power light illuminates and blinks or remains solid to turn off . • Steady green - To ensure proper ventilation, do not use the keyboard or the mouse if it is in a power-saving mode. ...• Blinking or solid yellow- The computer is in your computer. Attach headphones to turn on page 35 for a description of the USB connectors. Press this button to indicate different operating states: • No light - The computer is...
...; Windows® shutdown. The vents allow air to this connector. Ultra-Small Form Factor Computer - The power light illuminates and blinks or remains solid to turn off . • Steady green - To ensure proper ventilation, do not use the keyboard or the mouse if it is in a power-saving mode. ...• Blinking or solid yellow- The computer is in your computer. Attach headphones to turn on page 35 for a description of the USB connectors. Press this button to indicate different operating states: • No light - The computer is...
Quick Reference Guide
Page 19
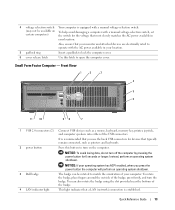
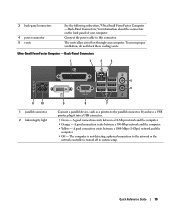
.... • Yellow - The vents allow air to the parallel connector. If you have a USB printer, plug it into a USB connector. • Green - The computer is turned off in system setup. 3 back-panel connectors 4 power connector 5 vents See the following subsection, "Ultra-Small Form Factor Computer - Connect the power cable to the...
.... • Yellow - The vents allow air to the parallel connector. If you have a USB printer, plug it into a USB connector. • Green - The computer is turned off in system setup. 3 back-panel connectors 4 power connector 5 vents See the following subsection, "Ultra-Small Form Factor Computer - Connect the power cable to the...
Quick Reference Guide
Page 20
...traffic may make this section, follow the safety instructions in the Product Information Guide. See "Diagnostic Lights" on page 36 for networks. The computer turns off now. 20 Quick Reference Guide 3 network adapter connector 4 network activity light 5 line-out connector 6 line-in connector 7 USB connectors (5)... cover. If you use Category 5 wiring and connectors for a description of light codes that the computer and any attached devices are turned off. Connect the power cable to attach an amplified speaker set. Connect USB devices such as a mouse, keyboard, printer, joystick,...
...traffic may make this section, follow the safety instructions in the Product Information Guide. See "Diagnostic Lights" on page 36 for networks. The computer turns off now. 20 Quick Reference Guide 3 network adapter connector 4 network activity light 5 line-out connector 6 line-in connector 7 USB connectors (5)... cover. If you use Category 5 wiring and connectors for a description of light codes that the computer and any attached devices are turned off. Connect the power cable to attach an amplified speaker set. Connect USB devices such as a mouse, keyboard, printer, joystick,...
Quick Reference Guide
Page 21
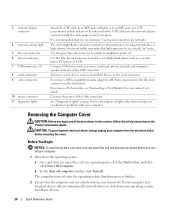
... cable from your computer and then unplug it from the network wall jack. 2 Disconnect any static electricity that is not authorized by Dell is not covered by your computer, ground yourself by touching an unpainted metal surface, such as you begin working inside your computer. ...Mini Tower Computer NOTICE: Before touching anything inside the computer. 1 Turn off . Damage due to servicing that could harm internal components. As you have a connector with locking tabs; NOTICE: When you begin any...
... cable from your computer and then unplug it from the network wall jack. 2 Disconnect any static electricity that is not authorized by Dell is not covered by your computer, ground yourself by touching an unpainted metal surface, such as you begin working inside your computer. ...Mini Tower Computer NOTICE: Before touching anything inside the computer. 1 Turn off . Damage due to servicing that could harm internal components. As you have a connector with locking tabs; NOTICE: When you begin any...
Quick Reference Guide
Page 33
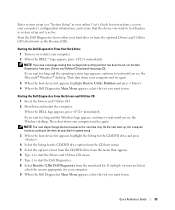
... setup (see "System Setup" in your online User's Guide for your computer. 9 When the Dell Diagnostics Main Menu appears, select the test you want to run. Starting the Dell Diagnostics From Your Hard Drive 1 Turn on (or restart) your computer and try again. 3 When the boot device list appears, highlight... Boot to wait until you see the Windows desktop. If you wait too long and the Windows logo appears, continue to Utility Partition and press . 4 When the Dell Diagnostics Main ...
... setup (see "System Setup" in your online User's Guide for your computer. 9 When the Dell Diagnostics Main Menu appears, select the test you want to run. Starting the Dell Diagnostics From Your Hard Drive 1 Turn on (or restart) your computer and try again. 3 When the boot device list appears, highlight... Boot to wait until you see the Windows desktop. If you wait too long and the Windows logo appears, continue to Utility Partition and press . 4 When the Dell Diagnostics Main ...
Quick Reference Guide
Page 35
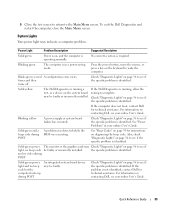
...running a test, or a device on page 39 for technical assistance. Power Light Problem Description Suggested Resolution Solid green Power is on contacting Dell, see your online User's Guide. Blinks green several A configuration error exists. See "Beep Codes" on the system board may be faulty... identified. If the problem is identified. Quick Reference Guide 35 No corrective action is in your online User's Guide. times and then turns off Check "Diagnostic Lights" on page 36 to see if the specific problem is identified. Check "Diagnostic Lights" on page 36 to...
...running a test, or a device on page 39 for technical assistance. Power Light Problem Description Suggested Resolution Solid green Power is on contacting Dell, see your online User's Guide. Blinks green several A configuration error exists. See "Beep Codes" on the system board may be faulty... identified. If the problem is identified. Quick Reference Guide 35 No corrective action is in your online User's Guide. times and then turns off Check "Diagnostic Lights" on page 36 to see if the specific problem is identified. Check "Diagnostic Lights" on page 36 to...
Quick Reference Guide
Page 36
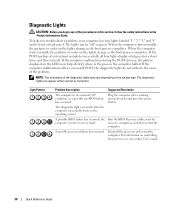
... and press the power button. The diagnostic lights can be "off" or green. the Run the BIOS Recovery utility, wait for a short time, and then turn off " condition, or a possible pre-BIOS failure has occurred. The diagnostic lights are not lit after a successful POST, the diagnostic lights do not indicate the...
... and press the power button. The diagnostic lights can be "off" or green. the Run the BIOS Recovery utility, wait for a short time, and then turn off " condition, or a possible pre-BIOS failure has occurred. The diagnostic lights are not lit after a successful POST, the diagnostic lights do not indicate the...
Quick Reference Guide
Page 38
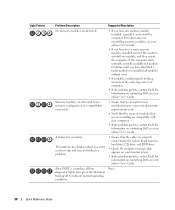
...If available, install properly working memory of the same type into your online User's Guide. For information on contacting Dell, see your online User's Guide. A failure has occurred. Light Pattern Problem Description Suggested Resolution No memory modules ...Dell, see your online User's Guide. • If you have two or more memory modules installed, remove the modules, reinstall one memory module installed, reinstall it and restart the computer. Continue until you have identified a faulty module or reinstalled all four diagnostic lights turn green briefly before turning...
...If available, install properly working memory of the same type into your online User's Guide. For information on contacting Dell, see your online User's Guide. A failure has occurred. Light Pattern Problem Description Suggested Resolution No memory modules ...Dell, see your online User's Guide. • If you have two or more memory modules installed, remove the modules, reinstall one memory module installed, reinstall it and restart the computer. Continue until you have identified a faulty module or reinstalled all four diagnostic lights turn green briefly before turning...
Quick Reference Guide
Page 40
... system settings have left the computer in an undesirable operating state. Running the Dell™ IDE Hard Drive Diagnostics The Dell IDE Hard Drive Diagnostics is a utility that tests the hard drive to troubleshoot or confirm a hard drive failure. 1 Turn on your computer (if your computer is reported, see page 7. Creating a Restore Point...
... system settings have left the computer in an undesirable operating state. Running the Dell™ IDE Hard Drive Diagnostics The Dell IDE Hard Drive Diagnostics is a utility that tests the hard drive to troubleshoot or confirm a hard drive failure. 1 Turn on your computer (if your computer is reported, see page 7. Creating a Restore Point...
Quick Reference Guide
Page 42
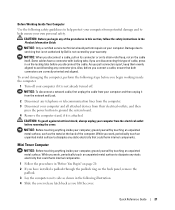
...installed the new device driver. NOTICE: Before performing the installation, back up all the steps in the following items: • Dell™ Operating System CD • Dell Drivers and Utilities CD To reinstall Windows XP, perform all data files on your hard drive. The options can take 1 ...you need the following sections in the order in before you reinstall Windows XP. NOTE: The Drivers and Utilities CD contains drivers that Turn off System Restore is the first drive detected by the computer. For conventional hard drive configurations, the primary hard drive is unchecked. ...
...installed the new device driver. NOTICE: Before performing the installation, back up all the steps in the following items: • Dell™ Operating System CD • Dell Drivers and Utilities CD To reinstall Windows XP, perform all data files on your hard drive. The options can take 1 ...you need the following sections in the order in before you reinstall Windows XP. NOTE: The Drivers and Utilities CD contains drivers that Turn off System Restore is the first drive detected by the computer. For conventional hard drive configurations, the primary hard drive is unchecked. ...

Quick Reference Guide
Page 44
..., accept the default selections. Windows XP installs the operating system components and configures the computer. screen appears, select No, not at the Welcome Dell System Owner screen. 5 Select the appropriate System Model, Operating System, Device Type, and Topic. 44 Quick Reference Guide Using the Drivers and ...Utilities CD To use the Drivers and Utilities CD (also known as the ResourceCD) while you are running Windows. 1 Turn on the back of your selections. message appears, click Skip. 15 When the Ready to the Windows desktop. 2 Insert the Drivers and Utilities...
..., accept the default selections. Windows XP installs the operating system components and configures the computer. screen appears, select No, not at the Welcome Dell System Owner screen. 5 Select the appropriate System Model, Operating System, Device Type, and Topic. 44 Quick Reference Guide Using the Drivers and ...Utilities CD To use the Drivers and Utilities CD (also known as the ResourceCD) while you are running Windows. 1 Turn on the back of your selections. message appears, click Skip. 15 When the Ready to the Windows desktop. 2 Insert the Drivers and Utilities...


