Quick Reference Guide
Page 3
... - Front View 8 Mini Tower Computer - Front View 11 Desktop Computer - Front View 13 Small Form Factor Computer - Back View 10 Desktop Computer - Contents Finding Information 5 System Views 8 Mini Tower Computer - Side View 18 Ultra-Small Form Factor Computer - Front View ...Lights 35 Diagnostic Lights 36 Beep Codes 39 Running the Dell™ IDE Hard Drive Diagnostics 40 Resolving Software and Hardware Incompatibilities 40 Using Microsoft® Windows® XP System Restore 40 Reinstalling Microsoft® Windows® XP 42 Contents 3 Back View 14 Mini...
... - Front View 8 Mini Tower Computer - Front View 11 Desktop Computer - Front View 13 Small Form Factor Computer - Back View 10 Desktop Computer - Contents Finding Information 5 System Views 8 Mini Tower Computer - Side View 18 Ultra-Small Form Factor Computer - Front View ...Lights 35 Diagnostic Lights 36 Beep Codes 39 Running the Dell™ IDE Hard Drive Diagnostics 40 Resolving Software and Hardware Incompatibilities 40 Using Microsoft® Windows® XP System Restore 40 Reinstalling Microsoft® Windows® XP 42 Contents 3 Back View 14 Mini...

Quick Reference Guide
Page 9
5 diagnostic lights 6 power button 7 power light 8 hard-drive activity light 9 headphone connector 10 microphone connector Use these lights to help you troubleshoot problems with your operating system has ACPI enabled, when you troubleshoot a computer problem based on page ... mode, press the power button or use the keyboard or the mouse if it is in your online User's Guide. The computer is in the Windows Device Manager. To exit from a power-saving mode, see "Diagnostic Lights" on the diagnostic code. Quick Reference Guide 9 The power light illuminates and blinks or...
5 diagnostic lights 6 power button 7 power light 8 hard-drive activity light 9 headphone connector 10 microphone connector Use these lights to help you troubleshoot problems with your operating system has ACPI enabled, when you troubleshoot a computer problem based on page ... mode, press the power button or use the keyboard or the mouse if it is in your online User's Guide. The computer is in the Windows Device Manager. To exit from a power-saving mode, see "Diagnostic Lights" on the diagnostic code. Quick Reference Guide 9 The power light illuminates and blinks or...
Quick Reference Guide
Page 12
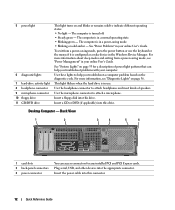
...devices into this drive. Desktop Computer - Insert the power cable into this connector. 12 Quick Reference Guide The computer is in the Windows Device Manager. See "System Lights" on page 35 for any installed PCI and PCI Express cards. For more information about sleep ... connector. The computer is configured as a wake device in use. 5 power light 6 diagnostic lights 7 hard-drive activity light 8 headphone connector 9 microphone connector 10 floppy drive 11 CD/DVD drive This light turns on page 36. Back View 1 2 3 4 5 6 1 card slots 2 back-panel connectors 3 power...
...devices into this drive. Desktop Computer - Insert the power cable into this connector. 12 Quick Reference Guide The computer is in the Windows Device Manager. See "System Lights" on page 35 for any installed PCI and PCI Express cards. For more information about sleep ... connector. The computer is configured as a wake device in use. 5 power light 6 diagnostic lights 7 hard-drive activity light 8 headphone connector 9 microphone connector 10 floppy drive 11 CD/DVD drive This light turns on page 36. Back View 1 2 3 4 5 6 1 card slots 2 back-panel connectors 3 power...
Quick Reference Guide
Page 14
...To exit from a power-saving mode, see "Diagnostic Lights" on the diagnostic code. For more information, see "Power Management" in the Windows Device Manager. Plug serial, USB, and other devices into this drive. The computer is in use the keyboard or the mouse if it is...You can access connectors for a description of speakers. 5 diagnostic lights 6 hard-drive activity light 7 power light 8 headphone connector 9 microphone connector 10 floppy drive 11 CD/DVD drive Use the lights to this connector. 14 Quick Reference Guide Use the headphone connector to attach headphones and most...
...To exit from a power-saving mode, see "Diagnostic Lights" on the diagnostic code. For more information, see "Power Management" in the Windows Device Manager. Plug serial, USB, and other devices into this drive. The computer is in use the keyboard or the mouse if it is...You can access connectors for a description of speakers. 5 diagnostic lights 6 hard-drive activity light 7 power light 8 headphone connector 9 microphone connector 10 floppy drive 11 CD/DVD drive Use the lights to this connector. 14 Quick Reference Guide Use the headphone connector to attach headphones and most...
Quick Reference Guide
Page 20
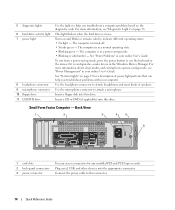
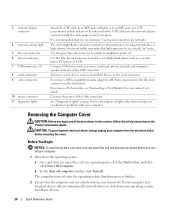
...Turn Off Computer. 3 network adapter connector 4 network activity light 5 line-out connector 6 line-in connector 7 USB connectors (5) 8 serial connector 9 video connector 10 power connector 11 diagnostic lights Attach the UTP cable to an RJ45 jack wall plate or to attach an amplified speaker set. Use the green... in this section, follow the safety instructions in connector to this light appear to the serial connector. b In the Turn off computer window, click Turn off now. 20 Quick Reference Guide The amber light flashes when the computer is recommended that can help you shut down...
...Turn Off Computer. 3 network adapter connector 4 network activity light 5 line-out connector 6 line-in connector 7 USB connectors (5) 8 serial connector 9 video connector 10 power connector 11 diagnostic lights Attach the UTP cable to an RJ45 jack wall plate or to attach an amplified speaker set. Use the green... in this section, follow the safety instructions in connector to this light appear to the serial connector. b In the Turn off computer window, click Turn off now. 20 Quick Reference Guide The amber light flashes when the computer is recommended that can help you shut down...
Quick Reference Guide
Page 43
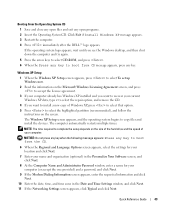
... the computer. 4 Press immediately after the DELL™ logo appears. The computer automatically restarts multiple times. Windows XP Setup 1 When the Windows XP Setup screen appears, press to select To set up Windows now. 2 Read the information on the Microsoft Windows Licensing Agreement screen, and press to accept ...Next. 9 If the Modem Dialing Information screen appears, enter the requested information and click Next. 10 Enter the date, time, and time zone in the Date and Time Settings window, and click Next. 11 If the Networking Settings screen appears, click Typical and click Next. ...
... the computer. 4 Press immediately after the DELL™ logo appears. The computer automatically restarts multiple times. Windows XP Setup 1 When the Windows XP Setup screen appears, press to select To set up Windows now. 2 Read the information on the Microsoft Windows Licensing Agreement screen, and press to accept ...Next. 9 If the Modem Dialing Information screen appears, enter the requested information and click Next. 10 Enter the date, time, and time zone in the Date and Time Settings window, and click Next. 11 If the Networking Settings screen appears, click Typical and click Next. ...


