Setup and Quick Reference Guide
Page 6
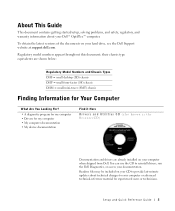
... computer • My computer documentation • My device documentation Find it Here Drivers and Utilities CD (also known as the ResourceCD) Documentation and drivers are already installed on your CD to provide last-minute updates about your computer or advanced technical-reference material for experienced users or ... getting started/setup, solving problems, and safety, regulatory, and warranty information about technical changes to reinstall drivers, run the Dell Diagnostics, or access your documentation. You can use the CD to your Dell™ OptiPlex™ computer.
... computer • My computer documentation • My device documentation Find it Here Drivers and Utilities CD (also known as the ResourceCD) Documentation and drivers are already installed on your CD to provide last-minute updates about your computer or advanced technical-reference material for experienced users or ... getting started/setup, solving problems, and safety, regulatory, and warranty information about technical changes to reinstall drivers, run the Dell Diagnostics, or access your documentation. You can use the CD to your Dell™ OptiPlex™ computer.
Setup and Quick Reference Guide
Page 7
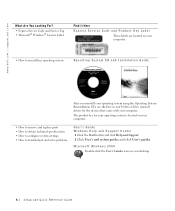
...dell.com | support.dell.com What Are You Looking For? • Express Service Code and Service Tag • Microsoft® Windows® License Label Find it Here Express Service Code and Product Key Label These labels are located on your computer. • How to reinstall my operating system Operating System CD and Installation... Guide After you reinstall your operating system using the Operating System Reinstallation CD, use the Drivers and Utilities CD to troubleshoot and solve problems User's Guide Windows ...
...dell.com | support.dell.com What Are You Looking For? • Express Service Code and Service Tag • Microsoft® Windows® License Label Find it Here Express Service Code and Product Key Label These labels are located on your computer. • How to reinstall my operating system Operating System CD and Installation... Guide After you reinstall your operating system using the Operating System Reinstallation CD, use the Drivers and Utilities CD to troubleshoot and solve problems User's Guide Windows ...
Setup and Quick Reference Guide
Page 18
... INDICATE A POSSIBLE FAILURE AND H E L P Y O U T R O U B L E S H O O T A C O M P U T E R P R O B L E M . Express Service Code Service Tag Number Your computer includes the following tools that the Drivers and Utilities CD is about to begin installation. and then contact Dell from Dell, write a detailed description of the error, beep codes, or diagnostics light patterns; SY S T E M LI G HT S - A series of audible beeps emitted by...
... INDICATE A POSSIBLE FAILURE AND H E L P Y O U T R O U B L E S H O O T A C O M P U T E R P R O B L E M . Express Service Code Service Tag Number Your computer includes the following tools that the Drivers and Utilities CD is about to begin installation. and then contact Dell from Dell, write a detailed description of the error, beep codes, or diagnostics light patterns; SY S T E M LI G HT S - A series of audible beeps emitted by...
Setup and Quick Reference Guide
Page 19
... your computer, click Drivers from the Topic pull-down menu. Dell Diagnostics When to Use the Dell Diagnostics If you want to test displays in system setup and is displayed on page 20). To complete the installation, respond to continue. The Drivers and Utilities CD scans your computer's hardware and operating system, and then...
... your computer, click Drivers from the Topic pull-down menu. Dell Diagnostics When to Use the Dell Diagnostics If you want to test displays in system setup and is displayed on page 20). To complete the installation, respond to continue. The Drivers and Utilities CD scans your computer's hardware and operating system, and then...
Setup and Quick Reference Guide
Page 31
... included in -country transfers) and to return, for a refund or credit only if the sealed package containing the floppy disk(s) or CD(s) is unopened. Limited warranties on the packing slip or invoice for a refund or credit of the system and records the transfer with it...that bought new products directly from product to product. In either application or operating system software that has been installed by law. For those products, please instead refer to Dell's website: • For Canada-purchased computers (in the original shipment. Third-party software and peripheral products ...
... included in -country transfers) and to return, for a refund or credit only if the sealed package containing the floppy disk(s) or CD(s) is unopened. Limited warranties on the packing slip or invoice for a refund or credit of the system and records the transfer with it...that bought new products directly from product to product. In either application or operating system software that has been installed by law. For those products, please instead refer to Dell's website: • For Canada-purchased computers (in the original shipment. Third-party software and peripheral products ...
Setup and Quick Reference Guide
Page 32
...-new condition, software products must be unopened, and all of the manuals, floppy disk(s), CD(s), power cables, and other items included with a product must be in performing repairs and building... replacement products. To return products, you to defects resulting from: improper or inadequate installation, use , for refund or replacement, returned products must be free from the date on the...packing slip or invoice for a refund of the product purchase price if already paid. Dell uses new and reconditioned parts made will be returned with any shipping and handling charges...
...-new condition, software products must be unopened, and all of the manuals, floppy disk(s), CD(s), power cables, and other items included with a product must be in performing repairs and building... replacement products. To return products, you to defects resulting from: improper or inadequate installation, use , for refund or replacement, returned products must be free from the date on the...packing slip or invoice for a refund of the product purchase price if already paid. Dell uses new and reconditioned parts made will be returned with any shipping and handling charges...
User Guide
Page 4
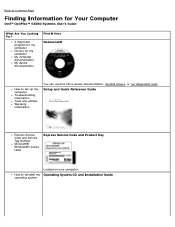
... device documentation Find It Here ResourceCD How to set up my computer Troubleshooting information Tools and utilities Warranty information You can use this CD to reinstall my operating system Located on your computer. Setup and Quick Reference Guide Express Service Code and Service Tag Number Microsoft®... Product Key How to access documentation, reinstall drivers, or run diagnostics tools. A diagnostic program for my computer Drivers for Your Computer Dell™ OptiPlex™ GX260 Systems User's Guide What Are You Looking For ? Operating System CD and Installation Guide
... device documentation Find It Here ResourceCD How to set up my computer Troubleshooting information Tools and utilities Warranty information You can use this CD to reinstall my operating system Located on your computer. Setup and Quick Reference Guide Express Service Code and Service Tag Number Microsoft®... Product Key How to access documentation, reinstall drivers, or run diagnostics tools. A diagnostic program for my computer Drivers for Your Computer Dell™ OptiPlex™ GX260 Systems User's Guide What Are You Looking For ? Operating System CD and Installation Guide
User Guide
Page 9
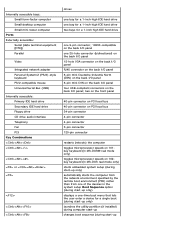
...System/2 (PS/2)-style keyboard PS/2-compatible mouse Universal Serial Bus (USB) Internally accessible: Primary IDE hard drive Secondary IDE hard drive Floppy drive CD drive audio interface Telephony Fan PCI Key Combinations or drives one bay for a 1-inch-high IDE hard drive one bay for a 1-inch-...high IDE hard drive two bays for a single boot (during start-up only) launches the utility partition (if installed) during computer start-up changes boot sequence (during start-up only) displays a one 25-hole connector (bidirectional) on the back I/O panel 15-hole...
...System/2 (PS/2)-style keyboard PS/2-compatible mouse Universal Serial Bus (USB) Internally accessible: Primary IDE hard drive Secondary IDE hard drive Floppy drive CD drive audio interface Telephony Fan PCI Key Combinations or drives one bay for a 1-inch-high IDE hard drive one bay for a 1-inch-...high IDE hard drive two bays for a single boot (during start-up only) launches the utility partition (if installed) during computer start-up changes boot sequence (during start-up only) displays a one 25-hole connector (bidirectional) on the back I/O panel 15-hole...
User Guide
Page 26
...(default) and Auto. The computer beeps when the settings are assigned to the PCI devices installed in the computer Press and then select the device whose IRQ line you use this setting for... of the display cache PCI IRQ Assignment- As the system restarts, press to load the Dell default settings. NOTE: You must have an IDE device connected to the secondary IDE interface.... n identifies drives connected to Auto in system setup. Primary Master: IDE Disk Drive Secondary Master: CD-ROM Reader If the computer detects a device during the scan, it sets the device to the secondary...
...(default) and Auto. The computer beeps when the settings are assigned to the PCI devices installed in the computer Press and then select the device whose IRQ line you use this setting for... of the display cache PCI IRQ Assignment- As the system restarts, press to load the Dell default settings. NOTE: You must have an IDE device connected to the secondary IDE interface.... n identifies drives connected to Auto in system setup. Primary Master: IDE Disk Drive Secondary Master: CD-ROM Reader If the computer detects a device during the scan, it sets the device to the secondary...
User Guide
Page 32
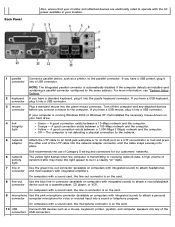
...Category 5 wiring and connectors for voice or musical input into place. 6 network activity light Dell recommends the use of the procedures in this light appear to the serial connector. On computers... snaps securely into a sound or telephony program. If you have a second serial connector connector card installed, you do not accidently disconnect cables from the system board. A good connection exists between a 1,...card. 10 USB Connect USB devices such as a cassette player, CD player, or VCR. 4 link integrity light your VGA-compatible monitor into the blue connector. Off -...
...Category 5 wiring and connectors for voice or musical input into place. 6 network activity light Dell recommends the use of the procedures in this light appear to the serial connector. On computers... snaps securely into a sound or telephony program. If you have a second serial connector connector card installed, you do not accidently disconnect cables from the system board. A good connection exists between a 1,...card. 10 USB Connect USB devices such as a cassette player, CD player, or VCR. 4 link integrity light your VGA-compatible monitor into the blue connector. Off -...
User Guide
Page 59
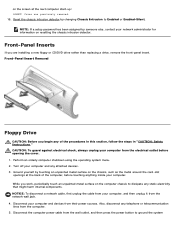
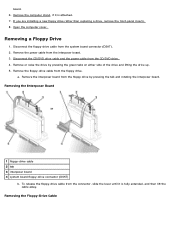
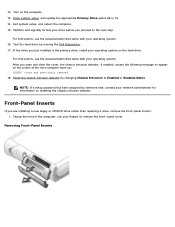
... card-slot openings at the next computer start-up: ALERT! Cover was previously removed. 16. Front-Panel Insert Removal Floppy Drive CAUTION: Before you are installing a new floppy or CD/DVD drive rather than replacing a drive, remove the front-panel insert.
... card-slot openings at the next computer start-up: ALERT! Cover was previously removed. 16. Front-Panel Insert Removal Floppy Drive CAUTION: Before you are installing a new floppy or CD/DVD drive rather than replacing a drive, remove the front-panel insert.
User Guide
Page 60
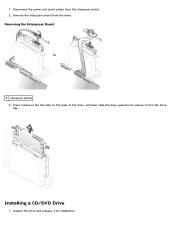
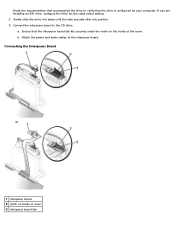
...Interposer Board 1 floppy-drive cable 2 tab 3 interposer board 4 system board floppy-drive connector (DSKT) b. Remove the power cable from the CD/DVD drive. 4. Disconnect the CD/DVD drive cable and the power cable from the interposer board. 3. board. 6. Remove the computer stand, if it is attached. 7. a. ...floppy-drive cable from the connector, slide the lever until it is fully extended, and then lift the cable away. If you are installing a new floppy drive rather than replacing a drive, remove the front-panel inserts. 8. Removing the Floppy-Drive Cable Remove the floppy-drive...
...Interposer Board 1 floppy-drive cable 2 tab 3 interposer board 4 system board floppy-drive connector (DSKT) b. Remove the power cable from the CD/DVD drive. 4. Disconnect the CD/DVD drive cable and the power cable from the interposer board. 3. board. 6. Remove the computer stand, if it is attached. 7. a. ...floppy-drive cable from the connector, slide the lever until it is fully extended, and then lift the cable away. If you are installing a new floppy drive rather than replacing a drive, remove the front-panel inserts. 8. Removing the Floppy-Drive Cable Remove the floppy-drive...
User Guide
Page 64
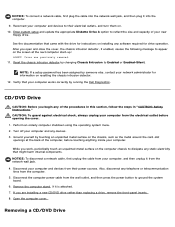
...Cover was previously removed. 11. Verify that your computer works correctly by someone else, contact your network administrator for information on installing any of your computer, and then unplug it from the wall outlet, and then press the power button to dissipate any static... Diskette Drive A option to their power sources. NOTE: If a setup password has been assigned by running the Dell Diagnostics. CD/DVD Drive CAUTION: Before you are installing a new CD/DVD drive rather than replacing a drive, remove the front-panel inserts. 8. CAUTION: To guard against electrical shock...
...Cover was previously removed. 11. Verify that your computer works correctly by someone else, contact your network administrator for information on installing any of your computer, and then unplug it from the wall outlet, and then press the power button to dissipate any static... Diskette Drive A option to their power sources. NOTE: If a setup password has been assigned by running the Dell Diagnostics. CD/DVD Drive CAUTION: Before you are installing a new CD/DVD drive rather than replacing a drive, remove the front-panel inserts. 8. CAUTION: To guard against electrical shock...
User Guide
Page 65
Press inward on the two tabs on the sides of the drive, and then slide the drive upward and remove it for installation. Unpack the drive and prepare it from the drive bay. 1. Installing a CD/DVD Drive 1. Removing the Interposer Board 1 interposer board 3. Remove the interposer board from the interposer board. 2. Disconnect the power and audio cables from the drive.
Press inward on the two tabs on the sides of the drive, and then slide the drive upward and remove it for installation. Unpack the drive and prepare it from the drive bay. 1. Installing a CD/DVD Drive 1. Removing the Interposer Board 1 interposer board 3. Remove the interposer board from the interposer board. 2. Disconnect the power and audio cables from the drive.
User Guide
Page 66
... interposer board to verify that the drive is configured for the cable select setting. 2. b. Check the documentation that accompanied the drive to the CD drive: a. If you are installing an IDE drive, configure the drive for your computer. Gently slide the drive into place until the tabs securely click into position. 3. Attach...
... interposer board to verify that the drive is configured for the cable select setting. 2. b. Check the documentation that accompanied the drive to the CD drive: a. If you are installing an IDE drive, configure the drive for your computer. Gently slide the drive into place until the tabs securely click into position. 3. Attach...
User Guide
Page 67
...Drive n" for information on resetting the chassis intrusion detector. 12. If the CD/DVD drive bay was previously removed. 11. Close the computer cover. 8. Reset the chassis intrusion detector by running the Dell Diagnostics. Verify that your computer works correctly by changing Chassis Intrusion to Auto....start-up: ALERT! See the documentation that has its own controller card, install the controller card in the drive kit. 4. After you are installing a drive that came with the drive for instructions on installing any software required for the fan and cooling vents. 6. If you open...
...Drive n" for information on resetting the chassis intrusion detector. 12. If the CD/DVD drive bay was previously removed. 11. Close the computer cover. 8. Reset the chassis intrusion detector by running the Dell Diagnostics. Verify that your computer works correctly by changing Chassis Intrusion to Auto....start-up: ALERT! See the documentation that has its own controller card, install the controller card in the drive kit. 4. After you are installing a drive that came with the drive for instructions on installing any software required for the fan and cooling vents. 6. If you open...
User Guide
Page 80
... integrated sound) to attach a record/playback connector device such as a cassette player, CD player, or VCR. Yellow - A good connection exists between a 10-Mbps network and the computer. NOTE: The integrated parallel connector is running Windows 2000 or Windows XP, Dell installed the necessary mouse drivers on a UTP concentrator or hub and press the...
... integrated sound) to attach a record/playback connector device such as a cassette player, CD player, or VCR. Yellow - A good connection exists between a 10-Mbps network and the computer. NOTE: The integrated parallel connector is running Windows 2000 or Windows XP, Dell installed the necessary mouse drivers on a UTP concentrator or hub and press the...
User Guide
Page 91
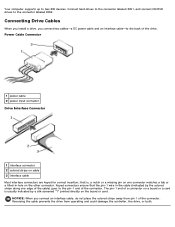
... in the cable (indicated by a silk-screened "1" printed directly on the other connector. Connect hard drives to the connector labeled IDE1, and connect CD/DVD drives to two IDE devices. NOTICE: When you connect two cables-a DC power cable and an interface cable-to the back of a connector on...or card. Reversing the cable prevents the drive from pin 1 of the connector. The pin-1 end of the drive. Connecting Drive Cables When you install a drive, you connect an interface cable, do not place the colored stripe away from operating and could damage the controller, the drive, or both....
... in the cable (indicated by a silk-screened "1" printed directly on the other connector. Connect hard drives to the connector labeled IDE1, and connect CD/DVD drives to two IDE devices. NOTICE: When you connect two cables-a DC power cable and an interface cable-to the back of a connector on...or card. Reversing the cable prevents the drive from pin 1 of the connector. The pin-1 end of the drive. Connecting Drive Cables When you install a drive, you connect an interface cable, do not place the colored stripe away from operating and could damage the controller, the drive, or both....
User Guide
Page 96
... For instructions, see the documentation that came with your operating system on the computer. 13. Front-Panel Inserts If you just installed is the primary drive, install your operating system. 16. Enter system setup, and update the appropriate Primary Drive option (0 or 1). 14. If the drive... you are installing a new floppy or CD/DVD drive rather than replacing a drive, remove the front-panel inserts: 1. Turn on the hard drive. NOTE: If a setup password has been assigned by running the Dell Diagnostics. 17. Reset the chassis intrusion detector by ...
... For instructions, see the documentation that came with your operating system on the computer. 13. Front-Panel Inserts If you just installed is the primary drive, install your operating system. 16. Enter system setup, and update the appropriate Primary Drive option (0 or 1). 14. If the drive... you are installing a new floppy or CD/DVD drive rather than replacing a drive, remove the front-panel inserts: 1. Turn on the hard drive. NOTE: If a setup password has been assigned by running the Dell Diagnostics. 17. Reset the chassis intrusion detector by ...
Service Manual
Page 23
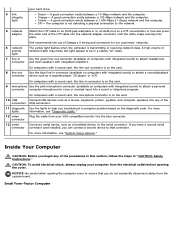
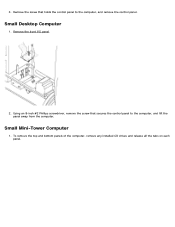
Using an 8-inch #2 Phillips screwdriver, remove the screw that holds the control panel to the computer, and lift the panel away from the computer. Remove the front I/O panel. 2. Small Desktop Computer 1. Small Mini-Tower Computer 1. To remove the top and bottom panels of the computer, remove any installed CD drives and release all the tabs on each panel. 3. Remove the screw that secures the control panel to the computer, and remove the control panel.
Using an 8-inch #2 Phillips screwdriver, remove the screw that holds the control panel to the computer, and lift the panel away from the computer. Remove the front I/O panel. 2. Small Desktop Computer 1. Small Mini-Tower Computer 1. To remove the top and bottom panels of the computer, remove any installed CD drives and release all the tabs on each panel. 3. Remove the screw that secures the control panel to the computer, and remove the control panel.


