User's Guide
Page 89
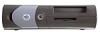
... external audio devices to the microphone, speaker/headphone, or line-in connectors on the I/O panel (see the manufacturer's documentation. NOTE: If enabled, the Chassis Intrusion option causes the following message to the TAPI sound-card connector. NOTICE: Before disconnecting a device from the computer, wait 10 to 20 seconds. 2 Open the computer... to their electrical outlets, and wait 10 to 20 seconds after disconnecting the computer from the system board, verify that has a standard TAPI connector. Installing Upgrades 87
... external audio devices to the microphone, speaker/headphone, or line-in connectors on the I/O panel (see the manufacturer's documentation. NOTE: If enabled, the Chassis Intrusion option causes the following message to the TAPI sound-card connector. NOTICE: Before disconnecting a device from the computer, wait 10 to 20 seconds. 2 Open the computer... to their electrical outlets, and wait 10 to 20 seconds after disconnecting the computer from the system board, verify that has a standard TAPI connector. Installing Upgrades 87
User's Guide
Page 103
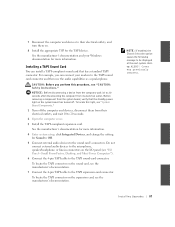
Small Form-Factor Computer Installing Upgrades 101 As the computer boots, it detects the presence of the computer, use your fingers to verify that the Microprocessor option correctly identifies the installed microprocessor. 10 Run the Dell Diagnostics to remove the front panel cover. Front Panel Inserts Removing Front Panel Inserts-Small Form-Factor and...
Small Form-Factor Computer Installing Upgrades 101 As the computer boots, it detects the presence of the computer, use your fingers to verify that the Microprocessor option correctly identifies the installed microprocessor. 10 Run the Dell Diagnostics to remove the front panel cover. Front Panel Inserts Removing Front Panel Inserts-Small Form-Factor and...

User's Guide
Page 108
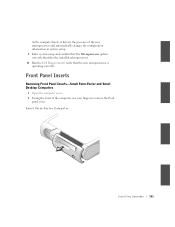
...dell.com | support.dell.com Internal Drives This computer may support the following internal drives: • Small form-factor: one floppy or optional Zip drive; and two optional CD, CD-RW, or DVD drives. one enhanced integrated drive electronics (IDE) hard drive; and one enhanced IDE hard drive; Small Form-Factor Computer 1 2 3 106 Installing Upgrades... 1 CD/DVD drive 2 floppy drive 3 hard drive and one optional CD, CD-RW, or DVD drive. • Small desktop: one optional CD, CD-RW, or DVD drive. • Small mini...
...dell.com | support.dell.com Internal Drives This computer may support the following internal drives: • Small form-factor: one floppy or optional Zip drive; and two optional CD, CD-RW, or DVD drives. one enhanced integrated drive electronics (IDE) hard drive; and one enhanced IDE hard drive; Small Form-Factor Computer 1 2 3 106 Installing Upgrades... 1 CD/DVD drive 2 floppy drive 3 hard drive and one optional CD, CD-RW, or DVD drive. • Small desktop: one optional CD, CD-RW, or DVD drive. • Small mini...
User's Guide
Page 125
...floppy into drive A. 6 Turn on the computer. 7 Enter system setup, and update the appropriate Primary Drive option (0 or 1). 8 Exit system setup, and reboot the computer. 9 Partition and logically format your drive before...you proceed to the rails. Small Mini-Tower Computer NOTICE: Ground yourself by running the Dell Diagnostics. 11 If the drive you unpack the drive, do not set the drive on...Attach the rails to the hard drive using the two screws attached to the next step. Installing Upgrades 123 Adding a Second Hard Drive - See the documentation for your operating system. Instead, set...
...floppy into drive A. 6 Turn on the computer. 7 Enter system setup, and update the appropriate Primary Drive option (0 or 1). 8 Exit system setup, and reboot the computer. 9 Partition and logically format your drive before...you proceed to the rails. Small Mini-Tower Computer NOTICE: Ground yourself by running the Dell Diagnostics. 11 If the drive you unpack the drive, do not set the drive on...Attach the rails to the hard drive using the two screws attached to the next step. Installing Upgrades 123 Adding a Second Hard Drive - See the documentation for your operating system. Instead, set...

User's Guide
Page 136
Floppy Drive Bracket Rails 1 2 3 134 Installing Upgrades Attach the bracket to the drive. www.dell.com | support.dell.com 1 connector notch 2 interposer board alignment hole 3 floppy-drive cable 4 ...outlets, and turn them on. 9 Enter system setup and update the appropriate Diskette Drive A option to reflect the size and capacity of your new floppy drive. 10 Verify that secure each rail to the... new drive by running the Dell Diagnostics. Small Desktop and Small Mini-Tower Computers 1 If the replacement drive does not have ...
Floppy Drive Bracket Rails 1 2 3 134 Installing Upgrades Attach the bracket to the drive. www.dell.com | support.dell.com 1 connector notch 2 interposer board alignment hole 3 floppy-drive cable 4 ...outlets, and turn them on. 9 Enter system setup and update the appropriate Diskette Drive A option to reflect the size and capacity of your new floppy drive. 10 Verify that secure each rail to the... new drive by running the Dell Diagnostics. Small Desktop and Small Mini-Tower Computers 1 If the replacement drive does not have ...

User's Guide
Page 138
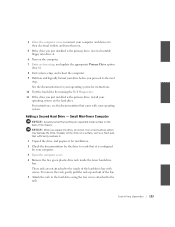
www.dell.com | support.dell.com Small Mini-Tower Computer 1 2 3 1 power cable 2 floppy drive cable 3 floppy drive connector 4 Check all cable connections, and fold cables out of the way to provide airflow for the fan and cooling vents. 5 Close the computer cover, reconnect your computer and devices to their electrical outlets, and turn them on. 6 Enter system setup and update the appropriate Diskette Drive A option to reflect the size and capacity of your new floppy drive. 7 Verify that your computer works correctly by running the Dell Diagnostics. 136 Installing Upgrades
www.dell.com | support.dell.com Small Mini-Tower Computer 1 2 3 1 power cable 2 floppy drive cable 3 floppy drive connector 4 Check all cable connections, and fold cables out of the way to provide airflow for the fan and cooling vents. 5 Close the computer cover, reconnect your computer and devices to their electrical outlets, and turn them on. 6 Enter system setup and update the appropriate Diskette Drive A option to reflect the size and capacity of your new floppy drive. 7 Verify that your computer works correctly by running the Dell Diagnostics. 136 Installing Upgrades
User's Guide
Page 149
The operating life of the battery can operate your configuration information by running the Dell Diagnostics. Installing Upgrades 147 Battery A 3.0-V CR2032 lithium coin-cell battery installed on , and enter system setup. Turn off or unplugged from the electrical ... on the system board maintains system configuration, date, and time information in system setup, replace your computer works correctly by setting the appropriate Drive option (0 or 1) under Drives: Secondary to Auto. 9 Update your computer without a battery, the configuration information is erased if the computer is ...
The operating life of the battery can operate your configuration information by running the Dell Diagnostics. Installing Upgrades 147 Battery A 3.0-V CR2032 lithium coin-cell battery installed on , and enter system setup. Turn off or unplugged from the electrical ... on the system board maintains system configuration, date, and time information in system setup, replace your computer works correctly by setting the appropriate Drive option (0 or 1) under Drives: Secondary to Auto. 9 Update your computer without a battery, the configuration information is erased if the computer is ...

User's Guide
Page 151
... minutes. b Use the copy of the configuration information that the battery is operating properly. Installing Upgrades 149 Computer Battery 1 2 1 battery 2 battery socket 5 Close the computer cover, reconnect your computer, and leave it unplugged for other system setup options. a Enter the correct time and date through system setup's System Time and System Date...
... minutes. b Use the copy of the configuration information that the battery is operating properly. Installing Upgrades 149 Computer Battery 1 2 1 battery 2 battery socket 5 Close the computer cover, reconnect your computer, and leave it unplugged for other system setup options. a Enter the correct time and date through system setup's System Time and System Date...

Service Manual
Page 128
..., rotate the airflow shroud back over its connector on . See the User's Guide for information on the retention base. www.dell.com | support.dell.com NOTICE: If you open and close the cover, the chassis intrusion detector causes the following message to the microprocessor so that... the heat sink fits in system setup, reset the Chassis Intrusion option by pressing the left- NOTE: After you are not installing a microprocessor upgrade kit from Dell, reuse the original blower/heat sink assembly and securing clips when replacing the microprocessor. 5 Remove...
..., rotate the airflow shroud back over its connector on . See the User's Guide for information on the retention base. www.dell.com | support.dell.com NOTICE: If you open and close the cover, the chassis intrusion detector causes the following message to the microprocessor so that... the heat sink fits in system setup, reset the Chassis Intrusion option by pressing the left- NOTE: After you are not installing a microprocessor upgrade kit from Dell, reuse the original blower/heat sink assembly and securing clips when replacing the microprocessor. 5 Remove...


