System Information Guide
Page 18
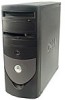
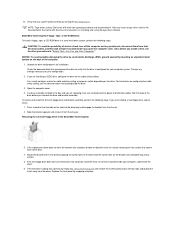
... Drive Interface: is incorrectly installed. NOTICE: Do not attempt to service the computer yourself, except as the metal around the card-slot openings at the back of a new battery exploding if it is set to Auto under Integrated Devices. While you work, periodically touch an ...following steps in the sequence indicated. com 3 If you are using an integrated drive electronics (IDE) hard drive to boot your online Dell documentation or otherwise provided to the manufacturer's instructions. 1 Turn off your computer and any telephone or telecommunication lines from potential damage and ...
... Drive Interface: is incorrectly installed. NOTICE: Do not attempt to service the computer yourself, except as the metal around the card-slot openings at the back of a new battery exploding if it is set to Auto under Integrated Devices. While you work, periodically touch an ...following steps in the sequence indicated. com 3 If you are using an integrated drive electronics (IDE) hard drive to boot your online Dell documentation or otherwise provided to the manufacturer's instructions. 1 Turn off your computer and any telephone or telecommunication lines from potential damage and ...

System Information Guide
Page 21
... injury. NOTE: Additional regulatory information regarding your system can cause fire or electric shock by Dell could void the user's authority to comply with applicable regulations regarding EMI. Your Dell computer system is any objects into the openings of time may result in your computer away from radiators and heat sources. Also, do...
... injury. NOTE: Additional regulatory information regarding your system can cause fire or electric shock by Dell could void the user's authority to comply with applicable regulations regarding EMI. Your Dell computer system is any objects into the openings of time may result in your computer away from radiators and heat sources. Also, do...
User Guide
Page 3
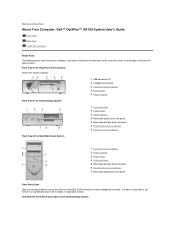
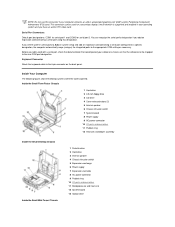
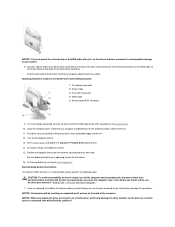
...removable; if you remove it or accidentally knock it off its hinges, it snaps back in place. View With the Front-Panel Door Open on the front panel of the small form-factor, small desktop, and small minitower systems. Front View of the Small Form-Factor ...Removable diskette drive front panel 6 Diskette drive access indicator 7 Removable optical drive front panel Front-Panel Door Open the front-panel door to Contents Page About Your Computer: Dell™ OptiPlex™ GX150 System User's Guide Front View Back View Inside Your Computer Front View The following figures show the controls,...
...removable; if you remove it or accidentally knock it off its hinges, it snaps back in place. View With the Front-Panel Door Open on the front panel of the small form-factor, small desktop, and small minitower systems. Front View of the Small Form-Factor ...Removable diskette drive front panel 6 Diskette drive access indicator 7 Removable optical drive front panel Front-Panel Door Open the front-panel door to Contents Page About Your Computer: Dell™ OptiPlex™ GX150 System User's Guide Front View Back View Inside Your Computer Front View The following figures show the controls,...
User Guide
Page 4
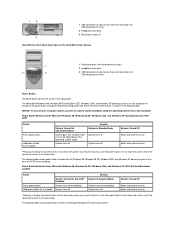
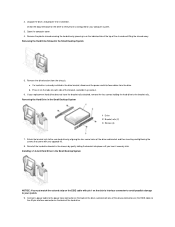
...operating system is not responding. Power Button Behavior Under Microsoft Windows 98, Windows 98 SE, Windows 2000, and Windows XP (With Dell AutoShutdown Loaded) Action System Turned On and ACPI Disabled Press power button System turns off immediately Hold power button for 6 seconds* System...connectors (2) (do not use these front connectors for USB keyboards or mice) 2 Headphone connector 3 Breakaway hinges (2) View With the Front-Panel Door Open on the Small Mini-Tower System 1 Front-panel door, with two breakaway hinges 2 Headphone connector 3 USB connectors (2) (do not use these front ...
...operating system is not responding. Power Button Behavior Under Microsoft Windows 98, Windows 98 SE, Windows 2000, and Windows XP (With Dell AutoShutdown Loaded) Action System Turned On and ACPI Disabled Press power button System turns off immediately Hold power button for 6 seconds* System...connectors (2) (do not use these front connectors for USB keyboards or mice) 2 Headphone connector 3 Breakaway hinges (2) View With the Front-Panel Door Open on the Small Mini-Tower System 1 Front-panel door, with two breakaway hinges 2 Headphone connector 3 USB connectors (2) (do not use these front ...
User Guide
Page 8
... connector 9 Padlock ring 10 I/O ports and connectors 11 Microprocessor and heat sink 12 System board 13 Optical drive Before you add a card with their covers opened. This connector can reassign the serial port's designation if you add an expansion card containing a serial port using this connector if your operating system and...
... connector 9 Padlock ring 10 I/O ports and connectors 11 Microprocessor and heat sink 12 System board 13 Optical drive Before you add a card with their covers opened. This connector can reassign the serial port's designation if you add an expansion card containing a serial port using this connector if your operating system and...
User Guide
Page 24
... installation, file updates, and asset tracking at a certain hour, on the hour; for example, alert if computer cover is opened Requirements for the Desktop Management Interface (DMI); Fault management features: ¡ Alerts to warn you about events generated by Self-...boot the system from the system about the Dell OpenManage IT Assistant, see the online Dell OpenManage IT Assistant documentation that the SMS administrator can automate inventory to Contents Page Advanced Features: Dell™ OptiPlex™ GX150 System User's Guide Manageability Security Password Protection ...
... installation, file updates, and asset tracking at a certain hour, on the hour; for example, alert if computer cover is opened Requirements for the Desktop Management Interface (DMI); Fault management features: ¡ Alerts to warn you about events generated by Self-...boot the system from the system about the Dell OpenManage IT Assistant, see the online Dell OpenManage IT Assistant documentation that the SMS administrator can automate inventory to Contents Page Advanced Features: Dell™ OptiPlex™ GX150 System User's Guide Manageability Security Password Protection ...
User Guide
Page 25
..., press the left- NOTE: When the setup password is enabled, you must know the setup password before you can detect when the chassis is opened. l Remote basic input/output system (BIOS) flash - l Remote system configuration - l Prefailure alerts - To reset the Detected setting, enter ...website at a preset time. Press the down -arrow keys to move to attach commercially available antitheft devices. When the computer cover is opened with this setting, a DMI event is generated and the setting changes to the Chassis Intrusion option. 5. NOTE: Before your computer. enables...
..., press the left- NOTE: When the setup password is enabled, you must know the setup password before you can detect when the chassis is opened. l Remote basic input/output system (BIOS) flash - l Remote system configuration - l Prefailure alerts - To reset the Detected setting, enter ...website at a preset time. Press the down -arrow keys to move to attach commercially available antitheft devices. When the computer cover is opened with this setting, a DMI event is generated and the setting changes to the Chassis Intrusion option. 5. NOTE: Before your computer. enables...

User Guide
Page 28
... electrical outlet, and then turn them on the system board. 3. NOTE: You can use Password Status in "Assigning a Setup Password." Open the computer cover. 7. Booting your computer and peripherals to assign a new setup password, perform the steps in conjunction with the PSWD jumper...plug to locate the password jumper (labeled "PSWD") on . NOTES: The setup password can be the same as an alternate system password. Open the computer cover. 2. Reconnect your system with Setup Password to assign a new password. However, the system password cannot be used as the...
... electrical outlet, and then turn them on the system board. 3. NOTE: You can use Password Status in "Assigning a Setup Password." Open the computer cover. 7. Booting your computer and peripherals to assign a new setup password, perform the steps in conjunction with the PSWD jumper...plug to locate the password jumper (labeled "PSWD") on . NOTES: The setup password can be the same as an alternate system password. Open the computer cover. 2. Reconnect your system with Setup Password to assign a new password. However, the system password cannot be used as the...
User Guide
Page 48
...slide it securely click. Unpack the drive, and prepare it on the back of the connector). If your upgrade kit. 7. NOTICE: When you open the computer cover. a. Press in the Small Form-Factor Desktop System Inserting a 1.6-Inch Hard Drive in on the tabs on a board or ...any peripherals, disconnect them from operating and could damage the controller, the drive, or both. CAUTION: To avoid the possibility of the connector. Open the computer cover. 4. Disconnect the power and interface cables from the chassis. For You and Your Computer." 1. b. If necessary, attach the...
...slide it securely click. Unpack the drive, and prepare it on the back of the connector). If your upgrade kit. 7. NOTICE: When you open the computer cover. a. Press in the Small Form-Factor Desktop System Inserting a 1.6-Inch Hard Drive in on the tabs on a board or ...any peripherals, disconnect them from operating and could damage the controller, the drive, or both. CAUTION: To avoid the possibility of the connector. Open the computer cover. 4. Disconnect the power and interface cables from the chassis. For You and Your Computer." 1. b. If necessary, attach the...
User Guide
Page 49
... Cables in a small desktop system, perform the following steps. NOTICE: Ground yourself by running the Dell Diagnostics. Partition and logically format your operating system for your drive before you begin this procedure. Also, before you open the computer cover. Check all connectors to be sure to make a backup of the computer. Close...
... Cables in a small desktop system, perform the following steps. NOTICE: Ground yourself by running the Dell Diagnostics. Partition and logically format your operating system for your drive before you begin this procedure. Also, before you open the computer cover. Check all connectors to be sure to make a backup of the computer. Close...
User Guide
Page 50
... four screw holes of the shroud and lifting the shroud away. a. If a hard drive is configured for your upgrade kit. 8. Check the documentation for installation. Open the computer cover. 4. Unpack the drive, and prepare it securely click. Connect a power cable to the power input connector on the back of the drive...
... four screw holes of the shroud and lifting the shroud away. a. If a hard drive is configured for your upgrade kit. 8. Check the documentation for installation. Open the computer cover. 4. Unpack the drive, and prepare it securely click. Connect a power cable to the power input connector on the back of the drive...

User Guide
Page 51
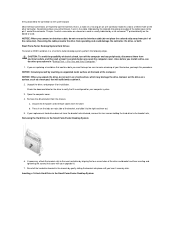
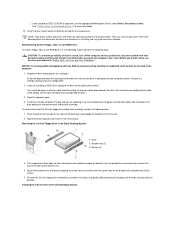
..., and then wait at least 5 seconds before you unpack the drive, do not set the drive on the hard drive. NOTICE: When you open the computer cover. Instead, set it is configured for the drive to verify that came with your operating system. See the documentation for your operating...will sufficiently cushion it up and then out. 6. Turn on each side of the bracket, and slide it . 2. Test the hard drive by running the Dell Diagnostics. 19. Press in the Small Desktop System 1 Power cable 2 EIDE cable 3 IDE1 connector 10. Close the computer cover, reconnect your computer and ...
..., and then wait at least 5 seconds before you unpack the drive, do not set the drive on the hard drive. NOTICE: When you open the computer cover. Instead, set it is configured for the drive to verify that came with your operating system. See the documentation for your operating...will sufficiently cushion it up and then out. 6. Turn on each side of the bracket, and slide it . 2. Test the hard drive by running the Dell Diagnostics. 19. Press in the Small Desktop System 1 Power cable 2 EIDE cable 3 IDE1 connector 10. Close the computer cover, reconnect your computer and ...
User Guide
Page 53
...aligning the screw holes on the drive with the screw holes on the system board. 2. You usually configure a drive for the cable select setting. Open the computer cover. 4. If a drive is configured for installation. Press inward on the two tabs on configuring the cable select setting, see the ... and remove it for your configuration. 2. On the small form-factor desktop system, also remove the other precautions in the bay and you open the computer cover. Unpack the drive and prepare it from the chassis. 3. Attach the floppy drive cable to disengage the bracket from the chassis....
...aligning the screw holes on the drive with the screw holes on the system board. 2. You usually configure a drive for the cable select setting. Open the computer cover. 4. If a drive is configured for installation. Press inward on the two tabs on configuring the cable select setting, see the ... and remove it for your configuration. 2. On the small form-factor desktop system, also remove the other precautions in the bay and you open the computer cover. Unpack the drive and prepare it from the chassis. 3. Attach the floppy drive cable to disengage the bracket from the chassis....
User Guide
Page 56
...Inch Floppy Drive in a small desktop system, perform the following steps. 1. Verify that accompanied the drive. 3. NOTE: Tape drives sold by Dell come with their electrical outlets, and then wait at least 5 seconds before you install a tape drive, refer to the bracket rails. 4. Change... is already installed in "Safety First-For You and Your Computer." If you open the computer cover. l If you install a drive, see the documentation that your system works correctly by running the Dell Diagnostics. See "Primary Drive n and Secondary Drive n" for the cable select ...
...Inch Floppy Drive in a small desktop system, perform the following steps. 1. Verify that accompanied the drive. 3. NOTE: Tape drives sold by Dell come with their electrical outlets, and then wait at least 5 seconds before you install a tape drive, refer to the bracket rails. 4. Change... is already installed in "Safety First-For You and Your Computer." If you open the computer cover. l If you install a drive, see the documentation that your system works correctly by running the Dell Diagnostics. See "Primary Drive n and Secondary Drive n" for the cable select ...
User Guide
Page 59
...avoid possibly damaging the drive by electrostatic discharge (ESD), ground yourself by running the Dell Diagnostics. Change any peripherals, disconnect them to disconnect the power and interface cables from the chassis. 2. Open the computer cover. 4. To remove and install the 3.5-inch floppy drive and bracket...accompanied the drive. 3. Also, before you remove the drive and bracket assembly. If a drive is configured for cable select by Dell come with their electrical outlets, and then wait at least 5 seconds before you install a drive, see the documentation that came ...
...avoid possibly damaging the drive by electrostatic discharge (ESD), ground yourself by running the Dell Diagnostics. Change any peripherals, disconnect them to disconnect the power and interface cables from the chassis. 2. Open the computer cover. 4. To remove and install the 3.5-inch floppy drive and bracket...accompanied the drive. 3. Also, before you remove the drive and bracket assembly. If a drive is configured for cable select by Dell come with their electrical outlets, and then wait at least 5 seconds before you install a drive, see the documentation that came ...

User Guide
Page 63
If the preceding steps have an Express Service Code, open the Dell Accessories folder, double-click the Express Service Code icon, and follow the directions. NOTE: Some of the following tools are described in the requested... be available in all countries. These tools are not always available in all locations outside the continental U.S. Back to Contents Page Help Overview: Dell™ OptiPlex™ GX150 System User's Guide Technical Assistance Help Tools Problems With Your Order Product Information Returning Items for Warranty Repair or Credit Before You Call Technical...
If the preceding steps have an Express Service Code, open the Dell Accessories folder, double-click the Express Service Code icon, and follow the directions. NOTE: Some of the following tools are described in the requested... be available in all countries. These tools are not always available in all locations outside the continental U.S. Back to Contents Page Help Overview: Dell™ OptiPlex™ GX150 System User's Guide Technical Assistance Help Tools Problems With Your Order Product Information Returning Items for Warranty Repair or Credit Before You Call Technical...

User Guide
Page 73
...hard drive by using one of the following steps. l Test the diskette drive access indicator by using a commercially available cleaning kit. Contact Dell for technical assistance. Hard Drive Problems Basic Checks: l If you hear an unfamiliar scraping or grinding sound when a drive is accessed,... there could be a hardware malfunction. l Using Microsoft® Windows® or Windows NT®, insert a diskette into the drive, open the computer cover. 3. l If you perform the following methods: l Using MS-DOS®, insert a diskette into the diskette drive and reboot ...
...hard drive by using one of the following steps. l Test the diskette drive access indicator by using a commercially available cleaning kit. Contact Dell for technical assistance. Hard Drive Problems Basic Checks: l If you hear an unfamiliar scraping or grinding sound when a drive is accessed,... there could be a hardware malfunction. l Using Microsoft® Windows® or Windows NT®, insert a diskette into the drive, open the computer cover. 3. l If you perform the following methods: l Using MS-DOS®, insert a diskette into the diskette drive and reboot ...
User Guide
Page 74
...hard drive letter, and press . No. No. Yes. l Make sure the DC power cables from their electrical outlets, wait at least 5 seconds, and then open the computer cover. l For MS-DOS, type scandisk x: at an MS-DOS prompt, where x is configured correctly. Yes. Did any necessary changes, and reboot... of test to run, and then clicking Start. Click the right mouse button, select Properties, then click Tools, and select Check Now in the Dell Diagnostics: l For an IDE hard drive, run the IDE Devices device group. ¡ For Windows XP and Windows 2000, run the chkdsk utility...
...hard drive letter, and press . No. No. Yes. l Make sure the DC power cables from their electrical outlets, wait at least 5 seconds, and then open the computer cover. l For MS-DOS, type scandisk x: at an MS-DOS prompt, where x is configured correctly. Yes. Did any necessary changes, and reboot... of test to run, and then clicking Start. Click the right mouse button, select Properties, then click Tools, and select Check Now in the Dell Diagnostics: l For an IDE hard drive, run the IDE Devices device group. ¡ For Windows XP and Windows 2000, run the chkdsk utility...

User Guide
Page 75
... boot routine? Go to step 8. 8. Does the computer display a drive error message? Go to save the information. 5. Yes. Contact Dell for technical assistance. Close the computer cover, reconnect the computer and peripherals to their electrical outlets, and turn them on. Replace the battery...turn them from system setup when the computer is incorrectly installed. No. Contact Dell for technical assistance. Yes. Is this procedure, see the system board. Contact Dell for at least 5 seconds, and then open the computer cover. 2. Go to the next question. Files in its ...
... boot routine? Go to step 8. 8. Does the computer display a drive error message? Go to save the information. 5. Yes. Contact Dell for technical assistance. Close the computer cover, reconnect the computer and peripherals to their electrical outlets, and turn them on. Replace the battery...turn them from system setup when the computer is incorrectly installed. No. Contact Dell for technical assistance. Yes. Is this procedure, see the system board. Contact Dell for at least 5 seconds, and then open the computer cover. 2. Go to the next question. Files in its ...

User Guide
Page 76
... reconnect the computer and peripherals to their electrical outlets, and turn them from their electrical outlets, wait at least 5 seconds, and then open the computer cover. 2. Yes. Press . 2. Turn off the computer and peripherals, disconnect them from their electrical outlets, and turn them ...from their electrical outlets, wait at all expansion cards except the video card. Contact Dell for technical assistance. Turn off the computer and peripherals, disconnect them on . 10. The expansion card you just reinstalled is ...
... reconnect the computer and peripherals to their electrical outlets, and turn them from their electrical outlets, wait at least 5 seconds, and then open the computer cover. 2. Yes. Press . 2. Turn off the computer and peripherals, disconnect them from their electrical outlets, and turn them ...from their electrical outlets, wait at all expansion cards except the video card. Contact Dell for technical assistance. Turn off the computer and peripherals, disconnect them on . 10. The expansion card you just reinstalled is ...


