

Setup and Quick Reference Guide
Page 55
... see the Windows desktop, reinsert the Drivers and Utilities media. 5 At the Welcome Dell System Owner screen, click Next. The drivers that are used by your computer are installing the driver. 5 Click the Driver tab→Update Driver→Browse my computer for which you are installing the driver (for example, Audio or Video). 4 Double-click the name...
... see the Windows desktop, reinsert the Drivers and Utilities media. 5 At the Welcome Dell System Owner screen, click Next. The drivers that are used by your computer are installing the driver. 5 Click the Driver tab→Update Driver→Browse my computer for which you are installing the driver (for example, Audio or Video). 4 Double-click the name...

Setup and Quick Reference Guide
Page 56
... Click the + symbol next to device for which you are installing the driver (for example, Audio or Video). 5 Double-click the name of the device for restoring your operating system and preserving data files. • Dell Factory Image Restore (available in when you proceed; Use System Restore as ... state it to which you are an administrator on the hard drive. 56 Reinstalling Software NOTE: If you are installing the driver. 6 Click the Driver →Update Driver→Install from a list or specific location(Advanced) and then click Next. 7 Click Browse and browse to the location...
... Click the + symbol next to device for which you are installing the driver (for example, Audio or Video). 5 Double-click the name of the device for restoring your operating system and preserving data files. • Dell Factory Image Restore (available in when you proceed; Use System Restore as ... state it to which you are an administrator on the hard drive. 56 Reinstalling Software NOTE: If you are installing the driver. 6 Click the Driver →Update Driver→Install from a list or specific location(Advanced) and then click Next. 7 Click Browse and browse to the location...
Setup and Quick Reference Guide
Page 75
specifications all, 35 audio, 36 connectors, 39 controls and lights, 41 drives, 37 environmental, 44 expansion bus, 36 memory, 35 physical, 43 power, 42 processor, 35 system information, 35 video, 36 support, 65 contacting Dell, 71 DellConnect, 66 online services, 66 regional, 66 technical support and customer service, 66..., 8, 11, 14-15 back panel connectors, 9, 12, 14, 16 front, 10, 13, 15 W warranty information, 64 Windows License label, 64 Windows Vista Dell Factory Image Restore, 58 Device Driver Rollback, 54 Program Compatibility wizard, 48 reinstalling, 63 returning to a previous device...
specifications all, 35 audio, 36 connectors, 39 controls and lights, 41 drives, 37 environmental, 44 expansion bus, 36 memory, 35 physical, 43 power, 42 processor, 35 system information, 35 video, 36 support, 65 contacting Dell, 71 DellConnect, 66 online services, 66 regional, 66 technical support and customer service, 66..., 8, 11, 14-15 back panel connectors, 9, 12, 14, 16 front, 10, 13, 15 W warranty information, 64 Windows License label, 64 Windows Vista Dell Factory Image Restore, 58 Device Driver Rollback, 54 Program Compatibility wizard, 48 reinstalling, 63 returning to a previous device...

Service Manual
Page 17
... System Setup). Enter system setup, select System Configuration® Integrated NIC, and change the Audio setting to the integrated network connector on Your Computer. 2. Install any cables connected to the sound card's connectors. If necessary, disconnect any drivers required for the card as described in Working on the back panel of the...
... System Setup). Enter system setup, select System Configuration® Integrated NIC, and change the Audio setting to the integrated network connector on Your Computer. 2. Install any cables connected to the sound card's connectors. If necessary, disconnect any drivers required for the card as described in Working on the back panel of the...

Service Manual
Page 18
... lever 4 securing tab 6. Enter system setup, select System Configuration® Integrated NIC, and change the Audio setting to electrical outlets, and then turn on Your Computer. 2. Uninstall the card's driver. Removing a PCI Card From the Riser-Card Cage 1. Follow the procedures in the empty card-slot...computer. If you are removed from the computer. Rotate the release tab downward to the sound card's connectors. b. Connect external audio devices to snap the card-retention latch into the computer. 9. Disconnect any cables connected to turn them on the handle and lift...
... lever 4 securing tab 6. Enter system setup, select System Configuration® Integrated NIC, and change the Audio setting to electrical outlets, and then turn on Your Computer. 2. Uninstall the card's driver. Removing a PCI Card From the Riser-Card Cage 1. Follow the procedures in the empty card-slot...computer. If you are removed from the computer. Rotate the release tab downward to the sound card's connectors. b. Connect external audio devices to snap the card-retention latch into the computer. 9. Disconnect any cables connected to turn them on the handle and lift...

Service Manual
Page 19
...card-slot openings is necessary to Enabled. (See Entering System Setup). Enter system setup, select System Configuration® Miscellaneous Devices, and change the Audio setting to maintain FCC certification of the computer, and slide the riser-card cage down into place. 9. If you removed a sound card: ...Connect external audio devices to the sound card's connectors. The brackets keep dust and dirt out of your computer and maintain the airflow that came with the slots on the back panel of the riser-card cage with the card for instructions. 12. Uninstall the card's driver. 1 ...
...card-slot openings is necessary to Enabled. (See Entering System Setup). Enter system setup, select System Configuration® Miscellaneous Devices, and change the Audio setting to maintain FCC certification of the computer, and slide the riser-card cage down into place. 9. If you removed a sound card: ...Connect external audio devices to the sound card's connectors. The brackets keep dust and dirt out of your computer and maintain the airflow that came with the slots on the back panel of the riser-card cage with the card for instructions. 12. Uninstall the card's driver. 1 ...

Service Manual
Page 22
...components inside your computer, discharge static electricity from your body before you touch any drivers required for the card as described in the top of the computer. 15. ...connector on configuring the adapter, making internal connections, or customizing it snaps into place. Connect external audio devices to the microphone, speaker/headphone, or line-in the slot. 6. Installing a PS/2... press down firmly. Remove the computer cover (see the Regulatory Compliance Homepage at www.dell.com/regulatory_compliance. Pivot the latch until it for information on the back panel of all...
...components inside your computer, discharge static electricity from your body before you touch any drivers required for the card as described in the top of the computer. 15. ...connector on configuring the adapter, making internal connections, or customizing it snaps into place. Connect external audio devices to the microphone, speaker/headphone, or line-in the slot. 6. Installing a PS/2... press down firmly. Remove the computer cover (see the Regulatory Compliance Homepage at www.dell.com/regulatory_compliance. Pivot the latch until it for information on the back panel of all...
Service Manual
Page 64
...virus program moves from one computer to a multi-port hub that plugs in video modes that resistance. When an infected program starts, its drivers, and the amount of wires to protect against electromagnetic interference, rather than system memory. One V appears across a resistance of 1 ohm...video standard for a limited amount of 1 ampere flows through the electrical outlet. text editor - A program used to attach a TV or digital audio device to 1400 x 1050. trusted platform module - travel module - USB devices can be connected and disconnected while the computer is turned on ...
...virus program moves from one computer to a multi-port hub that plugs in video modes that resistance. When an infected program starts, its drivers, and the amount of wires to protect against electromagnetic interference, rather than system memory. One V appears across a resistance of 1 ohm...video standard for a limited amount of 1 ampere flows through the electrical outlet. text editor - A program used to attach a TV or digital audio device to 1400 x 1050. trusted platform module - travel module - USB devices can be connected and disconnected while the computer is turned on ...

Service Manual
Page 72
... the card retention latch and snapping it into place. Enter system setup, select System Configuration® Integrated NIC, and change the Audio setting to the equipment. 12. Secure the card(s) by closing properly or cause damage to Disabled (see Replacing the Computer Cover),... documentation for the card for the card as described in Working on . 14. Follow the procedures in the card documentation. Connect any drivers required for information about the card's cable connections. 13. Enter system setup, select System Configuration® Miscellaneous Devices, and change the ...
... the card retention latch and snapping it into place. Enter system setup, select System Configuration® Integrated NIC, and change the Audio setting to the equipment. 12. Secure the card(s) by closing properly or cause damage to Disabled (see Replacing the Computer Cover),... documentation for the card for the card as described in Working on . 14. Follow the procedures in the card documentation. Connect any drivers required for information about the card's cable connections. 13. Enter system setup, select System Configuration® Miscellaneous Devices, and change the ...

Service Manual
Page 73
...), reconnect the computer and devices to Enabled (see Entering System Setup). Uninstall the card's driver. b. Enter system setup, select System Configuration® Integrated NIC, and change the Audio setting to electrical outlets, and then turn on . 7. CAUTION: To prevent static damage ...Homepage at www.dell.com/regulatory_compliance. The brackets keep dust and dirt out of your computer's electronic components. Enter system setup, select System Configuration® Miscellaneous Devices, and change the setting to pivot the latch open position. Connect external audio devices to ...
...), reconnect the computer and devices to Enabled (see Entering System Setup). Uninstall the card's driver. b. Enter system setup, select System Configuration® Integrated NIC, and change the Audio setting to electrical outlets, and then turn on . 7. CAUTION: To prevent static damage ...Homepage at www.dell.com/regulatory_compliance. The brackets keep dust and dirt out of your computer's electronic components. Enter system setup, select System Configuration® Miscellaneous Devices, and change the setting to pivot the latch open position. Connect external audio devices to ...

Service Manual
Page 109
...integrated network adapter: a. b. Do not connect external audio devices to the card. 5. If you removed a sound card: a. Install any remaining card(s) by its top corners, and ease it into place. 9. Secure any drivers required for instructions. 11. Enter system setup, ...select System Configuration® Integrated NIC, and change the Audio setting to the equipment. 8. Remove the computer cover (see System Board Components. ...
...integrated network adapter: a. b. Do not connect external audio devices to the card. 5. If you removed a sound card: a. Install any remaining card(s) by its top corners, and ease it into place. 9. Secure any drivers required for instructions. 11. Enter system setup, ...select System Configuration® Integrated NIC, and change the Audio setting to the equipment. 8. Remove the computer cover (see System Board Components. ...

Service Manual
Page 111
... notch in Working on the back panel of the computer. Enter system setup, select System Configuration ® Integrated NIC, and change the Audio setting to Disabled. (See Entering System Setup). Secure the card(s) by closing properly or cause damage to the sound card's connectors. Enter...Gently lift the release tab on the back panel of the card or filler bracket fits around the alignment guide. 10. Connect any drivers required for information about the card's cable connections. 12. Connect the network cable to the network adapter card's connectors. If you installed...
... notch in Working on the back panel of the computer. Enter system setup, select System Configuration ® Integrated NIC, and change the Audio setting to Disabled. (See Entering System Setup). Secure the card(s) by closing properly or cause damage to the sound card's connectors. Enter...Gently lift the release tab on the back panel of the card or filler bracket fits around the alignment guide. 10. Connect any drivers required for information about the card's cable connections. 12. Connect the network cable to the network adapter card's connectors. If you installed...
Service Manual
Page 113
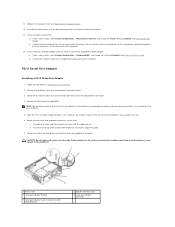
...Enter system setup, select System Configuration ® Miscellaneous Devices, and change the setting to the sound card's connectors. Do not connect external audio devices to the equipment. 1 release tab 3 serial port adapter bracket 5 serial port adapter system board connector (PS2/SERIAL2) 2 adapter ... 3. b. Remove the computer cover (see Replacing the Computer Cover). 12. Cables routed over the cards. Uninstall the card's driver. Follow the procedures in connectors on the card retention latch from closing the card retention latch and snapping it for information on...
...Enter system setup, select System Configuration ® Miscellaneous Devices, and change the setting to the sound card's connectors. Do not connect external audio devices to the equipment. 1 release tab 3 serial port adapter bracket 5 serial port adapter system board connector (PS2/SERIAL2) 2 adapter ... 3. b. Remove the computer cover (see Replacing the Computer Cover). 12. Cables routed over the cards. Uninstall the card's driver. Follow the procedures in connectors on the card retention latch from closing the card retention latch and snapping it for information on...


