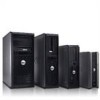

Quick Reference Guide
Page 2
... Windows are registered trademarks of Microsoft Corporation. Other trademarks and trade names may be used in this text: Dell, the DELL logo, Inspiron, Dell Precision, Dimension, OptiPlex, Latitude, PowerEdge, PowerVault, PowerApp, and Dell OpenManage are trademarks of Dell Inc. book.book Page 2 Wednesday, August 16, 2006 3:18 PM Notes, Notices, and Cautions NOTE: A NOTE indicates important...
... Windows are registered trademarks of Microsoft Corporation. Other trademarks and trade names may be used in this text: Dell, the DELL logo, Inspiron, Dell Precision, Dimension, OptiPlex, Latitude, PowerEdge, PowerVault, PowerApp, and Dell OpenManage are trademarks of Dell Inc. book.book Page 2 Wednesday, August 16, 2006 3:18 PM Notes, Notices, and Cautions NOTE: A NOTE indicates important...
Quick Reference Guide
Page 3
... Computer 41 Setting Up Your Computer 43 Set Up Your Keyboard and Mouse 45 Set Up Your Monitor 45 Power Connections 46 Solving Problems 46 Dell Diagnostics 46 System Lights 49 Contents 3 Back View 23 Ultra-Small Form Factor Computer - Front View 8 Mini Tower Computer - Back-Panel Connectors 19 Ultra-Small...
... Computer 41 Setting Up Your Computer 43 Set Up Your Keyboard and Mouse 45 Set Up Your Monitor 45 Power Connections 46 Solving Problems 46 Dell Diagnostics 46 System Lights 49 Contents 3 Back View 23 Ultra-Small Form Factor Computer - Front View 8 Mini Tower Computer - Back-Panel Connectors 19 Ultra-Small...
Quick Reference Guide
Page 4
book.book Page 4 Wednesday, August 16, 2006 3:18 PM Diagnostic Lights 50 Beep Codes 52 Resolving Software and Hardware Incompatibilities 53 Using Microsoft Windows XP System Restore 54 Reinstalling Microsoft Windows XP 55 Using the Drivers and Utilities CD 58 Drivers for Your Computer 58 Index 59 4 Contents
book.book Page 4 Wednesday, August 16, 2006 3:18 PM Diagnostic Lights 50 Beep Codes 52 Resolving Software and Hardware Incompatibilities 53 Using Microsoft Windows XP System Restore 54 Reinstalling Microsoft Windows XP 55 Using the Drivers and Utilities CD 58 Drivers for Your Computer 58 Index 59 4 Contents

Quick Reference Guide
Page 5
... to your computer or advanced technical reference material for technicians or experienced users. Dell™ OptiPlex™ User's Guide Microsoft Windows XP Help and Support Center 1 Click Start→ Help and Support→ Dell User and System Guides→ System Guides. 2 Click the User's Guide ...configure system settings • How to reinstall drivers (see "Using the Drivers and Utilities CD" on page 58), run the Dell Diagnostics (see "Dell Diagnostics" on the optional Drivers and Utilities CD. NOTE: Drivers and documentation updates can use the CD to troubleshoot and solve ...
... to your computer or advanced technical reference material for technicians or experienced users. Dell™ OptiPlex™ User's Guide Microsoft Windows XP Help and Support Center 1 Click Start→ Help and Support→ Dell User and System Guides→ System Guides. 2 Click the User's Guide ...configure system settings • How to reinstall drivers (see "Using the Drivers and Utilities CD" on page 58), run the Dell Diagnostics (see "Dell Diagnostics" on the optional Drivers and Utilities CD. NOTE: Drivers and documentation updates can use the CD to troubleshoot and solve ...
Quick Reference Guide
Page 6
... operating system you reinstall your operating system, use the optional Drivers and Utilities CD (ResourceCD) to personalize my desktop 6 Quick Reference Guide Find It Here Dell™ Product Information Guide Operating System CD NOTE: The Operating System CD may be optional and may not ship with your operating system, use Windows...
... operating system you reinstall your operating system, use the optional Drivers and Utilities CD (ResourceCD) to personalize my desktop 6 Quick Reference Guide Find It Here Dell™ Product Information Guide Operating System CD NOTE: The Operating System CD may be optional and may not ship with your operating system, use Windows...
Quick Reference Guide
Page 7
...segment to view the appropriate support site. • Community - Quick Reference Guide 7 updates for your operating system and support for Dell™ 2 Select Drivers & Downloads, then click Go. 3.5-inch USB floppy drives, Intel® processors, optical 3 Click your... support. • Solutions - Troubleshooting hints and tips, articles from technicians, online courses, and frequently asked questions Dell Support Website - support.dell.com NOTE: Select your selections. operation of your Service Tag. Contact information, service call status, support history, service...
...segment to view the appropriate support site. • Community - Quick Reference Guide 7 updates for your operating system and support for Dell™ 2 Select Drivers & Downloads, then click Go. 3.5-inch USB floppy drives, Intel® processors, optical 3 Click your... support. • Solutions - Troubleshooting hints and tips, articles from technicians, online courses, and frequently asked questions Dell Support Website - support.dell.com NOTE: Select your selections. operation of your Service Tag. Contact information, service call status, support history, service...
Quick Reference Guide
Page 9
Can contain an optical drive. Press this button to attach headphones and most kinds of light codes that a LAN (local area network) connection is in a normal operating state. • Blinking green - See "Before You Begin" on the computer. See your operating system has ACPI enabled, when you press the power button the computer will perform an operating system shutdown. For more information. Use the headphone connector to turn off . • Steady green - Quick Reference Guide 9 NOTICE: To avoid losing data, do not turn on page 25 for more information about sleep ...
Can contain an optical drive. Press this button to attach headphones and most kinds of light codes that a LAN (local area network) connection is in a normal operating state. • Blinking green - See "Before You Begin" on the computer. See your operating system has ACPI enabled, when you press the power button the computer will perform an operating system shutdown. For more information. Use the headphone connector to turn off . • Steady green - Quick Reference Guide 9 NOTICE: To avoid losing data, do not turn on page 25 for more information about sleep ...

Quick Reference Guide
Page 10
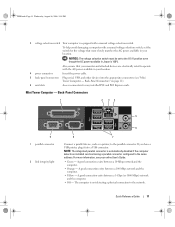
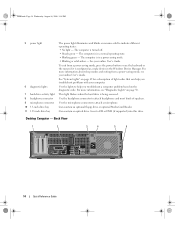
Insert a padlock to open the computer cover. book.book Page 10 Wednesday, August 16, 2006 3:18 PM Mini Tower Computer - Back View 1 2 3 4 5 6 1 cover-release latch 2 padlock ring This latch allows you to lock the computer cover. 10 Quick Reference Guide
Insert a padlock to open the computer cover. book.book Page 10 Wednesday, August 16, 2006 3:18 PM Mini Tower Computer - Back View 1 2 3 4 5 6 1 cover-release latch 2 padlock ring This latch allows you to lock the computer cover. 10 Quick Reference Guide
Quick Reference Guide
Page 11
A good connection exists between a 1-Gbps (or 1000-Mbps) network and the computer. • Off - A good connection exists between a 100-Mbps network and the computer. • Yellow - Back-Panel Connectors" on page 11). 6 card slots Access connectors for the voltage that your monitor and attached devices are electrically rated to operate with a manual voltage-selection switch, set to the same address. A good connection exists between a 10-Mbps network and the computer. • Orange - NOTICE: The voltage selection switch must be set the switch for any installed PCI and PCI ...
A good connection exists between a 1-Gbps (or 1000-Mbps) network and the computer. • Off - A good connection exists between a 100-Mbps network and the computer. • Yellow - Back-Panel Connectors" on page 11). 6 card slots Access connectors for the voltage that your monitor and attached devices are electrically rated to operate with a manual voltage-selection switch, set to the same address. A good connection exists between a 10-Mbps network and the computer. • Orange - NOTICE: The voltage selection switch must be set the switch for any installed PCI and PCI ...

Quick Reference Guide
Page 12
On computers with integrated amplifiers. 6 line-in/microphone connector Use the blue and pink line-in/microphone connector to attach a record/playback device such as printers and keyboards. 8 video connector Plug the cable from your VGA-compatible monitor into the blue connector. For more information, see your online User's Guide. 12 Quick Reference Guide or a personal computer microphone for voice or musical input into the network connector. Connect your monitor to the serial port. A high volume of network traffic may make this connector will be in a steady "on ...
On computers with integrated amplifiers. 6 line-in/microphone connector Use the blue and pink line-in/microphone connector to attach a record/playback device such as printers and keyboards. 8 video connector Plug the cable from your VGA-compatible monitor into the blue connector. For more information, see your online User's Guide. 12 Quick Reference Guide or a personal computer microphone for voice or musical input into the network connector. Connect your monitor to the serial port. A high volume of network traffic may make this connector will be in a steady "on ...
Quick Reference Guide
Page 13
..., such as printers and keyboards. 2 LAN indicator light This light indicates that you press the power button the computer will perform an operating system shutdown. 4 Dell badge This badge can also rotate the badge using the slot provided near the bottom of the badge, press firmly, and turn off the computer...
..., such as printers and keyboards. 2 LAN indicator light This light indicates that you press the power button the computer will perform an operating system shutdown. 4 Dell badge This badge can also rotate the badge using the slot provided near the bottom of the badge, press firmly, and turn off the computer...
Quick Reference Guide
Page 14
For more information, see your online User's Guide. This light flickers when the hard drive is in a normal operating state. • Blinking green - Insert a CD or DVD (if supported) into this drive. The computer is being accessed. The computer is configured as a wake device in a power-saving mode. • Blinking or solid amber - To exit from a power-saving mode, see "Diagnostic Lights" on page 50. For more information about sleep modes and exiting from a power-saving mode, press the power button or use the keyboard or the mouse if it is in the Windows Device ...
For more information, see your online User's Guide. This light flickers when the hard drive is in a normal operating state. • Blinking green - Insert a CD or DVD (if supported) into this drive. The computer is being accessed. The computer is configured as a wake device in a power-saving mode. • Blinking or solid amber - To exit from a power-saving mode, see "Diagnostic Lights" on page 50. For more information about sleep modes and exiting from a power-saving mode, press the power button or use the keyboard or the mouse if it is in the Windows Device ...
Quick Reference Guide
Page 15
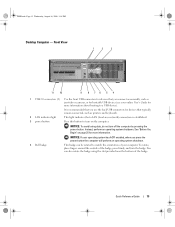
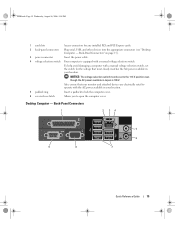
Also, ensure that most closely matches the AC power available in your location. book.book Page 15 Wednesday, August 16, 2006 3:18 PM 1 card slots Access connectors for the voltage that your monitor and attached devices are electrically rated to open the computer cover. NOTICE: The voltage selection switch must be set the switch for any installed PCI and PCI Express cards. 2 back-panel connectors Plug serial, USB, and other devices into the appropriate connectors (see "Desktop Computer - Back-Panel Connectors" on page 15). 3 power connector Insert the power cable. 4 ...
Also, ensure that most closely matches the AC power available in your location. book.book Page 15 Wednesday, August 16, 2006 3:18 PM 1 card slots Access connectors for the voltage that your monitor and attached devices are electrically rated to open the computer cover. NOTICE: The voltage selection switch must be set the switch for any installed PCI and PCI Express cards. 2 back-panel connectors Plug serial, USB, and other devices into the appropriate connectors (see "Desktop Computer - Back-Panel Connectors" on page 15). 3 power connector Insert the power cable. 4 ...
Quick Reference Guide
Page 16
book.book Page 16 Wednesday, August 16, 2006 3:18 PM 1 parallel connector Connect a parallel device, such as a printer, to the connector on the graphics card. If you have a USB printer, plug it into the network connector. A click indicates that came with your online User's Guide. 16 Quick Reference Guide Connect your VGA-compatible monitor into a sound or telephony program. 7 USB 2.0 connectors (6) Use the back USB connectors for devices that you purchased an optional graphics card, this light appear to the same address. For more information, see your computer. 9 serial ...
book.book Page 16 Wednesday, August 16, 2006 3:18 PM 1 parallel connector Connect a parallel device, such as a printer, to the connector on the graphics card. If you have a USB printer, plug it into the network connector. A click indicates that came with your online User's Guide. 16 Quick Reference Guide Connect your VGA-compatible monitor into a sound or telephony program. 7 USB 2.0 connectors (6) Use the back USB connectors for devices that you purchased an optional graphics card, this light appear to the same address. For more information, see your computer. 9 serial ...
Quick Reference Guide
Page 17
... lights to help you use the back USB connectors for devices that you press the power button the computer will perform an operating system shutdown. 3 Dell badge Can be rotated to match the orientation of the badge, press firmly, and turn off the computer by pressing the power button. For more...
... lights to help you use the back USB connectors for devices that you press the power button the computer will perform an operating system shutdown. 3 Dell badge Can be rotated to match the orientation of the badge, press firmly, and turn off the computer by pressing the power button. For more...

Quick Reference Guide
Page 18
The computer is in a normal operating state. • Blinking green - The computer is in a power-saving mode. • Blinking or solid amber - To exit from a power-saving mode, see your online User's Guide. See "System Lights" on page 49 for a description of speakers. Can contain an optional floppy drive or optional media card reader. Small Form Factor Computer - See your computer. For more information about sleep modes and exiting from a power-saving mode, press the power button or use the keyboard or the mouse if it is turned off. • Steady green - Use the headphone ...
The computer is in a normal operating state. • Blinking green - The computer is in a power-saving mode. • Blinking or solid amber - To exit from a power-saving mode, see your online User's Guide. See "System Lights" on page 49 for a description of speakers. Can contain an optional floppy drive or optional media card reader. Small Form Factor Computer - See your computer. For more information about sleep modes and exiting from a power-saving mode, press the power button or use the keyboard or the mouse if it is turned off. • Steady green - Use the headphone ...

Quick Reference Guide
Page 19
NOTICE: The voltage selection switch must be set the switch for any installed PCI and PCI Express cards. 2 back-panel connectors Plug serial, USB, and other devices into the appropriate connectors (see "Small Form Factor Computer - Small Form Factor Computer - Back-Panel Connectors 1 2 34 9 8 5 6 7 Quick Reference Guide 19 Back-Panel Connectors" on page 19). 3 power connector Insert the power cable. 4 voltage selection switch Your computer is 100 V. To help avoid damaging a computer with a manual voltage selection switch, set to the 115-V position even though the AC ...
NOTICE: The voltage selection switch must be set the switch for any installed PCI and PCI Express cards. 2 back-panel connectors Plug serial, USB, and other devices into the appropriate connectors (see "Small Form Factor Computer - Small Form Factor Computer - Back-Panel Connectors 1 2 34 9 8 5 6 7 Quick Reference Guide 19 Back-Panel Connectors" on page 19). 3 power connector Insert the power cable. 4 voltage selection switch Your computer is 100 V. To help avoid damaging a computer with a manual voltage selection switch, set to the 115-V position even though the AC ...
Quick Reference Guide
Page 20
book.book Page 20 Wednesday, August 16, 2006 3:18 PM 1 parallel connector Connect a parallel device, such as a cassette player, CD player, or VCR; If you have a USB printer, plug it into a sound or telephony program. 7 USB 2.0 connectors (6) Use the back USB connectors for devices that typically remain connected, such as printers and keyboards. 20 Quick Reference Guide The computer is recommended that the network cable has been securely attached. On computers with integrated sound) to attach a record/playback device such as a printer, to the parallel connector. A high volume of...
book.book Page 20 Wednesday, August 16, 2006 3:18 PM 1 parallel connector Connect a parallel device, such as a cassette player, CD player, or VCR; If you have a USB printer, plug it into a sound or telephony program. 7 USB 2.0 connectors (6) Use the back USB connectors for devices that typically remain connected, such as printers and keyboards. 20 Quick Reference Guide The computer is recommended that the network cable has been securely attached. On computers with integrated sound) to attach a record/playback device such as a printer, to the parallel connector. A high volume of...
Quick Reference Guide
Page 21
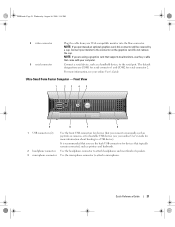
NOTE: If you use the y-cable that typically remain connected, such as printers and keyboards. 2 headphone connector Use the headphone connector to attach headphones and most kinds of speakers. 3 microphone connector Use the microphone connector to attach a microphone. Ultra-Small Form Factor Computer - The default designations are using a graphics card that supports dual monitors, use the back USB connectors for serial connector 2. It is recommended that you are COM1 for serial connector 1 and COM2 for devices that came with your computer. Do not remove the cap. ...
NOTE: If you use the y-cable that typically remain connected, such as printers and keyboards. 2 headphone connector Use the headphone connector to attach headphones and most kinds of speakers. 3 microphone connector Use the microphone connector to attach a microphone. Ultra-Small Form Factor Computer - The default designations are using a graphics card that supports dual monitors, use the back USB connectors for serial connector 2. It is recommended that you are COM1 for serial connector 1 and COM2 for devices that came with your computer. Do not remove the cap. ...
Quick Reference Guide
Page 22
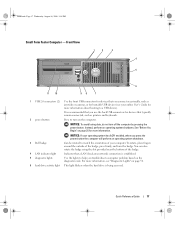
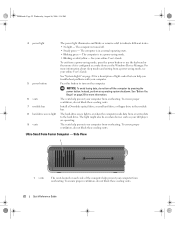
The computer is in the Windows Device Manager. Instead, perform an operating system shutdown. The light might also be on the computer. The computer is turned off the computer by pressing the power button. See your computer. 5 power button Press this button to turn off . • Steady green - To exit from overheating. To ensure proper ventilation, do not turn on when devices such as a wake device in a normal operating state. • Blinking green - NOTICE: To avoid losing data, do not block these cooling vents. 7 module bay Install a D-module optical drive, ...
The computer is in the Windows Device Manager. Instead, perform an operating system shutdown. The light might also be on the computer. The computer is turned off the computer by pressing the power button. See your computer. 5 power button Press this button to turn off . • Steady green - To exit from overheating. To ensure proper ventilation, do not turn on when devices such as a wake device in a normal operating state. • Blinking green - NOTICE: To avoid losing data, do not block these cooling vents. 7 module bay Install a D-module optical drive, ...
