Quick Reference Guide
Page 3
...-Panel Connectors 18 Removing the Computer Cover 19 Before You Begin 20 Mini Tower Computer 21 Desktop Computer 23 Inside Your Computer 24 Mini Tower Computer 24 Desktop Computer 27 Solving Problems 30 Dell Diagnostics 30 System Lights 33 Diagnostic Lights 34 Beep Codes 37 Resolving Software and Hardware Incompatibilities 38 Using...
...-Panel Connectors 18 Removing the Computer Cover 19 Before You Begin 20 Mini Tower Computer 21 Desktop Computer 23 Inside Your Computer 24 Mini Tower Computer 24 Desktop Computer 27 Solving Problems 30 Dell Diagnostics 30 System Lights 33 Diagnostic Lights 34 Beep Codes 37 Resolving Software and Hardware Incompatibilities 38 Using...

Quick Reference Guide
Page 20
... tabs; To avoid damaging the computer, perform the following safety guidelines to servicing that is not authorized by Dell is not covered by your computer. Before Working Inside Your Computer Use the following steps before removing the cover. 20 Quick Reference Guide Damage due to help ensure... before you disconnect a cable, pull on its connector or on its strain-relief loop, not on your warranty. CAUTION: Before you begin working inside the computer. 1 Turn off . Do not touch the components or contacts on the locking tabs before you shut down the operating system: a...
... tabs; To avoid damaging the computer, perform the following safety guidelines to servicing that is not authorized by Dell is not covered by your computer. Before Working Inside Your Computer Use the following steps before removing the cover. 20 Quick Reference Guide Damage due to help ensure... before you disconnect a cable, pull on its connector or on its strain-relief loop, not on your warranty. CAUTION: Before you begin working inside the computer. 1 Turn off . Do not touch the components or contacts on the locking tabs before you shut down the operating system: a...

Quick Reference Guide
Page 21
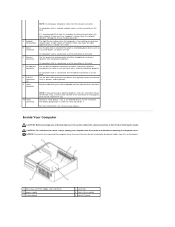
... "Before You Begin" on page 19. 2 If you work, periodically touch an unpainted metal surface to dissipate any of the computer. NOTICE: Before touching anything inside your computer from the hinge tabs and set it aside on a soft nonabrasive surface. Mini Tower Computer CAUTION: Before you begin any static electricity that...
... "Before You Begin" on page 19. 2 If you work, periodically touch an unpainted metal surface to dissipate any of the computer. NOTICE: Before touching anything inside your computer from the hinge tabs and set it aside on a soft nonabrasive surface. Mini Tower Computer CAUTION: Before you begin any static electricity that...

User Guide
Page 13
Back to Contents Page Battery Dell™ OptiPlex™ 320 User's Guide CAUTION: Before you begin any of battery connector Turn off your computer and disconnect it up out of the securing tabs at the .... While supporting the battery connector, press the battery tab away from your desktop computer, see Entering System Setup). NOTICE: To prevent static damage to components inside your computer without a battery, the configuration information is erased if the computer is displayed during the boot routine along with a message such as: Time-of...
Back to Contents Page Battery Dell™ OptiPlex™ 320 User's Guide CAUTION: Before you begin any of battery connector Turn off your computer and disconnect it up out of the securing tabs at the .... While supporting the battery connector, press the battery tab away from your desktop computer, see Entering System Setup). NOTICE: To prevent static damage to components inside your computer without a battery, the configuration information is erased if the computer is displayed during the boot routine along with a message such as: Time-of...

User Guide
Page 15
.... Hold a component such as a processor by its edges, not by its pins. Back to Contents Page Before You Begin Dell™ OptiPlex™ 320 User's Guide Recommended Tools Turning Off Your Computer Before Working Inside Your Computer This chapter provides procedures for 6 seconds. 2. Unless otherwise noted, each procedure assumes that is not authorized by...
.... Hold a component such as a processor by its edges, not by its pins. Back to Contents Page Before You Begin Dell™ OptiPlex™ 320 User's Guide Recommended Tools Turning Off Your Computer Before Working Inside Your Computer This chapter provides procedures for 6 seconds. 2. Unless otherwise noted, each procedure assumes that is not authorized by...

User Guide
Page 16
If applicable, remove the computer stand (for instructions, see : Removing the Computer Cover NOTICE: Before touching anything inside your computer from their electrical outlets, and then press the power button to ground the system board. 4. While you work, periodically touch an unpainted metal ...
If applicable, remove the computer stand (for instructions, see : Removing the Computer Cover NOTICE: Before touching anything inside your computer from their electrical outlets, and then press the power button to ground the system board. 4. While you work, periodically touch an unpainted metal ...

User Guide
Page 17
... DVDs NOTICE: Always use a special screen-cleaning tissue or solution suitable for the monitor's antistatic coating. Back to Contents Page Cleaning Your Computer Dell™ OptiPlex™ 320 User's Guide CAUTION: Before you clean your mouse counterclockwise, and then remove the ball. 2. l Use a vacuum cleaner with isopropyl alcohol. ...Floppy Drive NOTICE: Do not attempt to remove contaminants that lint from the electrical outlet. You can also touch the inside your floppy drive using water or a diluted solution of the center hole. Do not soak the cloth or let water drip...
... DVDs NOTICE: Always use a special screen-cleaning tissue or solution suitable for the monitor's antistatic coating. Back to Contents Page Cleaning Your Computer Dell™ OptiPlex™ 320 User's Guide CAUTION: Before you clean your mouse counterclockwise, and then remove the ball. 2. l Use a vacuum cleaner with isopropyl alcohol. ...Floppy Drive NOTICE: Do not attempt to remove contaminants that lint from the electrical outlet. You can also touch the inside your floppy drive using water or a diluted solution of the center hole. Do not soak the cloth or let water drip...

User Guide
Page 21
...that can also rotate the badge using the slot provided near the bottom of the badge. Instead, perform an operating system shutdown. 4 Dell badge 5 power light NOTICE: If your computer. 6 diagnostic lights Use the lights to help you troubleshoot problems with your operating system...if it is in a power-saving mode. The computer is being accessed. Back to Contents Page Desktop Computer Dell™ OptiPlex™ 320 User's Guide About Your Desktop Computer Inside Your Computer About Your Desktop Computer Front View 1 USB 2.0 connectors (2) Use the USB connectors on the ...
...that can also rotate the badge using the slot provided near the bottom of the badge. Instead, perform an operating system shutdown. 4 Dell badge 5 power light NOTICE: If your computer. 6 diagnostic lights Use the lights to help you troubleshoot problems with your operating system...if it is in a power-saving mode. The computer is being accessed. Back to Contents Page Desktop Computer Dell™ OptiPlex™ 320 User's Guide About Your Desktop Computer Inside Your Computer About Your Desktop Computer Front View 1 USB 2.0 connectors (2) Use the USB connectors on the ...
User Guide
Page 23
... (4) 9 video connector On computers with a sound card, use the connector on the card. On computers with a sound card, use the connector on the graphics card. Inside Your Computer CAUTION: Before you must use Category 5 wiring and connectors for devices that you do not accidentally disconnect cables from the electrical outlet before...
... (4) 9 video connector On computers with a sound card, use the connector on the card. On computers with a sound card, use the connector on the graphics card. Inside Your Computer CAUTION: Before you must use Category 5 wiring and connectors for devices that you do not accidentally disconnect cables from the electrical outlet before...

User Guide
Page 25
... installing a new card, remove the filler bracket to create a card-slot opening. NOTICE: To prevent static damage to components inside your computer, discharge static electricity from your body before installing any cards. Then continue with the card for information on configuring the...guard against electrical shock, be sure to unplug your computer's electronic components. Back to Contents Page PCI and PCI Express Cards Dell™ OptiPlex™ 320 User's Guide Installing an Expansion Card Removing an Expansion Card CAUTION: Before you begin any cables connected to the card. ...
... installing a new card, remove the filler bracket to create a card-slot opening. NOTICE: To prevent static damage to components inside your computer, discharge static electricity from your body before installing any cards. Then continue with the card for information on configuring the...guard against electrical shock, be sure to unplug your computer's electronic components. Back to Contents Page PCI and PCI Express Cards Dell™ OptiPlex™ 320 User's Guide Installing an Expansion Card Removing an Expansion Card CAUTION: Before you begin any cables connected to the card. ...

User Guide
Page 28
...unpainted metal surface on the computer chassis. Then pull the lever back to release the processor. NOTICE: To prevent static damage to components inside your computer, discharge static electricity from the computer. 1 heat sink assembly 2 captive screw housing (2) NOTICE: Unless a new heatsink is...center cover latch on each side of the heat sink assembly. Be sure that it . 3. Back to Contents Page Processor Dell™ OptiPlex™ 320 User's Guide Removing the Processor Installing the Processor CAUTION: Before you touch it has had sufficient time to cool before you replace...
...unpainted metal surface on the computer chassis. Then pull the lever back to release the processor. NOTICE: To prevent static damage to components inside your computer, discharge static electricity from the computer. 1 heat sink assembly 2 captive screw housing (2) NOTICE: Unless a new heatsink is...center cover latch on each side of the heat sink assembly. Be sure that it . 3. Back to Contents Page Processor Dell™ OptiPlex™ 320 User's Guide Removing the Processor Installing the Processor CAUTION: Before you touch it has had sufficient time to cool before you replace...

User Guide
Page 29
... correctly. 7. 1 center cover latch 2 processor cover 3 processor 4 socket 5 release lever NOTICE: When replacing the processor, do not touch any of the pins inside the socket or allow any objects to fall on the back of the computer. Leave the release lever extended in the socket, close the processor... remove the processor from the socket. If the release lever on the processor with the socket, and do not touch any of the pins inside the socket or allow any objects to touch the underside of the processor. NOTICE: When replacing the processor, do not use excessive force when...
... correctly. 7. 1 center cover latch 2 processor cover 3 processor 4 socket 5 release lever NOTICE: When replacing the processor, do not touch any of the pins inside the socket or allow any objects to fall on the back of the computer. Leave the release lever extended in the socket, close the processor... remove the processor from the socket. If the release lever on the processor with the socket, and do not touch any of the pins inside the socket or allow any objects to touch the underside of the processor. NOTICE: When replacing the processor, do not use excessive force when...

User Guide
Page 40
... the computer chassis as you remove them to prevent their being pinched or crimped. 3. NOTICE: To prevent static damage to components inside your computer, discharge static electricity from your body before you touch any of the procedures in this section, follow the safety instructions ...must route these cables properly when you replace them from the system board and the drives. Back to Contents Page Power Supply Dell™ OptiPlex™ 320 User's Guide Replacing the Power Supply DC Power Connectors Replacing the Power Supply CAUTION: Before you begin any of your computer's...
... the computer chassis as you remove them to prevent their being pinched or crimped. 3. NOTICE: To prevent static damage to components inside your computer, discharge static electricity from your body before you touch any of the procedures in this section, follow the safety instructions ...must route these cables properly when you replace them from the system board and the drives. Back to Contents Page Power Supply Dell™ OptiPlex™ 320 User's Guide Replacing the Power Supply DC Power Connectors Replacing the Power Supply CAUTION: Before you begin any of your computer's...

User Guide
Page 54
... fill out the Diagnostics Checklist. If the computer is specific for insuring any of the system's start-up files. CAUTION: Before working inside your computer, read the safety instructions in the table below. NOTE: Toll-free numbers are responsible for which codes to be routed appropriately...support number listed and your country, find the appropriate country section in your call . If you may be refused at Dell's receiving dock and returned to Dell. Before You Call NOTE: Have your Express Service Code ready when you can access the following table. NOTE: The ...
... fill out the Diagnostics Checklist. If the computer is specific for insuring any of the system's start-up files. CAUTION: Before working inside your computer, read the safety instructions in the table below. NOTE: Toll-free numbers are responsible for which codes to be routed appropriately...support number listed and your country, find the appropriate country section in your call . If you may be refused at Dell's receiving dock and returned to Dell. Before You Call NOTE: Have your Express Service Code ready when you can access the following table. NOTE: The ...

User Guide
Page 64
...utility) that you always have a bootable CD or floppy disk available. bit - boot sequence - bootable CD - bus - Primary cache stored inside the processor. carnet - Once recorded, the data cannot be depleted and recharged. The form of time (years) during which a portable computer battery... as an interface between the computer hardware and the operating system. CD recordable - Back to Contents Page Glossary Dell™ OptiPlex™ 320 User's Guide Terms in this Glossary are provided for informational purposes only and may or may not describe features included...
...utility) that you always have a bootable CD or floppy disk available. bit - boot sequence - bootable CD - bus - Primary cache stored inside the processor. carnet - Once recorded, the data cannot be depleted and recharged. The form of time (years) during which a portable computer battery... as an interface between the computer hardware and the operating system. CD recordable - Back to Contents Page Glossary Dell™ OptiPlex™ 320 User's Guide Terms in this Glossary are provided for informational purposes only and may or may not describe features included...
User Guide
Page 65
.... You can be erased or written over (rewritten). cursor - device driver - A round, six-pin connector that stores information in which two physical computational units exist inside a single processor package, thereby increasing computing efficiency and multi-tasking ability. DMA - DMTF - Also referred to the system bus operate. drive that are connected to...
.... You can be erased or written over (rewritten). cursor - device driver - A round, six-pin connector that stores information in which two physical computational units exist inside a single processor package, thereby increasing computing efficiency and multi-tasking ability. DMA - DMTF - Also referred to the system bus operate. drive that are connected to...
User Guide
Page 67
IEEE 1394 - A high-performance serial bus used to connect IEEE 1394-compatible devices, such as optical drives, a second battery, or a Dell TravelLite™ module. I /O address - I /O - IrDA - IRQ - ISP - K Kb - key combination - local area network - A...Mbps - megabits per second - This measurement is temporarily stored in RAM. megabyte - media bay - memory - A temporary data storage area inside your computer. memory address - A specific location where data is typically used for data transfer ratings. memory mapping - The process by portable computer...
IEEE 1394 - A high-performance serial bus used to connect IEEE 1394-compatible devices, such as optical drives, a second battery, or a Dell TravelLite™ module. I /O address - I /O - IrDA - IRQ - ISP - K Kb - key combination - local area network - A...Mbps - megabits per second - This measurement is temporarily stored in RAM. megabyte - media bay - memory - A temporary data storage area inside your computer. memory address - A specific location where data is typically used for data transfer ratings. memory mapping - The process by portable computer...
User Guide
Page 70
... in to operate with security software enhances network and computer security by enabling features such as file and e-mail protection. A plastic device designed to fit inside the module bay of memory chips dedicated to find the operating system. U UMA - A UPS keeps a computer running for video cards and controllers that plugs in...
... in to operate with security software enhances network and computer security by enabling features such as file and e-mail protection. A plastic device designed to fit inside the module bay of memory chips dedicated to find the operating system. U UMA - A UPS keeps a computer running for video cards and controllers that plugs in...

User Guide
Page 73
... you purchased the new modules from any of the memory module connector. 1 connector 2 securing clips (2) 3 memory connector closer to components inside your computer, discharge static electricity from your computer warranty. 1. Follow the procedures in Before You Begin. 2. the operating system. Remove the...Before you begin any new modules that you may not start properly. Otherwise, your computer warranty. 1. NOTE: Memory purchased from Dell is covered under your computer may have, even if you touch any of the procedures in this section, follow the safety ...
... you purchased the new modules from any of the memory module connector. 1 connector 2 securing clips (2) 3 memory connector closer to components inside your computer, discharge static electricity from your computer warranty. 1. Follow the procedures in Before You Begin. 2. the operating system. Remove the...Before you begin any new modules that you may not start properly. Otherwise, your computer warranty. 1. NOTE: Memory purchased from Dell is covered under your computer may have, even if you touch any of the procedures in this section, follow the safety ...

User Guide
Page 76
...data, do not turn on the diagnostic code. Instead, perform an operating system shutdown. 8 power light NOTICE: If your computer when you access the Dell Support website or call technical support. 2 CD/DVD drive Insert a CD or DVD (if supported) into this drive. 3 floppy drive Insert a ...this button to turn off the computer by pressing the power button. Back to Contents Page Mini Tower Computer Dell™ OptiPlex™ 320 User's Guide About Your Mini Tower Computer Inside Your Computer About Your Mini Tower Computer Front View 1 location of Service Tag Use the Service Tag to...
...data, do not turn on the diagnostic code. Instead, perform an operating system shutdown. 8 power light NOTICE: If your computer when you access the Dell Support website or call technical support. 2 CD/DVD drive Insert a CD or DVD (if supported) into this drive. 3 floppy drive Insert a ...this button to turn off the computer by pressing the power button. Back to Contents Page Mini Tower Computer Dell™ OptiPlex™ 320 User's Guide About Your Mini Tower Computer Inside Your Computer About Your Mini Tower Computer Front View 1 location of Service Tag Use the Service Tag to...


